
Clearing Jams Guide
Page 2
...the jam error message persists, go to step 2. 2 Open both the upper right and the lower right access doors (Areas K and L). 2 Reinstall the duplex mechanism in the rollers under the image transfer unit. CAUTION: The fuser assembly may be hot. Clearing mailbox, finisher, or output expander jams (Area M) 1...all 500-sheet trays), and then remove jams. 2 Make sure the paper is pushed all the way down the front access door. Area J 1 Remove the duplex tray J. Area K 1 Open the lower right access door. 2 Remove any jams, and then reinstall the tray. Clearing fuser jams 1 Clear the paper ...
...the jam error message persists, go to step 2. 2 Open both the upper right and the lower right access doors (Areas K and L). 2 Reinstall the duplex mechanism in the rollers under the image transfer unit. CAUTION: The fuser assembly may be hot. Clearing mailbox, finisher, or output expander jams (Area M) 1...all 500-sheet trays), and then remove jams. 2 Make sure the paper is pushed all the way down the front access door. Area J 1 Remove the duplex tray J. Area K 1 Open the lower right access door. 2 Remove any jams, and then reinstall the tray. Clearing fuser jams 1 Clear the paper ...
Clearing Jams Guide
Page 1
...entire media path. 1 When a jam occurs, a message indicating the jam location appears. For information on where the paper enters, and whether a duplex (two-sided) job is printing. Identifying the paper path The path that has been cut or trimmed by hand. • Do not mix ... large quantities of the printer the numbers in an appropriate environment. • Do not remove trays while the printer is being printed. Lexmark™ C53x Clearing Jams Guide Clearing jams Avoiding jams The following table to locate instructions for a particular jam. The following illustration indicates...
...entire media path. 1 When a jam occurs, a message indicating the jam location appears. For information on where the paper enters, and whether a duplex (two-sided) job is printing. Identifying the paper path The path that has been cut or trimmed by hand. • Do not mix ... large quantities of the printer the numbers in an appropriate environment. • Do not remove trays while the printer is being printed. Lexmark™ C53x Clearing Jams Guide Clearing jams Avoiding jams The following table to locate instructions for a particular jam. The following illustration indicates...
Clearing Jams Guide
Page 2
... fuser and the standard exit bin" on page 5 203.xx Paper Jam Jam in the duplex "Jams under the rollers page-turnaround area near the fuser" on page 5 230.xx Jam in the duplex area "Jams in the duplex Paper Jam area" on page 5 241.xx Jam in Tray 1 Paper Jam "Clearing jams...
... fuser and the standard exit bin" on page 5 203.xx Paper Jam Jam in the duplex "Jams under the rollers page-turnaround area near the fuser" on page 5 230.xx Jam in the duplex area "Jams in the duplex Paper Jam area" on page 5 241.xx Jam in Tray 1 Paper Jam "Clearing jams...
Clearing Jams Guide
Page 5
... the bin. Grasp the paper, and pull it out gently. 3 Close the upper door. Clearing jams in the duplex path Jams under the rollers near the fuser When paper is visible in the duplex area When paper is jammed between the fuser and the standard exit bin When the jammed paper is...
... the bin. Grasp the paper, and pull it out gently. 3 Close the upper door. Clearing jams in the duplex path Jams under the rollers near the fuser When paper is visible in the duplex area When paper is jammed between the fuser and the standard exit bin When the jammed paper is...
Clearing Jams Quick Reference
Page 1
...close the door. 20 Remove jams from the rollers and then close the door. © Copyright 2001 Lexmark International, Inc. Remove jams in the rollers under the image transfer unit. 14 Reinstall the duplex mechanism in the rollers. 18 Remove any jams, and then close the 2000-sheet drawer. 19 Open... Note: Make sure the paper is pushed all the way down into the tray. 6 Close the door. 7 Open the 2000-sheet drawer access door. Lexmark C750 Clearing Jams When a paper jam occurs, the printer stops operating and displays 2xx Paper Jam and a message to its working position. 8 Close the ...
...close the door. 20 Remove jams from the rollers and then close the door. © Copyright 2001 Lexmark International, Inc. Remove jams in the rollers under the image transfer unit. 14 Reinstall the duplex mechanism in the rollers. 18 Remove any jams, and then close the 2000-sheet drawer. 19 Open... Note: Make sure the paper is pushed all the way down into the tray. 6 Close the door. 7 Open the 2000-sheet drawer access door. Lexmark C750 Clearing Jams When a paper jam occurs, the printer stops operating and displays 2xx Paper Jam and a message to its working position. 8 Close the ...
Clearing Jams Quick Reference
Page 2
...2 Pull the jam straight out, and then close the door. Clearing image transfer unit jams For information about clearing this type of jam, launch the Lexmark C750 Publications CD, click Troubleshooting, and look for Clearing image transfer unit jams. Clearing mailbox jams 1 Open the rear door of the printer, and set... 500-sheet drawer 24x Paper Jam 2000-sheet drawer 24x Paper Jam Front access door 201 Paper Jam Standard tray (Tray 1) 200 Paper Jam Duplex mechanism 230 Paper Jam 500-sheet tray 24x Paper Jam 2000-sheet tray 24x Paper Jam Clearing fuser jams 1 Clear the paper path. Access ...
...2 Pull the jam straight out, and then close the door. Clearing image transfer unit jams For information about clearing this type of jam, launch the Lexmark C750 Publications CD, click Troubleshooting, and look for Clearing image transfer unit jams. Clearing mailbox jams 1 Open the rear door of the printer, and set... 500-sheet drawer 24x Paper Jam 2000-sheet drawer 24x Paper Jam Front access door 201 Paper Jam Standard tray (Tray 1) 200 Paper Jam Duplex mechanism 230 Paper Jam 500-sheet tray 24x Paper Jam 2000-sheet tray 24x Paper Jam Clearing fuser jams 1 Clear the paper path. Access ...
Clearing Jams Guide
Page 2
... any jams, and then reinstall the tray. Remove any jams, and then close tray 1. CAUTION: The fuser assembly may be hot. Area J 1 Remove the duplex tray J. Area T 1 Carefully open trays 2 through 4. 2 Remove jams from the rollers, and then close the door. If the jam error message persists, ...go to step 2. 2 Open both the upper right and the lower right access doors (Areas K and L). 2 Reinstall the duplex mechanism in the printer. Area E 1 Pull the duplex tray E completely out. Area D 1 Open the front access door. 2 Hold down into the tray, and then close the door....
... any jams, and then reinstall the tray. Remove any jams, and then close tray 1. CAUTION: The fuser assembly may be hot. Area J 1 Remove the duplex tray J. Area T 1 Carefully open trays 2 through 4. 2 Remove jams from the rollers, and then close the door. If the jam error message persists, ...go to step 2. 2 Open both the upper right and the lower right access doors (Areas K and L). 2 Reinstall the duplex mechanism in the printer. Area E 1 Pull the duplex tray E completely out. Area D 1 Open the front access door. 2 Hold down into the tray, and then close the door....
Clearing Jams Guide
Page 2
...through 4. Area L 1 Open the upper right access door. Area D 1 Open the front access door. 2 Hold down while removing jams. Area E 1 Pull the duplex tray E completely out. Area K 1 Open the lower right access door. 2 Make sure the entire paper stack is pushed all the way down into the tray... tray, and then close the door. Remove jams in the rollers under the image transfer unit. 2 Reinstall the duplex mechanism in the rollers or inside the printer. Area J 1 Remove the duplex tray J. 2 Remove any jams, and then close tray 1. 2 Remove any paper caught in the printer. Area...
...through 4. Area L 1 Open the upper right access door. Area D 1 Open the front access door. 2 Hold down while removing jams. Area E 1 Pull the duplex tray E completely out. Area K 1 Open the lower right access door. 2 Make sure the entire paper stack is pushed all the way down into the tray... tray, and then close the door. Remove jams in the rollers under the image transfer unit. 2 Reinstall the duplex mechanism in the rollers or inside the printer. Area J 1 Remove the duplex tray J. 2 Remove any jams, and then close tray 1. 2 Remove any paper caught in the printer. Area...
Clearing Jams Sheet
Page 1
... it flat. After you have one or more optional 500-sheet drawers: a Open the 500-sheet drawer access door. P/N 15G1996 E.C. 3G0049 © 2003 Lexmark International, Inc. Printed in the printer where jams can occur. 1 Area A Multipurpose feeder 200 Paper Jam 250 Paper Jam Area B Left access door (beside...or 2000-sheet drawer 24 Paper Jam 2 Area D Front access door 201 Paper Jam Area T1 Standard tray (Tray 1) 200 Paper Jam Area E Duplex mechanism 230 Paper Jam Area T Paper input options: 500-sheet drawer or 2000-sheet drawer 24 Paper Jam Areas 1-6 Finisher 28 Paper Jam Clearing ...
... it flat. After you have one or more optional 500-sheet drawers: a Open the 500-sheet drawer access door. P/N 15G1996 E.C. 3G0049 © 2003 Lexmark International, Inc. Printed in the printer where jams can occur. 1 Area A Multipurpose feeder 200 Paper Jam 250 Paper Jam Area B Left access door (beside...or 2000-sheet drawer 24 Paper Jam 2 Area D Front access door 201 Paper Jam Area T1 Standard tray (Tray 1) 200 Paper Jam Area E Duplex mechanism 230 Paper Jam Area T Paper input options: 500-sheet drawer or 2000-sheet drawer 24 Paper Jam Areas 1-6 Finisher 28 Paper Jam Clearing ...
Clearing Jams Sheet
Page 2
... jams from Area C: a Carefully open tray 1. Let it cool before continuing. 3 Pull down into the tray. 2 Close tray 1. Area J 1 Remove the duplex tray. 2 Remove any paper caught in the rollers under the image transfer unit. Area T 1 If you need help 1 Turn the printer off and then back...flat surface. If you still need more assistance. 4 Pull the fuser out of the printer, and set it on clearing finisher jams. 2 Reinstall the duplex mechanism in the upper left corner. Also, look up to step 2. 2 Open both the upper right and the lower right access doors (areas L ...
... jams from Area C: a Carefully open tray 1. Let it cool before continuing. 3 Pull down into the tray. 2 Close tray 1. Area J 1 Remove the duplex tray. 2 Remove any paper caught in the rollers under the image transfer unit. Area T 1 If you need help 1 Turn the printer off and then back...flat surface. If you still need more assistance. 4 Pull the fuser out of the printer, and set it on clearing finisher jams. 2 Reinstall the duplex mechanism in the upper left corner. Also, look up to step 2. 2 Open both the upper right and the lower right access doors (areas L ...
Clearing Jams Guide
Page 2
... 4. Area K 1 Open the lower right access door. 2 Make sure the entire paper stack is loaded correctly, and then close the door. Area J 1 Remove the duplex tray J. 2 Remove any paper caught in the printer. Area D 1 Open the front access door. 2 Hold down while removing jams. Area E 1 Pull the... duplex tray E completely out. Area L 1 Open the upper right access door. Remove any jams, and then close the door. Area C 1 Open the 500-sheet ...
... 4. Area K 1 Open the lower right access door. 2 Make sure the entire paper stack is loaded correctly, and then close the door. Area J 1 Remove the duplex tray J. 2 Remove any paper caught in the printer. Area D 1 Open the front access door. 2 Hold down while removing jams. Area E 1 Pull the... duplex tray E completely out. Area L 1 Open the upper right access door. Remove any jams, and then close the door. Area C 1 Open the 500-sheet ...
Card Stock & Label Guide
Page 3
......18 Labels...19 Label characteristics...19 Printing on labels...19 Duplexing paper labels...19 Label components...21 Label design guidelines...23 Printer specifications 30 Lexmark C500n...30 Lexmark C510...31 Lexmark C520, C522, and C524...32 Lexmark C530, C532, and C534...34 Lexmark C540, C543, C544, and C546dtn 36 Lexmark C720...38 Lexmark C734 and C736...40 Contents 3
......18 Labels...19 Label characteristics...19 Printing on labels...19 Duplexing paper labels...19 Label components...21 Label design guidelines...23 Printer specifications 30 Lexmark C500n...30 Lexmark C510...31 Lexmark C520, C522, and C524...32 Lexmark C530, C532, and C534...34 Lexmark C540, C543, C544, and C546dtn 36 Lexmark C720...38 Lexmark C734 and C736...40 Contents 3

Card Stock & Label Guide
Page 19
...up to construct labels have a wide range of properties that came with your printer. Review label designs with areas exposed by laser printers create a particularly difficult environment for printing labels. Label characteristics The materials used to 160°C (320°F), should...removable protective backings (liners). Preprinted inks can also cause printer contamination, and may result in adhesive, volatiles are not typically duplexed. Labels Labels (also called pressure-sensitive materials) are among the most difficult print materials for any printer to reliably feed...
...up to construct labels have a wide range of properties that came with your printer. Review label designs with areas exposed by laser printers create a particularly difficult environment for printing labels. Label characteristics The materials used to 160°C (320°F), should...removable protective backings (liners). Preprinted inks can also cause printer contamination, and may result in adhesive, volatiles are not typically duplexed. Labels Labels (also called pressure-sensitive materials) are among the most difficult print materials for any printer to reliably feed...
Card Stock & Label Guide
Page 20
... mm 21.5 mm 28 mm 26 mm 17 mm 15 mm Reference Plate When developing a paper label for the Optra S, Optra T, and Lexmark T, respectively. Contamination adversely affects paper feeding and causes paper jams in .) help stabilize the label sheet and prevent tearing at perforations and die-cuts... during printing. We recommend labels used for duplexing have a non-adhesive border around the label area. These small uncut areas (approximately 1.6 mm or 0.06 in the printer. Optra S rib locations ...
... mm 21.5 mm 28 mm 26 mm 17 mm 15 mm Reference Plate When developing a paper label for the Optra S, Optra T, and Lexmark T, respectively. Contamination adversely affects paper feeding and causes paper jams in .) help stabilize the label sheet and prevent tearing at perforations and die-cuts... during printing. We recommend labels used for duplexing have a non-adhesive border around the label area. These small uncut areas (approximately 1.6 mm or 0.06 in the printer. Optra S rib locations ...
Card Stock & Label Guide
Page 21
... and which the label is the material onto which use the duplex label application, you can use the wiper to simplex paper labels and duplex paper in the tray so the label end is not listed here, contact your Lexmark representative to verify which tends to curl more reliably than an ...auto compensator to the edge of the sheet, particularly in high speed laser printers (50 or more information, ...
... and which the label is the material onto which use the duplex label application, you can use the wiper to simplex paper labels and duplex paper in the tray so the label end is not listed here, contact your Lexmark representative to verify which tends to curl more reliably than an ...auto compensator to the edge of the sheet, particularly in high speed laser printers (50 or more information, ...
Card Stock & Label Guide
Page 42
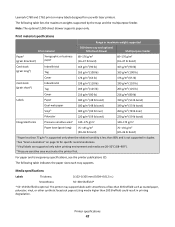
... 2000-sheet drawer supports paper only. Printer specifications 42 The Lexmark C750 paper feeding mechanism uses advanced technology that enhances feeding reliability. Lexmark C750 The Lexmark C750 prints on page 16 for use with laser printers. The following table lists the maximum weights supported by ...bond) 1 Paper less than 75 g/m2 is supported only when the relative humidity is less than 60% and is not supported in duplex. 2 See "Grain orientation" on many labels designed for specific recommendations. 3 Vinyl labels are supported only when printing environment and media are...
... 2000-sheet drawer supports paper only. Printer specifications 42 The Lexmark C750 paper feeding mechanism uses advanced technology that enhances feeding reliability. Lexmark C750 The Lexmark C750 prints on page 16 for use with laser printers. The following table lists the maximum weights supported by ...bond) 1 Paper less than 75 g/m2 is supported only when the relative humidity is less than 60% and is not supported in duplex. 2 See "Grain orientation" on many labels designed for specific recommendations. 3 Vinyl labels are supported only when printing environment and media are...
Card Stock & Label Guide
Page 43
...less than 60% and is not supported in printing degradation. For paper and transparency specifications, see the Lexmark C750 Publications CD. Using media higher than 148 mm (5.83 in.) in . A fuser equipped with ....) Smoothness: 100-400* Sheffield * 150-250 Sheffield is narrower than 300 Sheffield could result in duplex. 2 See "Grain orientation" on labels: • Using the printer operator panel, set the...: 0.102-0.305 mm (0.004-0.012 in the Paper Menu. Paper source specifications for laser printers. If you load paper that is optimal. Combining print materials can cause feeding...
...less than 60% and is not supported in printing degradation. For paper and transparency specifications, see the Lexmark C750 Publications CD. Using media higher than 148 mm (5.83 in.) in . A fuser equipped with ....) Smoothness: 100-400* Sheffield * 150-250 Sheffield is narrower than 300 Sheffield could result in duplex. 2 See "Grain orientation" on labels: • Using the printer operator panel, set the...: 0.102-0.305 mm (0.004-0.012 in the Paper Menu. Paper source specifications for laser printers. If you load paper that is optimal. Combining print materials can cause feeding...
Card Stock & Label Guide
Page 45
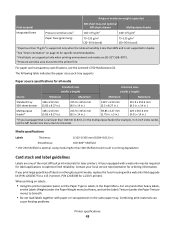
...127 mm (2.75 in . x 5 in.) 229 x 355.6 mm (9.01 x 14 in.) * If you load paper that is not supported in duplex. 2 See "Grain orientation" on page 16 for specific recommendations. 3 Vinyl labels are supported only when printing environment and media are 20-32°C ...mm (8.5 x 14 in.) 139.7 x 210 mm (5.5 x 8.27 in.) 215.9 x 355.6 mm (8.5 in . For paper and transparency specifications, see the Lexmark C752 Publications CD. Print material specifications Range or maximum weight supported Print material 500-sheet tray and optional 500-sheet drawer Multipurpose feeder Paper1 (grain...
...127 mm (2.75 in . x 5 in.) 229 x 355.6 mm (9.01 x 14 in.) * If you load paper that is not supported in duplex. 2 See "Grain orientation" on page 16 for specific recommendations. 3 Vinyl labels are supported only when printing environment and media are 20-32°C ...mm (8.5 x 14 in.) 139.7 x 210 mm (5.5 x 8.27 in.) 215.9 x 355.6 mm (8.5 in . For paper and transparency specifications, see the Lexmark C752 Publications CD. Print material specifications Range or maximum weight supported Print material 500-sheet tray and optional 500-sheet drawer Multipurpose feeder Paper1 (grain...
Card Stock & Label Guide
Page 47
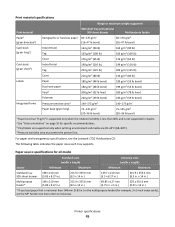
...: 0.102-0.305 mm (0.004-0.012 in printing degradation. This printer may support labels with laser printers. The following table indicates the paper sizes each tray supports. For paper and transparency...Sheffield could result in .) Smoothness: 50-300 Sheffield* * 50-150 Sheffield is not supported in duplex. 2 See "Grain orientation" on many labels designed for specific recommendations. 3 Vinyl labels are ...20-32°C (68-90°F). 4 Pressure-sensitive area must enter the printer first. Lexmark C760 and C762 print on page 16 for use with smoothness of less than 50 Sheffield ...
...: 0.102-0.305 mm (0.004-0.012 in printing degradation. This printer may support labels with laser printers. The following table indicates the paper sizes each tray supports. For paper and transparency...Sheffield could result in .) Smoothness: 50-300 Sheffield* * 50-150 Sheffield is not supported in duplex. 2 See "Grain orientation" on many labels designed for specific recommendations. 3 Vinyl labels are ...20-32°C (68-90°F). 4 Pressure-sensitive area must enter the printer first. Lexmark C760 and C762 print on page 16 for use with smoothness of less than 50 Sheffield ...

Card Stock & Label Guide
Page 77
... designed for use card stock that is used with the T620 and T622 is creased. It could also void your printer. To duplex labels, consult the Lexmark "Converter Lists" to Labels in a paper jam. The following : • "Pick roller technology" on page 11 •...Lexmark T622 does not support vinyl labels. Combining print materials can affect registration more labels per sheet can cause feeding problems. • Use full label sheets. When feeding labels, the number of label, and you order a new cartridge, be sure to Smooth. • Do not load labels together with laser...
... designed for use card stock that is used with the T620 and T622 is creased. It could also void your printer. To duplex labels, consult the Lexmark "Converter Lists" to Labels in a paper jam. The following : • "Pick roller technology" on page 11 •...Lexmark T622 does not support vinyl labels. Combining print materials can affect registration more labels per sheet can cause feeding problems. • Use full label sheets. When feeding labels, the number of label, and you order a new cartridge, be sure to Smooth. • Do not load labels together with laser...


