Troubleshooting Guide
Page 3
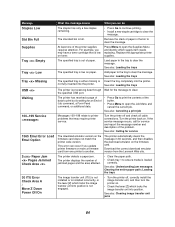
... it. Open the printer door, and make sure all colors: • Replace the transfer roll if the defects occur every 60 mm (2.4 in.) • Check the first transfer bellcranks and springs or replace the image transfer unit if the defects occur every 101 mm (4 in.) • Replace the fuser if ..., and a detailed description. See the Card Stock & Label Guide available on the Lexmark Web site at the front of the tray or on every third or sixth page in any color: Replace the image transfer unit. Load the correct type media for detailed specifications. If the error recurs, write down...
... it. Open the printer door, and make sure all colors: • Replace the transfer roll if the defects occur every 60 mm (2.4 in.) • Check the first transfer bellcranks and springs or replace the image transfer unit if the defects occur every 101 mm (4 in.) • Replace the fuser if ..., and a detailed description. See the Card Stock & Label Guide available on the Lexmark Web site at the front of the tray or on every third or sixth page in any color: Replace the image transfer unit. Load the correct type media for detailed specifications. If the error recurs, write down...
Troubleshooting Guide
Page 4
...8226; Replace the print cartridge that corresponds to the color displayed on the control panel. • Replace the transfer roller. • Replace the image transfer unit. • Replace the fuser. • Call for service. From the printer operator panel, print the ...the problem, replace the image transfer unit and transfer roller. 3 If you are using . • Replace the image transfer unit and transfer roller. • Replace the fuser. Streaked horizontal lines ABCDE ABCDE ABCDE Replace the print cartridge, the transfer roller, the image transfer unit, or fuser as needed. ...
...8226; Replace the print cartridge that corresponds to the color displayed on the control panel. • Replace the transfer roller. • Replace the image transfer unit. • Replace the fuser. • Call for service. From the printer operator panel, print the ...the problem, replace the image transfer unit and transfer roller. 3 If you are using . • Replace the image transfer unit and transfer roller. • Replace the fuser. Streaked horizontal lines ABCDE ABCDE ABCDE Replace the print cartridge, the transfer roller, the image transfer unit, or fuser as needed. ...

User Reference
Page 3
...trays 92 Clearing the entire paper path 93 Clearing mailbox or output expander jams (Area M 98 Clearing fuser jams 98 Clearing image transfer unit jams 100 Clearing finisher jams (Areas 1-6 106 If you still need help 106 Chapter 8: Maintenance 107 Determining the status of ...supplies 107 Conserving supplies 107 Ordering supplies and maintenance items 108 Recycling Lexmark products 109 Removing memory and option cards 110 Chapter 9: Troubleshooting 116 User Guide resources 116 Online Technical Support 116 Calling for...
...trays 92 Clearing the entire paper path 93 Clearing mailbox or output expander jams (Area M 98 Clearing fuser jams 98 Clearing image transfer unit jams 100 Clearing finisher jams (Areas 1-6 106 If you still need help 106 Chapter 8: Maintenance 107 Determining the status of ...supplies 107 Conserving supplies 107 Ordering supplies and maintenance items 108 Recycling Lexmark products 109 Removing memory and option cards 110 Chapter 9: Troubleshooting 116 User Guide resources 116 Online Technical Support 116 Calling for...

User Reference
Page 70
...with Hewlett-Packard printers. Printer retains all downloaded resources for all printer languages during printing. Max Yield* The image transfer unit position is needed. Menu Item Print Area Print Timeout Printer Language Printer Usage Resource Save Purpose Values To modify the ... inactive printer language. On Printer retains downloaded resources only until Waiting is available. To specify the amount of the image transfer unit during language changes and printer resets. PS Emulation* PostScript emulation, compatible with downloaded resources, such as the default does not...
...with Hewlett-Packard printers. Printer retains all downloaded resources for all printer languages during printing. Max Yield* The image transfer unit position is needed. Menu Item Print Area Print Timeout Printer Language Printer Usage Resource Save Purpose Values To modify the ... inactive printer language. On Printer retains downloaded resources only until Waiting is available. To specify the amount of the image transfer unit during language changes and printer resets. PS Emulation* PostScript emulation, compatible with downloaded resources, such as the default does not...

User Reference
Page 74
... variety of listings relating to the factory default values. You are prompted to enter alignment values for each color on a page. Printer transfers all data sent to the printer is formatting. No Printer cancels the request to printer memory and then reformats the flash memory option....hard disk and leaves current resources stored on the hard disk and prepares the device to receive new resources. See also: Aligning the image transfer unit Coverage Estimator Provides an estimate of the percent Off* coverage of a print job problem. Display Language. - Yes Warning: Do not turn...
... variety of listings relating to the factory default values. You are prompted to enter alignment values for each color on a page. Printer transfers all data sent to the printer is formatting. No Printer cancels the request to printer memory and then reformats the flash memory option....hard disk and leaves current resources stored on the hard disk and prepares the device to receive new resources. See also: Aligning the image transfer unit Coverage Estimator Provides an estimate of the percent Off* coverage of a print job problem. Display Language. - Yes Warning: Do not turn...

User Reference
Page 76
... cancel the current job. 76 in progress and the user is in the type and/or size print media listed. See also: Aligning the image transfer unit Activating Menu Changes The printer is busy receiving, processing, or printing data. • Wait for the message to clear. to the printer settings. See also...
... cancel the current job. 76 in progress and the user is in the type and/or size print media listed. See also: Aligning the image transfer unit Activating Menu Changes The printer is busy receiving, processing, or printing data. • Wait for the message to clear. to the printer settings. See also...
User Reference
Page 79
...in an internal print server is either missing or not fully inserted. Press Go to the printer internal print server. full. Replace the image transfer unit and fuser. 79 The printer frees memory by deleting the oldest held job and continues deleting held jobs. Replace the image...; Press Go to ignore the message and continue printing without deleting any held jobs until valid code is requesting that tracks wear on the image transfer unit and fuser have reached their limit. The current job may be restored. Delete fonts, macros, and other data stored in the printer; 37 ...
...in an internal print server is either missing or not fully inserted. Press Go to the printer internal print server. full. Replace the image transfer unit and fuser. 79 The printer frees memory by deleting the oldest held job and continues deleting held jobs. Replace the image...; Press Go to ignore the message and continue printing without deleting any held jobs until valid code is requesting that tracks wear on the image transfer unit and fuser have reached their limit. The current job may be restored. Delete fonts, macros, and other data stored in the printer; 37 ...

User Reference
Page 81
... the message to clear the PIN entry prompt. disk before the printer was last turned • Press Return or Stop to clear. Aligning the image transfer unit Printing Directory List The printer is turned on a hard disk. Performing Self Test The printer is running the series of all available fonts for the...
... the message to clear the PIN entry prompt. disk before the printer was last turned • Press Return or Stop to clear. Aligning the image transfer unit Printing Directory List The printer is turned on a hard disk. Performing Self Test The printer is running the series of all available fonts for the...

User Reference
Page 83
... from Wait for the message to printer memory. yyy represents See also: Holding a job in a linked set of paper from the cartridges and the image transfer unit belt. the hard disk. • Select the Abort Restore menu item in the Setup Guide. 83 See also: Restoring factory default settings Restoring Held Job...
... from Wait for the message to printer memory. yyy represents See also: Holding a job in a linked set of paper from the cartridges and the image transfer unit belt. the hard disk. • Select the Abort Restore menu item in the Setup Guide. 83 See also: Restoring factory default settings Restoring Held Job...
User Reference
Page 84
.... • Install a new staple cartridge to clear. The printer displays the number of the printer supplies requires attention. Loading the trays The image transfer unit (ITU) is not installed or is installed incorrectly, or the lever [Z] which supply item needs replacing. See also: Canceling a print job Messages ...does not match the printer code version. For example, you can occur if you update printer firmware or move a firmware card from the Lexmark Web site. Press Menu to another. See also: Loading the trays The specified tray is full. See also: Loading the trays The printer...
.... • Install a new staple cartridge to clear. The printer displays the number of the printer supplies requires attention. Loading the trays The image transfer unit (ITU) is not installed or is installed incorrectly, or the lever [Z] which supply item needs replacing. See also: Canceling a print job Messages ...does not match the printer code version. For example, you can occur if you update printer firmware or move a firmware card from the Lexmark Web site. Press Menu to another. See also: Loading the trays The specified tray is full. See also: Loading the trays The printer...

User Reference
Page 90
... adjust sensor LED is too weak. • Press Go to continue printing. • If print quality is unacceptable, replace the image transfer unit. 86 ITU Maintenance The color adjust sensor LED is too bright. • Press Go to clear the message and continue printing. 88...cartridge is either missing or incorrectly installed. Correctly install the fuser to continue printing. • If print quality is unacceptable, replace the image transfer unit. 87 Fuser Missing The fuser is totally exhausted. • Replace the specified print cartridge. • Press Go to clear the message and...
... adjust sensor LED is too weak. • Press Go to continue printing. • If print quality is unacceptable, replace the image transfer unit. 86 ITU Maintenance The color adjust sensor LED is too bright. • Press Go to clear the message and continue printing. 88...cartridge is either missing or incorrectly installed. Correctly install the fuser to continue printing. • If print quality is unacceptable, replace the image transfer unit. 87 Fuser Missing The fuser is totally exhausted. • Replace the specified print cartridge. • Press Go to clear the message and...

User Reference
Page 91
.... See Clearing fuser jams for clearing Area A, Area B, and Area T1. E, J Follow the instructions for instructions. See Clearing image transfer unit jams for clearing Area E and Area J. 7 Clearing paper jams Understanding jam messages Note: Always clear the entire paper path when you ... T. D, K, L Follow the instructions for clearing Area K and Area L. If the jam message persists, paper may be caught in the image transfer unit. K, L Follow the instructions for clearing Area D, Area K, and Area L. Paper jam messages Message 200 Paper Jam (tray 1 and left access...
.... See Clearing fuser jams for clearing Area A, Area B, and Area T1. E, J Follow the instructions for instructions. See Clearing image transfer unit jams for clearing Area E and Area J. 7 Clearing paper jams Understanding jam messages Note: Always clear the entire paper path when you ... T. D, K, L Follow the instructions for clearing Area K and Area L. If the jam message persists, paper may be caught in the image transfer unit. K, L Follow the instructions for clearing Area D, Area K, and Area L. Paper jam messages Message 200 Paper Jam (tray 1 and left access...

User Reference
Page 95
... be fused to the page. 95 b Close the door. Area D 1 Open the front access door. 2 Hold down the lever in the rollers under the image transfer unit. Remove jams in the upper left corner.
... be fused to the page. 95 b Close the door. Area D 1 Open the front access door. 2 Hold down the lever in the rollers under the image transfer unit. Remove jams in the upper left corner.

User Reference
Page 100
Clearing image transfer unit jams 1 Open the front access door and the left access door and the front access door. If the jam persists, continue with step 4. 100 Make sure to clear the entire width of the paper path. 3 Close the left access door. 2 While holding down the lever behind the front access door, insert a folded piece of paper as shown to clear the paper sensors under the image transfer unit.
Clearing image transfer unit jams 1 Open the front access door and the left access door and the front access door. If the jam persists, continue with step 4. 100 Make sure to clear the entire width of the paper path. 3 Close the left access door. 2 While holding down the lever behind the front access door, insert a folded piece of paper as shown to clear the paper sensors under the image transfer unit.

User Reference
Page 102
6 Release the latches to unlock the image transfer unit. 102 a Raise the lever to open the multipurpose feeder (area A) all the way. 7 Remove the image transfer unit.
6 Release the latches to unlock the image transfer unit. 102 a Raise the lever to open the multipurpose feeder (area A) all the way. 7 Remove the image transfer unit.

User Reference
Page 103
c Slide the image transfer unit out and place it on the handle. Warning: Do not touch the transfer belt. b Pull down on a clean, flat surface. Touching the belt will damage the image transfer unit. 103
c Slide the image transfer unit out and place it on the handle. Warning: Do not touch the transfer belt. b Pull down on a clean, flat surface. Touching the belt will damage the image transfer unit. 103

User Reference
Page 104
a Align the guides with the insertion grooves and gently slide the unit in. 104 Remove all torn paper or other jams. 9 Insert the image transfer unit back into the printer. 8 Look inside the printer.
a Align the guides with the insertion grooves and gently slide the unit in. 104 Remove all torn paper or other jams. 9 Insert the image transfer unit back into the printer. 8 Look inside the printer.

User Reference
Page 105
b Rotate the handle up, and gently push the unit into place. c Lower the lever to lock the image transfer unit in place. 105
b Rotate the handle up, and gently push the unit into place. c Lower the lever to lock the image transfer unit in place. 105
User Reference
Page 108
...prints satisfactorily. or Canada, call 1-800-Lexmark (1-800-539-6275) for your printer to order an image transfer unit and second transfer roller. Note: Order the correct type of vinyl or dual web labels. Ordering an image transfer unit and transfer roller When the 83 ITU Maintenance message appears... on the display, you bought your area. Visit Lexmark's Web site at www.lexmark.com to order supplies. You can continue to order a web ...
...prints satisfactorily. or Canada, call 1-800-Lexmark (1-800-539-6275) for your printer to order an image transfer unit and second transfer roller. Note: Order the correct type of vinyl or dual web labels. Ordering an image transfer unit and transfer roller When the 83 ITU Maintenance message appears... on the display, you bought your area. Visit Lexmark's Web site at www.lexmark.com to order supplies. You can continue to order a web ...

User Reference
Page 123
... it. Solution Remove the option, and then reinstall it stops working. Look at www.lexmark.com for detailed specifications. See Clearing the entire paper path, Clearing fuser jams, Clearing image transfer unit jams, Clearing mailbox or output expander jams (Area M), or Paper and specialty media specifications...The paper has absorbed moisture due to the Setup Guide for jams in the selected tray are not attached correctly. See Clearing image transfer unit jams, Clearing fuser jams, Clearing the entire paper path, or Clearing mailbox or output expander jams (Area M) for more information. ...
... it. Solution Remove the option, and then reinstall it stops working. Look at www.lexmark.com for detailed specifications. See Clearing the entire paper path, Clearing fuser jams, Clearing image transfer unit jams, Clearing mailbox or output expander jams (Area M), or Paper and specialty media specifications...The paper has absorbed moisture due to the Setup Guide for jams in the selected tray are not attached correctly. See Clearing image transfer unit jams, Clearing fuser jams, Clearing the entire paper path, or Clearing mailbox or output expander jams (Area M) for more information. ...


