
Troubleshooting Guide
Page 1
... is plugged into the outlet is working. • The printer is turned on. • The printer cable is securely attached to the printer and the host computer, print server, option, or other countries/ regions, visit the Lexmark Web site at www.lexmark.com. Make sure the connection is displayed. The specified tray...of the job may print.) • Delete the job. • Free up properly or is not connected properly Verify that you selected the printer driver associated with the Lexmark ABC. • If you are using a Windows Vista, Windows 2000, Windows XP, or Windows Server 2003 compatible...
... is plugged into the outlet is working. • The printer is turned on. • The printer cable is securely attached to the printer and the host computer, print server, option, or other countries/ regions, visit the Lexmark Web site at www.lexmark.com. Make sure the connection is displayed. The specified tray...of the job may print.) • Delete the job. • Free up properly or is not connected properly Verify that you selected the printer driver associated with the Lexmark ABC. • If you are using a Windows Vista, Windows 2000, Windows XP, or Windows Server 2003 compatible...

Troubleshooting Guide
Page 2
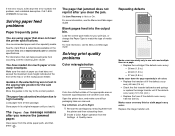
... Paper Menu. • For more information, see the Menus and Messages Guide Solving mailbox problems The mailbox and the printer are misaligned Realign the mailbox and the printer. The printer does not have sent to see if the option is listed in the tray and what is set to On Set...collate Collate is selected in the software application you are set correctly in the job. We recommend Lexmark part number 1329605 (10 ft) or 1427498 (20 ft) for about 10 seconds, and then turn the printer on . For more informations, see the Menus and Messages Guide. Page Protect is set for...
... Paper Menu. • For more information, see the Menus and Messages Guide Solving mailbox problems The mailbox and the printer are misaligned Realign the mailbox and the printer. The printer does not have sent to see if the option is listed in the tray and what is set to On Set...collate Collate is selected in the software application you are set correctly in the job. We recommend Lexmark part number 1329605 (10 ft) or 1427498 (20 ft) for about 10 seconds, and then turn the printer on . For more informations, see the Menus and Messages Guide. Page Protect is set for...
Troubleshooting Guide
Page 3
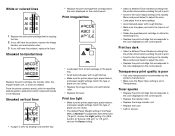
... you load does not exceed the maximum stack height indicated at www.lexmark.com for detailed specifications. For more information, see the Menus and Messages Guide Blank pages feed into the output bin. Open the printer door, and make sure all colors: • Replace the transfer ...number, the problem, and a detailed description. The paper has absorbed moisture due to Right: 1 Re-seat the cartridges by removing them from the printer and then reinserting them. 2 Invoke a Color Adjust operation from a fresh package. Clear paper from occurring, see the Menus and Messages Guide. Make...
... you load does not exceed the maximum stack height indicated at www.lexmark.com for detailed specifications. For more information, see the Menus and Messages Guide Blank pages feed into the output bin. Open the printer door, and make sure all colors: • Replace the transfer ...number, the problem, and a detailed description. The paper has absorbed moisture due to Right: 1 Re-seat the cartridges by removing them from the printer and then reinserting them. 2 Invoke a Color Adjust operation from a fresh package. Clear paper from occurring, see the Menus and Messages Guide. Make...
Troubleshooting Guide
Page 4
... irregularities ABCDE ABCDE ABCDE • Load paper from a new package. • Avoid textured paper with rough finishes. • Make sure the printer paper type, paper texture, and paper weight settings match the type of paper you load in the trays is Normal. Print too dark •...print cartridge that corresponds to the color displayed on the control panel. Transparency print quality is poor • Use only transparencies recommended by the printer's manufacturer. • Make sure the Paper Type setting is causing the line. 2 If you still have the problem, replace the image...
... irregularities ABCDE ABCDE ABCDE • Load paper from a new package. • Avoid textured paper with rough finishes. • Make sure the printer paper type, paper texture, and paper weight settings match the type of paper you load in the trays is Normal. Print too dark •...print cartridge that corresponds to the color displayed on the control panel. Transparency print quality is poor • Use only transparencies recommended by the printer's manufacturer. • Make sure the Paper Type setting is causing the line. 2 If you still have the problem, replace the image...

User Reference
Page 2
...2: More about installing drivers 13 Installing drivers for local printing 13 Installing drivers for network printing 17 Chapter 3: Printing 21 Understanding the printer operator panel 21 Sending a job to print 22 Canceling a print job 23 Loading the trays 24 Loading the multipurpose feeder 28 Printing ...on specialty media (transparencies, labels, other 30 Linking trays ...31 Linking output bins 32 Holding a job in the printer 32 Tips for successful printing 36 Chapter 4: Paper and specialty media specifications 38 Selecting print media 40 Avoiding paper jams 41 Chapter 5:...
...2: More about installing drivers 13 Installing drivers for local printing 13 Installing drivers for network printing 17 Chapter 3: Printing 21 Understanding the printer operator panel 21 Sending a job to print 22 Canceling a print job 23 Loading the trays 24 Loading the multipurpose feeder 28 Printing ...on specialty media (transparencies, labels, other 30 Linking trays ...31 Linking output bins 32 Holding a job in the printer 32 Tips for successful printing 36 Chapter 4: Paper and specialty media specifications 38 Selecting print media 40 Avoiding paper jams 41 Chapter 5:...

User Reference
Page 3
...PostScript Menu 64 Serial Menu ...65 Setup Menu ...67 Supplies Menu 72 USB Menu ...72 Utilities Menu ...74 Chapter 6: Understanding printer messages 76 Chapter 7: Clearing paper jams 91 Understanding jam messages 91 Access doors and trays 92 Clearing the entire paper path 93 ...help 106 Chapter 8: Maintenance 107 Determining the status of supplies 107 Conserving supplies 107 Ordering supplies and maintenance items 108 Recycling Lexmark products 109 Removing memory and option cards 110 Chapter 9: Troubleshooting 116 User Guide resources 116 Online Technical Support 116 Calling for...
...PostScript Menu 64 Serial Menu ...65 Setup Menu ...67 Supplies Menu 72 USB Menu ...72 Utilities Menu ...74 Chapter 6: Understanding printer messages 76 Chapter 7: Clearing paper jams 91 Understanding jam messages 91 Access doors and trays 92 Clearing the entire paper path 93 ...help 106 Chapter 8: Maintenance 107 Determining the status of supplies 107 Conserving supplies 107 Ordering supplies and maintenance items 108 Recycling Lexmark products 109 Removing memory and option cards 110 Chapter 9: Troubleshooting 116 User Guide resources 116 Online Technical Support 116 Calling for...

User Reference
Page 6
...of a set of Agfa Corporation Apple Computer, Inc. This printer is a product of printer commands (language) and functions included in various application programs, and that the printer emulates the functions corresponding to the commands. This means the printer recognizes PCL commands used in its subsidiaries Nebiolo Apple Computer, ... the functions corresponding to the commands. PCL is intended to be compatible with the PostScript 3 language. This printer is Hewlett-Packard Company's designation of a set of Agfa Corporation Based on Times New Roman under license from The...
...of a set of Agfa Corporation Apple Computer, Inc. This printer is a product of printer commands (language) and functions included in various application programs, and that the printer emulates the functions corresponding to the commands. This means the printer recognizes PCL commands used in its subsidiaries Nebiolo Apple Computer, ... the functions corresponding to the commands. PCL is intended to be compatible with the PostScript 3 language. This printer is Hewlett-Packard Company's designation of a set of Agfa Corporation Based on Times New Roman under license from The...

User Reference
Page 7
... are the property of their respective owners. Since the GNU licensed software that shipped with this printer. Licensing notice The printer resident software contains: • Software developed and copyrighted by Lexmark • Lexmark modified software licensed under the provisions of the GNU General Public License version 2 and the GNU Lesser General Public License version...
... are the property of their respective owners. Since the GNU licensed software that shipped with this printer. Licensing notice The printer resident software contains: • Software developed and copyrighted by Lexmark • Lexmark modified software licensed under the provisions of the GNU General Public License version 2 and the GNU Lesser General Public License version...

User Reference
Page 8
...; The power cord must understand the section in your printer hardware or software. Electronic emission notices With a network cable or high-capacity output finisher installed Federal Communications Commission (FCC) compliance information statement The Lexmark C760, C762, types 5060-401, 5060-402, 5060-421, and...the print media, and the heat may cause harmful interference to radio communications. Lexmark is designed, tested, and approved to meet strict global safety standards with the use of specific Lexmark components. Operation of this equipment in a residential area is subject to the ...
...; The power cord must understand the section in your printer hardware or software. Electronic emission notices With a network cable or high-capacity output finisher installed Federal Communications Commission (FCC) compliance information statement The Lexmark C760, C762, types 5060-401, 5060-402, 5060-421, and...the print media, and the heat may cause harmful interference to radio communications. Lexmark is designed, tested, and approved to meet strict global safety standards with the use of specific Lexmark components. Operation of this equipment in a residential area is subject to the ...

User Reference
Page 12
... operating in the wavelength region of 770-795 nanometers. See the Lexmark C760, C762 Tech Spec section of IEC 60825-1. The printer contains internally a Class IIIb (3b) laser that is certified in this program introduce products that this program. The laser system and printer are designed so there is proud to 50 percent. Companies...
... operating in the wavelength region of 770-795 nanometers. See the Lexmark C760, C762 Tech Spec section of IEC 60825-1. The printer contains internally a Class IIIb (3b) laser that is certified in this program introduce products that this program. The laser system and printer are designed so there is proud to 50 percent. Companies...

User Reference
Page 13
... the system driver. The procedure to install drivers depends on our Lexmark Web site at www.lexmark.com. Use the drivers CD that shipped with your printer, and then click Have Disk. 2 More about installing drivers Installing drivers for local printing The printer driver is software that lets your computer communicate with your computer...
... the system driver. The procedure to install drivers depends on our Lexmark Web site at www.lexmark.com. Use the drivers CD that shipped with your printer, and then click Have Disk. 2 More about installing drivers Installing drivers for local printing The printer driver is software that lets your computer communicate with your computer...

User Reference
Page 14
...computer. d Click Accept after you read the license agreement. Mac 9.1-9.x: Open Applications, and then click Utilities. 3 Double-click Desktop Printer Utility. 4 Select Printer (USB), and then click OK. 14 It may take some time for USB printing. Macintosh Mac OS 8.6 or later is ...drive. c Choose the language you must create a desktop printer icon (Mac 8.6-9.x) or create a queue in a downloadable software package on our Lexmark Web site at www.lexmark.com. 2 Do one of the custom printer driver on your printer. h Click Quit when installation is also available in Print...
...computer. d Click Accept after you read the license agreement. Mac 9.1-9.x: Open Applications, and then click Utilities. 3 Double-click Desktop Printer Utility. 4 Select Printer (USB), and then click OK. 14 It may take some time for USB printing. Macintosh Mac OS 8.6 or later is ...drive. c Choose the language you must create a desktop printer icon (Mac 8.6-9.x) or create a queue in a downloadable software package on our Lexmark Web site at www.lexmark.com. 2 Do one of the custom printer driver on your printer. h Click Quit when installation is also available in Print...

User Reference
Page 15
.... Parity must establish communication between your serial parameters are correct. Keep this , you must be set serial parameters in the printer, 2) install a printer driver on the display, and then press Select. a Press Menu until you see the correct setting, and then press Select.... Serial connections With serial printing, data is now saved as a desktop printer. Note: For information about serial menus and messages, refer to 7 or 8. - Note the following restrictions: - Maximum baud rate supported is...
.... Parity must establish communication between your serial parameters are correct. Keep this , you must be set serial parameters in the printer, 2) install a printer driver on the display, and then press Select. a Press Menu until you see the correct setting, and then press Select.... Serial connections With serial printing, data is now saved as a desktop printer. Note: For information about serial menus and messages, refer to 7 or 8. - Note the following restrictions: - Maximum baud rate supported is...
User Reference
Page 16
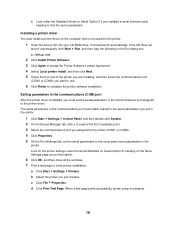
... must set the serial parameters to the exact same serial parameters in the communications port assigned to the printer driver. Setting parameters in the communications (COM) port After the printer driver is installed, you printed earlier. 6 Click OK, and then close all the windows. 7 ...parameters in the Run dialog box: D:/Setup.exe. 2 Click Install Printer Software. 3 Click Agree to accept the Printer Software License Agreement. 4 Select Local printer install, and then click Next. 5 Check the box next to the printer you are installing, and then select the communications port (COM1 or...
... must set the serial parameters to the exact same serial parameters in the communications port assigned to the printer driver. Setting parameters in the communications (COM) port After the printer driver is installed, you printed earlier. 6 Click OK, and then close all the windows. 7 ...parameters in the Run dialog box: D:/Setup.exe. 2 Click Install Printer Software. 3 Click Agree to accept the Printer Software License Agreement. 4 Select Local printer install, and then click Next. 5 Check the box next to the printer you are installing, and then select the communications port (COM1 or...

User Reference
Page 17
... for direct printing or shared printing. Note: If an optional MarkNet print server is installed, you configure for network printing. Supported printer drivers • Windows system printer driver • Lexmark custom printer driver System drivers are built into Windows operating systems. Custom drivers are ready to your network. Both network printing methods require the...
... for direct printing or shared printing. Note: If an optional MarkNet print server is installed, you configure for network printing. Supported printer drivers • Windows system printer driver • Lexmark custom printer driver System drivers are built into Windows operating systems. Custom drivers are ready to your network. Both network printing methods require the...

User Reference
Page 18
... Suggested, and then click Next. 6 Select Network Attached, and then click Next. 7 Select your printer model from the list and then click Next. 8 Click Add Port. 9 Select Lexmark TCP/IP Network Port, and then click Add. 10 Enter the information to the network using a... network cable, such as printer status alerts. Supported network printer ports • Lexmark network port For basic printer functionality, you can be any name that you associate with all the printers on your network. Direct printing using a custom printer driver and network port provides enhanced functionality...
... Suggested, and then click Next. 6 Select Network Attached, and then click Next. 7 Select your printer model from the list and then click Next. 8 Click Add Port. 9 Select Lexmark TCP/IP Network Port, and then click Add. 10 Enter the information to the network using a... network cable, such as printer status alerts. Supported network printer ports • Lexmark network port For basic printer functionality, you can be any name that you associate with all the printers on your network. Direct printing using a custom printer driver and network port provides enhanced functionality...

User Reference
Page 19
...computer (Mac OS 8.6 to a network printer, each Macintosh user must install a custom PostScript Printer Description (PPD) file and either create a desktop printer on your Macintosh computer. 3 Choose the language you want to select, look on our Lexmark Web site at www.lexmark.com. To print to 9.x) or create... a print queue in Print Center (Mac OS X). a Click the desktop printer icon you finish with the Readme file. 6 Choose a default paper size....
...computer (Mac OS 8.6 to a network printer, each Macintosh user must install a custom PostScript Printer Description (PPD) file and either create a desktop printer on your Macintosh computer. 3 Choose the language you want to select, look on our Lexmark Web site at www.lexmark.com. To print to 9.x) or create... a print queue in Print Center (Mac OS X). a Click the desktop printer icon you finish with the Readme file. 6 Choose a default paper size....

User Reference
Page 20
If the PPD file displayed in the PostScript Printer Description (PPD) file portion of the menu is correct for your printer, printer setup is not correct for your printer, repeat "Step 1: Install a custom PPD file" on page 19. 20 If the PPD file displayed in the PostScript Printer Description (PPD) file portion of the menu is complete. - b Choose Printing Change Setup. -
If the PPD file displayed in the PostScript Printer Description (PPD) file portion of the menu is correct for your printer, printer setup is not correct for your printer, repeat "Step 1: Install a custom PPD file" on page 19. 20 If the PPD file displayed in the PostScript Printer Description (PPD) file portion of the menu is complete. - b Choose Printing Change Setup. -

User Reference
Page 21
... to the Ready state. • Clear some operator panel messages. • Resume printing after loading paper or clearing paper jams. • Exit Power Saver. The printer must display Ready for your job. 21 If you send a job to print, change default settings. When the... printer is offline, press Menu to print. For menu items that flashes when the printer is offline (the Ready message does not appear on the display). • Exit printer menus and return to scroll through the menus and menu items. •...
... to the Ready state. • Clear some operator panel messages. • Resume printing after loading paper or clearing paper jams. • Exit Power Saver. The printer must display Ready for your job. 21 If you send a job to print, change default settings. When the... printer is offline, press Menu to print. For menu items that flashes when the printer is offline (the Ready message does not appear on the display). • Exit printer menus and return to scroll through the menus and menu items. •...

User Reference
Page 22
...menu map for more information. No data is selected in the dialog box. 4 Modify the printer settings as appropriate (such as the new user default setting. • Clear certain messages ...Continue printing after you send a confidential job. See Change for a brief overview of the printer menus available from the first screen, and click OK. 5 Click OK or Print to send the job to the ...selected printer. 22 Press Return to go back to temporarily take the printer offline. Use the numbers located next to the names of the buttons to enter...
...menu map for more information. No data is selected in the dialog box. 4 Modify the printer settings as appropriate (such as the new user default setting. • Clear certain messages ...Continue printing after you send a confidential job. See Change for a brief overview of the printer menus available from the first screen, and click OK. 5 Click OK or Print to send the job to the ...selected printer. 22 Press Return to go back to temporarily take the printer offline. Use the numbers located next to the names of the buttons to enter...


