
User Manual
Page 6
... the status of supplies from a network computer 111 Ordering supplies...112 Ordering toner cartridges...112 Ordering imaging kits ...113 Ordering a waste toner bottle...113 Replacing supplies...114 Replacing the waste toner bottle ...114 Replacing a black imaging kit ...117 Replacing a black and color... imaging kit ...123 Replacing a toner cartridge...128 Replacing a developer unit ...130 Cleaning the exterior of the printer...135 Recycling Lexmark products...136 Moving the printer...136 Before moving the printer...136 Moving the printer to...
... the status of supplies from a network computer 111 Ordering supplies...112 Ordering toner cartridges...112 Ordering imaging kits ...113 Ordering a waste toner bottle...113 Replacing supplies...114 Replacing the waste toner bottle ...114 Replacing a black imaging kit ...117 Replacing a black and color... imaging kit ...123 Replacing a toner cartridge...128 Replacing a developer unit ...130 Cleaning the exterior of the printer...135 Recycling Lexmark products...136 Moving the printer...136 Before moving the printer...136 Moving the printer to...
User Manual
Page 7
... is too dark...150 Print is too light ...151 Repeating defects...152 Skewed print...153 Solid color pages...153 Toner fog or background shading appears on the page 153 Toner rubs off...153 Toner specks...154 Transparency print quality is poor...154 Uneven print density...155 Solving color quality problems...155 Color misregistration...
... is too dark...150 Print is too light ...151 Repeating defects...152 Skewed print...153 Solid color pages...153 Toner fog or background shading appears on the page 153 Toner rubs off...153 Toner specks...154 Transparency print quality is poor...154 Uneven print density...155 Solving color quality problems...155 Color misregistration...
User Manual
Page 46
... be stiff enough to 47 lb bond) grain long. Paper and specialty media guide 46 Paper and specialty media guide Additional information for printing on Lexmark.com/publications. Storing paper unwrapped in hot, humid, cold, or dry conditions, even in its original wrapper until it in its original wrapper in a sheet... direction Grain refers to the alignment of paper. If paper is the tendency for 24 to curl at its performance. Curl Curl is too rough, toner cannot fuse to 47 lb bond) paper, use 80 g/m2 (21 lb bond) grain long paper. If paper is too smooth, it properly. For 60...
... be stiff enough to 47 lb bond) grain long. Paper and specialty media guide 46 Paper and specialty media guide Additional information for printing on Lexmark.com/publications. Storing paper unwrapped in hot, humid, cold, or dry conditions, even in its original wrapper until it in its original wrapper in a sheet... direction Grain refers to the alignment of paper. If paper is the tendency for 24 to curl at its performance. Curl Curl is too rough, toner cannot fuse to 47 lb bond) paper, use 80 g/m2 (21 lb bond) grain long paper. If paper is too smooth, it properly. For 60...
User Manual
Page 47
...-quality xerographic paper is usually indicated on the paper package. • Do not use paper that has been cut or trimmed by the resin in toner. To help avoid jams and poor print quality: • Always use coated papers unless they are not affected by hand. • Do not mix paper...
...-quality xerographic paper is usually indicated on the paper package. • Do not use paper that has been cut or trimmed by the resin in toner. To help avoid jams and poor print quality: • Always use coated papers unless they are not affected by hand. • Do not mix paper...
User Manual
Page 70
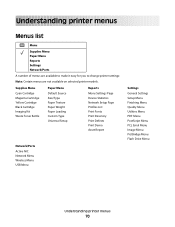
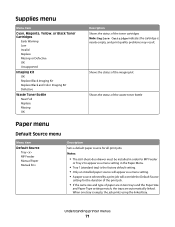
Supplies Menu Cyan Cartridge Magenta Cartridge Yellow Cartridge Black Cartridge Imaging Kit Waste Toner Bottle Paper Menu Default Source Size/Type Paper Texture Paper Weight Paper Loading Custom Type Universal Setup Reports Menu Settings Page Device Statistics Network Setup ...
Supplies Menu Cyan Cartridge Magenta Cartridge Yellow Cartridge Black Cartridge Imaging Kit Waste Toner Bottle Paper Menu Default Source Size/Type Paper Texture Paper Weight Paper Loading Custom Type Universal Setup Reports Menu Settings Page Device Statistics Network Setup ...
User Manual
Page 71
...Early Warning Low Invalid Replace Missing or Defective OK Unsupported Imaging Kit OK Replace Black Imaging Kit Replace Black and Color Imaging Kit Defective Waste Toner Bottle Near Full Replace Missing OK Description Shows the status of paper are in the Paper Menu. • Tray 1 (standard tray) is... nearly empty, and print quality problems may result. Shows the status of the imaging kit Shows the status of the waste toner bottle Paper menu Default Source menu Menu item Default Source Tray MP Feeder Manual Paper Manual Env Description Sets a default paper source for all...
...Early Warning Low Invalid Replace Missing or Defective OK Unsupported Imaging Kit OK Replace Black Imaging Kit Replace Black and Color Imaging Kit Defective Waste Toner Bottle Near Full Replace Missing OK Description Shows the status of paper are in the Paper Menu. • Tray 1 (standard tray) is... nearly empty, and print quality problems may result. Shows the status of the imaging kit Shows the status of the waste toner bottle Paper menu Default Source menu Menu item Default Source Tray MP Feeder Manual Paper Manual Env Description Sets a default paper source for all...

User Manual
Page 92
... • 0 is the factory default setting. • This does not affect files where CMYK color specifications are being used. Reduces the amount of toner used . Adjusts saturation in color outputs Notes: • 0 is the factory default setting. • -6 is the maximum decrease. 6 is the... factory default setting. • On overrides Toner Darkness settings. for graphics and images. Adjusts brightness in color outputs Notes: • 0 is the factory default setting. • This does not ...
... • 0 is the factory default setting. • This does not affect files where CMYK color specifications are being used. Reduces the amount of toner used . Adjusts saturation in color outputs Notes: • 0 is the factory default setting. • -6 is the maximum decrease. 6 is the... factory default setting. • On overrides Toner Darkness settings. for graphics and images. Adjusts brightness in color outputs Notes: • 0 is the factory default setting. • This does not ...

User Manual
Page 93
... Description Adjusts color in the printer Notes: • Selecting any setting prints the sample. • Color samples consist of a series of toner being used to help decide which combinations to use to get the desired printed output. • From a browser window, type the IP... a color conversion table that produces brighter, more saturated colors. • Display-True Black applies a color conversion table that uses only black toner for each color Note: 0 is the factory default setting for RGB Image. Understanding printer menus 93 Restores the Color Balance factory default settings ...
... Description Adjusts color in the printer Notes: • Selecting any setting prints the sample. • Color samples consist of a series of toner being used to help decide which combinations to use to get the desired printed output. • From a browser window, type the IP... a color conversion table that produces brighter, more saturated colors. • Display-True Black applies a color conversion table that uses only black toner for each color Note: 0 is the factory default setting for RGB Image. Understanding printer menus 93 Restores the Color Balance factory default settings ...
User Manual
Page 100
..., the camera value always supersedes the printer value. Menu item Quality Normal Draft Fine Paper Source MP Feeder Tray Manual Paper Description Determines which resolution, toner darkness, and color saver values the device uses when printing photos sent from a PictBridge-enabled device Note: A photo size larger than the size of the...
..., the camera value always supersedes the printer value. Menu item Quality Normal Draft Fine Paper Source MP Feeder Tray Manual Paper Description Determines which resolution, toner darkness, and color saver values the device uses when printing photos sent from a PictBridge-enabled device Note: A photo size larger than the size of the...
User Manual
Page 101
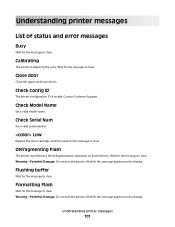
... Set a valid serial number. Defragmenting Flash The printer is invalid. Wait for the message to clear. Wait for the message to clear. Low Replace the toner cartridge, and then wait for the message to clear. Understanding printer messages List of status and error messages Busy Wait for the message to clear...
... Set a valid serial number. Defragmenting Flash The printer is invalid. Wait for the message to clear. Wait for the message to clear. Low Replace the toner cartridge, and then wait for the message to clear. Understanding printer messages List of status and error messages Busy Wait for the message to clear...

User Manual
Page 104
... printing. • Press to print. Tray Low Load the paper tray or other source with the correct paper type and size. Replace cartridge Replace the toner cartridge, and then press to flash. Ready The printer is offline while it configures settings. Remove paper from the... toner cartridges. Reload printed pages in Tray • Press to clear the message and continue processing the second side of the following : • Load the paper ...
... printing. • Press to print. Tray Low Load the paper tray or other source with the correct paper type and size. Replace cartridge Replace the toner cartridge, and then press to flash. Ready The printer is offline while it configures settings. Remove paper from the... toner cartridges. Reload printed pages in Tray • Press to clear the message and continue processing the second side of the following : • Load the paper ...

User Manual
Page 105
...command, a Form Feed command, or additional data. Press to clear the message and continue printing. 30.yy cartridge missing Insert the missing toner cartridge to print, but is nearly full. Waiting, too many events Wait for PictBridge Waiting The printer has received data to clear the ...message and continue printing. 31.yy Defective Cartridge Replace the defective toner cartridge with a new one. 31.yy Defective Imaging Kit Replace the defective imaging kit with a new one. 32.yy Replace Unsupported ...
...command, a Form Feed command, or additional data. Press to clear the message and continue printing. 30.yy cartridge missing Insert the missing toner cartridge to print, but is nearly full. Waiting, too many events Wait for PictBridge Waiting The printer has received data to clear the ...message and continue printing. 31.yy Defective Cartridge Replace the defective toner cartridge with a new one. 31.yy Defective Imaging Kit Replace the defective imaging kit with a new one. 32.yy Replace Unsupported ...

User Manual
Page 106
.... From the PPDS menu, select Best Fit, and then select On. Press , and then press to cancel printing. 40 Invalid refill, change cartridge Replace the toner cartridge with a new one or more of the following: • Press , and then press to continue printing. 35 Insufficient memory to support Resource Save feature...
.... From the PPDS menu, select Best Fit, and then select On. Press , and then press to cancel printing. 40 Invalid refill, change cartridge Replace the toner cartridge with a new one or more of the following: • Press , and then press to continue printing. 35 Insufficient memory to support Resource Save feature...
User Manual
Page 108
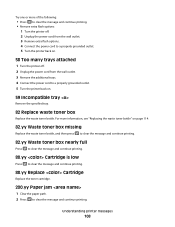
Try one or more information, see "Replacing the waste toner bottle" on page 114. 82.yy Waste toner box missing Replace the waste toner bottle, and then press to clear the message and continue printing. 82.yy Waste toner box nearly full Press to clear the message and continue printing. 88.yy ...Cartridge is low Press to clear the message and continue printing. 88.yy Replace Cartridge Replace the toner cartridge. 200.yy Paper jam 1 Clear the paper path. 2 Press to a properly grounded outlet. 5 Turn the printer back on . 58 Too many trays ...
Try one or more information, see "Replacing the waste toner bottle" on page 114. 82.yy Waste toner box missing Replace the waste toner bottle, and then press to clear the message and continue printing. 82.yy Waste toner box nearly full Press to clear the message and continue printing. 88.yy ...Cartridge is low Press to clear the message and continue printing. 88.yy Replace Cartridge Replace the toner cartridge. 200.yy Paper jam 1 Clear the paper path. 2 Press to a properly grounded outlet. 5 Turn the printer back on . 58 Too many trays ...
User Manual
Page 110
... the front door. 5 Press to clear the message and continue printing. 940.01 Press down on the cyan toner cartridge to make sure it is installed properly. Call for service. 942.02 The yellow toner cartridge needs maintenance. Turn the printer off , wait about 10 seconds, and then turn the printer back... is installed properly. Turn the printer off , wait about 10 seconds, and then turn the printer back on 941.01 Press down on the black toner cartridge to make sure it is installed properly. Turn the printer off , wait about 10 seconds, and then turn the printer back on. 942.01...
... the front door. 5 Press to clear the message and continue printing. 940.01 Press down on the cyan toner cartridge to make sure it is installed properly. Call for service. 942.02 The yellow toner cartridge needs maintenance. Turn the printer off , wait about 10 seconds, and then turn the printer back... is installed properly. Turn the printer off , wait about 10 seconds, and then turn the printer back on 941.01 Press down on the black toner cartridge to make sure it is installed properly. Turn the printer off , wait about 10 seconds, and then turn the printer back on. 942.01...
User Manual
Page 111
... 111 Storing supplies Choose a cool, clean storage area for accuracy before printing the remaining copies. Do not expose supplies to print several copies, you conserve toner and paper. Checking the status of printer supplies by printing the first copy and checking it for the printer supplies. If you need to : •...
... 111 Storing supplies Choose a cool, clean storage area for accuracy before printing the remaining copies. Do not expose supplies to print several copies, you conserve toner and paper. Checking the status of printer supplies by printing the first copy and checking it for the printer supplies. If you need to : •...

User Manual
Page 112
... Cartridge appears, you purchased the printer. or A4-size plain paper. In other countries or regions, visit the Lexmark Web Site at 1-800-539-6275 for printer supplies assume printing on letter- Ordering toner cartridges When 88 Cyan Cartridge Low, 88 Magenta Cartridge Low, 88 Yellow Cartridge Low, or 88 Black Cartridge...
... Cartridge appears, you purchased the printer. or A4-size plain paper. In other countries or regions, visit the Lexmark Web Site at 1-800-539-6275 for printer supplies assume printing on letter- Ordering toner cartridges When 88 Cyan Cartridge Low, 88 Magenta Cartridge Low, 88 Yellow Cartridge Low, or 88 Black Cartridge...
User Manual
Page 113
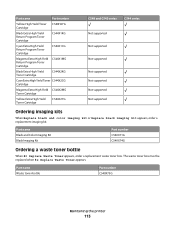
... Imaging Kit Part number C540X71G C540X74G Ordering a waste toner bottle When 82 Replace Waste Toner appears, order a replacement waste toner box. Part name Part number Yellow High Yield Toner C540H2YG Cartridge Black Extra High Yield Return Program Toner Cartridge C544X1KG Cyan Extra High Yield Return Program Toner Cartridge C544X1CG Magenta Extra High Yield C544X1MG Return Program...
... Imaging Kit Part number C540X71G C540X74G Ordering a waste toner bottle When 82 Replace Waste Toner appears, order a replacement waste toner box. Part name Part number Yellow High Yield Toner C540H2YG Cartridge Black Extra High Yield Return Program Toner Cartridge C544X1KG Cyan Extra High Yield Return Program Toner Cartridge C544X1CG Magenta Extra High Yield C544X1MG Return Program...

User Manual
Page 114
Maintaining the printer 114 The printer will not continue printing until the waste toner bottle is replaced. 1 2 4 3 1 Top door 2 Waste toner bottle 3 Right side cover 4 Front door 1 Unpack the replacement waste toner bottle. 2 Grasp the front door at the side handholds, and then pull it toward you. To reduce the risk of the printer might be hot. Replacing supplies Replacing the waste toner bottle Replace the waste toner bottle when 82 Replace waste toner appears. CAUTION-HOT SURFACE: The inside of injury from a hot component, allow the surface to cool before touching.
Maintaining the printer 114 The printer will not continue printing until the waste toner bottle is replaced. 1 2 4 3 1 Top door 2 Waste toner bottle 3 Right side cover 4 Front door 1 Unpack the replacement waste toner bottle. 2 Grasp the front door at the side handholds, and then pull it toward you. To reduce the risk of the printer might be hot. Replacing supplies Replacing the waste toner bottle Replace the waste toner bottle when 82 Replace waste toner appears. CAUTION-HOT SURFACE: The inside of injury from a hot component, allow the surface to cool before touching.
User Manual
Page 116
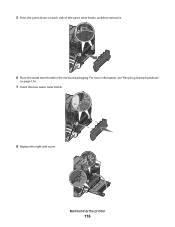
For more information, see "Recycling Lexmark products" on each side of the waste toner bottle, and then remove it. 6 Place the waste toner bottle in the enclosed packaging. Maintaining the printer 116 5 Press the green levers on page 136. 7 Insert the new waste toner bottle. 8 Replace the right side cover.
For more information, see "Recycling Lexmark products" on each side of the waste toner bottle, and then remove it. 6 Place the waste toner bottle in the enclosed packaging. Maintaining the printer 116 5 Press the green levers on page 136. 7 Insert the new waste toner bottle. 8 Replace the right side cover.


