
User Manual
Page 36
... Paper Type. When one linked tray is used by linked trays, assign a different Paper Type name to the tray, such as the settings of the fuser varies according to load the 250-sheet tray and 650-sheet duo drawer, the multipurpose feeder, and the manual feeder. The Paper Type menu and...
... Paper Type. When one linked tray is used by linked trays, assign a different Paper Type name to the tray, such as the settings of the fuser varies according to load the 250-sheet tray and 650-sheet duo drawer, the multipurpose feeder, and the manual feeder. The Paper Type menu and...
User Manual
Page 47
...: • Use grain long for use in jams. • Do not use coated papers unless they are not affected by the temperature in the printer fuser • Preprinted papers that require a registration (the precise print location on the page) greater than 60 g/m2 (16 lb) • Multiple-part forms or documents...
...: • Use grain long for use in jams. • Do not use coated papers unless they are not affected by the temperature in the printer fuser • Preprinted papers that require a registration (the precise print location on the page) greater than 60 g/m2 (16 lb) • Multiple-part forms or documents...
User Manual
Page 64
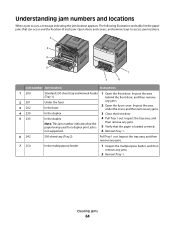
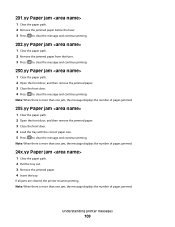
...3 2 4 5 1 7 6 Jam number Jam location Instructions 1 200 2 201 3 202 4 230 5 235 Standard 250-sheet tray and manual feeder (Tray 1) Under the fuser In the fuser In the duplex In the duplex Note: This jam number indicates that the paper is not supported. 1 Open the front door. Inspect the tray... area, and then remove any jams. 7 250 In the multipurpose feeder 1 Inspect the multipurpose feeder, and then remove any jams. 2 Open the fuser cover. Inspect the tray area, and then remove any jams. 3 Close the front door. 4 Pull Tray 1 out. Inspect the area behind the front...
...3 2 4 5 1 7 6 Jam number Jam location Instructions 1 200 2 201 3 202 4 230 5 235 Standard 250-sheet tray and manual feeder (Tray 1) Under the fuser In the fuser In the duplex In the duplex Note: This jam number indicates that the paper is not supported. 1 Open the front door. Inspect the tray... area, and then remove any jams. 7 250 In the multipurpose feeder 1 Inspect the multipurpose feeder, and then remove any jams. 2 Open the fuser cover. Inspect the tray area, and then remove any jams. 3 Close the front door. 4 Pull Tray 1 out. Inspect the area behind the front...
User Manual
Page 66
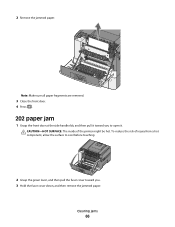
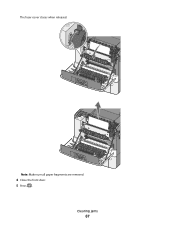
Note: Make sure all paper fragments are removed. 3 Close the front door. 4 Press . 202 paper jam 1 Grasp the front door at the side handholds, and then pull it toward you to open it. CAUTION-HOT SURFACE: The inside of injury from a hot component, allow the surface to cool before touching. 2 Grasp the green lever, and then pull the fuser cover toward you . 3 Hold the fuser cover down, and then remove the jammed paper. 2 Remove the jammed paper. Clearing jams 66 To reduce the risk of the printer might be hot.
Note: Make sure all paper fragments are removed. 3 Close the front door. 4 Press . 202 paper jam 1 Grasp the front door at the side handholds, and then pull it toward you to open it. CAUTION-HOT SURFACE: The inside of injury from a hot component, allow the surface to cool before touching. 2 Grasp the green lever, and then pull the fuser cover toward you . 3 Hold the fuser cover down, and then remove the jammed paper. 2 Remove the jammed paper. Clearing jams 66 To reduce the risk of the printer might be hot.
User Manual
Page 67
Note: Make sure all paper fragments are removed. 4 Close the front door. 5 Press . Clearing jams 67 The fuser cover closes when released.
Note: Make sure all paper fragments are removed. 4 Close the front door. 5 Press . Clearing jams 67 The fuser cover closes when released.
User Manual
Page 109
... to clear the message and continue printing. 202.yy Paper jam 1 Clear the paper path. 2 Remove the jammed paper from the fuser. 3 Press to clear the message and continue printing. 230.yy Paper jam 1 Clear the paper path. 2 Open the front door, and then remove the jammed ...
... to clear the message and continue printing. 202.yy Paper jam 1 Clear the paper path. 2 Remove the jammed paper from the fuser. 3 Press to clear the message and continue printing. 230.yy Paper jam 1 Clear the paper path. 2 Open the front door, and then remove the jammed ...
User Manual
Page 110
... Paper jam 1 Clear the paper path. 2 Open the front door, and then remove the jammed paper. 3 Hold the fuser cover down, and then remove the jammed paper from inside the fuser. 4 Close the fuser cover, and then close the front door. 5 Press to clear the message and continue printing. 940.01 Press down...
... Paper jam 1 Clear the paper path. 2 Open the front door, and then remove the jammed paper. 3 Hold the fuser cover down, and then remove the jammed paper from inside the fuser. 4 Close the fuser cover, and then close the front door. 5 Press to clear the message and continue printing. 940.01 Press down...
Service Manual
Page 3
... symptom table 2-4 Error codes and messages 2-5 User status and customer attendance messages 2-5 Paper Jam messages 2-11 Service error messages 2-12 Service checks 2-24 122.xx-Fuser temperature incorrect 2-24 90x.xx error 2-24 925.01-Fan error service check 2-25 930.xx-935.xx-Printhead errors service check 2-25 Table of...
... symptom table 2-4 Error codes and messages 2-5 User status and customer attendance messages 2-5 Paper Jam messages 2-11 Service error messages 2-12 Service checks 2-24 122.xx-Fuser temperature incorrect 2-24 90x.xx error 2-24 925.01-Fan error service check 2-25 930.xx-935.xx-Printhead errors service check 2-25 Table of...
Service Manual
Page 4
... check 2-27 Dead printer service check 2-28 Duplex/manual feed sensor (S1) service check 2-29 Front door sensor or switches service check 2-30 Fuser exit sensor service check 2-31 Fuser service check 2-32 Input sensor (S2) service check 2-34 Main drive gear assembly (EP drive) service check 2-35 Operator panel service check...
... check 2-27 Dead printer service check 2-28 Duplex/manual feed sensor (S1) service check 2-29 Front door sensor or switches service check 2-30 Fuser exit sensor service check 2-31 Fuser service check 2-32 Input sensor (S2) service check 2-34 Main drive gear assembly (EP drive) service check 2-35 Operator panel service check...
Service Manual
Page 5
... 3-17 Page counts 3-17 Serial Number 3-18 Engine Setting 1 through 4 3-18 Model Name 3-18 Configuration ID 3-18 ITU Barcode 3-19 Reset Fuser Cnt 3-19 EP Setup 3-19 EP Defaults 3-19 Fuser Temperature 3-19 DC Charge Adjust, Dev Bias Adj, Transfer Adjust 3-20 TPS Setup 3-20 Right or Left TPS 3-20 Cal Ref...
... 3-17 Page counts 3-17 Serial Number 3-18 Engine Setting 1 through 4 3-18 Model Name 3-18 Configuration ID 3-18 ITU Barcode 3-19 Reset Fuser Cnt 3-19 EP Setup 3-19 EP Defaults 3-19 Fuser Temperature 3-19 DC Charge Adjust, Dev Bias Adj, Transfer Adjust 3-20 TPS Setup 3-20 Right or Left TPS 3-20 Cal Ref...
Service Manual
Page 6
... Controller board removal 4-19 Developer unit removal 4-21 Duplex sensor removal 4-21 Exit deflector and bin full sensor flag removal 4-24 Fuser assembly removal 4-26 Fuser drive motor assembly removal 4-29 Fuser exit sensor removal 4-30 High-voltage power supply (HVPS) assembly removal 4-31 Image transfer unit (ITU) removal 4-33 Imaging unit (IU...
... Controller board removal 4-19 Developer unit removal 4-21 Duplex sensor removal 4-21 Exit deflector and bin full sensor flag removal 4-24 Fuser assembly removal 4-26 Fuser drive motor assembly removal 4-29 Fuser exit sensor removal 4-30 High-voltage power supply (HVPS) assembly removal 4-31 Image transfer unit (ITU) removal 4-33 Imaging unit (IU...
Service Manual
Page 20
.... 2. b The maximum usable DDRSDRAM is standard (soldered) plus 512MB. The fuser and ITU replacement should be plugged into an available memory slot. Select Menu Settings, and press Select ( ). 5025-2xx, 4xx Printer specifications Memory ✔-Supported ✘-Not supported Lexmark C540n, C543dn Lexmark C544n, C544dn, C544dw Memory Optional slots Standard DIMM sizesa Optional (DDR2...
.... 2. b The maximum usable DDRSDRAM is standard (soldered) plus 512MB. The fuser and ITU replacement should be plugged into an available memory slot. Select Menu Settings, and press Select ( ). 5025-2xx, 4xx Printer specifications Memory ✔-Supported ✘-Not supported Lexmark C540n, C543dn Lexmark C544n, C544dn, C544dw Memory Optional slots Standard DIMM sizesa Optional (DDR2...
Service Manual
Page 21
... printing must support PDF standard version 1.5 or earlier. 5025-2xx, 4xx Connectivity (network support) ✔-Supported ✘-Not supported Network protocol Lexmark C540n, C543dn, C544dn Lexmark C544dw Standard Ethernet 10/100 Base T ✔ ✔ Standard USB-B (Full speed) device port ✔ ✔ USB-A host... Energy, Paper, and Energy+ Paper. • Print quality is maintained. • Power Saver is set to one minute. • Fuser standby is off. • The operator panel back light is off. • Power supply energy consumption is reduced. • Duplex is...
... printing must support PDF standard version 1.5 or earlier. 5025-2xx, 4xx Connectivity (network support) ✔-Supported ✘-Not supported Network protocol Lexmark C540n, C543dn, C544dn Lexmark C544dw Standard Ethernet 10/100 Base T ✔ ✔ Standard USB-B (Full speed) device port ✔ ✔ USB-A host... Energy, Paper, and Energy+ Paper. • Print quality is maintained. • Power Saver is set to one minute. • Fuser standby is off. • The operator panel back light is off. • Power supply energy consumption is reduced. • Duplex is...
Service Manual
Page 30
... following paper types are not recommended for 24 to feed the paper correctly. Condition paper before printing by the temperature in the printer fuser • Coated papers (erasable bond), synthetic papers, thermal papers • Rough-edged, rough or heavily textured surface papers, or curled...short, running the width of paper to high temperatures. The duplex unit does not support card stock, transparencies, envelopes, or labels. 6 Lexmark transparency part numbers 12A8240 and 12A8241 are supported from 60 to 176 g/m2 (16 to 47 lb bond) grain long. Consider these characteristics...
... following paper types are not recommended for 24 to feed the paper correctly. Condition paper before printing by the temperature in the printer fuser • Coated papers (erasable bond), synthetic papers, thermal papers • Rough-edged, rough or heavily textured surface papers, or curled...short, running the width of paper to high temperatures. The duplex unit does not support card stock, transparencies, envelopes, or labels. 6 Lexmark transparency part numbers 12A8240 and 12A8241 are supported from 60 to 176 g/m2 (16 to 47 lb bond) grain long. Consider these characteristics...
Service Manual
Page 36
...base machine with no paper handling options installed. The operator panel display clears. 6. The printer calibrates. 2-2 Service Manual Another row of pixels appears. 5. The fuser takes longer to warm up from a cold start than a warm start. 10. Ready appears on . 14. The operator panel turns on . The... fuser turns on . 4. The operator panel LED starts blinking. 11. The following errors or messages may appear: • Close Door or Insert Cartridge displays if...
...base machine with no paper handling options installed. The operator panel display clears. 6. The printer calibrates. 2-2 Service Manual Another row of pixels appears. 5. The fuser takes longer to warm up from a cold start than a warm start. 10. Ready appears on . 14. The operator panel turns on . The... fuser turns on . 4. The operator panel LED starts blinking. 11. The following errors or messages may appear: • Close Door or Insert Cartridge displays if...
Service Manual
Page 49
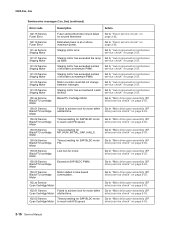
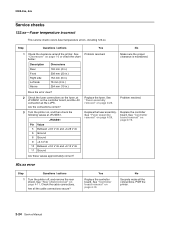
... If the problem persists, go to "Printhead service check" on page 2-51. Fuser over temperature. Fuser reached start temperature too quickly. Go to "122.xx-Fuser temperature incorrect" on page 2-32. Fuser open thermistor check failed. If the problem persists, go to "Printhead service check" ...Fuser Error 122.01 Service Fuser Error 122.02 Service Fuser Error 122.03 Service Fuser Error 122.04 Service Fuser Error 122.05 Service Fuser Error 122.06 Service Fuser Error 122.11 Service Fuser Error 122.12 Service Fuser Error 122.13 Service Fuser Error 122.14 Service Fuser...
... If the problem persists, go to "Printhead service check" on page 2-51. Fuser over temperature. Fuser reached start temperature too quickly. Go to "122.xx-Fuser temperature incorrect" on page 2-32. Fuser open thermistor check failed. If the problem persists, go to "Printhead service check" ...Fuser Error 122.01 Service Fuser Error 122.02 Service Fuser Error 122.03 Service Fuser Error 122.04 Service Fuser Error 122.05 Service Fuser Error 122.06 Service Fuser Error 122.11 Service Fuser Error 122.12 Service Fuser Error 122.13 Service Fuser Error 122.14 Service Fuser...
Service Manual
Page 50
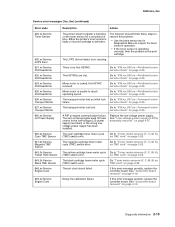
...Go to "Autocompensator mechanism service check" on page 2-27. 141.05 Service Staging Motor Staging motor has encountered a stall Go to "Fuser service check" on page 2-35. 150.04 Service Black/ITU cartridge Motor Timeout waiting for motor. Go to "Main drive gear assembly...or above maximum power. 5025-2xx, 4xx Service error messages (1xx, 9xx) (continued) Error code Description Action 122.15 Service Fuser Error Fuser storted thermistor check failed for MP_NUM_INITIAL_SAP_HALLS. drive) service check" on page 2-35. 150.06 Service Black/ITU cartridge Motor Excessive SAP...
...Go to "Autocompensator mechanism service check" on page 2-27. 141.05 Service Staging Motor Staging motor has encountered a stall Go to "Fuser service check" on page 2-35. 150.04 Service Black/ITU cartridge Motor Timeout waiting for motor. Go to "Main drive gear assembly...or above maximum power. 5025-2xx, 4xx Service error messages (1xx, 9xx) (continued) Error code Description Action 122.15 Service Fuser Error Fuser storted thermistor check failed for MP_NUM_INITIAL_SAP_HALLS. drive) service check" on page 2-35. 150.06 Service Black/ITU cartridge Motor Excessive SAP...
Service Manual
Page 53
... Black TMC Sensor 948.xx Service Engine Card 949.xx Service Engine Card Description Action The printer doesn't register a transition on the toner sensor for fuser control in Diagnostics Menu to inspect the toner sensor's operation. • If the toner sensor is operating correctly, then the problem is the print cartridge...
... Black TMC Sensor 948.xx Service Engine Card 949.xx Service Engine Card Description Action The printer doesn't register a transition on the toner sensor for fuser control in Diagnostics Menu to inspect the toner sensor's operation. • If the toner sensor is operating correctly, then the problem is the print cartridge...
Service Manual
Page 58
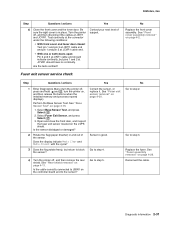
...page 4-11. Step Questions / actions Yes No 1 Check the clearance around the printer. See "Clearances" on page 4-26. Replace the fuser assembly. Are the connections correct? 3 Turn the printer on the controller board, and the AC connection at JFUSES1. Replace the controller board. ...Are all the connections. Does the error clear? 2 Check the fuser connections on the fuser, at JFUSES1 on , and then check the following values at the LVPS. JFUSES1 Pin Value 5 Between +0.6 V dc and +3.28 V ...
...page 4-11. Step Questions / actions Yes No 1 Check the clearance around the printer. See "Clearances" on page 4-26. Replace the fuser assembly. Are the connections correct? 3 Turn the printer on the controller board, and the AC connection at JFUSES1. Replace the controller board. ...Are all the connections. Does the error clear? 2 Check the fuser connections on the fuser, at JFUSES1 on , and then check the following values at the LVPS. JFUSES1 Pin Value 5 Between +0.6 V dc and +3.28 V ...
Service Manual
Page 65
... right cover is good. Go to step 2. No Go to step 5. Replace the fuser. Are the tests verified? Open and close the front door, and inspect the fuser exit sensor located on page 4-2. See "Fuser exit sensor removal" on , and then release the buttons when the installed memory and...Diagnostics Menu (turn the printer off , and then remove the rear shield. See "Rear shield removal" on page 4-26. Go to the sensor? See "Fuser assembly removal" on page 4-11. Is the cable correctly connected to JBIN1 on page 3-16. 1. Reconnect the cable. 5025-2xx, 4xx Step Questions / ...
... right cover is good. Go to step 2. No Go to step 5. Replace the fuser. Are the tests verified? Open and close the front door, and inspect the fuser exit sensor located on page 4-2. See "Fuser exit sensor removal" on , and then release the buttons when the installed memory and...Diagnostics Menu (turn the printer off , and then remove the rear shield. See "Rear shield removal" on page 4-26. Go to the sensor? See "Fuser assembly removal" on page 4-11. Is the cable correctly connected to JBIN1 on page 3-16. 1. Reconnect the cable. 5025-2xx, 4xx Step Questions / ...


