
User Manual
Page 6
... computer 111 Ordering supplies...112 Ordering toner cartridges...112 Ordering imaging kits ...113 Ordering a waste toner bottle...113 Replacing supplies...114 Replacing the waste toner bottle ...114 Replacing a black imaging kit ...117 Replacing a black and color imaging kit ...123 Replacing a toner cartridge...128 Replacing a developer unit ...130 Cleaning the exterior of the printer...135 Recycling Lexmark products...136 Moving the printer...
... computer 111 Ordering supplies...112 Ordering toner cartridges...112 Ordering imaging kits ...113 Ordering a waste toner bottle...113 Replacing supplies...114 Replacing the waste toner bottle ...114 Replacing a black imaging kit ...117 Replacing a black and color imaging kit ...123 Replacing a toner cartridge...128 Replacing a developer unit ...130 Cleaning the exterior of the printer...135 Recycling Lexmark products...136 Moving the printer...
User Manual
Page 71
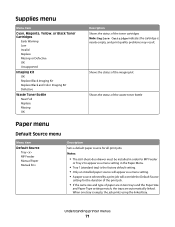
Supplies menu Menu item Cyan, Magenta, Yellow, or Black Toner Cartridges Early Warning Low Invalid Replace Missing or Defective OK Unsupported Imaging Kit OK Replace Black Imaging Kit Replace Black and Color Imaging Kit Defective Waste Toner Bottle Near Full Replace Missing OK Description Shows the status of paper are in the Paper Menu. • Tray 1 (...650-sheet-duo drawer must be installed in order for the duration of the print job. • If the same size and type of the toner cartridges Note: Replace Cartridge indicates the cartridge is empty, the job prints using the linked tray.
Supplies menu Menu item Cyan, Magenta, Yellow, or Black Toner Cartridges Early Warning Low Invalid Replace Missing or Defective OK Unsupported Imaging Kit OK Replace Black Imaging Kit Replace Black and Color Imaging Kit Defective Waste Toner Bottle Near Full Replace Missing OK Description Shows the status of paper are in the Paper Menu. • Tray 1 (...650-sheet-duo drawer must be installed in order for the duration of the print job. • If the same size and type of the toner cartridges Note: Replace Cartridge indicates the cartridge is empty, the job prints using the linked tray.
User Manual
Page 101
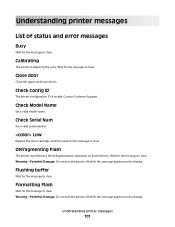
.... Check Serial Num Set a valid serial number. Wait for the message to clear. Contact Customer Support. Check Model Name Set a valid model name. Low Replace the toner cartridge, and then wait for the message to clear. Understanding printer messages 101 Check Config ID The printer configuration ID is adjusting the color. Close...
.... Check Serial Num Set a valid serial number. Wait for the message to clear. Contact Customer Support. Check Model Name Set a valid model name. Low Replace the toner cartridge, and then wait for the message to clear. Understanding printer messages 101 Check Config ID The printer configuration ID is adjusting the color. Close...

User Manual
Page 104
.... Ready The printer is offline while it configures settings. Unsupported USB device, please remove Remove the unrecognized USB device. Replace cartridge Replace the toner cartridge, and then press to flash. Tray Missing Insert the specified tray into the printer. Programming Flash Fonts and macros are being written to clear ...
.... Ready The printer is offline while it configures settings. Unsupported USB device, please remove Remove the unrecognized USB device. Replace cartridge Replace the toner cartridge, and then press to flash. Tray Missing Insert the specified tray into the printer. Programming Flash Fonts and macros are being written to clear ...

User Manual
Page 105
...to clear the message and continue printing. 31.yy Defective Cartridge Replace the defective toner cartridge with a new one. 31.yy Defective Imaging Kit Replace the defective imaging kit with a new one. 32.yy Replace Unsupported Cartridge Replace the unsupported toner cartridge with a supported one. 34 Short paper Try one or...• Press , and then press to print the contents of -Job command, a Form Feed command, or additional data. Waste Toner Box The waste toner bottle is waiting for an End-of the buffer. • Cancel the current print job. Waiting, too many events Wait for ...
...to clear the message and continue printing. 31.yy Defective Cartridge Replace the defective toner cartridge with a new one. 31.yy Defective Imaging Kit Replace the defective imaging kit with a new one. 32.yy Replace Unsupported Cartridge Replace the unsupported toner cartridge with a supported one. 34 Short paper Try one or...• Press , and then press to print the contents of -Job command, a Form Feed command, or additional data. Waste Toner Box The waste toner bottle is waiting for an End-of the buffer. • Cancel the current print job. Waiting, too many events Wait for ...

User Manual
Page 106
... reformat the affected text. • Press , and then press to save settings. Press , and then press to cancel printing. 40 Invalid refill, change cartridge Replace the toner cartridge with a new one or more of text or graphics on a page and deleting unnecessary downloaded fonts or macros. • Install additional printer memory. 39...
... reformat the affected text. • Press , and then press to save settings. Press , and then press to cancel printing. 40 Invalid refill, change cartridge Replace the toner cartridge with a new one or more of text or graphics on a page and deleting unnecessary downloaded fonts or macros. • Install additional printer memory. 39...
User Manual
Page 108
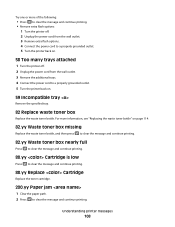
... a properly grounded outlet. 5 Turn the printer back on page 114. 82.yy Waste toner box missing Replace the waste toner bottle, and then press to clear the message and continue printing. 82.yy Waste toner box nearly full Press to clear the message and continue printing. 88.yy Cartridge is low... Press to clear the message and continue printing. 88.yy Replace Cartridge Replace the toner cartridge. 200.yy Paper jam 1 Clear the paper path. ...
... a properly grounded outlet. 5 Turn the printer back on page 114. 82.yy Waste toner box missing Replace the waste toner bottle, and then press to clear the message and continue printing. 82.yy Waste toner box nearly full Press to clear the message and continue printing. 88.yy Cartridge is low... Press to clear the message and continue printing. 88.yy Replace Cartridge Replace the toner cartridge. 200.yy Paper jam 1 Clear the paper path. ...
User Manual
Page 111
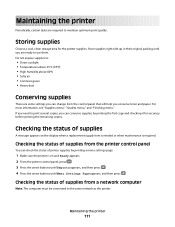
... tasks are some settings you can conserve supplies by printing a menu settings page: 1 Make sure the printer is on the display when a replacement supply item is needed or when maintenance is required. Do not expose supplies to use them. For more information, see "Supplies menu," "Quality...the printer control panel, press . 3 Press the arrow buttons until Reports appears, and then press . 4 Press the arrow buttons until you conserve toner and paper. Checking the status of supplies from the control panel that will help you are ready to : • Direct sunlight • Temperatures ...
... tasks are some settings you can conserve supplies by printing a menu settings page: 1 Make sure the printer is on the display when a replacement supply item is needed or when maintenance is required. Do not expose supplies to use them. For more information, see "Supplies menu," "Quality...the printer control panel, press . 3 Press the arrow buttons until Reports appears, and then press . 4 Press the arrow buttons until you conserve toner and paper. Checking the status of supplies from the control panel that will help you are ready to : • Direct sunlight • Temperatures ...

User Manual
Page 112
... and C543 series C544 series Maintaining the printer 112 Note: If you must replace the specified toner cartridge. In other countries or regions, visit the Lexmark Web Site at 1-800-539-6275 for printer supplies assume printing on letter- Ordering toner cartridges When 88 Cyan Cartridge Low, 88 Magenta Cartridge Low, 88 Yellow Cartridge...
... and C543 series C544 series Maintaining the printer 112 Note: If you must replace the specified toner cartridge. In other countries or regions, visit the Lexmark Web Site at 1-800-539-6275 for printer supplies assume printing on letter- Ordering toner cartridges When 88 Cyan Cartridge Low, 88 Magenta Cartridge Low, 88 Yellow Cartridge...
User Manual
Page 113
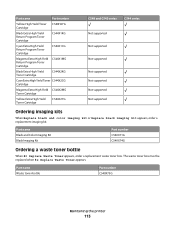
... Kit Black Imaging Kit Part number C540X71G C540X74G Ordering a waste toner bottle When 82 Replace Waste Toner appears, order a replacement waste toner box. The waste toner box must be replaced when 82 Replace Waste Toner appears. Part name Part number Yellow High Yield Toner C540H2YG Cartridge Black Extra High Yield Return Program Toner Cartridge C544X1KG Cyan Extra High Yield Return Program...
... Kit Black Imaging Kit Part number C540X71G C540X74G Ordering a waste toner bottle When 82 Replace Waste Toner appears, order a replacement waste toner box. The waste toner box must be replaced when 82 Replace Waste Toner appears. Part name Part number Yellow High Yield Toner C540H2YG Cartridge Black Extra High Yield Return Program Toner Cartridge C544X1KG Cyan Extra High Yield Return Program...

User Manual
Page 114
To reduce the risk of the printer might be hot. The printer will not continue printing until the waste toner bottle is replaced. 1 2 4 3 1 Top door 2 Waste toner bottle 3 Right side cover 4 Front door 1 Unpack the replacement waste toner bottle. 2 Grasp the front door at the side handholds, and then pull it toward you. CAUTION-HOT SURFACE: The inside of injury from a hot component, allow the surface to cool before touching. Maintaining the printer 114 Replacing supplies Replacing the waste toner bottle Replace the waste toner bottle when 82 Replace waste toner appears.
To reduce the risk of the printer might be hot. The printer will not continue printing until the waste toner bottle is replaced. 1 2 4 3 1 Top door 2 Waste toner bottle 3 Right side cover 4 Front door 1 Unpack the replacement waste toner bottle. 2 Grasp the front door at the side handholds, and then pull it toward you. CAUTION-HOT SURFACE: The inside of injury from a hot component, allow the surface to cool before touching. Maintaining the printer 114 Replacing supplies Replacing the waste toner bottle Replace the waste toner bottle when 82 Replace waste toner appears.
User Manual
Page 116
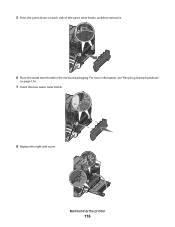
5 Press the green levers on page 136. 7 Insert the new waste toner bottle. 8 Replace the right side cover. Maintaining the printer 116 For more information, see "Recycling Lexmark products" on each side of the waste toner bottle, and then remove it. 6 Place the waste toner bottle in the enclosed packaging.
5 Press the green levers on page 136. 7 Insert the new waste toner bottle. 8 Replace the right side cover. Maintaining the printer 116 For more information, see "Recycling Lexmark products" on each side of the waste toner bottle, and then remove it. 6 Place the waste toner bottle in the enclosed packaging.

User Manual
Page 122
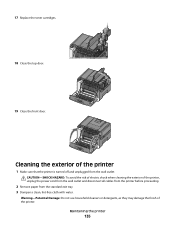
17 Replace the waste toner bottle. 18 Replace the right side cover. 19 Replace the toner cartridges. Maintaining the printer 122
17 Replace the waste toner bottle. 18 Replace the right side cover. 19 Replace the toner cartridges. Maintaining the printer 122

User Manual
Page 125
Warning-Potential Damage: Do not touch the underside of the waste toner bottle, and remove it. 6 Lift the blue levers on the imaging kit, and then pull it toward you. 7 Press down on the blue levers, grasp the green handles on the sides, and then pull the imaging kit out. Leave the packaging on the developer units. 9 Gently shake the yellow, cyan, magenta, and black developer units side to side. Maintaining the printer 125 This could damage the imaging kit. 8 Unpack the replacement black and color imaging kit. 5 Press the green levers on each side of the imaging kit.
Warning-Potential Damage: Do not touch the underside of the waste toner bottle, and remove it. 6 Lift the blue levers on the imaging kit, and then pull it toward you. 7 Press down on the blue levers, grasp the green handles on the sides, and then pull the imaging kit out. Leave the packaging on the developer units. 9 Gently shake the yellow, cyan, magenta, and black developer units side to side. Maintaining the printer 125 This could damage the imaging kit. 8 Unpack the replacement black and color imaging kit. 5 Press the green levers on each side of the imaging kit.

User Manual
Page 127
Maintaining the printer 127 14 Replace the waste toner bottle. 15 Replace the right side cover. 16 Replace the toner cartridges.
Maintaining the printer 127 14 Replace the waste toner bottle. 15 Replace the right side cover. 16 Replace the toner cartridges.
User Manual
Page 128
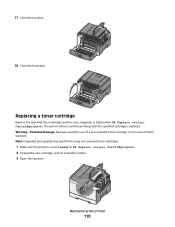
... appears. Note: Degraded print quality may result from using non-Lexmark toner cartridges. 1 Make sure the printer is replaced. The printer will not continue printing until the specified cartridge is on and Ready or 88 Replace Cartridge appears. 2 Unpack the new cartridge, and set it near the printer. 3 Open... the top door. K M C Y Maintaining the printer 128 Y C M K Warning-Potential Damage: Damage caused by use of a non-Lexmark toner cartridge is not covered under warranty....
... appears. Note: Degraded print quality may result from using non-Lexmark toner cartridges. 1 Make sure the printer is replaced. The printer will not continue printing until the specified cartridge is on and Ready or 88 Replace Cartridge appears. 2 Unpack the new cartridge, and set it near the printer. 3 Open... the top door. K M C Y Maintaining the printer 128 Y C M K Warning-Potential Damage: Damage caused by use of a non-Lexmark toner cartridge is not covered under warranty....

User Manual
Page 134
Maintaining the printer 134 15 Replace the waste toner bottle. 16 Replace the right side cover.
Maintaining the printer 134 15 Replace the waste toner bottle. 16 Replace the right side cover.
User Manual
Page 135
... printer is turned off and unplugged from the standard exit tray. 3 Dampen a clean, lint-free cloth with water. Cleaning the exterior of the printer. 17 Replace the toner cartridges. 18 Close the top door. 19 Close the front door.
... printer is turned off and unplugged from the standard exit tray. 3 Dampen a clean, lint-free cloth with water. Cleaning the exterior of the printer. 17 Replace the toner cartridges. 18 Close the top door. 19 Close the front door.

User Manual
Page 147
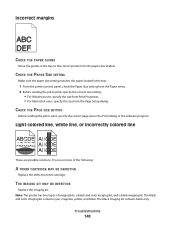
Gray background ABCDE ABCDE ABCDE CHECK THE TONER DARKNESS SETTING Select a lighter Toner Darkness setting: • From the printer control panel, change the setting from the Quality menu. • For Windows users, change the setting from Print Properties. &#.... • For Macintosh users, specify the size from the Print dialog. If Black and color imaging kit life warning orBlack imaging kit life warning appears, replace the imaging kit. Dark lines ABCDE ABCDE ABCDE The imaging kit may be defective. Try one or more of the following: CHECK THE GUIDES Move...
Gray background ABCDE ABCDE ABCDE CHECK THE TONER DARKNESS SETTING Select a lighter Toner Darkness setting: • From the printer control panel, change the setting from the Quality menu. • For Windows users, change the setting from Print Properties. &#.... • For Macintosh users, specify the size from the Print dialog. If Black and color imaging kit life warning orBlack imaging kit life warning appears, replace the imaging kit. Dark lines ABCDE ABCDE ABCDE The imaging kit may be defective. Try one or more of the following: CHECK THE GUIDES Move...
User Manual
Page 148
... line, or incorrectly colored line These are possible solutions. Note: The printer has two types of the following: A TONER CARTRIDGE MAY BE DEFECTIVE Replace the defective toner cartridge. THE IMAGING KIT MAY BE DEFECTIVE Replace the imaging kit. CHECK THE PAGE SIZE SETTING Before sending the job to the correct positions for the paper...
... line, or incorrectly colored line These are possible solutions. Note: The printer has two types of the following: A TONER CARTRIDGE MAY BE DEFECTIVE Replace the defective toner cartridge. THE IMAGING KIT MAY BE DEFECTIVE Replace the imaging kit. CHECK THE PAGE SIZE SETTING Before sending the job to the correct positions for the paper...


