Clearing Jams Guide
Page 1
...documentation. For more information, see the Card Stock & Label Guide available on the Lexmark Web site at www.lexmark.com/publications. • For detailed information about purchasing large quantities of the printer the numbers in the control panel menu. • Make sure all media must ...8226; Flex, fan, and straighten media before removing a tray. • Do not load the manual feeder while the printer is printing. The illustration shows the possible jam areas. 1 Upper door 2 Fuser cover 3 Inner door 4 Lower door 5 Standard tray (Tray 1) 6 Optional 550-sheet tray (Tray 2) 7 Exit...
...documentation. For more information, see the Card Stock & Label Guide available on the Lexmark Web site at www.lexmark.com/publications. • For detailed information about purchasing large quantities of the printer the numbers in the control panel menu. • Make sure all media must ...8226; Flex, fan, and straighten media before removing a tray. • Do not load the manual feeder while the printer is printing. The illustration shows the possible jam areas. 1 Upper door 2 Fuser cover 3 Inner door 4 Lower door 5 Standard tray (Tray 1) 6 Optional 550-sheet tray (Tray 2) 7 Exit...
Clearing Jams Guide
Page 2
... between an input "Jams under the sensor and the fuser photoconductors" on exit sensor page 4 "Jams under the fuser or fuser cover" on page 4 202.xx Paper Jam Jam after the fuser exit "Jams under and behind sensor the fuser" on page 5 "Clearing jams between the fuser and the standard exit bin" on page 5 203.xx... Paper Jam Jam in the duplex "Jams under the rollers page-turnaround area near the fuser" on page 5 230.xx Jam in the duplex area "Jams in the duplex Paper Jam area" on page 5 241.xx Jam in Tray 1 Paper Jam "...
... between an input "Jams under the sensor and the fuser photoconductors" on exit sensor page 4 "Jams under the fuser or fuser cover" on page 4 202.xx Paper Jam Jam after the fuser exit "Jams under and behind sensor the fuser" on page 5 "Clearing jams between the fuser and the standard exit bin" on page 5 203.xx... Paper Jam Jam in the duplex "Jams under the rollers page-turnaround area near the fuser" on page 5 230.xx Jam in the duplex area "Jams in the duplex Paper Jam area" on page 5 241.xx Jam in Tray 1 Paper Jam "...
Clearing Jams Guide
Page 4
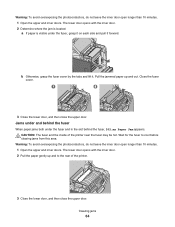
... Follow these instructions to remove jams under the fuser or the fuser cover, 201.xx Paper Jam appears. Close the fuser cover. 3 Close the lower door, and then close the upper door. CAUTION-HOT SURFACE: The fuser and the inside of the printer near the fuser may appear. 1 Open the upper and inner... doors. The lower door opens with the inner door. 2 Determine where the jam is located: a If paper is visible under the fuser, grasp it on each side and...
... Follow these instructions to remove jams under the fuser or the fuser cover, 201.xx Paper Jam appears. Close the fuser cover. 3 Close the lower door, and then close the upper door. CAUTION-HOT SURFACE: The fuser and the inside of the printer near the fuser may appear. 1 Open the upper and inner... doors. The lower door opens with the inner door. 2 Determine where the jam is located: a If paper is visible under the fuser, grasp it on each side and...
Clearing Jams Guide
Page 5
... the standard exit bin When the jammed paper is jammed under the fuser and in the standard exit bin, 203.xx Paper Jam appears. CAUTION-HOT SURFACE: The fuser and the inside of the printer. Grasp the paper, and pull it away from the bin. 3 Close the lower door, and then close the... area. Clearing jams in the duplex path Jams under the rollers near the fuser When paper is visible in the standard exit bin, 202.xx Paper Jam appears. Wait for the fuser to the rear of the printer near the fuser, 203.xx Paper Jam appears. 1 Open the upper door. 2 Grasp the paper on...
... the standard exit bin When the jammed paper is jammed under the fuser and in the standard exit bin, 203.xx Paper Jam appears. CAUTION-HOT SURFACE: The fuser and the inside of the printer. Grasp the paper, and pull it away from the bin. 3 Close the lower door, and then close the... area. Clearing jams in the duplex path Jams under the rollers near the fuser When paper is visible in the standard exit bin, 202.xx Paper Jam appears. Wait for the fuser to the rear of the printer near the fuser, 203.xx Paper Jam appears. 1 Open the upper door. 2 Grasp the paper on...
Troubleshooting Guide
Page 4
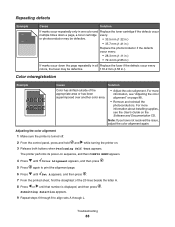
...The pages are formatted. The information in .). Repeating defects Example Cause Solution If marks occur repeatedly only in one color and multiple times down Replace the fuser if the page the defects occur repeatedly in all the pages print. 5 After the print quality test pages print,... MENU appears. 4 Press until that number is displayed, and then press . may have not resolved the issue, adjust the color alignment again. The printer performs its power-on page 4. • Remove and reinstall the photoconductors. Page that jammed does not reprint after you clear the...
...The pages are formatted. The information in .). Repeating defects Example Cause Solution If marks occur repeatedly only in one color and multiple times down Replace the fuser if the page the defects occur repeatedly in all the pages print. 5 After the print quality test pages print,... MENU appears. 4 Press until that number is displayed, and then press . may have not resolved the issue, adjust the color alignment again. The printer performs its power-on page 4. • Remove and reinstall the photoconductors. Page that jammed does not reprint after you clear the...
Troubleshooting Guide
Page 5
... you load in the Quality menu. Replace the transfer belt. Toner is On. Resetting the Printer appears briefly, followed by a clock, and then Ready appears. Replace the color cartridge causing the line. or worn. The media being used does not meet the... Photoconductors are Clean the printhead dirty. Replace the transfer belt. Transfer belt is defective Replace the fuser. Fuser is defective. Replace the toner cartridge causing the streaks. or worn. Turn Color Saver off. another tray. Streaked horizontal lines Example Cause Solution A toner cartridge is not damp...
... you load in the Quality menu. Replace the transfer belt. Toner is On. Resetting the Printer appears briefly, followed by a clock, and then Ready appears. Replace the color cartridge causing the line. or worn. The media being used does not meet the... Photoconductors are Clean the printhead dirty. Replace the transfer belt. Transfer belt is defective Replace the fuser. Fuser is defective. Replace the toner cartridge causing the streaks. or worn. Turn Color Saver off. another tray. Streaked horizontal lines Example Cause Solution A toner cartridge is not damp...
Troubleshooting Guide
Page 6
... for the media you are supported by the printer manufacturer. Photoconductor is defective. Transparency print quality is set to Transparency. Select a different toner darkness setting in the paper path. Photoconductor is worn or defective. Fuser is Replace the worn or defective. Solution Reinstall... Properties before sending the job to print. Replace the photoconductor. Use only transparencies recommended by the printer, the host computer, and the software application. Fuser is worn or defective. the paper tray. Transfer belt is worn or defective.
... for the media you are supported by the printer manufacturer. Photoconductor is defective. Transparency print quality is set to Transparency. Select a different toner darkness setting in the paper path. Photoconductor is worn or defective. Fuser is Replace the worn or defective. Solution Reinstall... Properties before sending the job to print. Replace the photoconductor. Use only transparencies recommended by the printer, the host computer, and the software application. Fuser is worn or defective. the paper tray. Transfer belt is worn or defective.
Troubleshooting Guide
Page 7
... Remove the toner cartridge from Normal to the proper positions for the size loaded. Printing presses, inkjet printers, and color laser printers create colors in this manner. Auto size sensing is set the Paper Size to A4. • Set the ...Paper Size to produce a large range of colors observed in nature. Blank pages Cause Solution Toner is CMYK color? Paper curl Solution Remove and then reinstall the photoconductor. Toner is worn or defective. The fuser...
... Remove the toner cartridge from Normal to the proper positions for the size loaded. Printing presses, inkjet printers, and color laser printers create colors in this manner. Auto size sensing is set the Paper Size to A4. • Set the ...Paper Size to produce a large range of colors observed in nature. Blank pages Cause Solution Toner is CMYK color? Paper curl Solution Remove and then reinstall the photoconductor. Toner is worn or defective. The fuser...
User's Guide
Page 5
......70 Ordering supplies...70 Ordering toner cartridges...71 Ordering a transfer belt...72 Ordering a waste toner box ...73 Ordering a fuser...73 Ordering photoconductors ...73 Moving the printer...73 Before moving the printer ...73 Moving the printer to another location ...74 Administrative support 75 Adjusting the brightness or contrast of the display 75 Disabling control panel...
......70 Ordering supplies...70 Ordering toner cartridges...71 Ordering a transfer belt...72 Ordering a waste toner box ...73 Ordering a fuser...73 Ordering photoconductors ...73 Moving the printer...73 Before moving the printer ...73 Moving the printer to another location ...74 Administrative support 75 Adjusting the brightness or contrast of the display 75 Disabling control panel...
User's Guide
Page 12
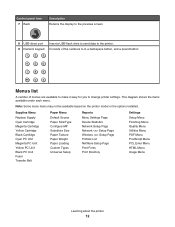
... Replace Supply Cyan Cartridge Magenta Cartridge Yellow Cartridge Black Cartridge Cyan PC Unit Magenta PC Unit Yellow PC Unit Black PC Unit Fuser Transfer Belt Paper Menu Default Source Paper Size/Type Configure MP Substitute Size Paper Texture Paper Weight Paper Loading Custom Types Universal...Print Directory Settings Setup Menu Finishing Menu Quality Menu Utilities Menu PDF Menu PostScript Menu PCL Emul Menu HTML Menu Image Menu Learning about the printer 12 Control panel item 7 Back Description Returns the display to the previous screen 8 USB direct port 9 Numeric keypad Insert a USB ...
... Replace Supply Cyan Cartridge Magenta Cartridge Yellow Cartridge Black Cartridge Cyan PC Unit Magenta PC Unit Yellow PC Unit Black PC Unit Fuser Transfer Belt Paper Menu Default Source Paper Size/Type Configure MP Substitute Size Paper Texture Paper Weight Paper Loading Custom Types Universal...Print Directory Settings Setup Menu Finishing Menu Quality Menu Utilities Menu PDF Menu PostScript Menu PCL Emul Menu HTML Menu Image Menu Learning about the printer 12 Control panel item 7 Back Description Returns the display to the previous screen 8 USB direct port 9 Numeric keypad Insert a USB ...
User's Guide
Page 38
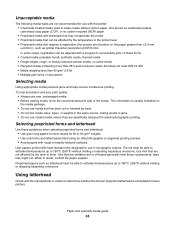
... does not meet these guidelines when selecting preprinted forms and letterhead: • Use grain long papers for best results for laser printers. Paper and specialty media guide 38 Use inks that are specifically designed for electrophotographic printing. User papers printed with heat-resistant... (±0.09 in.), such as optical character recognition (OCR) forms In some cases, registration can be affected by the temperature in the printer fuser • Preprinted media that requires a registration (the precise print location on the page) greater than 60 g/m2 (16 lb) •...
... does not meet these guidelines when selecting preprinted forms and letterhead: • Use grain long papers for best results for laser printers. Paper and specialty media guide 38 Use inks that are specifically designed for electrophotographic printing. User papers printed with heat-resistant... (±0.09 in.), such as optical character recognition (OCR) forms In some cases, registration can be affected by the temperature in the printer fuser • Preprinted media that requires a registration (the precise print location on the page) greater than 60 g/m2 (16 lb) •...

User's Guide
Page 58
203 203 202 230 201 250 200 241 200 242 Accessing jam areas Open doors and covers, and remove trays to access jam areas. The illustration shows the possible jam areas. 1 2 7 3 1 Upper door 2 Fuser cover 3 Inner door 4 Lower door 5 Standard tray (Tray 1) 4 6 5 Clearing jams 58
203 203 202 230 201 250 200 241 200 242 Accessing jam areas Open doors and covers, and remove trays to access jam areas. The illustration shows the possible jam areas. 1 2 7 3 1 Upper door 2 Fuser cover 3 Inner door 4 Lower door 5 Standard tray (Tray 1) 4 6 5 Clearing jams 58

User's Guide
Page 59
... under the photoconductors" on exit sensor page 62 "Jams under the fuser or fuser cover" on page 63 202.xx Paper Jam Jam after the fuser exit sensor "Jams under and behind the fuser" on page 64 "Clearing jams between the fuser and the standard exit bin" on page 65 203.xx Paper Jam Jam... in the duplex page-turnaround area "Jams under the rollers near the fuser" on page 65 230.xx Paper Jam Jam in the duplex area "Jams in the duplex area" on page 66 241.xx Paper Jam Jam ...
... under the photoconductors" on exit sensor page 62 "Jams under the fuser or fuser cover" on page 63 202.xx Paper Jam Jam after the fuser exit sensor "Jams under and behind the fuser" on page 64 "Clearing jams between the fuser and the standard exit bin" on page 65 203.xx Paper Jam Jam... in the duplex page-turnaround area "Jams under the rollers near the fuser" on page 65 230.xx Paper Jam Jam in the duplex area "Jams in the duplex area" on page 66 241.xx Paper Jam Jam ...

User's Guide
Page 63
...jammed paper out straight. CAUTION: The fuser and the inside of the printer near the fuser may appear. 1 Open the upper and inner doors. Clearing jams under the fuser or fuser cover Jams under the fuser or fuser cover When paper is jammed under the fuser or the fuser cover, 201.xx Paper Jam appears....4 Close the lower door, and then close the upper door. Wait for the fuser to dislodge the photoconductors. 3 If the paper will not move, remove all four photoconductors (for more information, see "Removing the color supplies" on page 51). Clearing jams 63 Note: Be careful not to cool ...
...jammed paper out straight. CAUTION: The fuser and the inside of the printer near the fuser may appear. 1 Open the upper and inner doors. Clearing jams under the fuser or fuser cover Jams under the fuser or fuser cover When paper is jammed under the fuser or the fuser cover, 201.xx Paper Jam appears....4 Close the lower door, and then close the upper door. Wait for the fuser to dislodge the photoconductors. 3 If the paper will not move, remove all four photoconductors (for more information, see "Removing the color supplies" on page 51). Clearing jams 63 Note: Be careful not to cool ...
User's Guide
Page 64
...: a If paper is visible under the fuser and in the slot behind the fuser When paper jams both under the fuser, grasp it on each side and pull it . b Otherwise, grasp the fuser cover by the tabs and lift it forward. CAUTION: The fuser and the inside of the printer. 3 Close the lower door, and then... close the upper door. Pull the jammed paper up and to cool before clearing jams from this area. Wait for the fuser to the rear of the printer near the fuser may be hot. The lower door opens with the inner door. 2 Pull the paper gently up and out.
...: a If paper is visible under the fuser and in the slot behind the fuser When paper jams both under the fuser, grasp it on each side and pull it . b Otherwise, grasp the fuser cover by the tabs and lift it forward. CAUTION: The fuser and the inside of the printer. 3 Close the lower door, and then... close the upper door. Pull the jammed paper up and to cool before clearing jams from this area. Wait for the fuser to the rear of the printer near the fuser may be hot. The lower door opens with the inner door. 2 Pull the paper gently up and out.

User's Guide
Page 65
... the standard exit bin When the jammed paper is jammed under the rollers near the fuser, 203.xx Paper Jam appears. 1 Open the upper door. 2 Grasp the paper on each side, and pull it out gently. 3 Close the upper door. Clearing ..., 203.xx Paper Jam appears. Clearing jams in the standard exit bin When paper jams in the duplex path Jams under the rollers near the fuser When paper is visible in the standard exit bin, 202.xx Paper Jam appears.
... the standard exit bin When the jammed paper is jammed under the rollers near the fuser, 203.xx Paper Jam appears. 1 Open the upper door. 2 Grasp the paper on each side, and pull it out gently. 3 Close the upper door. Clearing ..., 203.xx Paper Jam appears. Clearing jams in the standard exit bin When paper jams in the duplex path Jams under the rollers near the fuser When paper is visible in the standard exit bin, 202.xx Paper Jam appears.
User's Guide
Page 73
... Unit Life Warning appears, you need to the printer caused by the printer warranty. Part number C53030X C53034X Part name Photoconductor Unit Photoconductor Unit, Multi-Pack Moving the printer Before moving is on the sides of the printer to lift it down. When Replace Fuser appears, replace the fuser immediately. For installation information, see the documentation...
... Unit Life Warning appears, you need to the printer caused by the printer warranty. Part number C53030X C53034X Part name Photoconductor Unit Photoconductor Unit, Multi-Pack Moving the printer Before moving is on the sides of the printer to lift it down. When Replace Fuser appears, replace the fuser immediately. For installation information, see the documentation...
User's Guide
Page 88
... marks occur down the page repeatedly in all Replace the fuser if the defects occur every colors, the fuser may be defective. 116.2 mm (4.58 in.). Note: If you have not resolved the issue, adjust the color alignment again. Adjusting the color alignment 1 Make sure the printer is displayed, and then press . For more information about...
... marks occur down the page repeatedly in all Replace the fuser if the defects occur every colors, the fuser may be defective. 116.2 mm (4.58 in.). Note: If you have not resolved the issue, adjust the color alignment again. Adjusting the color alignment 1 Make sure the printer is displayed, and then press . For more information about...

User's Guide
Page 89
Solution Replace the color cartridge causing the line. Clean the printhead lenses. Replace the fuser. Fuser is defective. Dark lines Example ABCDE ABCDE ABCDE Cause Toner cartridge(s), photoconductor, or transfer belt is defective or worn. Transfer belt is defective, empty, or worn. Resetting the Printer appears briefly, followed by a clock, and then Ready appears. Printhead...
Solution Replace the color cartridge causing the line. Clean the printhead lenses. Replace the fuser. Fuser is defective. Dark lines Example ABCDE ABCDE ABCDE Cause Toner cartridge(s), photoconductor, or transfer belt is defective or worn. Transfer belt is defective, empty, or worn. Resetting the Printer appears briefly, followed by a clock, and then Ready appears. Printhead...

User's Guide
Page 91
..., or RGB Contrast setting from a fresh package high humidity. Transparency print quality is worn or defective. Fuser is poor Cause Solution You are using transparencies that do not meet Make sure the Paper Type and the printer specifications. Replace the transfer belt. into the paper tray. A toner cartridge is worn or defective...
..., or RGB Contrast setting from a fresh package high humidity. Transparency print quality is worn or defective. Fuser is poor Cause Solution You are using transparencies that do not meet Make sure the Paper Type and the printer specifications. Replace the transfer belt. into the paper tray. A toner cartridge is worn or defective...


