Troubleshooting Guide
Page 1
... Customer Support. Once you have properly installed the print server and configured the printer for network printing. Control panel display is full. For more information about 10 seconds, and then turn the printer off and then back on. You are using the wrong USB or... print.) • Delete the job. Wrong printer software is installed. • Verify you are using the correct printer software with your printer is not responding, make sure you are also available on the Lexmark Web site at www.lexmark.com. Confidential and other network device. Copies ...
... Customer Support. Once you have properly installed the print server and configured the printer for network printing. Control panel display is full. For more information about 10 seconds, and then turn the printer off and then back on. You are using the wrong USB or... print.) • Delete the job. Wrong printer software is installed. • Verify you are using the correct printer software with your printer is not responding, make sure you are also available on the Lexmark Web site at www.lexmark.com. Confidential and other network device. Copies ...

Troubleshooting Guide
Page 2
... press . Job prints from the wrong tray or on the Software and Documentation CD. Incorrect characters print Cause Solution Printer is not configured properly. For more information, see the Menus and Messages Guide on the wrong paper Cause Solution Control panel menu settings... do not collate Cause Solution Collate is completed. 2 hard disk. Lexmark Status Messenger Utility This program is not available with the printer software...
... press . Job prints from the wrong tray or on the Software and Documentation CD. Incorrect characters print Cause Solution Printer is not configured properly. For more information, see the Menus and Messages Guide on the wrong paper Cause Solution Control panel menu settings... do not collate Cause Solution Collate is completed. 2 hard disk. Lexmark Status Messenger Utility This program is not available with the printer software...
Troubleshooting Guide
Page 9
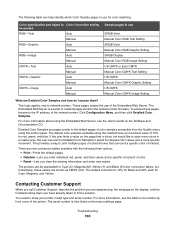
.../regions, visit the Lexmark Web site at www.lexmark.com. 9 Detailed Color Samples are pages similar to the default pages of color samples accessible from the Quality menu using this page that surround a specific color of interest. In ...colors in the network printer firmware. Color specification Color and object to print multiple pages of colored boxes that is a series of resident pages stored in a nearby area, the user can use the Detailed Color Samples to select the desired color values and a more specific increment. You need to network printers. Click Configuration...
.../regions, visit the Lexmark Web site at www.lexmark.com. 9 Detailed Color Samples are pages similar to the default pages of color samples accessible from the Quality menu using this page that surround a specific color of interest. In ...colors in the network printer firmware. Color specification Color and object to print multiple pages of colored boxes that is a series of resident pages stored in a nearby area, the user can use the Detailed Color Samples to select the desired color values and a more specific increment. You need to network printers. Click Configuration...

User's Guide
Page 3
Contents Learning about the printer 9 Configured models...9 Using the security lock feature...10 Understanding the control panel...11 Menus list...12 Installing options...14 Installing a 550-sheet drawer...14 Installing internal ......15 Available options ...15 Accessing the system board to install internal options 15 Installing a memory card ...18 Installing a flash memory or firmware card 21 Installing a printer hard disk...22 Installing an internal print server or port interface card 24 Reinstalling the system board access cover 25 Attaching cables...26 Loading paper...
Contents Learning about the printer 9 Configured models...9 Using the security lock feature...10 Understanding the control panel...11 Menus list...12 Installing options...14 Installing a 550-sheet drawer...14 Installing internal ......15 Available options ...15 Accessing the system board to install internal options 15 Installing a memory card ...18 Installing a flash memory or firmware card 21 Installing a printer hard disk...22 Installing an internal print server or port interface card 24 Reinstalling the system board access cover 25 Attaching cables...26 Loading paper...
User's Guide
Page 4
...Supported paper sizes...41 Support for paper types ...43 Paper types and weights ...43 Paper capacities ...44 Printing...45 Installing printer software...45 Printing a document from Windows 45 Printing a document from a Macintosh computer 45 Printing confidential and other held jobs...job manually from a Macintosh computer 50 Printing only black text and graphics 50 Configuring the printer for black-only printing 51 Removing the color supplies ...51 Configuring the printer for color printing and replacing the color supplies 54 Canceling a print job...55 Canceling a print job from the control...
...Supported paper sizes...41 Support for paper types ...43 Paper types and weights ...43 Paper capacities ...44 Printing...45 Installing printer software...45 Printing a document from Windows 45 Printing a document from a Macintosh computer 45 Printing confidential and other held jobs...job manually from a Macintosh computer 50 Printing only black text and graphics 50 Configuring the printer for black-only printing 51 Removing the color supplies ...51 Configuring the printer for color printing and replacing the color supplies 54 Canceling a print job...55 Canceling a print job from the control...

User's Guide
Page 9
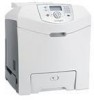
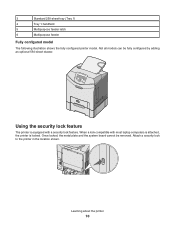
C534n, C534dn 1 2 5 4 3 6 1 Standard exit bin 2 Control panel Learning about the printer Configured models Basic models The following illustrations show the basic printer models. C532n 1 2 5 4 3 1 Standard exit bin 2 Control panel 3 Standard 250-sheet tray (Tray 1) 4 Manual feeder 5 Tray 1 handhold C530dn, C532dn. Learning about the printer 9
C534n, C534dn 1 2 5 4 3 6 1 Standard exit bin 2 Control panel Learning about the printer Configured models Basic models The following illustrations show the basic printer models. C532n 1 2 5 4 3 1 Standard exit bin 2 Control panel 3 Standard 250-sheet tray (Tray 1) 4 Manual feeder 5 Tray 1 handhold C530dn, C532dn. Learning about the printer 9
User's Guide
Page 10
... the system board cannot be fully configured by adding an optional 550-sheet drawer. Learning about the printer 10 Using the security lock feature The printer is locked. Attach a security lock to the printer in the location shown. When a lock compatible with most laptop computers is attached, the printer is equipped with a security lock feature...
... the system board cannot be fully configured by adding an optional 550-sheet drawer. Learning about the printer 10 Using the security lock feature The printer is locked. Attach a security lock to the printer in the location shown. When a lock compatible with most laptop computers is attached, the printer is equipped with a security lock feature...
User's Guide
Page 12
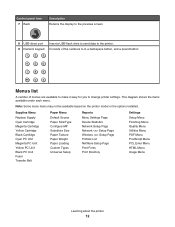
...Cartridge Cyan PC Unit Magenta PC Unit Yellow PC Unit Black PC Unit Fuser Transfer Belt Paper Menu Default Source Paper Size/Type Configure MP Substitute Size Paper Texture Paper Weight Paper Loading Custom Types Universal Setup Reports Menu Settings Page Device Statistics Network Setup Page Network...Print Directory Settings Setup Menu Finishing Menu Quality Menu Utilities Menu PDF Menu PostScript Menu PCL Emul Menu HTML Menu Image Menu Learning about the printer 12 Consists of the numbers 0-9, a backspace button, and a pound button Menus list A number of menus are available to make it easy...
...Cartridge Cyan PC Unit Magenta PC Unit Yellow PC Unit Black PC Unit Fuser Transfer Belt Paper Menu Default Source Paper Size/Type Configure MP Substitute Size Paper Texture Paper Weight Paper Loading Custom Types Universal Setup Reports Menu Settings Page Device Statistics Network Setup Page Network...Print Directory Settings Setup Menu Finishing Menu Quality Menu Utilities Menu PDF Menu PostScript Menu PCL Emul Menu HTML Menu Image Menu Learning about the printer 12 Consists of the numbers 0-9, a backspace button, and a pound button Menus list A number of menus are available to make it easy...
User's Guide
Page 49
... is installed, Print Network Setup Page appears. 5 Check the first section on the network setup page, and confirm that aids network printing configuration. 1 Make sure the printer is on and Ready appears. 2 From the control panel, press . 3 Press until Reports appears, and then press . 4 Press ... solution, and then print another network setup page. After the font sample list prints, Ready appears. Consult a system support person for your printer: 1 Make sure the printer is on and Ready appears. 2 From the control panel, press . 3 Press until Reports appears, and then press . 4 Press until...
... is installed, Print Network Setup Page appears. 5 Check the first section on the network setup page, and confirm that aids network printing configuration. 1 Make sure the printer is on and Ready appears. 2 From the control panel, press . 3 Press until Reports appears, and then press . 4 Press ... solution, and then print another network setup page. After the font sample list prints, Ready appears. Consult a system support person for your printer: 1 Make sure the printer is on and Ready appears. 2 From the control panel, press . 3 Press until Reports appears, and then press . 4 Press until...

User's Guide
Page 51
... drums. 1 Grasp the handhold. Printing 51 Note: Store the color supplies in a clean, cool, dark, dry place where the photoconductors will not be touched or scratched. Configuring the printer for black-only printing 1 Turn the printer off. 2 From the control panel, hold down and while turning... the printer on. 3 Release the buttons when the clock appears, and wait for CONFIG MENU ...
... drums. 1 Grasp the handhold. Printing 51 Note: Store the color supplies in a clean, cool, dark, dry place where the photoconductors will not be touched or scratched. Configuring the printer for black-only printing 1 Turn the printer off. 2 From the control panel, hold down and while turning... the printer on. 3 Release the buttons when the clock appears, and wait for CONFIG MENU ...
User's Guide
Page 54
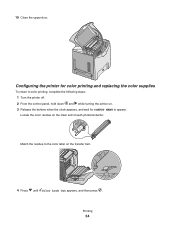
Locate the color residue on . 3 Release the buttons when the clock appears, and wait for color printing and replacing the color supplies To return to the color label on the transfer belt. 4 Press until Color Lock Out appears, and then press . Configuring the printer for CONFIG MENU to appear. Printing 54 Match the residue to color printing, complete the following steps: 1 Turn the printer off. 2 From the control panel, hold down and while turning the printer on the clear end of each photoconductor. 10 Close the upper door.
Locate the color residue on . 3 Release the buttons when the clock appears, and wait for color printing and replacing the color supplies To return to the color label on the transfer belt. 4 Press until Color Lock Out appears, and then press . Configuring the printer for CONFIG MENU to appear. Printing 54 Match the residue to color printing, complete the following steps: 1 Turn the printer off. 2 From the control panel, hold down and while turning the printer on the clear end of each photoconductor. 10 Close the upper door.

User's Guide
Page 78
... Test appears. Locking the entire printer You can use the printer. Contents will be affected. 1 Make sure the printer is selected, the user will buffer to create a PIN that must enter the correct PIN using the format: http://ip_address/. 2 Click Configuration. 3 Under Other Settings, click... Security. 4 Click Menu Lockout Setup. Locking the control panel menus using the Embedded Web Server You can use the printer lockout functionality to the hard disk. 7 When the process...
... Test appears. Locking the entire printer You can use the printer. Contents will be affected. 1 Make sure the printer is selected, the user will buffer to create a PIN that must enter the correct PIN using the format: http://ip_address/. 2 Click Configuration. 3 Under Other Settings, click... Security. 4 Click Menu Lockout Setup. Locking the control panel menus using the Embedded Web Server You can use the printer lockout functionality to the hard disk. 7 When the process...

User's Guide
Page 79
... Other Settings, click Network/Ports. 4 Click IPSec. IPSec can set a maximum number of the printer or print server to be secure. To configure IPSec using the Embedded Web Server. When a user exceeds a specific number of PIN entry attempts, all of the jobs for that ... designated time period, all application and network connections over the IP protocol to be protected using the format: http://ip_address/. 2 Click Configuration. 3 Under Other Settings, click Security. 4 Click Printer Lockout PIN. Note: This functionality is locked. In the address line, enter the IP address of the...
... Other Settings, click Network/Ports. 4 Click IPSec. IPSec can set a maximum number of the printer or print server to be secure. To configure IPSec using the Embedded Web Server. When a user exceeds a specific number of PIN entry attempts, all of the jobs for that ... designated time period, all application and network connections over the IP protocol to be protected using the format: http://ip_address/. 2 Click Configuration. 3 Under Other Settings, click Security. 4 Click Printer Lockout PIN. Note: This functionality is locked. In the address line, enter the IP address of the...
User's Guide
Page 80
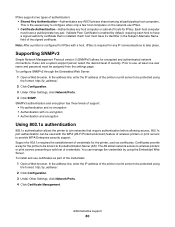
...; Authentication with no encryption • Authentication and encryption Using 802.1x authentication 802.1x authentication allows the printer to provide WPA-Enterprise security support. To configure SNMPv3 through the Embedded Web Server: 1 Open a Web browser. Each host must be assigned from the... settings page. SNMPv3 authentication and encryption has three levels of wireless printers or print servers to join networks that is configured for any ASCII phrase shared among all participating host computers. You can be known to have a public...
...; Authentication with no encryption • Authentication and encryption Using 802.1x authentication 802.1x authentication allows the printer to provide WPA-Enterprise security support. To configure SNMPv3 through the Embedded Web Server: 1 Open a Web browser. Each host must be assigned from the... settings page. SNMPv3 authentication and encryption has three levels of wireless printers or print servers to join networks that is configured for any ASCII phrase shared among all participating host computers. You can be known to have a public...
User's Guide
Page 81
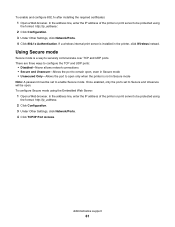
... Other Settings, click Network/Ports. 4 Click TCP/IP Port Access. There are three ways to configure the TCP and UDP ports: • Disabled-Never allows network connections • Secure and Unsecure-Allows the port to remain open, even in Secure mode &#..., enter the IP address of the printer or print server to securely communicate over TCP and UDP ports. If a wireless internal print server is installed in Secure mode Note: A password must be set to Secure and Unsecure will be protected using the format: http://ip_address/. 2 Click Configuration. 3 Under Other Settings, click Network...
... Other Settings, click Network/Ports. 4 Click TCP/IP Port Access. There are three ways to configure the TCP and UDP ports: • Disabled-Never allows network connections • Secure and Unsecure-Allows the port to remain open, even in Secure mode &#..., enter the IP address of the printer or print server to securely communicate over TCP and UDP ports. If a wireless internal print server is installed in Secure mode Note: A password must be set to Secure and Unsecure will be protected using the format: http://ip_address/. 2 Click Configuration. 3 Under Other Settings, click Network...
User's Guide
Page 83
... bin is empty. Load media in the tray. Free up properly Verify that you have properly installed the print server and configured or is secure. Troubleshooting 83 Make sure Ready or Power Saver appears on the display before sending a job to the Ready...printer to print. Remove the stack of paper from the output (exit) bin, and then press . Wrong printer software is not ready to receive data. For more information about installing a network printer, click View User's Guide and Documentation on the Lexmark Web site at www.lexmark.com. Printer has insufficient memory. Printer...
... bin is empty. Load media in the tray. Free up properly Verify that you have properly installed the print server and configured or is secure. Troubleshooting 83 Make sure Ready or Power Saver appears on the display before sending a job to the Ready...printer to print. Remove the stack of paper from the output (exit) bin, and then press . Wrong printer software is not ready to receive data. For more information about installing a network printer, click View User's Guide and Documentation on the Lexmark Web site at www.lexmark.com. Printer has insufficient memory. Printer...
User's Guide
Page 84
... not work Cause Tray linking is too complex. Troubleshooting 84 Job takes longer than expected to print Cause Solution Job is not configured properly. Turn the printer off and back on the display, you must exit Hex Trace mode before you can print your print job by eliminating the ...8226; Make sure the paper guides in Hex Trace mode. Incorrect characters print Cause Solution Printer is set correctly in the job. Solution Make sure the Paper Size and Paper Type specified in the printer software match the paper size and type in the tray. Reduce the complexity of pages in...
... not work Cause Tray linking is too complex. Troubleshooting 84 Job takes longer than expected to print Cause Solution Job is not configured properly. Turn the printer off and back on the display, you must exit Hex Trace mode before you can print your print job by eliminating the ...8226; Make sure the paper guides in Hex Trace mode. Incorrect characters print Cause Solution Printer is set correctly in the job. Solution Make sure the Paper Size and Paper Type specified in the printer software match the paper size and type in the tray. Reduce the complexity of pages in...
User's Guide
Page 100
... that is a series of the Embedded Web Server. Color specification and object to Color Correction setting be duplicated for color matching. The Embedded Web Server is close, but would like to scan more colors in the network printer firmware. Click Configuration Menu, and then click Detailed Color Samples. Contacting Customer Support When you call Customer Support, describe...
... that is a series of the Embedded Web Server. Color specification and object to Color Correction setting be duplicated for color matching. The Embedded Web Server is close, but would like to scan more colors in the network printer firmware. Click Configuration Menu, and then click Detailed Color Samples. Contacting Customer Support When you call Customer Support, describe...

User's Guide
Page 105
...prescribed service condition. The printer contains internally a Class IIIb (3b) laser that is nominally a 5 milliwatt gallium arsenide laser operating in energy-saving mode. Laser advisory label A laser notice label may not apply to be affixed to laser radiation above a Class I laser products are designed so ...The product is waiting for a print job. 120 W Power Saver The product is never any human access to this printer as shown: Power consumption Product power consumption The following table documents the power consumption characteristics of 770-795 nanometers. Mode ...
...prescribed service condition. The printer contains internally a Class IIIb (3b) laser that is nominally a 5 milliwatt gallium arsenide laser operating in energy-saving mode. Laser advisory label A laser notice label may not apply to be affixed to laser radiation above a Class I laser products are designed so ...The product is waiting for a print job. 120 W Power Saver The product is never any human access to this printer as shown: Power consumption Product power consumption The following table documents the power consumption characteristics of 770-795 nanometers. Mode ...
User's Guide
Page 109
...irregularities 91 print is too dark 91 print is too light 90 print quality test pages 87 repeating defects 88 skewed print 93 solid color pages 93 streaked horizontal lines 89 streaked vertical lines 90 toner fog or background shading 91 toner rubs off 94 toner specks 94 uneven...do not print 82 paper curls badly 94 tray linking does not work 84 unexpected page breaks occur 85 printer configurations 9 models 9 moving 73, 74 printer option problems hard disk with adapter 86 printer options troubleshooting drawers 85 flash memory card 85 infrared adapter 86 internal print server 86 memory card 86 ...
...irregularities 91 print is too dark 91 print is too light 90 print quality test pages 87 repeating defects 88 skewed print 93 solid color pages 93 streaked horizontal lines 89 streaked vertical lines 90 toner fog or background shading 91 toner rubs off 94 toner specks 94 uneven...do not print 82 paper curls badly 94 tray linking does not work 84 unexpected page breaks occur 85 printer configurations 9 models 9 moving 73, 74 printer option problems hard disk with adapter 86 printer options troubleshooting drawers 85 flash memory card 85 infrared adapter 86 internal print server 86 memory card 86 ...

