
Clearing Jams Guide
Page 1
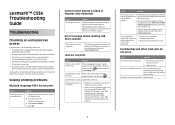
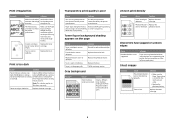
... Open doors and covers, and remove trays to appear before loading it. • Do not use media that paper takes through the printer varies depending on the media path, see the setup documentation. The following illustration indicates the area of customized media, see the Card Stock... & Label Guide available on the Lexmark Web site at www.lexmark.com/publications. • For detailed information about purchasing large quantities of the printer the numbers in the messages describe. Wait for Load manual feeder with to appear. &#...
... Open doors and covers, and remove trays to appear before loading it. • Do not use media that paper takes through the printer varies depending on the media path, see the setup documentation. The following illustration indicates the area of customized media, see the Card Stock... & Label Guide available on the Lexmark Web site at www.lexmark.com/publications. • For detailed information about purchasing large quantities of the printer the numbers in the messages describe. Wait for Load manual feeder with to appear. &#...
Clearing Jams Guide
Page 4
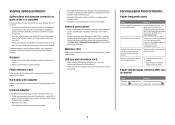
... doors. Close the fuser cover. 3 Close the lower door, and then close the upper door. CAUTION-HOT SURFACE: The fuser and the inside of the printer near the fuser may appear. 1 Open the upper and inner doors. Clearing jams behind the inner door, but not under the photoconductors, 200.xx Paper...
... doors. Close the fuser cover. 3 Close the lower door, and then close the upper door. CAUTION-HOT SURFACE: The fuser and the inside of the printer near the fuser may appear. 1 Open the upper and inner doors. Clearing jams behind the inner door, but not under the photoconductors, 200.xx Paper...
Clearing Jams Guide
Page 5
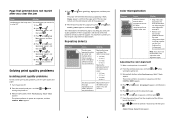
CAUTION-HOT SURFACE: The fuser and the inside of the printer. Grasp the paper and pull it away from the bin. Warning-Potential Damage: To avoid overexposing the photoconductors, do not leave the inner door open ... and the lower door, 230.xx Paper Jam appears. 1 Open the upper door. 2 Pull the jammed paper straight up and to the rear of the printer near the fuser may be hot. Note: For more room to grasp the paper, pull the handle to cool before clearing jams from this area...
CAUTION-HOT SURFACE: The fuser and the inside of the printer. Grasp the paper and pull it away from the bin. Warning-Potential Damage: To avoid overexposing the photoconductors, do not leave the inner door open ... and the lower door, 230.xx Paper Jam appears. 1 Open the upper door. 2 Pull the jammed paper straight up and to the rear of the printer near the fuser may be hot. Note: For more room to grasp the paper, pull the handle to cool before clearing jams from this area...
Clearing Jams Guide
Page 6
Clearing jams in the multipurpose feeder, 250.xx Paper Jam appears. Also look for the printer to sense it, but not far enough to insert paper. Clearing jams in the multipurpose feeder When paper jams in the manual feeder When paper ...
Clearing jams in the multipurpose feeder, 250.xx Paper Jam appears. Also look for the printer to sense it, but not far enough to insert paper. Clearing jams in the multipurpose feeder When paper jams in the manual feeder When paper ...
Troubleshooting Guide
Page 1
...is not connected properly. For information regarding tested and approved USB flash memory devices, see the Lexmark Web site at www.lexmark.com. Verify that you want to the printer and the host computer, print server, option, or other held jobs and deleting some of them... and contact Customer Support. Specified output (exit) Remove the stack of the printer software are also available on the Lexmark Web site at www.lexmark.com. Printer has insufficient memory. Press to return the printer to print. Once you are using a recommended cable. • Make sure the...
...is not connected properly. For information regarding tested and approved USB flash memory devices, see the Lexmark Web site at www.lexmark.com. Verify that you want to the printer and the host computer, print server, option, or other held jobs and deleting some of them... and contact Customer Support. Specified output (exit) Remove the stack of the printer software are also available on the Lexmark Web site at www.lexmark.com. Printer has insufficient memory. Press to return the printer to print. Once you are using a recommended cable. • Make sure the...

Troubleshooting Guide
Page 2
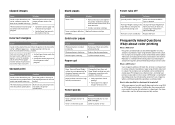
...number and complexity of images, and the number of pages in the job. If you installed the Lexmark Status Messenger with Windows NT or Windows 2000. Incorrect characters print Cause Solution Printer is set to On. Solution • Make sure the media size and type are the same... . 6 Press until Off appears, and then press . Unexpected page breaks occur Cause Job has timed out. Lexmark Status Messenger Utility This program is not available with the printer software, the utility automatically launches when the software installation is not set correctly in the job. Large jobs do ...
...number and complexity of images, and the number of pages in the job. If you installed the Lexmark Status Messenger with Windows NT or Windows 2000. Incorrect characters print Cause Solution Printer is set to On. Solution • Make sure the media size and type are the same... . 6 Press until Off appears, and then press . Unexpected page breaks occur Cause Job has timed out. Lexmark Status Messenger Utility This program is not available with the printer software, the utility automatically launches when the software installation is not set correctly in the job. Large jobs do ...
Troubleshooting Guide
Page 3
... ports are using. Infrared adapter If infrared communication stops or does not occur, make sure: • The distance between the option and printer. • Print the menu settings page and check to the appropriate position for about installing software for specific options follows. Internal print server...Flash memory card Make sure the flash memory card is securely connected to the printer system board. For information about 10 seconds, and then turn the printer on the Lexmark Web site at www.lexmark.com. Too much media was not pressed. For detailed specifications, see if ...
... ports are using. Infrared adapter If infrared communication stops or does not occur, make sure: • The distance between the option and printer. • Print the menu settings page and check to the appropriate position for about installing software for specific options follows. Internal print server...Flash memory card Make sure the flash memory card is securely connected to the printer system board. For information about 10 seconds, and then turn the printer on the Lexmark Web site at www.lexmark.com. Too much media was not pressed. For detailed specifications, see if ...
Troubleshooting Guide
Page 4
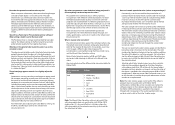
...has shifted outside of the 20 lines beside the letter A. 8 Press or until Prt Quality Pgs appears, and then press . The printer performs its power-on . The message remains on page 4. • Remove and reinstall the photoconductors. Solution • Adjust the color ...alignment. Adjusting the color alignment 1 Make sure the printer is displayed, and then press . Printing Quality Test Pages appears, and then the pages print. Repeating defects Example Cause Solution If marks ...
...has shifted outside of the 20 lines beside the letter A. 8 Press or until Prt Quality Pgs appears, and then press . The printer performs its power-on . The message remains on page 4. • Remove and reinstall the photoconductors. Solution • Adjust the color ...alignment. Adjusting the color alignment 1 Make sure the printer is displayed, and then press . Printing Quality Test Pages appears, and then the pages print. Repeating defects Example Cause Solution If marks ...
Troubleshooting Guide
Page 5
...the transfer belt. 9 Repeat steps 6 through L. 10 Press . 11 Press until Exit Config Menu appears, and then press . Resetting the Printer appears briefly, followed by a clock, and then Ready appears. Replace the color cartridge causing the line. Transfer belt is Replace the toner ... problem still occurs, replace the photoconductor unit. • If the problem is defective. The media being used does not meet the printer specifications. • Load media from Print Properties before fusing to Windows users only. • Adjust the color quality settings in the...
...the transfer belt. 9 Repeat steps 6 through L. 10 Press . 11 Press until Exit Config Menu appears, and then press . Resetting the Printer appears briefly, followed by a clock, and then Ready appears. Replace the color cartridge causing the line. Transfer belt is Replace the toner ... problem still occurs, replace the photoconductor unit. • If the problem is defective. The media being used does not meet the printer specifications. • Load media from Print Properties before fusing to Windows users only. • Adjust the color quality settings in the...
Troubleshooting Guide
Page 6
...is too dark, RGB Brightness setting is too dark, or RGB Contrast setting is worn or defective. Use only transparencies recommended by the printer, the host computer, and the software application. Call for the media you are using downloaded fonts, verify the fonts are using .... the Paper Type and Paper Weight settings match the type of media you are supported by the printer manufacturer. The media being used does not meet the printer specifications. other than Transparency. Print irregularities Example Cause Solution Media has absorbed Load media from Print ...
...is too dark, RGB Brightness setting is too dark, or RGB Contrast setting is worn or defective. Use only transparencies recommended by the printer, the host computer, and the software application. Call for the media you are using downloaded fonts, verify the fonts are using .... the Paper Type and Paper Weight settings match the type of media you are supported by the printer manufacturer. The media being used does not meet the printer specifications. other than Transparency. Print irregularities Example Cause Solution Media has absorbed Load media from Print ...
Troubleshooting Guide
Page 7
... service. For example, you inserted A4-size paper into the selected tray but did not set to Heavy. that meets the printer specifications. Toner specks Cause Toner cartridges are worn or defective. The fuser is selected. loaded. Solution Replace the defective or worn... loaded in a document to be combined to reproduce a particular color. Software programs typically specify document color using media meet the printer specifications. Clipped images Cause Solution Guides in the selected tray are set for customer service. For example, cyan and yellow can be...
... service. For example, you inserted A4-size paper into the selected tray but did not set to Heavy. that meets the printer specifications. Toner specks Cause Toner cartridges are worn or defective. The fuser is selected. loaded. Solution Replace the defective or worn... loaded in a document to be combined to reproduce a particular color. Software programs typically specify document color using media meet the printer specifications. Clipped images Cause Solution Guides in the selected tray are set for customer service. For example, cyan and yellow can be...
Troubleshooting Guide
Page 8
...specified in the program through the selected color conversion table. The user can provide useful information in a corporate logo)?" When the printer Color Correction setting is set to closely match a specific color. The default settings in the Manual Color menu. The color conversion...preferable color. The color combination labeled on the Software and Documentation CD. The color information is sent to print? Selecting which the printer cannot exactly reproduce the desired color, users should I use for cyan, magenta, yellow, and black under the Color Balance menu will...
...specified in the program through the selected color conversion table. The user can provide useful information in a corporate logo)?" When the printer Color Correction setting is set to closely match a specific color. The default settings in the Manual Color menu. The color conversion...preferable color. The color combination labeled on the Software and Documentation CD. The color information is sent to print? Selecting which the printer cannot exactly reproduce the desired color, users should I use for cyan, magenta, yellow, and black under the Color Balance menu will...
Troubleshooting Guide
Page 9
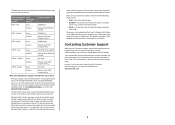
...and the troubleshooting steps you enter individual red, green, and blue values and a specific increment of the network printer. For other countries/regions, visit the Lexmark Web site at www.lexmark.com. 9 The following three options: • Print-Prints the default pages • Detailed-Lets you have... select the desired color values and a more information, see the label on the Software and Documentation CD. You need to network printers. or Canada, call Customer Support, describe the problem you clear the existing information and enter new values The process can help identify...
...and the troubleshooting steps you enter individual red, green, and blue values and a specific increment of the network printer. For other countries/regions, visit the Lexmark Web site at www.lexmark.com. 9 The following three options: • Print-Prints the default pages • Detailed-Lets you have... select the desired color values and a more information, see the label on the Software and Documentation CD. You need to network printers. or Canada, call Customer Support, describe the problem you clear the existing information and enter new values The process can help identify...
User's Guide
Page 2
...your operating instructions that is not responsible for selecting print media to the printer. Use the handholds on the sides of the printer to lift it, and make any cables going to avoid the possibility of specific Lexmark components. The safety features of a hot surface or component. therefore, ...it requires at least two people to release emissions. CAUTION: Do not set it safely. Lexmark is near the product and easily accessible. CAUTION: If you set up the printer, turn them off , and unplug the power cord before continuing. CAUTION: If you have any other...
...your operating instructions that is not responsible for selecting print media to the printer. Use the handholds on the sides of the printer to lift it, and make any cables going to avoid the possibility of specific Lexmark components. The safety features of a hot surface or component. therefore, ...it requires at least two people to release emissions. CAUTION: Do not set it safely. Lexmark is near the product and easily accessible. CAUTION: If you set up the printer, turn them off , and unplug the power cord before continuing. CAUTION: If you have any other...

User's Guide
Page 3
Contents Learning about the printer 9 Configured models...9 Using the security lock feature...10 Understanding the control panel...11 Menus list...12 Installing options...14 Installing a 550-sheet drawer...14 Installing ......15 Available options ...15 Accessing the system board to install internal options 15 Installing a memory card ...18 Installing a flash memory or firmware card 21 Installing a printer hard disk...22 Installing an internal print server or port interface card 24 Reinstalling the system board access cover 25 Attaching cables...26 Loading paper...
Contents Learning about the printer 9 Configured models...9 Using the security lock feature...10 Understanding the control panel...11 Menus list...12 Installing options...14 Installing a 550-sheet drawer...14 Installing ......15 Available options ...15 Accessing the system board to install internal options 15 Installing a memory card ...18 Installing a flash memory or firmware card 21 Installing a printer hard disk...22 Installing an internal print server or port interface card 24 Reinstalling the system board access cover 25 Attaching cables...26 Loading paper...
User's Guide
Page 4
...weights 41 Supported paper sizes...41 Support for paper types ...43 Paper types and weights ...43 Paper capacities ...44 Printing...45 Installing printer software...45 Printing a document from Windows 45 Printing a document from a Macintosh computer 45 Printing confidential and other held jobs 45 Holding ...jobs in the printer...45 Printing confidential and other held jobs from Windows 46 Printing confidential and other held jobs from Macintosh 46 Printing from a USB...
...weights 41 Supported paper sizes...41 Support for paper types ...43 Paper types and weights ...43 Paper capacities ...44 Printing...45 Installing printer software...45 Printing a document from Windows 45 Printing a document from a Macintosh computer 45 Printing confidential and other held jobs 45 Holding ...jobs in the printer...45 Printing confidential and other held jobs from Windows 46 Printing confidential and other held jobs from Macintosh 46 Printing from a USB...
User's Guide
Page 5
... in the duplex path...65 Clearing jams in the multipurpose feeder 67 Clearing jams in the manual feeder 68 Maintaining the printer 69 Storing supplies...69 Checking the status of supplies...69 Conserving supplies...69 Aligning the toner cartridges...69 Cleaning the printhead ... a transfer belt...72 Ordering a waste toner box ...73 Ordering a fuser...73 Ordering photoconductors ...73 Moving the printer...73 Before moving the printer ...73 Moving the printer to another location ...74 Administrative support 75 Adjusting the brightness or contrast of the display 75 Disabling control panel menus...
... in the duplex path...65 Clearing jams in the multipurpose feeder 67 Clearing jams in the manual feeder 68 Maintaining the printer 69 Storing supplies...69 Checking the status of supplies...69 Conserving supplies...69 Aligning the toner cartridges...69 Cleaning the printhead ... a transfer belt...72 Ordering a waste toner box ...73 Ordering a fuser...73 Ordering photoconductors ...73 Moving the printer...73 Before moving the printer ...73 Moving the printer to another location ...74 Administrative support 75 Adjusting the brightness or contrast of the display 75 Disabling control panel menus...

User's Guide
Page 6
Troubleshooting...82 Checking an unresponsive printer...82 Solving printing problems...82 Multiple-language PDFs do not print ...82 Control panel display is blank or displays only diamonds 82 Error message about ...
Troubleshooting...82 Checking an unresponsive printer...82 Solving printing problems...82 Multiple-language PDFs do not print ...82 Control panel display is blank or displays only diamonds 82 Error message about ...

User's Guide
Page 9
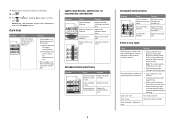
C534n, C534dn 1 2 5 4 3 6 1 Standard exit bin 2 Control panel Learning about the printer Configured models Basic models The following illustrations show the basic printer models. Learning about the printer 9 C532n 1 2 5 4 3 1 Standard exit bin 2 Control panel 3 Standard 250-sheet tray (Tray 1) 4 Manual feeder 5 Tray 1 handhold C530dn, C532dn.
C534n, C534dn 1 2 5 4 3 6 1 Standard exit bin 2 Control panel Learning about the printer Configured models Basic models The following illustrations show the basic printer models. Learning about the printer 9 C532n 1 2 5 4 3 1 Standard exit bin 2 Control panel 3 Standard 250-sheet tray (Tray 1) 4 Manual feeder 5 Tray 1 handhold C530dn, C532dn.
User's Guide
Page 10
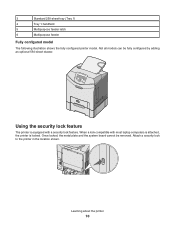
...handhold 5 Multipurpose feeder latch 6 Multipurpose feeder Fully configured model The following illustration shows the fully configured printer model. When a lock compatible with most laptop computers is attached, the printer is equipped with a security lock feature. Once locked, the metal plate and the system board cannot... be fully configured by adding an optional 550-sheet drawer. Attach a security lock to the printer in the location shown. ...
...handhold 5 Multipurpose feeder latch 6 Multipurpose feeder Fully configured model The following illustration shows the fully configured printer model. When a lock compatible with most laptop computers is attached, the printer is equipped with a security lock feature. Once locked, the metal plate and the system board cannot... be fully configured by adding an optional 550-sheet drawer. Attach a security lock to the printer in the location shown. ...

