Quick Reference
Page 2
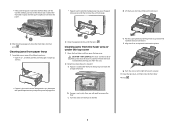
... paper is jammed in one or more of the optional trays, then open the top cover. e Pull the paper gently out of the printer near the fuser may be hot. f Align the fuser, and place it securely. 3 Close the top cover, and then close the front door, and then press . Wait for the... a paper jam, close the front door. 4 Press . 2 b If paper is not visible, then you will need to remove the fuser. g Turn the screws to the right to fasten it back into the printer. • If the jammed paper is between the front door and the transfer module, pull out on the release...
... paper is jammed in one or more of the optional trays, then open the top cover. e Pull the paper gently out of the printer near the fuser may be hot. f Align the fuser, and place it securely. 3 Close the top cover, and then close the front door, and then press . Wait for the... a paper jam, close the front door. 4 Press . 2 b If paper is not visible, then you will need to remove the fuser. g Turn the screws to the right to fasten it back into the printer. • If the jammed paper is between the front door and the transfer module, pull out on the release...
Menu Map
Page 1
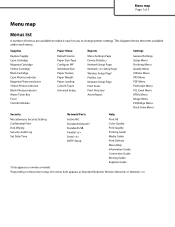
...Black Cartridge Cyan Photoconductor Magenta Photoconductor Yellow Photoconductor Black Photoconductor Waste Toner Box Fuser Transfer Module Paper Menu Default Source Paper Size/Type Configure MP Substitute Size ...Time Active NIC Standard Network2 Standard USB Parallel Serial SMTP Setup Print All Color Quality Print Quality Printing Guide Media Guide Print Defects Menu Map Information Guide ...Connection Guide Moving Guide Supplies Guide 1Only appears on wireless models. 2Depending on the printer setup, this menu item appears as Standard Network, Wireless Network, or Network . Menu ...
...Black Cartridge Cyan Photoconductor Magenta Photoconductor Yellow Photoconductor Black Photoconductor Waste Toner Box Fuser Transfer Module Paper Menu Default Source Paper Size/Type Configure MP Substitute Size ...Time Active NIC Standard Network2 Standard USB Parallel Serial SMTP Setup Print All Color Quality Print Quality Printing Guide Media Guide Print Defects Menu Map Information Guide ...Connection Guide Moving Guide Supplies Guide 1Only appears on wireless models. 2Depending on the printer setup, this menu item appears as Standard Network, Wireless Network, or Network . Menu ...
Print Defects
Page 1
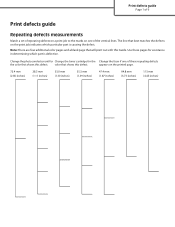
... defects on a print job to the marks on one of the vertical lines. Use these pages for the Change the fuser if one of these repeating defects the color that shows this Guide. color that best matches the defects on the printed page. 72.4 mm (2.85 inches) 28.3 mm (1.11 inches) 33.0 mm... the defect. Change the photoconductor unit for Change the toner cartridge for assistance in determining which particular part is defective. Note: There are four additional color pages and a blank page that will print out with this defect.
... defects on a print job to the marks on one of the vertical lines. Use these pages for the Change the fuser if one of these repeating defects the color that shows this Guide. color that best matches the defects on the printed page. 72.4 mm (2.85 inches) 28.3 mm (1.11 inches) 33.0 mm... the defect. Change the photoconductor unit for Change the toner cartridge for assistance in determining which particular part is defective. Note: There are four additional color pages and a blank page that will print out with this defect.

Print Quality
Page 1
...sure that the Paper Type and Paper Weight settings match the type of its intended life. Replace the print cartridge, the transfer module, or the fuser. ABC) D)E ABCDE ABCDE You are using paper that you are using. Print irregularities Example Cause Solution Paper has absorbed moisture due to appear. ... press . The print quality test pages print. 6 Press the down arrow button until Exit Config Menu appears, and then press . Resetting the Printer appears briefly, followed by replacing a supply or maintenance item that is approaching the end of paper that does not meet the...
...sure that the Paper Type and Paper Weight settings match the type of its intended life. Replace the print cartridge, the transfer module, or the fuser. ABC) D)E ABCDE ABCDE You are using paper that you are using. Print irregularities Example Cause Solution Paper has absorbed moisture due to appear. ... press . The print quality test pages print. 6 Press the down arrow button until Exit Config Menu appears, and then press . Resetting the Printer appears briefly, followed by replacing a supply or maintenance item that is approaching the end of paper that does not meet the...
Print Quality
Page 2
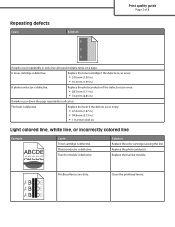
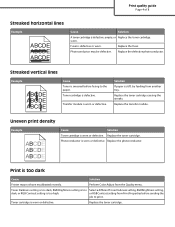
... occur every: • 28.3 mm (1.11 in.) • 72.4 mm (2.85 in.) If marks occur down the page repeatedly in all colors: The fuser is defective. Replace the fuser if the defects occur every: • 47.4 mm (1.87 in.) • 94.8 mm (3.73 in.) • 113.0 mm (4.45 in....) Light colored line, white line, or incorrectly colored line Example ABCDE ABCDE Cause Toner cartridge is defective. Replace the photoconductor. ABCDE ABCDE ABCDE Printhead ...
... occur every: • 28.3 mm (1.11 in.) • 72.4 mm (2.85 in.) If marks occur down the page repeatedly in all colors: The fuser is defective. Replace the fuser if the defects occur every: • 47.4 mm (1.87 in.) • 94.8 mm (3.73 in.) • 113.0 mm (4.45 in....) Light colored line, white line, or incorrectly colored line Example ABCDE ABCDE Cause Toner cartridge is defective. Replace the photoconductor. ABCDE ABCDE ABCDE Printhead ...
Print Quality
Page 4
...ABCDE ABCDE Cause Solution Toner cartridge is smeared before sending the job to the paper. Perform Color Adjust from Print Properties before fusing to print. Replace the fuser. Streaked vertical lines Example ABCDE ABCDE ABCDE Cause Toner is worn or defective. Transfer module... is too dark Cause Solution Printer may be defective. Print is worn or defective. worn. Replace the defective ...
...ABCDE ABCDE Cause Solution Toner cartridge is smeared before sending the job to the paper. Perform Color Adjust from Print Properties before fusing to print. Replace the fuser. Streaked vertical lines Example ABCDE ABCDE ABCDE Cause Toner is worn or defective. Transfer module... is too dark Cause Solution Printer may be defective. Print is worn or defective. worn. Replace the defective ...
Print Quality
Page 6
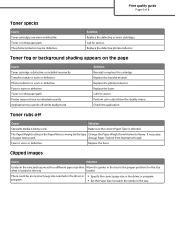
...the Paper Weight from Normal to match the media in the tray. Replace the fuser. Solution Replace the defective or worn cartridges. Photoconductor is worn or defective. Printer may specify off Cause Solution Specialty media is loaded in the tray. Call ...for service. Call for service. Solution Reinstall or replace the cartridge. Replace the transfer module. There could be defective. Fuser is selected. Perform color adjust from ...
...the Paper Weight from Normal to match the media in the tray. Replace the fuser. Solution Replace the defective or worn cartridges. Photoconductor is worn or defective. Printer may specify off Cause Solution Specialty media is loaded in the tray. Call ...for service. Call for service. Solution Reinstall or replace the cartridge. Replace the transfer module. There could be defective. Fuser is selected. Perform color adjust from ...
Supplies Guide
Page 1
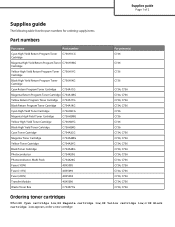
... Magenta Toner Cartridge C734A2MG Yellow Toner Cartridge C734A2YG Black Toner Cartridge C734A2KG Photoconductor C734X20G Photoconductor, Multi-Pack C734X24G Fuser (100V) 40X5095 Fuser (115V) 40X5093 Fuser (230V) 40X5094 Transfer Module 40X5096 Waste Toner Box C734X77G For printer(s) C736 C736 C736 C736 C734, C736 C734, C736 C734, C736 C734, C736 C736 C736 C736 C736 C734, C736...
... Magenta Toner Cartridge C734A2MG Yellow Toner Cartridge C734A2YG Black Toner Cartridge C734A2KG Photoconductor C734X20G Photoconductor, Multi-Pack C734X24G Fuser (100V) 40X5095 Fuser (115V) 40X5093 Fuser (230V) 40X5094 Transfer Module 40X5096 Waste Toner Box C734X77G For printer(s) C736 C736 C736 C736 C734, C736 C734, C736 C734, C736 C734, C736 C736 C736 C736 C736 C734, C736...

Supplies Guide
Page 2
... Warning or 83 Transfer Module Life Warning appears, order a replacement fuser or a transfer module. For installation information, see the documentation that color and may negatively affect actual yield for that came with about 5% coverage per color). Note: Waste toner box reuse is based on the ISO / ...IEC 19798 standard (with the part. Estimated cartridge yield is not recommended. When 80 Replace Fuser or 83 Replace Transfer Module appears, install the new fuser or the new transfer module....
... Warning or 83 Transfer Module Life Warning appears, order a replacement fuser or a transfer module. For installation information, see the documentation that color and may negatively affect actual yield for that came with about 5% coverage per color). Note: Waste toner box reuse is based on the ISO / ...IEC 19798 standard (with the part. Estimated cartridge yield is not recommended. When 80 Replace Fuser or 83 Replace Transfer Module appears, install the new fuser or the new transfer module....
User's Guide
Page 6
Checking the status of supplies...159 Checking the status of supplies from the printer control panel 159 Checking the status of supplies from a network computer 160 Ordering supplies...160 Ordering toner cartridges...160 Ordering photoconductors...160 Ordering a fuser or a transfer module...160 Ordering a waste toner box ...161 Replacing Supplies...162 Replacing a photoconductor ...162...
Checking the status of supplies...159 Checking the status of supplies from the printer control panel 159 Checking the status of supplies from a network computer 160 Ordering supplies...160 Ordering toner cartridges...160 Ordering photoconductors...160 Ordering a fuser or a transfer module...160 Ordering a waste toner box ...161 Replacing Supplies...162 Replacing a photoconductor ...162...

User's Guide
Page 9
...may not always be hot. The manufacturer is not responsible for signs of procedures other replacement parts. CAUTION-POTENTIAL INJURY: This product uses a laser. This product uses a printing process that heats the print media, and the heat may be obvious. Safety information 9 Do not pinch the.... Inspect the power cord regularly for the use the fax feature during a lightning storm. CAUTION-HOT SURFACE: The fuser and the inside of the printer near the fuser may cause the media to release emissions. Wait for selecting print media to cool before clearing jams from the electrical...
...may not always be hot. The manufacturer is not responsible for signs of procedures other replacement parts. CAUTION-POTENTIAL INJURY: This product uses a laser. This product uses a printing process that heats the print media, and the heat may be obvious. Safety information 9 Do not pinch the.... Inspect the power cord regularly for the use the fax feature during a lightning storm. CAUTION-HOT SURFACE: The fuser and the inside of the printer near the fuser may cause the media to release emissions. Wait for selecting print media to cool before clearing jams from the electrical...

User's Guide
Page 62
... automatic; If the name that does not accurately describe the type of paper loaded in the tray. they do not match the settings of the fuser varies according to the tray, such as Custom Type , or define your text or graphics may not be set manually from the Paper Size menu...
... automatic; If the name that does not accurately describe the type of paper loaded in the tray. they do not match the settings of the fuser varies according to the tray, such as Custom Type , or define your text or graphics may not be set manually from the Paper Size menu...

User's Guide
Page 64
...CCP), or no carbon required (NCR) paper • Preprinted papers with chemicals that may contaminate the printer • Preprinted papers that can be affected by the temperature in the printer fuser • Preprinted papers that has been cut or trimmed by the resin in xerographic copiers. Paper ...paper. • Use only forms and letterhead printed using an offset lithographic or engraved printing process. • Avoid papers with the printer: • Chemically treated papers used to make copies without melting or releasing hazardous emissions. Inks that are oxidation-set or oil-based ...
...CCP), or no carbon required (NCR) paper • Preprinted papers with chemicals that may contaminate the printer • Preprinted papers that can be affected by the temperature in the printer fuser • Preprinted papers that has been cut or trimmed by the resin in xerographic copiers. Paper ...paper. • Use only forms and letterhead printed using an offset lithographic or engraved printing process. • Avoid papers with the printer: • Chemically treated papers used to make copies without melting or releasing hazardous emissions. Inks that are oxidation-set or oil-based ...
User's Guide
Page 71
... for A4-size transparencies. Other media such as the cotton content is in some environments, and prolonged vinyl label usage may reduce fuser life. When printing on transparencies: • Feed transparencies from any way - Check with the manufacturer or vendor to ensure transparencies ... g/m2 (24 lb bond) paper. When printing on the labels being considered for laser printers. Have bent corners - Printing 71 Tips on using envelopes Print samples on the Lexmark Web site at www.lexmark.com/publications. For detailed information on label printing, characteristics, and design, see the...
... for A4-size transparencies. Other media such as the cotton content is in some environments, and prolonged vinyl label usage may reduce fuser life. When printing on transparencies: • Feed transparencies from any way - Check with the manufacturer or vendor to ensure transparencies ... g/m2 (24 lb bond) paper. When printing on the labels being considered for laser printers. Have bent corners - Printing 71 Tips on using envelopes Print samples on the Lexmark Web site at www.lexmark.com/publications. For detailed information on label printing, characteristics, and design, see the...

User's Guide
Page 81
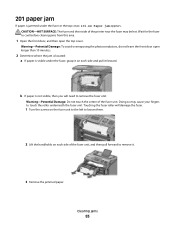
... bin. Leave paper in bin. "240 paper jam" on page 81 201.yy Paper jam, [x] pages jammed. CAUTION-HOT SURFACE: The fuser and the inside of the printer near the fuser may be hot. Leave paper in bin. 250.yy Paper jam, check [area name]. Leave paper in bin. 203.yy Paper jam... jams behind the toner cartridge area. "250 paper jam" on page 86 203.yy Paper jam, [x] pages jammed. Leave paper in bin. Wait for the fuser to cool before clearing jams from this area. 2 Pull the jammed paper up and out to remove it from behind the inner door, but not...
... bin. Leave paper in bin. "240 paper jam" on page 81 201.yy Paper jam, [x] pages jammed. CAUTION-HOT SURFACE: The fuser and the inside of the printer near the fuser may be hot. Leave paper in bin. 250.yy Paper jam, check [area name]. Leave paper in bin. 203.yy Paper jam... jams behind the toner cartridge area. "250 paper jam" on page 86 203.yy Paper jam, [x] pages jammed. Leave paper in bin. Wait for the fuser to cool before clearing jams from this area. 2 Pull the jammed paper up and out to remove it from behind the inner door, but not...
User's Guide
Page 83
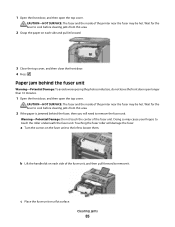
... paper is jammed under the fuser, grasp it on each side and pull it forward. b If paper is not visible, then you will damage the fuser. 1 Turn the screws on the fuser unit to the left to loosen them. 2 Lift the handholds on each side of the printer near the fuser may cause your fingers... to remove the fuser unit. Doing so may be hot. Warning-Potential Damage: To avoid...
... paper is jammed under the fuser, grasp it on each side and pull it forward. b If paper is not visible, then you will damage the fuser. 1 Turn the screws on the fuser unit to the left to loosen them. 2 Lift the handholds on each side of the printer near the fuser may cause your fingers... to remove the fuser unit. Doing so may be hot. Warning-Potential Damage: To avoid...

User's Guide
Page 84
... using the handholds on each side, and place it away from the bin. If the paper is jammed both under the fuser unit Warning-Potential Damage: To avoid overexposing the photoconductors, do not leave the front door open longer than 10 minutes. Clearing jams 84 c Close the ...top cover, and then close the front door. Paper jam under the fuser unit and in the standard exit bin, then grasp the paper and pull it back into the printer. 5 Turn the screws to the right to securely fasten the fuser unit. d Press . 202 paper jam If paper is visible in the...
... using the handholds on each side, and place it away from the bin. If the paper is jammed both under the fuser unit Warning-Potential Damage: To avoid overexposing the photoconductors, do not leave the front door open longer than 10 minutes. Clearing jams 84 c Close the ...top cover, and then close the front door. Paper jam under the fuser unit and in the standard exit bin, then grasp the paper and pull it back into the printer. 5 Turn the screws to the right to securely fasten the fuser unit. d Press . 202 paper jam If paper is visible in the...
User's Guide
Page 85
... pull it . Paper jam behind the fuser, then you will damage the fuser. Wait for the fuser to cool before clearing jams from this area. 2 Grasp the paper on a flat surface. c Place the fuser unit on each side of the printer near the fuser may cause your fingers to cool before ...clearing jams from this area. 2 If the paper is jammed behind the fuser unit Warning-Potential Damage: To avoid overexposing the photoconductors, do not...
... pull it . Paper jam behind the fuser, then you will damage the fuser. Wait for the fuser to cool before clearing jams from this area. 2 Grasp the paper on a flat surface. c Place the fuser unit on each side of the printer near the fuser may cause your fingers to cool before ...clearing jams from this area. 2 If the paper is jammed behind the fuser unit Warning-Potential Damage: To avoid overexposing the photoconductors, do not...

User's Guide
Page 86
3 Pull the paper gently out of the printer or up toward the standard exit bin to fasten the fuser unit securely. 5 Close the top cover, and then close the front door. 6 Press . 203 paper jam If paper is jammed under the rollers near the fuser, or in the standard exit bin 203.xx Paper... jam appears. 1 Grasp paper that is visible in the standard exit bin and pull it . 4 Reinstall the fuser unit. Clearing jams 86 b Turn the screws to the right to remove it away from the bin. 2 Open the front door, and then open the...
3 Pull the paper gently out of the printer or up toward the standard exit bin to fasten the fuser unit securely. 5 Close the top cover, and then close the front door. 6 Press . 203 paper jam If paper is jammed under the rollers near the fuser, or in the standard exit bin 203.xx Paper... jam appears. 1 Grasp paper that is visible in the standard exit bin and pull it . 4 Reinstall the fuser unit. Clearing jams 86 b Turn the screws to the right to remove it away from the bin. 2 Open the front door, and then open the...

User's Guide
Page 91
...Cartridge Cyan Photoconductor Magenta Photoconductor Yellow Photoconductor Black Photoconductor Waste Toner Box Fuser Transfer Module Paper Menu Default Source Paper Size/Type Configure MP Substitute ...Date/Time Active NIC Standard Network2 Standard USB Parallel Serial SMTP Setup Print All Color Quality Print Quality Printing Guide Media Guide Print Defects Menu Map Information Guide Connection...appears on wireless models. 2Depending on the printer setup, this menu item appears as Standard Network, Wireless Network, or Network . Understanding printer menus Menus list A number of menus are...
...Cartridge Cyan Photoconductor Magenta Photoconductor Yellow Photoconductor Black Photoconductor Waste Toner Box Fuser Transfer Module Paper Menu Default Source Paper Size/Type Configure MP Substitute ...Date/Time Active NIC Standard Network2 Standard USB Parallel Serial SMTP Setup Print All Color Quality Print Quality Printing Guide Media Guide Print Defects Menu Map Information Guide Connection...appears on wireless models. 2Depending on the printer setup, this menu item appears as Standard Network, Wireless Network, or Network . Understanding printer menus Menus list A number of menus are...


