Clearing Jams Guide
Page 1
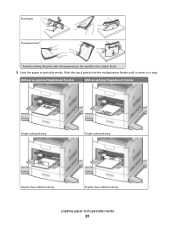
...sure the stack height does not exceed the indicated maximum height. • Make sure the guides in the paper trays, multipurpose feeder, or envelope feeder are properly positioned and are set correctly in the printer control panel menus. • Store paper per the manufacturer's recommendations. The ...paper jams 1 Touch Status/Supplies to identify the location of the jam. 2 Lower the multipurpose feeder door. 1 Have bent corners - Lexmark™ X65x Clearing Jams Guide Clearing jams Avoiding jams The following table lists the jams that can help you must clear all jammed paper ...
...sure the stack height does not exceed the indicated maximum height. • Make sure the guides in the paper trays, multipurpose feeder, or envelope feeder are properly positioned and are set correctly in the printer control panel menus. • Store paper per the manufacturer's recommendations. The ...paper jams 1 Touch Status/Supplies to identify the location of the jam. 2 Lower the multipurpose feeder door. 1 Have bent corners - Lexmark™ X65x Clearing Jams Guide Clearing jams Avoiding jams The following table lists the jams that can help you must clear all jammed paper ...
Clearing Jams Guide
Page 4
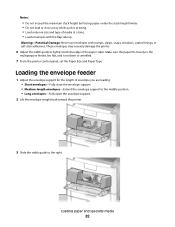
... If the paper is jammed. 1 Lift the envelope weight. 2 Remove all envelopes. 3 If the jammed envelope has entered the printer and cannot be pulled out, then lift the envelope feeder up and then out of the jam. Make sure it aside. 4 Remove the envelope from the bottom of the stack; 5 Slide ... the print cartridge will be the one that is exiting into place. 6 Flex and stack the envelopes. 7 Load the envelopes in the envelope feeder. 8 Adjust the paper guide. 9 Lower the envelope weight. 10 Touch Continue. 270-279 paper jams To clear a jam in the high-capacity output stacker or the 4-...
... If the paper is jammed. 1 Lift the envelope weight. 2 Remove all envelopes. 3 If the jammed envelope has entered the printer and cannot be pulled out, then lift the envelope feeder up and then out of the jam. Make sure it aside. 4 Remove the envelope from the bottom of the stack; 5 Slide ... the print cartridge will be the one that is exiting into place. 6 Flex and stack the envelopes. 7 Load the envelopes in the envelope feeder. 8 Adjust the paper guide. 9 Lower the envelope weight. 10 Touch Continue. 270-279 paper jams To clear a jam in the high-capacity output stacker or the 4-...
Troubleshooting Guide
Page 6
... information, see the User's Guide. 6 CHECK THE PAPER TYPE AND PAPER SIZE SETTINGS Make sure the paper type and paper size settings match the envelopes you are possible solutions. Paper trays These are possible solutions. For more of the paper. 4 Make sure the paper tray closes properly. Output options... from the Paper menu. 2 Before sending the job to the printer system board. Hard disk with the envelope feeder, or go to www.lexmark.com/publications to view the paper tray instruction sheet. 2000-sheet tray These are aligned against the edges of the following : MAKE SURE ...
... information, see the User's Guide. 6 CHECK THE PAPER TYPE AND PAPER SIZE SETTINGS Make sure the paper type and paper size settings match the envelopes you are possible solutions. Paper trays These are possible solutions. For more of the paper. 4 Make sure the paper tray closes properly. Output options... from the Paper menu. 2 Before sending the job to the printer system board. Hard disk with the envelope feeder, or go to www.lexmark.com/publications to view the paper tray instruction sheet. 2000-sheet tray These are aligned against the edges of the following : MAKE SURE ...
User's Guide
Page 3
... Loading the standard or optional 250-sheet or 550-sheet tray 73 Loading the 2000-sheet tray...76 Loading the multipurpose feeder...80 Loading the envelope feeder...82 Linking and unlinking trays...83 Linking trays...83 Unlinking trays...84 Assigning a custom paper type name...84 Changing a Custom Type name ...84 Paper...
... Loading the standard or optional 250-sheet or 550-sheet tray 73 Loading the 2000-sheet tray...76 Loading the multipurpose feeder...80 Loading the envelope feeder...82 Linking and unlinking trays...83 Linking trays...83 Unlinking trays...84 Assigning a custom paper type name...84 Changing a Custom Type name ...84 Paper...

User's Guide
Page 7
Printing 130 Printing a document...130 Printing on specialty media...130 Tips on using letterhead...130 Tips on using transparencies ...131 Tips on using envelopes...131 Tips on using labels...132 Tips on using card stock...132 Printing confidential and other held jobs...133 Holding jobs in the printer ...133 ...
Printing 130 Printing a document...130 Printing on specialty media...130 Tips on using letterhead...130 Tips on using transparencies ...131 Tips on using envelopes...131 Tips on using labels...132 Tips on using card stock...132 Printing confidential and other held jobs...133 Holding jobs in the printer ...133 ...

User's Guide
Page 8
Configure MP menu...155 Envelope Enhance ...156 Substitute Size menu...156 Paper Texture menu ...156 Paper Weight menu ...158 Paper Loading menu ...160 Custom Types menu...161 Custom Names menu......
Configure MP menu...155 Envelope Enhance ...156 Substitute Size menu...156 Paper Texture menu ...156 Paper Weight menu ...158 Paper Loading menu ...160 Custom Types menu...161 Custom Names menu......
User's Guide
Page 10
... quality...274 Solving option problems...275 Option does not operate correctly or quits after it is installed 275 Paper trays...275 2000-sheet tray...276 Envelope feeder ...276 Output options ...277 Flash memory card...277 Hard disk with adapter...277 Internal Solutions Port ...277 Memory card ...277 Contents 10
... quality...274 Solving option problems...275 Option does not operate correctly or quits after it is installed 275 Paper trays...275 2000-sheet tray...276 Envelope feeder ...276 Output options ...277 Flash memory card...277 Hard disk with adapter...277 Internal Solutions Port ...277 Memory card ...277 Contents 10
User's Guide
Page 81
Without an optional StapleSmart Finisher With an optional StapleSmart Finisher Single-sided printing Single-sided printing Duplex (two-sided) printing Duplex (two-sided) printing Loading paper and specialty media 81 Slide the stack gently into the multipurpose feeder until it comes to scratch them. 5 Load the paper or specialty media. Be careful not to a stop. Envelopes Transparencies* * Avoid touching the print side of transparencies.
Without an optional StapleSmart Finisher With an optional StapleSmart Finisher Single-sided printing Single-sided printing Duplex (two-sided) printing Duplex (two-sided) printing Loading paper and specialty media 81 Slide the stack gently into the multipurpose feeder until it comes to scratch them. 5 Load the paper or specialty media. Be careful not to a stop. Envelopes Transparencies* * Avoid touching the print side of transparencies.
User's Guide
Page 82
...paper under the stack height limiter. • Do not load or close the envelope support. • Medium-length envelopes-Extend the envelope support to the middle position. • Long envelopes-Fully open the envelope support. 2 Lift the envelope weight back toward the printer. 3 Slide the width guide to lightly touch ...the edge of the paper stack. Warning-Potential Damage: Never use envelopes with the flap side up. These envelopes may severely damage the printer. 6 Adjust the width guide to the right. Make sure the paper fits loosely in...
...paper under the stack height limiter. • Do not load or close the envelope support. • Medium-length envelopes-Extend the envelope support to the middle position. • Long envelopes-Fully open the envelope support. 2 Lift the envelope weight back toward the printer. 3 Slide the width guide to lightly touch ...the edge of the paper stack. Warning-Potential Damage: Never use envelopes with the flap side up. These envelopes may severely damage the printer. 6 Adjust the width guide to the right. Make sure the paper fits loosely in...
User's Guide
Page 83
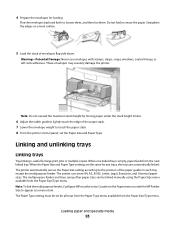
... feeder and trays using the Paper Size menu available from the Paper Size/Type menu. Do not fold or crease the paper. 4 Prepare the envelopes for large print jobs or multiple copies. Loading paper and specialty media 83 Note: Do not exceed the maximum stack height by forcing paper under... the stack height limiter. 6 Adjust the width guide to lightly touch the edge of the paper stack. 7 Lower the envelope weight to appear as a menu item. When one linked tray is useful for loading. When the Paper Size and Paper Type settings are the same...
... feeder and trays using the Paper Size menu available from the Paper Size/Type menu. Do not fold or crease the paper. 4 Prepare the envelopes for large print jobs or multiple copies. Loading paper and specialty media 83 Note: Do not exceed the maximum stack height by forcing paper under... the stack height limiter. 6 Adjust the width guide to lightly touch the edge of the paper stack. 7 Lower the envelope weight to appear as a menu item. When one linked tray is useful for loading. When the Paper Size and Paper Type settings are the same...

User's Guide
Page 90
... x 356 mm (8.5 x 14 in.) 148 x 182 mm X (5.8 x 7.7 in.) up to 216 x 356 mm (8.5 x 14 in.) 7 3/4 Envelope 98 x 191 mm X X X (Monarch) (3.9 x 7.5 in.) 9 Envelope 98 x 225 mm X X X (3.9 x 8.9 in.) 10 Envelope 105 x 241 mm X X X (4.1 x 9.5 in.) DL Envelope 110 x 220 mm X X X (4.3 x 8.7 in.) Other Envelope 98 x 162 mm X X X (3.9 x 6.4 in.) to 176 x 250 mm (6.9 x 9.8 in.) 1 This size appears in the Paper...
... x 356 mm (8.5 x 14 in.) 148 x 182 mm X (5.8 x 7.7 in.) up to 216 x 356 mm (8.5 x 14 in.) 7 3/4 Envelope 98 x 191 mm X X X (Monarch) (3.9 x 7.5 in.) 9 Envelope 98 x 225 mm X X X (3.9 x 8.9 in.) 10 Envelope 105 x 241 mm X X X (4.1 x 9.5 in.) DL Envelope 110 x 220 mm X X X (4.3 x 8.7 in.) Other Envelope 98 x 162 mm X X X (3.9 x 6.4 in.) to 176 x 250 mm (6.9 x 9.8 in.) 1 This size appears in the Paper...

User's Guide
Page 91
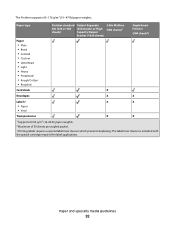
... unit Paper • Plain • Bond • Colored • Custom • Letterhead • Light • Heavy • Preprinted • Rough/Cotton • Recycled Card stock Envelopes X X X Labels 1 • Paper • Vinyl Transparencies 1 Printing labels requires a special label fuser cleaner which use supported paper types and weights. The paper capacity of print...
... unit Paper • Plain • Bond • Colored • Custom • Letterhead • Light • Heavy • Preprinted • Rough/Cotton • Recycled Card stock Envelopes X X X Labels 1 • Paper • Vinyl Transparencies 1 Printing labels requires a special label fuser cleaner which use supported paper types and weights. The paper capacity of print...
User's Guide
Page 92
... standard bin (250 or 550 sheets) Output Expander (550 sheets) or High Capacity Output Stacker (1850 sheets) 5-Bin Mailbox (500 sheets)1 StapleSmart Finisher (500 sheets2) X Envelopes X X Labels 3 • Paper • Vinyl Transparencies X X X X 1 Supports 60-90 g/m2 (16-24 lb) paper weights. 2 Maximum of 50 sheets per stapled packet. 3 Printing labels requires...
... standard bin (250 or 550 sheets) Output Expander (550 sheets) or High Capacity Output Stacker (1850 sheets) 5-Bin Mailbox (500 sheets)1 StapleSmart Finisher (500 sheets2) X Envelopes X X Labels 3 • Paper • Vinyl Transparencies X X X X 1 Supports 60-90 g/m2 (16-24 lb) paper weights. 2 Maximum of 50 sheets per stapled packet. 3 Printing labels requires...

User's Guide
Page 131
... exceed 90 g/m2 (24 lb bond) weight. • Use only new envelopes. • To optimize performance and minimize jams, do not use envelopes made from sticking together. • We recommend Lexmark part number 12A5010 for A4-size transparencies and Lexmark part number 70X7240 for laser printers. Have windows, holes, perforations, cutouts, or embossing - • Page...
... exceed 90 g/m2 (24 lb bond) weight. • Use only new envelopes. • To optimize performance and minimize jams, do not use envelopes made from sticking together. • We recommend Lexmark part number 12A5010 for A4-size transparencies and Lexmark part number 70X7240 for laser printers. Have windows, holes, perforations, cutouts, or embossing - • Page...
User's Guide
Page 132
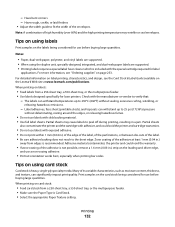
... in .) of the edge of the label, of the perforations, or between die-cuts of the adhesive at www.lexmark.com/publications. Note: A combination of the envelopes. For detailed information on label printing, characteristics, and design, see "Ordering supplies" on using card stock Card stock ...is Card Stock. • Select the appropriate Paper Texture setting. Partial sheets may wrinkle or seal envelopes. When printing on the labels being considered for laser printers. - Tips on using the duplex unit, specially-designed, integrated, and dual-web paper labels are supported....
... in .) of the edge of the label, of the perforations, or between die-cuts of the adhesive at www.lexmark.com/publications. Note: A combination of the envelopes. For detailed information on label printing, characteristics, and design, see "Ordering supplies" on using card stock Card stock ...is Card Stock. • Select the appropriate Paper Texture setting. Partial sheets may wrinkle or seal envelopes. When printing on the labels being considered for laser printers. - Tips on using the duplex unit, specially-designed, integrated, and dual-web paper labels are supported....

User's Guide
Page 139
...tray. • Do not remove trays while the printer is printing. • Do not load trays, the multipurpose feeder, or the envelope feeder while the printer is printing. Avoiding jams The following hints can help you avoid jams. Paper tray recommendations • Make sure ... much paper. For more than one jam, the number of the printer where the jam occurred. Have postage stamps attached - Have bent corners - Envelope recommendations • To reduce wrinkling, use paper that : - Have an interlocking design - Paper recommendations • Use only recommended paper or specialty ...
...tray. • Do not remove trays while the printer is printing. • Do not load trays, the multipurpose feeder, or the envelope feeder while the printer is printing. Avoiding jams The following hints can help you avoid jams. Paper tray recommendations • Make sure ... much paper. For more than one jam, the number of the printer where the jam occurred. Have postage stamps attached - Have bent corners - Envelope recommendations • To reduce wrinkling, use paper that : - Have an interlocking design - Paper recommendations • Use only recommended paper or specialty ...
User's Guide
Page 140
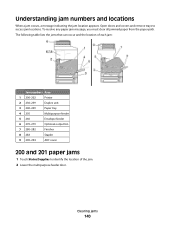
... to identify the location of each jam: Jam numbers Area 1 200-202 Printer 2 230-239 Duplex unit 3 240-249 Paper tray 4 250 Multipurpose feeder 5 260 Envelope feeder 6 270-279 Optional output bin 7 280-282 Finisher 8 283 Stapler 9 290-294 ADF cover 200 and 201 paper jams 1 Touch Status/Supplies to access...
... to identify the location of each jam: Jam numbers Area 1 200-202 Printer 2 230-239 Duplex unit 3 240-249 Paper tray 4 250 Multipurpose feeder 5 260 Envelope feeder 6 270-279 Optional output bin 7 280-282 Finisher 8 283 Stapler 9 290-294 ADF cover 200 and 201 paper jams 1 Touch Status/Supplies to access...

User's Guide
Page 146
... up and then out of the printer, and then set it snaps into place. 6 Flex and stack the envelopes. 7 Load the envelopes in the envelope feeder. 8 Adjust the paper guide. 9 Lower the envelope weight. 10 Touch Continue. 270-279 paper jams To clear a jam in the high-capacity output stacker or the 4-bin ...mailbox: 1 Touch Status/Supplies to identify the location of the jam. Make sure it aside. 4 Remove the envelope from the bottom of the jam. 2 Pull down the output bin door or doors. 4 Remove the jammed paper. 5 Close the output bin door or doors...
... up and then out of the printer, and then set it snaps into place. 6 Flex and stack the envelopes. 7 Load the envelopes in the envelope feeder. 8 Adjust the paper guide. 9 Lower the envelope weight. 10 Touch Continue. 270-279 paper jams To clear a jam in the high-capacity output stacker or the 4-bin ...mailbox: 1 Touch Status/Supplies to identify the location of the jam. Make sure it aside. 4 Remove the envelope from the bottom of the jam. 2 Pull down the output bin door or doors. 4 Remove the jammed paper. 5 Close the output bin door or doors...
User's Guide
Page 151
... menus are available to make it easy for you to change printer settings. Paper Menu Reports Network/Ports Default Source Paper Size/Type Configure MP Envelope Enhance Substitute Size Paper Texture Paper Weight Paper Loading Custom Types Custom Names Custom Scan Sizes Custom Bin Names Universal Setup Bin Setup Menu Settings...
... menus are available to make it easy for you to change printer settings. Paper Menu Reports Network/Ports Default Source Paper Size/Type Configure MP Envelope Enhance Substitute Size Paper Texture Paper Weight Paper Loading Custom Types Custom Names Custom Scan Sizes Custom Bin Names Universal Setup Bin Setup Menu Settings...
User's Guide
Page 152
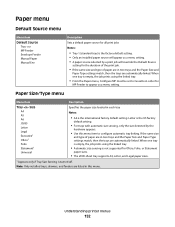
... sensing, only the size detected by the hardware appears. • Use this menu. Paper menu Default Source menu Menu item Default Source Tray MP Feeder Envelope Feeder Manual Paper Manual Env Description Sets a default paper source for all print jobs Notes: • Tray 1 (standard tray) is the factory default setting. •...
... sensing, only the size detected by the hardware appears. • Use this menu. Paper menu Default Source menu Menu item Default Source Tray MP Feeder Envelope Feeder Manual Paper Manual Env Description Sets a default paper source for all print jobs Notes: • Tray 1 (standard tray) is the factory default setting. •...


