
Embedded Web Server Administrator's Guide
Page 35
...included on an "AS IS" BASIS, WITHOUT WARRANTIES OR CONDITIONS OF ANY KIND, either an individual or a single entity) and Lexmark International, Inc. ("Lexmark") that a file or class name and description of the License at http://www.gnu.org/licenses/lgpl.html. GNU Lesser General... the License. Notices 35 We also recommend that , to the extent your Lexmark product or Software Program is a legal agreement between you (either express or implied. The term "Software Program" includes machine-readable instructions, audio/visual content (such as the copyright notice for the file format....
...included on an "AS IS" BASIS, WITHOUT WARRANTIES OR CONDITIONS OF ANY KIND, either an individual or a single entity) and Lexmark International, Inc. ("Lexmark") that a file or class name and description of the License at http://www.gnu.org/licenses/lgpl.html. GNU Lesser General... the License. Notices 35 We also recommend that , to the extent your Lexmark product or Software Program is a legal agreement between you (either express or implied. The term "Software Program" includes machine-readable instructions, audio/visual content (such as the copyright notice for the file format....
Troubleshooting Guide
Page 6
...one or more information, see the hardware setup documentation that came with the envelope feeder, or go to www.lexmark.com/publications to view the paper tray instruction sheet. 2000-sheet tray These are aligned against the edges of the following : THE ELEVATOR TRAY IS NOT WORKING... solutions. For more information, see the hardware setup documentation that came with the option, or go to www.lexmark.com/publications to view the envelope feeder instruction sheet. Try one or more information, see the hardware setup documentation that came with adapter Make sure the hard...
...one or more information, see the hardware setup documentation that came with the envelope feeder, or go to www.lexmark.com/publications to view the paper tray instruction sheet. 2000-sheet tray These are aligned against the edges of the following : THE ELEVATOR TRAY IS NOT WORKING... solutions. For more information, see the hardware setup documentation that came with the option, or go to www.lexmark.com/publications to view the envelope feeder instruction sheet. Try one or more information, see the hardware setup documentation that came with adapter Make sure the hard...

User's Guide
Page 13
... in hazardous radiation exposure. CAUTION-POTENTIAL INJURY: The printer weight is greater than those specified herein may result in your operating instructions that is designed, tested, and approved to meet strict global safety standards with this product near the product and easily accessible.... 26 AWG or larger replacement when connecting this product to the manufacturer's instructions and local regulations. Do not subject the power cord to abrasion or stress. CAUTION-POTENTIAL INJURY: This product uses a laser. Note: Use the handholds located on the power cord. This product is...
... in hazardous radiation exposure. CAUTION-POTENTIAL INJURY: The printer weight is greater than those specified herein may result in your operating instructions that is designed, tested, and approved to meet strict global safety standards with this product near the product and easily accessible.... 26 AWG or larger replacement when connecting this product to the manufacturer's instructions and local regulations. Do not subject the power cord to abrasion or stress. CAUTION-POTENTIAL INJURY: This product uses a laser. Note: Use the handholds located on the power cord. This product is...

User's Guide
Page 14
...input option. CAUTION-SHOCK HAZARD: Do not use either a printer stand or printer base if you may need additional furniture. SAVE THESE INSTRUCTIONS. Safety information 14 You must use the fax feature during a lightning storm. If you purchased a multifunction printer (MFP) that scans...and faxes, you are using a high-capacity input tray, a duplex unit and an input option, or more information, see www.lexmark.com/multifunctionprinters. CAUTION-TIPPING HAZARD: Floor-mounted configurations require additional furniture for stability. CAUTION-SHOCK HAZARD: To avoid the risk of ...
...input option. CAUTION-SHOCK HAZARD: Do not use either a printer stand or printer base if you may need additional furniture. SAVE THESE INSTRUCTIONS. Safety information 14 You must use the fax feature during a lightning storm. If you purchased a multifunction printer (MFP) that scans...and faxes, you are using a high-capacity input tray, a duplex unit and an input option, or more information, see www.lexmark.com/multifunctionprinters. CAUTION-TIPPING HAZARD: Floor-mounted configurations require additional furniture for stability. CAUTION-SHOCK HAZARD: To avoid the risk of ...
User's Guide
Page 15
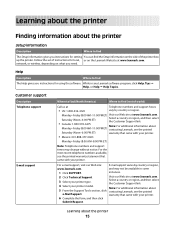
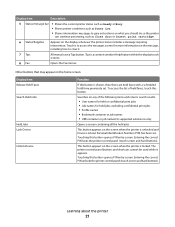
...Friday (8:00 AM-11:00 PM ET) contacting Lexmark, see the printed warranty statement that came with your printer model. Note: For additional information about the printer 15 Help Description Where to find The Help gives you instructions for setting You can find the Setup information ...Setup information Description Where to find The Setup information gives you instructions for using the software. network, or wireless, depending on the Lexmark Web site at www.lexmark.com. 3 Select your printer. Visit our Web site at www.lexmark.com. Monday-Friday (8:00 AM-11:00 PM ET) ...
...Friday (8:00 AM-11:00 PM ET) contacting Lexmark, see the printed warranty statement that came with your printer model. Note: For additional information about the printer 15 Help Description Where to find The Help gives you instructions for setting You can find the Setup information ...Setup information Description Where to find The Setup information gives you instructions for using the software. network, or wireless, depending on the Lexmark Web site at www.lexmark.com. 3 Select your printer. Visit our Web site at www.lexmark.com. Monday-Friday (8:00 AM-11:00 PM ET) ...
User's Guide
Page 21
... • Shows the current printer status such as Ready or Busy. • Shows printer conditions such as Toner Low. • Shows intervention messages to give instructions on what you should do so the printer can continue processing, such as Close door or Insert print cartridge. 6 Status/Supplies Appears on the home...
... • Shows the current printer status such as Ready or Busy. • Shows printer conditions such as Toner Low. • Shows intervention messages to give instructions on what you should do so the printer can continue processing, such as Close door or Insert print cartridge. 6 Status/Supplies Appears on the home...
User's Guide
Page 26
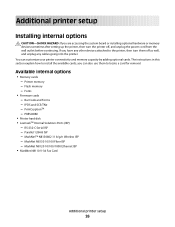
... - RS-232-C Serial ISP - Parallel 1284-B ISP - MarkNet N8120 10/100/1000 Ethernet ISP • MarkNet N8110 V-34 Fax Card Additional printer setup 26 The instructions in this section explain how to the printer, then turn the printer off as well, and unplug any other devices attached to install the available...
... - RS-232-C Serial ISP - Parallel 1284-B ISP - MarkNet N8120 10/100/1000 Ethernet ISP • MarkNet N8110 V-34 Fax Card Additional printer setup 26 The instructions in this section explain how to the printer, then turn the printer off as well, and unplug any other devices attached to install the available...
User's Guide
Page 47
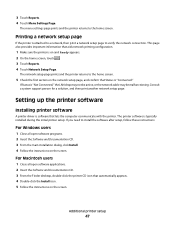
... Reports. 4 Touch Menu Settings Page. The menu settings page prints and the printer returns to install the software after setup, follow these instructions: For Windows users 1 Close all open software programs. 2 Insert the Software and Documentation CD. 3 From the main installation dialog, click Install. ...5 Check the first section on the network setup page, and confirm that automatically appears. 4 Double-click the Install icon. 5 Follow the instructions on the screen. Additional printer setup 47 The printer software is "Not Connected," the LAN drop may not be active, or the network ...
... Reports. 4 Touch Menu Settings Page. The menu settings page prints and the printer returns to install the software after setup, follow these instructions: For Windows users 1 Close all open software programs. 2 Insert the Software and Documentation CD. 3 From the main installation dialog, click Install. ...5 Check the first section on the network setup page, and confirm that automatically appears. 4 Double-click the Install icon. 5 Follow the instructions on the screen. Additional printer setup 47 The printer software is "Not Connected," the LAN drop may not be active, or the network ...

User's Guide
Page 50
... is connected to the same wireless network where you are fully on and ready. Additional printer setup 50 Do not connect the USB cable until instructed to set up the printer. 1 Connect the power cable, and then turn the printer on. Installing the printer on a wireless network (Windows) Before you install...
... is connected to the same wireless network where you are fully on and ready. Additional printer setup 50 Do not connect the USB cable until instructed to set up the printer. 1 Connect the power cable, and then turn the printer on. Installing the printer on a wireless network (Windows) Before you install...

User's Guide
Page 51
... address on the wireless network to disconnect the temporary USB cable so you can print wirelessly. Note: After the printer is configured, the software will instruct you to use the wireless printer, follow steps 2 through 6 and step 8 for each computer. Write the last six digits of the MAC address in the.... 7 Connect the cables in the space provided below: MAC address 2 If your printer has faxing capabilities, then connect the telephone cable. 8 Follow the on-screen instructions to complete the software installation. 9 To allow other computers on the sheet that came with the printer.
... address on the wireless network to disconnect the temporary USB cable so you can print wirelessly. Note: After the printer is configured, the software will instruct you to use the wireless printer, follow steps 2 through 6 and step 8 for each computer. Write the last six digits of the MAC address in the.... 7 Connect the cables in the space provided below: MAC address 2 If your printer has faxing capabilities, then connect the telephone cable. 8 Follow the on-screen instructions to complete the software installation. 9 To allow other computers on the sheet that came with the printer.

User's Guide
Page 54
If the CD does not launch after a minute, then do one of the following instructions to install the printer on a wired network, make sure that: • You have completed the initial setup of the printer. • The printer is connected ... OS X version 10.5 1 From the Apple menu, choose System Preferences. 2 Click Print & Fax. 3 Click +. 4 Click AppleTalk. 5 Select the printer from the list. 6 Click Add. These instructions apply to appear.
If the CD does not launch after a minute, then do one of the following instructions to install the printer on a wired network, make sure that: • You have completed the initial setup of the printer. • The printer is connected ... OS X version 10.5 1 From the Apple menu, choose System Preferences. 2 Click Print & Fax. 3 Click +. 4 Click AppleTalk. 5 Select the printer from the list. 6 Click Add. These instructions apply to appear.

User's Guide
Page 55
...the CD or DVD drive. 2 Double-click the installer package for computers on -screen instructions to the printer. 2 Print the network setup page from the list of printers discovered on -screen instructions. 5 Select Wired Network Attach, and then click Next. 6 Select the printer manufacturer from... Click Continue after viewing the license agreement, and then click Agree to configure printers using scripts, select Custom and follow the on-screen instructions. 9 Follow the on a different subnet than the printer. 4 Install the drivers and add the printer. Additional printer setup 55 Note:...
...the CD or DVD drive. 2 Double-click the installer package for computers on -screen instructions to the printer. 2 Print the network setup page from the list of printers discovered on -screen instructions. 5 Select Wired Network Attach, and then click Next. 6 Select the printer manufacturer from... Click Continue after viewing the license agreement, and then click Agree to configure printers using scripts, select Custom and follow the on-screen instructions. 9 Follow the on a different subnet than the printer. 4 Install the drivers and add the printer. Additional printer setup 55 Note:...
User's Guide
Page 73
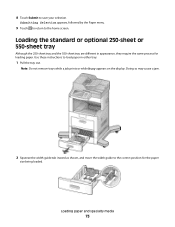
... guide to the home screen. 8 Touch Submit to load paper in appearance, they require the same process for the paper size being loaded. Use these instructions to save your selection. Loading paper and specialty media 73
... guide to the home screen. 8 Touch Submit to load paper in appearance, they require the same process for the paper size being loaded. Use these instructions to save your selection. Loading paper and specialty media 73
User's Guide
Page 126
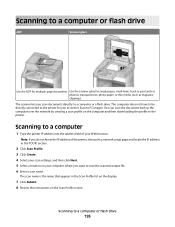
... of the printer, then print a network setup page and locate the IP address in the Scan Profile list on the display. 7 Click Submit. 8 Review the instructions on the Scan Profile screen. Scanning to a computer or a flash drive. Scanning to a computer or flash drive ADF Scanner glass Use the ADF for you...
... of the printer, then print a network setup page and locate the IP address in the Scan Profile list on the display. 7 Click Submit. 8 Review the instructions on the Scan Profile screen. Scanning to a computer or a flash drive. Scanning to a computer or flash drive ADF Scanner glass Use the ADF for you...
User's Guide
Page 184
... the factory default setting. Performance may be affected but not print quality. • Energy/Paper minimizes the use of noise produced by duplexing each page. Instructs the printer to its factory default settings. • The Energy setting minimizes the power used by selecting Done at the Country select screen, the default...
... the factory default setting. Performance may be affected but not print quality. • Energy/Paper minimizes the use of noise produced by duplexing each page. Instructs the printer to its factory default settings. • The Energy setting minimizes the power used by selecting Done at the Country select screen, the default...

User's Guide
Page 247
293 Replace all cable connections. 4 Connect the power cord to restart the job. The scanner was instructed to a properly grounded outlet. 5 Turn the printer back on . Load paper in the ADF. If the service message appears again, contact Customer Support, and report ...
293 Replace all cable connections. 4 Connect the power cord to restart the job. The scanner was instructed to a properly grounded outlet. 5 Turn the printer back on . Load paper in the ADF. If the service message appears again, contact Customer Support, and report ...
User's Guide
Page 256
Part name Staple Cartridges-3 pack Part number 25A0013 Recycling Lexmark products To return Lexmark products to Lexmark for recycling: 1 Visit our Web site at www.lexmark.com/recycle. 2 Find the product type you experience problems with paper double-feeding or failing to feed through the automatic document feeder. Maintaining the printer ... stapler door. Ordering ADF replacement parts Order ADF replacement parts if you want to recycle, and then select your country from the list. 3 Follow the instructions on the computer screen.
Part name Staple Cartridges-3 pack Part number 25A0013 Recycling Lexmark products To return Lexmark products to Lexmark for recycling: 1 Visit our Web site at www.lexmark.com/recycle. 2 Find the product type you experience problems with paper double-feeding or failing to feed through the automatic document feeder. Maintaining the printer ... stapler door. Ordering ADF replacement parts Order ADF replacement parts if you want to recycle, and then select your country from the list. 3 Follow the instructions on the computer screen.
User's Guide
Page 275
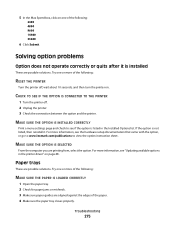
... does not operate correctly or quits after it . MAKE SURE THE OPTION IS INSTALLED CORRECTLY Print a menu settings page and check to view the option instruction sheet. CHECK TO SEE IF THE OPTION IS CONNECTED TO THE PRINTER 1 Turn the printer off , wait about 10 seconds, and then turn the... printer on one or more information, see the hardware setup documentation that came with the option, or go to www.lexmark.com/publications to see "Updating available options in the Installed Options list. Troubleshooting 275 If the option is not listed, then reinstall it is ...
... does not operate correctly or quits after it . MAKE SURE THE OPTION IS INSTALLED CORRECTLY Print a menu settings page and check to view the option instruction sheet. CHECK TO SEE IF THE OPTION IS CONNECTED TO THE PRINTER 1 Turn the printer off , wait about 10 seconds, and then turn the... printer on one or more information, see the hardware setup documentation that came with the option, or go to www.lexmark.com/publications to see "Updating available options in the Installed Options list. Troubleshooting 275 If the option is not listed, then reinstall it is ...

User's Guide
Page 276
... feeder" on page 82. Try one or more information, see the hardware setup documentation that came with the paper tray, or go to www.lexmark.com/publications to print, specify the correct settings from the computer: • For Windows users, specify the settings from Print Properties. •... For Macintosh users, specify the settings from the Paper menu. 2 Before sending the job to view the paper tray instruction sheet. 2000-sheet tray These are using : 1 From the printer control panel, check the settings for the length of the following : RESET THE...
... feeder" on page 82. Try one or more information, see the hardware setup documentation that came with the paper tray, or go to www.lexmark.com/publications to print, specify the correct settings from the computer: • For Windows users, specify the settings from Print Properties. •... For Macintosh users, specify the settings from the Paper menu. 2 Before sending the job to view the paper tray instruction sheet. 2000-sheet tray These are using : 1 From the printer control panel, check the settings for the length of the following : RESET THE...

User's Guide
Page 277
...Make sure the memory card is securely connected to the printer system board. Hard disk with the envelope feeder, or go to www.lexmark.com/publications to the printer system board. For more information, see the hardware setup documentation that it is securely connected. Internal Solutions ... printing, see the hardware setup documentation that came with adapter Make sure the hard disk is securely connected to view the envelope feeder instruction sheet. Reinstall the envelope feeder. Try one or more information, see the Networking Guide on the menu settings page, but an envelope...
...Make sure the memory card is securely connected to the printer system board. Hard disk with the envelope feeder, or go to www.lexmark.com/publications to the printer system board. For more information, see the hardware setup documentation that it is securely connected. Internal Solutions ... printing, see the hardware setup documentation that came with adapter Make sure the hard disk is securely connected to view the envelope feeder instruction sheet. Reinstall the envelope feeder. Try one or more information, see the Networking Guide on the menu settings page, but an envelope...


