Wireless Setup Guide
Page 3
...wirelessly 14 Information you will need to set up the printer on a wireless network 14 Adding the printer to a network using MAC address filtering 14 Connecting to a wireless network using Windows 16 Installing the printer on a wireless network (Windows 16 Connecting to a wireless... network using Macintosh 18 Installing the printer on a wireless network (Macintosh 18 Troubleshooting wireless setup 21 Connecting using a USB ...
...wirelessly 14 Information you will need to set up the printer on a wireless network 14 Adding the printer to a network using MAC address filtering 14 Connecting to a wireless network using Windows 16 Installing the printer on a wireless network (Windows 16 Connecting to a wireless... network using Macintosh 18 Installing the printer on a wireless network (Macintosh 18 Troubleshooting wireless setup 21 Connecting using a USB ...
Wireless Setup Guide
Page 5
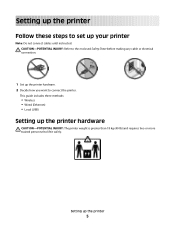
CAUTION-POTENTIAL INJURY: Refer to the enclosed Safety Sheet before making any cable or electrical connection. 1 Set up the printer hardware CAUTION-POTENTIAL INJURY: The printer weight is greater than 18 kg (40 lb) and requires two or more trained personnel to lift it safely. This guide includes three methods: • Wireless • Wired (Ethernet) • Local (USB) Setting up the printer hardware. 2 Decide how you want to connect the printer. Setting up the printer Follow these steps to set up the printer 5 Setting up your printer Note: Do not connect cables until instructed.
CAUTION-POTENTIAL INJURY: Refer to the enclosed Safety Sheet before making any cable or electrical connection. 1 Set up the printer hardware CAUTION-POTENTIAL INJURY: The printer weight is greater than 18 kg (40 lb) and requires two or more trained personnel to lift it safely. This guide includes three methods: • Wireless • Wired (Ethernet) • Local (USB) Setting up the printer hardware. 2 Decide how you want to connect the printer. Setting up the printer Follow these steps to set up the printer 5 Setting up your printer Note: Do not connect cables until instructed.
Wireless Setup Guide
Page 6
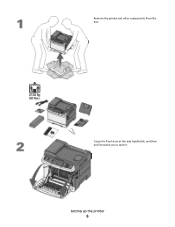
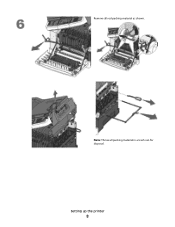
Setting up the printer 6 Grasp the front door at the side handholds, and then pull it toward you to open it. Remove the printer and other components from the box.
Setting up the printer 6 Grasp the front door at the side handholds, and then pull it toward you to open it. Remove the printer and other components from the box.

Wireless Setup Guide
Page 7
Remove the toner cartridges by lifting the handles and then gently pulling away from the imaging kit. Push in the green touch points on each side of the cartridges to open the top cover. Setting up the printer 7 Slide the release latch to the left and lift to release the side panel, and then remove it.
Remove the toner cartridges by lifting the handles and then gently pulling away from the imaging kit. Push in the green touch points on each side of the cartridges to open the top cover. Setting up the printer 7 Slide the release latch to the left and lift to release the side panel, and then remove it.
Wireless Setup Guide
Page 8
Setting up the printer 8 Remove all packing material in a trash can for disposal. Note: Throw all red packing material as shown.
Setting up the printer 8 Remove all packing material in a trash can for disposal. Note: Throw all red packing material as shown.

Wireless Setup Guide
Page 9
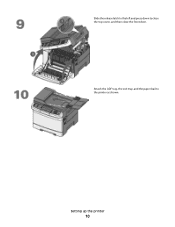
Align and reinsert the cartridges into the printer. Press down to lock each cartridge. Setting up the printer 9 Reinstall the side panel.
Align and reinsert the cartridges into the printer. Press down to lock each cartridge. Setting up the printer 9 Reinstall the side panel.
Wireless Setup Guide
Page 10
Slide the release latch to the left and press down to the printer as shown. Setting up the printer 10 Attach the ADF tray, the exit tray, and the paper bail to close the top cover, and then close the front door.
Slide the release latch to the left and press down to the printer as shown. Setting up the printer 10 Attach the ADF tray, the exit tray, and the paper bail to close the top cover, and then close the front door.
Wireless Setup Guide
Page 11
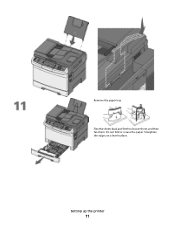
Flex the sheets back and forth to loosen them, and then fan them. Do not fold or crease the paper. Remove the paper tray. Setting up the printer 11 Straighten the edges on a level surface.
Flex the sheets back and forth to loosen them, and then fan them. Do not fold or crease the paper. Remove the paper tray. Setting up the printer 11 Straighten the edges on a level surface.
Wireless Setup Guide
Page 12
Do not try to the rear of the width guide which indicates the maximum height for loading paper. Note: Notice the maximum fill line on the side of the printer as shown. Attach the paper tray dust cover to overload the tray. Reinsert the paper tray into the tray as shown. Load the paper stack into the printer. Setting up the printer 12
Do not try to the rear of the width guide which indicates the maximum height for loading paper. Note: Notice the maximum fill line on the side of the printer as shown. Attach the paper tray dust cover to overload the tray. Reinsert the paper tray into the tray as shown. Load the paper stack into the printer. Setting up the printer 12
Wireless Setup Guide
Page 13
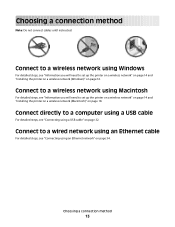
...Connect to a wireless network using Macintosh For detailed steps, see "Information you will need to set up the printer on a wireless network" on page 14 and "Installing the printer on a wireless network (Windows)" on page 18. Choosing a connection method 13 Connect to a wireless network ...using Windows For detailed steps, see "Information you will need to set up the printer on a wireless network" on page 14 and "Installing the printer on a wireless network (Macintosh)" on page 16. Choosing a connection method Note: Do not connect cables until ...
...Connect to a wireless network using Macintosh For detailed steps, see "Information you will need to set up the printer on a wireless network" on page 14 and "Installing the printer on a wireless network (Windows)" on page 18. Choosing a connection method 13 Connect to a wireless network ...using Windows For detailed steps, see "Information you will need to set up the printer on a wireless network" on page 14 and "Installing the printer on a wireless network (Macintosh)" on page 16. Choosing a connection method Note: Do not connect cables until ...
Wireless Setup Guide
Page 14
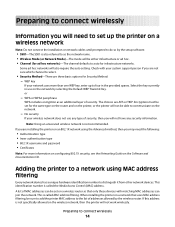
.... Encryption must be set for the same type on the router and on the printer, or the printer will not be able to communicate on the Software and Documentation CD. If you are installing the printer on an 802.1X network using MAC address filtering Every network device has a unique...security. Note: Using an unsecured wireless network is not specifically allowed on the wireless network, then the printer will be either infrastructure or ad hoc. • Channel (for Security Method: - Adding the printer to a network using the Advanced method, then you are not sure which channel to do so by...
.... Encryption must be set for the same type on the router and on the printer, or the printer will not be able to communicate on the Software and Documentation CD. If you are installing the printer on an 802.1X network using MAC address filtering Every network device has a unique...security. Note: Using an unsecured wireless network is not specifically allowed on the wireless network, then the printer will be either infrastructure or ad hoc. • Channel (for Security Method: - Adding the printer to a network using the Advanced method, then you are not sure which channel to do so by...
Wireless Setup Guide
Page 15
It will appear on printing a network setup page. Refer to connect wirelessly 15 The MAC address appears in the following format: 00:04:12:34:56:78 Note: Print a network setup page if you cannot locate the printer MAC address. Preparing to the User's Guide on the Software and Documentation CD for more information on the network setup page. If the printer has a factory-installed internal print server, then the MAC address is a series of letters and numbers located on the MAC address sheet that came with the printer.
It will appear on printing a network setup page. Refer to connect wirelessly 15 The MAC address appears in the following format: 00:04:12:34:56:78 Note: Print a network setup page if you cannot locate the printer MAC address. Preparing to the User's Guide on the Software and Documentation CD for more information on the network setup page. If the printer has a factory-installed internal print server, then the MAC address is a series of letters and numbers located on the MAC address sheet that came with the printer.
Wireless Setup Guide
Page 16
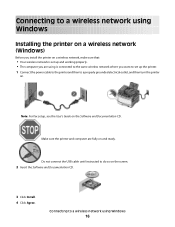
...Guide on and ready. Do not connect the USB cable until instructed to a properly grounded electrical outlet, and then turn the printer on. Make sure the printer and computer are using is connected to the same wireless network where you are fully on the Software and Documentation CD. Connecting... sure that: • Your wireless network is set up and working properly. • The computer you want to set up the printer. 1 Connect the power cable to the printer and then to do so on the screen. 2 Insert the Software and Documentation CD. 3 Click Install. 4 Click Agree. Connecting to...
...Guide on and ready. Do not connect the USB cable until instructed to a properly grounded electrical outlet, and then turn the printer on. Make sure the printer and computer are using is connected to the same wireless network where you are fully on the Software and Documentation CD. Connecting... sure that: • Your wireless network is set up and working properly. • The computer you want to set up the printer. 1 Connect the power cable to the printer and then to do so on the screen. 2 Insert the Software and Documentation CD. 3 Click Install. 4 Click Agree. Connecting to...

Wireless Setup Guide
Page 17
...Attach. 7 Remove the label covering the USB port on the back of the printer. 8 Temporarily connect a USB cable between the computer on -screen instructions to complete the software installation. Note: After the printer is the recommended path to a wireless network using Windows 17 Connecting to choose. ...Choose Advanced only if you can print wirelessly. 9 Follow the on the wireless network and the printer. Note: Basic is configured, the software will instruct you to disconnect the temporary USB cable so you want to customize your installation....
...Attach. 7 Remove the label covering the USB port on the back of the printer. 8 Temporarily connect a USB cable between the computer on -screen instructions to complete the software installation. Note: After the printer is the recommended path to a wireless network using Windows 17 Connecting to choose. ...Choose Advanced only if you can print wirelessly. 9 Follow the on the wireless network and the printer. Note: Basic is configured, the software will instruct you to disconnect the temporary USB cable so you want to customize your installation....
Wireless Setup Guide
Page 18
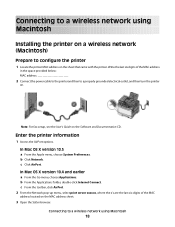
Connecting to a wireless network using Macintosh Installing the printer on a wireless network (Macintosh) Prepare to a wireless network using Macintosh 18 In Mac OS X version 10.5 a From the Apple menu, choose System Preferences. In ... provided below: MAC address 2 Connect the power cable to the printer and then to a properly grounded electrical outlet, and then turn the printer on the sheet that came with the printer. Connecting to configure the printer 1 Locate the printer MAC address on . Enter the printer information 1 Access the AirPort options. Write the last six digits...
Connecting to a wireless network using Macintosh Installing the printer on a wireless network (Macintosh) Prepare to a wireless network using Macintosh 18 In Mac OS X version 10.5 a From the Apple menu, choose System Preferences. In ... provided below: MAC address 2 Connect the power cable to the printer and then to a properly grounded electrical outlet, and then turn the printer on the sheet that came with the printer. Connecting to configure the printer 1 Locate the printer MAC address on . Enter the printer information 1 Access the AirPort options. Write the last six digits...
Wireless Setup Guide
Page 19
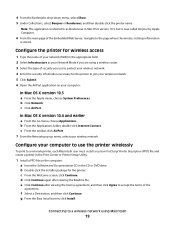
...Mac OS X version 10.3, but is now called Bonjour by Apple Computer. 6 From the main page of security you use the printer wirelessly To print to protect your network (SSID) in the appropriate field. 2 Select Infrastructure as Rendezvous in the CD or DVD drive.... f Select a Destination, and then click Continue. Configure your computer to use to a network printer, each Macintosh user must install a custom PostScript Printer Description (PPD) file and create a printer in the Print Center or Printer Setup Utility. 1 Install a PPD file on your wireless network. c From the Welcome screen, ...
...Mac OS X version 10.3, but is now called Bonjour by Apple Computer. 6 From the main page of security you use the printer wirelessly To print to protect your network (SSID) in the appropriate field. 2 Select Infrastructure as Rendezvous in the CD or DVD drive.... f Select a Destination, and then click Continue. Configure your computer to use to a network printer, each Macintosh user must install a custom PostScript Printer Description (PPD) file and create a printer in the Print Center or Printer Setup Utility. 1 Install a PPD file on your wireless network. c From the Welcome screen, ...

Wireless Setup Guide
Page 20
... version 10.4 1 From the Go menu, choose Applications. 2 Double-click the Utilities folder. 3 Double-click Printer Setup Utility or Print Center. 4 From the Printer List, choose Add. 5 Select the printer from the list. 10 Click Add. In Mac OS X version 10.4 1 From the Go menu, choose ...Applications. 2 Double-click the Utilities folder. 3 Double-click Print Center or Printer Setup Utility. 4 From the Printer List, choose Add. 5 Choose the Default Browser tab. 6 Click More Printers. 7 From the first pop-up menu, choose AppleTalk. 8 From the second pop-up menu, select...
... version 10.4 1 From the Go menu, choose Applications. 2 Double-click the Utilities folder. 3 Double-click Printer Setup Utility or Print Center. 4 From the Printer List, choose Add. 5 Select the printer from the list. 10 Click Add. In Mac OS X version 10.4 1 From the Go menu, choose ...Applications. 2 Double-click the Utilities folder. 3 Double-click Print Center or Printer Setup Utility. 4 From the Printer List, choose Add. 5 Choose the Default Browser tab. 6 Click More Printers. 7 From the first pop-up menu, choose AppleTalk. 8 From the second pop-up menu, select...
Wireless Setup Guide
Page 21
...wireless signal, including baby monitors, motors, cordless phones, security system cameras, other wireless networks, and some Bluetooth devices. • The printer driver is installed on the computer from which you are not separated by poles, walls, or support columns containing metal or concrete. •...access, then try connecting to the Internet over a wireless connection. • The encryption method (AES or TKIP) is the same for the printer as it is for the wireless access point (on networks using . Printing a network setup page A network setup page lists the configuration settings ...
...wireless signal, including baby monitors, motors, cordless phones, security system cameras, other wireless networks, and some Bluetooth devices. • The printer driver is installed on the computer from which you are not separated by poles, walls, or support columns containing metal or concrete. •...access, then try connecting to the Internet over a wireless connection. • The encryption method (AES or TKIP) is the same for the printer as it is for the wireless access point (on networks using . Printing a network setup page A network setup page lists the configuration settings ...
Wireless Setup Guide
Page 22
... or more information on printing a network setup page, refer to these devices. Make sure your Web browser. Make sure the SSID the printer is not positioned too closely to the User's Guide on printing a network setup page. If you can access them from other appliances, ... and reinstalling the software. Troubleshooting wireless setup 22 MOVE YOUR ACCESS POINT TO MINIMIZE INTERFERENCE There may be temporary interference from your printer does not appear in the address field of the following : MAKE SURE YOUR COMPUTER IS CONNECTED TO YOUR WIRELESS ACCESS POINT (WIRELESS...
... or more information on printing a network setup page, refer to these devices. Make sure your Web browser. Make sure the SSID the printer is not positioned too closely to the User's Guide on printing a network setup page. If you can access them from other appliances, ... and reinstalling the software. Troubleshooting wireless setup 22 MOVE YOUR ACCESS POINT TO MINIMIZE INTERFERENCE There may be temporary interference from your printer does not appear in the address field of the following : MAKE SURE YOUR COMPUTER IS CONNECTED TO YOUR WIRELESS ACCESS POINT (WIRELESS...
Wireless Setup Guide
Page 24
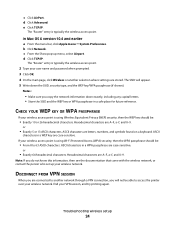
... Access (WPA) security, then the WPA passphrase should be : • From 8 to 63 ASCII characters. Notes: • Make sure you are connected to access the printer over your user name and password when prompted. 3 Click OK. 4 On the main page, click Wireless or another network through a VPN connection, you do not...
... Access (WPA) security, then the WPA passphrase should be : • From 8 to 63 ASCII characters. Notes: • Make sure you are connected to access the printer over your user name and password when prompted. 3 Click OK. 4 On the main page, click Wireless or another network through a VPN connection, you do not...


