

Service Manual
Page 7
... failure may not always be obvious. The ink contains permanent dyes that can stain clothing and furniture. The ink is harmful if swallowed. When servicing this machine: • Move the machine to lessen ink spills. Keep the ink cartridges out of reach of children. About This ... to a suitable service area • Use a drop cloth (PN 1280055) under the machine • Never disconnect ink lines while the printer is not intended to spill ink on electrical components. Safety Information • The maintenance information for this product has been prepared for use by others....
... failure may not always be obvious. The ink contains permanent dyes that can stain clothing and furniture. The ink is harmful if swallowed. When servicing this machine: • Move the machine to lessen ink spills. Keep the ink cartridges out of reach of children. About This ... to a suitable service area • Use a drop cloth (PN 1280055) under the machine • Never disconnect ink lines while the printer is not intended to spill ink on electrical components. Safety Information • The maintenance information for this product has been prepared for use by others....

Service Manual
Page 9
... 2-22 2-24 2-26 -30 ;'-34 ; -42 2-46 50 -52 : '-54 :or .ants IX About This Manual Related Publications Safety Information Ink Safety Notice General Information Description of the Printer Coated Paper Ink Cartridges . MAP 0110: Error Code/Symptom Index Logged Error code Operator Codes and Messages MAP 0120: Cover Open . Contents Special Notices Trademarks...
... 2-22 2-24 2-26 -30 ;'-34 ; -42 2-46 50 -52 : '-54 :or .ants IX About This Manual Related Publications Safety Information Ink Safety Notice General Information Description of the Printer Coated Paper Ink Cartridges . MAP 0110: Error Code/Symptom Index Logged Error code Operator Codes and Messages MAP 0120: Cover Open . Contents Special Notices Trademarks...

Service Manual
Page 11
Releasing Plastic Latches Ink Tube Servicing Print Head Uncapping and Carriage Centering Manual Carriage Centering (No Power) Manual Print Head Capping (Disabled Machine) Covers „ Operator Panel Inner Cover ... Width Sensor Encoder Cable Handling Carriage Ribbon Cables Carriage Cable Handling Carriage Shaft, Carriage Belt, and Carriage Ink Supply Power Supply Controller Board and Logic Board Electronic Modules (Assembly 4) Purge Unit Purge Unit Replacement Ink Cartridge Assembly Carriage Frame Paper Feed Pinch Roller Base Unit Pickup Roller, Paper Lifting Plate Platen Paper Feed...
Releasing Plastic Latches Ink Tube Servicing Print Head Uncapping and Carriage Centering Manual Carriage Centering (No Power) Manual Print Head Capping (Disabled Machine) Covers „ Operator Panel Inner Cover ... Width Sensor Encoder Cable Handling Carriage Ribbon Cables Carriage Cable Handling Carriage Shaft, Carriage Belt, and Carriage Ink Supply Power Supply Controller Board and Logic Board Electronic Modules (Assembly 4) Purge Unit Purge Unit Replacement Ink Cartridge Assembly Carriage Frame Paper Feed Pinch Roller Base Unit Pickup Roller, Paper Lifting Plate Platen Paper Feed...
Service Manual
Page 12
...NI INNIN Iu.NSIN. rocil Appendix A r int Sarr ples Index 4-;' 5-1 6 10 6-14 6-10 6-18 6-20 6-22 6-24 6-26 6-20 f3 3(a 6-30 6-45 6-4.2 X-1 X- Ink SI,T,,ply Diagram 11:iafety Inspet:lictin Guic e Parts Catalog SSem [3 y 1: C.i:ra A.ssembly (avers Corirdt Assembly 3: Inner ;:;rver A.sseiribly 4: Pri n te Assembly P::iwet Supply and...Assembly 19: ;Thee:feed Separation Assembly 20: Pape' Heed Frame . A.sserr Lily 12: Carriar:je Drive Frame Assembly 13: Ink S 41ply Unit Assembly 14: Ink Return Unit Assembly 15: Ink Cartridge Interlock. I X-7 I BNI Co lo • Jetp r,nte r FS 4079 HMS '1. :I
...NI INNIN Iu.NSIN. rocil Appendix A r int Sarr ples Index 4-;' 5-1 6 10 6-14 6-10 6-18 6-20 6-22 6-24 6-26 6-20 f3 3(a 6-30 6-45 6-4.2 X-1 X- Ink SI,T,,ply Diagram 11:iafety Inspet:lictin Guic e Parts Catalog SSem [3 y 1: C.i:ra A.ssembly (avers Corirdt Assembly 3: Inner ;:;rver A.sseiribly 4: Pri n te Assembly P::iwet Supply and...Assembly 19: ;Thee:feed Separation Assembly 20: Pape' Heed Frame . A.sserr Lily 12: Carriar:je Drive Frame Assembly 13: Ink S 41ply Unit Assembly 14: Ink Return Unit Assembly 15: Ink Cartridge Interlock. I X-7 I BNI Co lo • Jetp r,nte r FS 4079 HMS '1. :I
Service Manual
Page 14
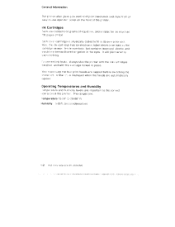
... idity levels are capped before SW itching zine iiirinter off. but ioontains isoorcpyl alccihai and iinould not be swallowed or gotten in its own color islet. Ink Cartridges :Etch one contains 31) grams of the printer. the ini«:;aritridgE has an electronic label which i s se ised cIi the -iariiridgei sensor. I gCl111.MEl 43410111::4
... idity levels are capped before SW itching zine iiirinter off. but ioontains isoorcpyl alccihai and iinould not be swallowed or gotten in its own color islet. Ink Cartridges :Etch one contains 31) grams of the printer. the ini«:;aritridgE has an electronic label which i s se ised cIi the -iariiridgei sensor. I gCl111.MEl 43410111::4

Service Manual
Page 21
Ink Cartridge MAP 0180: Ink Sensor MAP 019O Ink Flow . MAP 0280: Paper Feed Motor MAP 0290: Purge Unit MAP 0300 Operator Panel MAP 0310: Power Supply MAP 0320: Host Print MAP 0330: RAM (...
Ink Cartridge MAP 0180: Ink Sensor MAP 019O Ink Flow . MAP 0280: Paper Feed Motor MAP 0290: Purge Unit MAP 0300 Operator Panel MAP 0310: Power Supply MAP 0320: Host Print MAP 0330: RAM (...

Service Manual
Page 44
... mritor al, then replace the cartridge; I , If ,,1, 1010 k1MIMHWGMII • Cover any oiler ink l ines with the black cartridge end elevated . is not used. (51:ep 003 continues,' 2-24 leivi Color ,Jelp rin e F'S 4079 HhA E], is installed Conditions That Could Cause. I 10111.1 11404911, ill I .11111 ii 114 fag. Ink Cartridge MAP 0170: Ink Carinidge Symptom Explanatior The pr...
... mritor al, then replace the cartridge; I , If ,,1, 1010 k1MIMHWGMII • Cover any oiler ink l ines with the black cartridge end elevated . is not used. (51:ep 003 continues,' 2-24 leivi Color ,Jelp rin e F'S 4079 HhA E], is installed Conditions That Could Cause. I 10111.1 11404911, ill I .11111 ii 114 fag. Ink Cartridge MAP 0170: Ink Carinidge Symptom Explanatior The pr...

Service Manual
Page 45
Check continuity on each set of the cable. WBLW 9WYWK 12 3 45 6 76 9 hui ILL AL CNID 8 7 I (K') K W 2 1 - (C') BL W Is the continuity correct? Diagnostic Information 2-25 Match pin numbers at both ends of pins 15K to 25K Ohms? Yes No 4 (M ) R W 6 5 Y W 005 Replace the sensor cable. [006 Replace the ink cartridge sensor. 007] Replace the logic board. Ink Cartridge 003 (continued) Is the resistance on the sensor cable. Yes No 004 Remove the ink cartridge assembly.
Check continuity on each set of the cable. WBLW 9WYWK 12 3 45 6 76 9 hui ILL AL CNID 8 7 I (K') K W 2 1 - (C') BL W Is the continuity correct? Diagnostic Information 2-25 Match pin numbers at both ends of pins 15K to 25K Ohms? Yes No 4 (M ) R W 6 5 Y W 005 Replace the sensor cable. [006 Replace the ink cartridge sensor. 007] Replace the logic board. Ink Cartridge 003 (continued) Is the resistance on the sensor cable. Yes No 004 Remove the ink cartridge assembly.

Service Manual
Page 46
... indi c...Ele when the cartridge a empty Ink cartridge Ink sensor Ink sensor cable Logic board Note:, It you are ,mstrunted to remove the ink cartridge aSSE!M bry, it it recommended that you hear ink or cfEel ink movement in the cartridge? (es No CI02, RiecilacE the irk cidrtridge. 003 :Step 003 cc ntinues 2.26 IBM Color JElpri -:S 4079 HIV, S II , I•1 t II...
... indi c...Ele when the cartridge a empty Ink cartridge Ink sensor Ink sensor cable Logic board Note:, It you are ,mstrunted to remove the ink cartridge aSSE!M bry, it it recommended that you hear ink or cfEel ink movement in the cartridge? (es No CI02, RiecilacE the irk cidrtridge. 003 :Step 003 cc ntinues 2.26 IBM Color JElpri -:S 4079 HIV, S II , I•1 t II...

Service Manual
Page 47
... Yellow Black pins 1 - 2 pins 3 - 4 pins 5 - 6 pins 7 - 8 BR BLBR R BR Y BR K 1 2 3 4 5 6 7 8 [ I I (K) K / ----17., -\ BL ...J - 7 0 j --",(,C, *) R ....,(V Y _. ./ \ I 6 To push down the ink sensor: insert a thin screwdrver just above the ink cartridge assembly and below the paper lift plate, then push the ink sensor plunger down. '-"'" Magenta NN The voltage should be Low when the sensor is on the CNINK...
... Yellow Black pins 1 - 2 pins 3 - 4 pins 5 - 6 pins 7 - 8 BR BLBR R BR Y BR K 1 2 3 4 5 6 7 8 [ I I (K) K / ----17., -\ BL ...J - 7 0 j --",(,C, *) R ....,(V Y _. ./ \ I 6 To push down the ink sensor: insert a thin screwdrver just above the ink cartridge assembly and below the paper lift plate, then push the ink sensor plunger down. '-"'" Magenta NN The voltage should be Low when the sensor is on the CNINK...

Service Manual
Page 50
...durii ig the long. I $4 'MON.{ kr. sII lII IS II, n5 . Conditions That Could Cause This Symptom • Ink cartridge supply I ,vith the flow of ink tram the ink cartridge. If needed, stun y the i , k bow diagram on page 4.7 and the text on the following page. cleaning rat her...ormini) a long cleaning for blockage, tollowing the lines to sec where ink is fi l led or empty Replace the ink i,upoly assembly (Asm. 10-1) or Replace the ink ;:a rridge assembly supply lines (As 1.1 3.-z: necessary. 2.30 IOM G lor Jetorirde ' f:S 4079 HMS III 4. Are all carriage !suppi r lines full of it...
...durii ig the long. I $4 'MON.{ kr. sII lII IS II, n5 . Conditions That Could Cause This Symptom • Ink cartridge supply I ,vith the flow of ink tram the ink cartridge. If needed, stun y the i , k bow diagram on page 4.7 and the text on the following page. cleaning rat her...ormini) a long cleaning for blockage, tollowing the lines to sec where ink is fi l led or empty Replace the ink i,upoly assembly (Asm. 10-1) or Replace the ink ;:a rridge assembly supply lines (As 1.1 3.-z: necessary. 2.30 IOM G lor Jetorirde ' f:S 4079 HMS III 4. Are all carriage !suppi r lines full of it...

Service Manual
Page 51
... through the large purge waste lines when the purge motor runs? Check and replace the ink cartridge assembly waste lines 4Asm 14-3) or ink cartridge, as necessary. (Step 011 continues) Diagnostic Information 2-31 Yes No 010 Run a Long Cleaning and go to"MAP 0220: Print Quality - Yes No 0081 Replace ...the purge unit. 009 Is ink leaking from the ink cartridge assembly or into the bottom pan? Ink Flow 003 1 Is the purge assembly motor operating normally? on page 2-46 . 011j -- Yes No 004 Replace the purge unit...
... through the large purge waste lines when the purge motor runs? Check and replace the ink cartridge assembly waste lines 4Asm 14-3) or ink cartridge, as necessary. (Step 011 continues) Diagnostic Information 2-31 Yes No 010 Run a Long Cleaning and go to"MAP 0220: Print Quality - Yes No 0081 Replace ...the purge unit. 009 Is ink leaking from the ink cartridge assembly or into the bottom pan? Ink Flow 003 1 Is the purge assembly motor operating normally? on page 2-46 . 011j -- Yes No 004 Replace the purge unit...

Service Manual
Page 67
... correct print mode? (See "Printing Mode" on the ink lines and reposition the ink lines as needed. Make sure the platen is not dirty or ink stained. - Yes No 008 Replace the ink cartridge. 009 - oil Check for ink lines connectors loose, disconnected, or defective Check for the ...supply lines are always fi lled with a cloth, and gently shake the cartridge. Remove the suspected ink cartridge, cover the sensor end with ink.. (Step 011 continues) Diagnostic :nformation 2-47 Can you hear or feel ink movement in the cartridge? Check print head gap. (See "Head Gap Adjustment" on page ...
... correct print mode? (See "Printing Mode" on the ink lines and reposition the ink lines as needed. Make sure the platen is not dirty or ink stained. - Yes No 008 Replace the ink cartridge. 009 - oil Check for ink lines connectors loose, disconnected, or defective Check for the ...supply lines are always fi lled with a cloth, and gently shake the cartridge. Remove the suspected ink cartridge, cover the sensor end with ink.. (Step 011 continues) Diagnostic :nformation 2-47 Can you hear or feel ink movement in the cartridge? Check print head gap. (See "Head Gap Adjustment" on page ...

Service Manual
Page 118
Remova.ls Ink Cartridge Assemt ly Carriage Frarne Paper Feet, Pinch Roller Ease Jnit Pick.uo Roller, Pap r Lifting Plate Platen . . . . Frame .S e pa rati on Sheet 3-44 3-4.7 3-49 3-49 3-50 3-52 3-53 3-54 3-55 3-56 .3-57 3-12 NB M Color lpf int .1r. '5 4079 HMS .111.10116114.1.1 :r•. unrr.r mnxrx,"" Ixxll IMO*. M Paper Feed and Ej i?ct Rollers Paper Feed Mat::' Paper Sensor . .
Remova.ls Ink Cartridge Assemt ly Carriage Frarne Paper Feet, Pinch Roller Ease Jnit Pick.uo Roller, Pap r Lifting Plate Platen . . . . Frame .S e pa rati on Sheet 3-44 3-4.7 3-49 3-49 3-50 3-52 3-53 3-54 3-55 3-56 .3-57 3-12 NB M Color lpf int .1r. '5 4079 HMS .111.10116114.1.1 :r•. unrr.r mnxrx,"" Ixxll IMO*. M Paper Feed and Ej i?ct Rollers Paper Feed Mat::' Paper Sensor . .

Service Manual
Page 149
Separate the gray/black ink tube joint from the ink cartridge assembly. Wrap the nk tube ends in cleaning cloth ar d secure with a rubber band. Wrap the ink tube ends in cleaning cloth and se.Tu with a rubber band. 3. Removals Purge Unit Replacement When it is necessary to sp II ,nl< from ...the tubes. Be careful rot to replace the purge unit, follow this procedure 1. FJ Drain joint Ink tubes of purge unit The purge unit can now be l ifted out of the printer, if necessary Repair laformatior 3-43 Unplug the large purge waste line from the purge unit ty spreading both...
Separate the gray/black ink tube joint from the ink cartridge assembly. Wrap the nk tube ends in cleaning cloth ar d secure with a rubber band. Wrap the ink tube ends in cleaning cloth and se.Tu with a rubber band. 3. Removals Purge Unit Replacement When it is necessary to sp II ,nl< from ...the tubes. Be careful rot to replace the purge unit, follow this procedure 1. FJ Drain joint Ink tubes of purge unit The purge unit can now be l ifted out of the printer, if necessary Repair laformatior 3-43 Unplug the large purge waste line from the purge unit ty spreading both...
Service Manual
Page 150
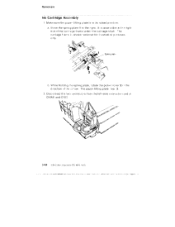
... of the carriage frame under the carriage shaft The carriage:tram E is in its raised position: a. The paper lifting plate Ise:, 3. 2. CalOr ...letprini et PS ,4079 HMIS . • .1*.i...4111.1•11.1. Rernova Is Ink Cartridge Ass,arnbly 1. Make sure the paper lilting plate is : shown removed for i l lustration p Jrposes only • , c" em ,Am 0 ; 3 h.
... of the carriage frame under the carriage shaft The carriage:tram E is in its raised position: a. The paper lifting plate Ise:, 3. 2. CalOr ...letprini et PS ,4079 HMIS . • .1*.i...4111.1•11.1. Rernova Is Ink Cartridge Ass,arnbly 1. Make sure the paper lilting plate is : shown removed for i l lustration p Jrposes only • , c" em ,Am 0 ; 3 h.

Service Manual
Page 151
Disconnect the carriage ink supply joint from the side frame Wrap the end of the tubes in cleaning cloth, secured with a rubber band, to the top of purge unit 4. Lay them in their correct positions. Repair Information 3-45 Disconnect the purge ink waste tubes from the side frame and hook it to prevent ink spillage. The ink cartridges are color-coded and can only be installed in a safe place where they will not stain furniture or clothing. Drain joint Ink tubes of the carriage frame as shown below. 7 -1t 5. Remove the ink cartridges. Removals 3.
Disconnect the carriage ink supply joint from the side frame Wrap the end of the tubes in cleaning cloth, secured with a rubber band, to the top of purge unit 4. Lay them in their correct positions. Repair Information 3-45 Disconnect the purge ink waste tubes from the side frame and hook it to prevent ink spillage. The ink cartridges are color-coded and can only be installed in a safe place where they will not stain furniture or clothing. Drain joint Ink tubes of the carriage frame as shown below. 7 -1t 5. Remove the ink cartridges. Removals 3.

Service Manual
Page 171
Pump r Purge Ink sensor Off On(No ink) ink cartridge Parts and Test Point Locations 4-7 Parts and Test Point Locations Ink Supply Diagram Carriage Bubble jet head Sub lank Air valve ' Head cap Capping Open -/ (Purge \) motor 1.
Pump r Purge Ink sensor Off On(No ink) ink cartridge Parts and Test Point Locations 4-7 Parts and Test Point Locations Ink Supply Diagram Carriage Bubble jet head Sub lank Air valve ' Head cap Capping Open -/ (Purge \) motor 1.

Service Manual
Page 172
...ink has thE, sarrie ink flow pattern. ▪ The irk Cartridge si ,pplies the ink 'C) the sensor i t les Ind also absorbs waste Ink in /i color JEkiiririei F. 3 4079 HM l3 1. .:* I nes and into tie Print Head. ▪ Waste ink... troll the , it Is itsorbec. 1-8 ir.in a separate en arryber. Parts and Test Point Lc,cations The ink, diagram illus:rates the ink flow for a single color ttf ink. Each color of the ink...
...ink has thE, sarrie ink flow pattern. ▪ The irk Cartridge si ,pplies the ink 'C) the sensor i t les Ind also absorbs waste Ink in /i color JEkiiririei F. 3 4079 HM l3 1. .:* I nes and into tie Print Head. ▪ Waste ink... troll the , it Is itsorbec. 1-8 ir.in a separate en arryber. Parts and Test Point Lc,cations The ink, diagram illus:rates the ink flow for a single color ttf ink. Each color of the ink...

Service Manual
Page 179
Parts Catalog Asm - Electrical label Cover, Rear w/W.T Electrical label Label. FCC Screw Screw Parts Catalog 6-5 Index 2 1 -2 -3 -4 -5 -6 -7 - 7 -8 -9 -10 Part Number Units 1321708 ' 1 1321709 ' 1 1321710 1 1321711 1 1321712 1 1321713 1 1321870 1 1321872 1 1331690 1 1321861 2 1321863 2 Description Top Cover (with logo) Plate, Upper Cover Coupler Cover, Ink Cartridge (also order refs. 5 and 6) Label, Ink Cartridge, Left Label, Ink Cartridge, Right Cover, Rear w/U.S.
Parts Catalog Asm - Electrical label Cover, Rear w/W.T Electrical label Label. FCC Screw Screw Parts Catalog 6-5 Index 2 1 -2 -3 -4 -5 -6 -7 - 7 -8 -9 -10 Part Number Units 1321708 ' 1 1321709 ' 1 1321710 1 1321711 1 1321712 1 1321713 1 1321870 1 1321872 1 1331690 1 1321861 2 1321863 2 Description Top Cover (with logo) Plate, Upper Cover Coupler Cover, Ink Cartridge (also order refs. 5 and 6) Label, Ink Cartridge, Left Label, Ink Cartridge, Right Cover, Rear w/U.S.

