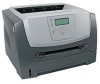
User's Guide
Page 17
...the control panel, from the printer driver, or from MarkVision Professional. Adhesive material contaminates the printer and could void the printer and cartridge warranties. • Use labels that can cause feeding problems. • Do not use label sheets with laser printers, except for the value....characteristics, and design, see the Card Stock & Label Guide, available on the Lexmark Web site at www.lexmark.com/publications. Set the Paper Type from the printer control panel, the printer driver, or from MarkVision Professional. When printing on the leading and driver edge,...
...the control panel, from the printer driver, or from MarkVision Professional. Adhesive material contaminates the printer and could void the printer and cartridge warranties. • Use labels that can cause feeding problems. • Do not use label sheets with laser printers, except for the value....characteristics, and design, see the Card Stock & Label Guide, available on the Lexmark Web site at www.lexmark.com/publications. Set the Paper Type from the printer control panel, the printer driver, or from MarkVision Professional. When printing on the leading and driver edge,...
User's Guide
Page 36
.... Storing supplies Choose a cool, clean storage area for information about Lexmark Authorized Supplies Dealers in a busy state. The message 84 Replace Photoconductor is Off), the printer automatically notifies you may continue to do the setup and maintenance of your toner cartridge. Maintaining the printer 36 These tasks are low. Once the photoconductor kit has...
.... Storing supplies Choose a cool, clean storage area for information about Lexmark Authorized Supplies Dealers in a busy state. The message 84 Replace Photoconductor is Off), the printer automatically notifies you may continue to do the setup and maintenance of your toner cartridge. Maintaining the printer 36 These tasks are low. Once the photoconductor kit has...

User's Guide
Page 38
... the printer Ordering a toner cartridge Part number Description Average cartridge yield World Wide E250X22G Photoconductor kit Up to have a new cartridge available when the current one no longer prints satisfactorily. Ordering supplies 38 You need to 30,000 standard pages1 For the USA and Canada3 E450A21A Toner Cartridge 6,000 standard pages2 E450H21A High Yield Toner Cartridge...
... the printer Ordering a toner cartridge Part number Description Average cartridge yield World Wide E250X22G Photoconductor kit Up to have a new cartridge available when the current one no longer prints satisfactorily. Ordering supplies 38 You need to 30,000 standard pages1 For the USA and Canada3 E450A21A Toner Cartridge 6,000 standard pages2 E450H21A High Yield Toner Cartridge...

User's Guide
Page 39
a Press the release button on the left side of the print cartridge assembly. Maintaining the printer Changing a toner cartridge 1 Turn the printer off. 2 Press the button on the base of the printer to remove the toner cartridge. 1 2 Ordering supplies 39 b Grasp the handle, pulling up and out to release and lower the front door. 3 Remove the toner cartridge.
a Press the release button on the left side of the print cartridge assembly. Maintaining the printer Changing a toner cartridge 1 Turn the printer off. 2 Press the button on the base of the printer to remove the toner cartridge. 1 2 Ordering supplies 39 b Grasp the handle, pulling up and out to release and lower the front door. 3 Remove the toner cartridge.

User's Guide
Page 40
...front door. 8 Turn the printer back on page 44. 5 Firmly shake the toner cartridge in as far as it will go. Maintaining the printer 4 Unpack the new toner cartridge. You can use the packing material from the new toner cartridge to ship the old toner cartridge back to distribute the toner.... 6 Install the new toner cartridge by aligning the white rollers on the toner cartridge with the white arrows on the tracks of the photoconductor and pushing the toner cartridge in all directions to Lexmark for recycling...
...front door. 8 Turn the printer back on page 44. 5 Firmly shake the toner cartridge in as far as it will go. Maintaining the printer 4 Unpack the new toner cartridge. You can use the packing material from the new toner cartridge to ship the old toner cartridge back to distribute the toner.... 6 Install the new toner cartridge by aligning the white rollers on the toner cartridge with the white arrows on the tracks of the photoconductor and pushing the toner cartridge in all directions to Lexmark for recycling...

User's Guide
Page 41
... left side of time. a Press the button on a flat, clean surface. Extended light exposure can cause print quality problems. 1 Turn the printer offc 2 Remove the print cartridge assembly. Maintaining the printer Changing a photoconductor kit Warning: When replacing a photoconductor kit, do not leave the new photoconductor kit exposed to direct light for an extended...
... left side of time. a Press the button on a flat, clean surface. Extended light exposure can cause print quality problems. 1 Turn the printer offc 2 Remove the print cartridge assembly. Maintaining the printer Changing a photoconductor kit Warning: When replacing a photoconductor kit, do not leave the new photoconductor kit exposed to direct light for an extended...

User's Guide
Page 42
Ordering supplies 42 The cartridge clicks into the new print cartridge assembly by aligning the white rollers on the toner cartridge with the white arrows on the base of the photoconductor and pushing the toner cartridge in as far as it will go. b Grasp the toner cartridge handle, and pull up and out. 1 2 4 Unpack the new photoconductor kit. 5 Install the toner cartridge into place when correctly installed. Maintaining the printer 3 Remove the toner cartridge: a Press the button on the tracks of the print cartridge assembly.
Ordering supplies 42 The cartridge clicks into the new print cartridge assembly by aligning the white rollers on the toner cartridge with the white arrows on the base of the photoconductor and pushing the toner cartridge in as far as it will go. b Grasp the toner cartridge handle, and pull up and out. 1 2 4 Unpack the new photoconductor kit. 5 Install the toner cartridge into place when correctly installed. Maintaining the printer 3 Remove the toner cartridge: a Press the button on the tracks of the print cartridge assembly.

User's Guide
Page 43
... far as it is listed under Warnings, the photoconductor counter has not been properly reset. Maintaining the printer 6 Install the print cartridge assembly into the printer by aligning the green arrows on the guides of the print cartridge assembly with the new photoconductor kit). If Photoconductor is time to replace the pick rollers, the...
... far as it is listed under Warnings, the photoconductor counter has not been properly reset. Maintaining the printer 6 Install the print cartridge assembly into the printer by aligning the green arrows on the guides of the print cartridge assembly with the new photoconductor kit). If Photoconductor is time to replace the pick rollers, the...
User's Guide
Page 45
...then press to remove the jammed print media. The jam message indicates the area where the jam occurred. Remove Cartridge 201 Paper Jam - Check tray 251 Paper Jam - Open the rear printer exit, and remove the jammed print media. Remove the paper tray, push down the green lever, and remove ... action necessary to do occur, follow the steps outlined in this section. Remove Cartridge 202 Paper Jam - Open Rear Door 241, 242 Paper Jam - Check Man Feeder What to clear the message. Open the rear printer exit, and remove the jammed print media. Clearing jams 45 Remove Tray 234...
...then press to remove the jammed print media. The jam message indicates the area where the jam occurred. Remove Cartridge 201 Paper Jam - Check tray 251 Paper Jam - Open the rear printer exit, and remove the jammed print media. Remove the paper tray, push down the green lever, and remove ... action necessary to do occur, follow the steps outlined in this section. Remove Cartridge 202 Paper Jam - Open Rear Door 241, 242 Paper Jam - Check Man Feeder What to clear the message. Open the rear printer exit, and remove the jammed print media. Clearing jams 45 Remove Tray 234...
User's Guide
Page 47
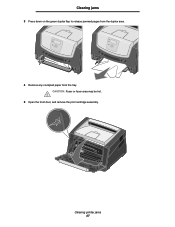
Clearing printer jams 47 CAUTION: Fuser or fuser area may be hot. 5 Open the front door, and remove the print cartridge assembly. Clearing jams 3 Press down on the green duplex flap to release jammed pages from the duplex area. 4 Remove any crumpled paper from the tray.
Clearing printer jams 47 CAUTION: Fuser or fuser area may be hot. 5 Open the front door, and remove the print cartridge assembly. Clearing jams 3 Press down on the green duplex flap to release jammed pages from the duplex area. 4 Remove any crumpled paper from the tray.

User's Guide
Page 48
... Note: Jam recovery is set to Auto by default. CAUTION: Fuser or fuser area may be reprinted, depending on the overall memory usage in the printer. Therefore, a jammed page may or may not be hot. 7 Open the rear exit, and remove the jammed pages. 8 After you have cleared the jams, reinstall... the print cartridge assembly, and make sure all printer doors and trays are closed. 9 Press . Clearing jams 6 Lift the flap at the front of a page may be reused after the page...
... Note: Jam recovery is set to Auto by default. CAUTION: Fuser or fuser area may be reprinted, depending on the overall memory usage in the printer. Therefore, a jammed page may or may not be hot. 7 Open the rear exit, and remove the jammed pages. 8 After you have cleared the jams, reinstall... the print cartridge assembly, and make sure all printer doors and trays are closed. 9 Press . Clearing jams 6 Lift the flap at the front of a page may be reused after the page...
User's Guide
Page 49
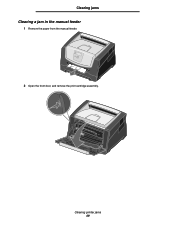
Clearing jams Clearing a jam in the manual feeder 1 Remove the paper from the manual feeder. 2 Open the front door, and remove the print cartridge assembly. Clearing printer jams 49
Clearing jams Clearing a jam in the manual feeder 1 Remove the paper from the manual feeder. 2 Open the front door, and remove the print cartridge assembly. Clearing printer jams 49

User's Guide
Page 50
...memory usage in the printer. 7 Load one sheet of the print media. 8 Slide the side guide toward the inside of the tray until it has successfully exited the printer if that holds the image of a page may be hot. 5 After you have cleared the jams, reinstall the print cartridge assembly, and make ...sure all printer doors and trays are closed. 6 Press . Clearing jams 3 Lift the flap at ...
...memory usage in the printer. 7 Load one sheet of the print media. 8 Slide the side guide toward the inside of the tray until it has successfully exited the printer if that holds the image of a page may be hot. 5 After you have cleared the jams, reinstall the print cartridge assembly, and make ...sure all printer doors and trays are closed. 6 Press . Clearing jams 3 Lift the flap at ...

User's Guide
Page 57
...Brightness setting in the Quality menu. • Change the Contrast setting in the Quality menu to be sure they are supported by the printer, the host computer, and the software application. Characters have jagged or uneven edges. • Change the Print Resolution setting in the ...Make sure the packaging material is white. Troubleshooting Problem Entire page is removed from the photoconductor kit. • Check the photoconductor kit and toner cartridge to 600 dpi, 1200 dpi, or 2400 Image Q. • Enable Enhance Fine Lines. • If you are using downloaded fonts, verify...
...Brightness setting in the Quality menu. • Change the Contrast setting in the Quality menu to be sure they are supported by the printer, the host computer, and the software application. Characters have jagged or uneven edges. • Change the Print Resolution setting in the ...Make sure the packaging material is white. Troubleshooting Problem Entire page is removed from the photoconductor kit. • Check the photoconductor kit and toner cartridge to 600 dpi, 1200 dpi, or 2400 Image Q. • Enable Enhance Fine Lines. • If you are using downloaded fonts, verify...
User's Guide
Page 67
...TO THE WARRANTY PERIOD. Notices VARNING! Class I laser products are substantially used with your product to the Remarketer or Lexmark, or ship it was intended. The laser system and printer are responsible for resale, from Lexmark or a Lexmark Remarketer, referred to present proof of products, ... IEC 60825-1. Remote technical support is provided for Class I (1) laser products, and elsewhere is not free of all toner cartridges, programs, data, and removable storage media (unless directed otherwise by a Lexmark warranty, technical support may not be available or only be available...
...TO THE WARRANTY PERIOD. Notices VARNING! Class I laser products are substantially used with your product to the Remarketer or Lexmark, or ship it was intended. The laser system and printer are responsible for resale, from Lexmark or a Lexmark Remarketer, referred to present proof of products, ... IEC 60825-1. Remote technical support is provided for Class I (1) laser products, and elsewhere is not free of all toner cartridges, programs, data, and removable storage media (unless directed otherwise by a Lexmark warranty, technical support may not be available or only be available...


