User's Guide
Page 2
... sequences...21 Understanding the secondary error light sequences...28 Understanding the secondary paper jam light sequences 34 Understanding the printer configuration menus...38 Printing the printer settings configuration sheet ...38 Loading paper and specialty media 40 Setting the paper size and paper type...40 Configuring Universal paper settings...40 Loading the standard 250-sheet tray...41 Loading the...
... sequences...21 Understanding the secondary error light sequences...28 Understanding the secondary paper jam light sequences 34 Understanding the printer configuration menus...38 Printing the printer settings configuration sheet ...38 Loading paper and specialty media 40 Setting the paper size and paper type...40 Configuring Universal paper settings...40 Loading the standard 250-sheet tray...41 Loading the...
User's Guide
Page 5
... feeder...123 Clearing jams behind the rear door...124 Troubleshooting 126 Solving basic printer problems...126 Solving printing problems...126 Jobs do not print...126 Multiple-language PDFs do not print...127 Job takes longer than expected to print ...127 Job prints from the wrong tray or on the wrong paper 127 Incorrect...
... feeder...123 Clearing jams behind the rear door...124 Troubleshooting 126 Solving basic printer problems...126 Solving printing problems...126 Jobs do not print...126 Multiple-language PDFs do not print...127 Job takes longer than expected to print ...127 Job prints from the wrong tray or on the wrong paper 127 Incorrect...

User's Guide
Page 28
Paper jam - Printer control panel Lights and buttons 1 Error 2 Jam 3 Load paper 4 Toner 5 Ready 6 Continue 7 Stop Interpreting the printer control panel lights 28 Light sequence What you can do Press twice quickly to see the secondary paper jam code. On - On Understanding the secondary error light sequences When the and lights are on page 34. For more information, see "Understanding the secondary paper jam light sequences" on simultaneously, press twice quickly to see the secondary error code.
Paper jam - Printer control panel Lights and buttons 1 Error 2 Jam 3 Load paper 4 Toner 5 Ready 6 Continue 7 Stop Interpreting the printer control panel lights 28 Light sequence What you can do Press twice quickly to see the secondary paper jam code. On - On Understanding the secondary error light sequences When the and lights are on page 34. For more information, see "Understanding the secondary paper jam light sequences" on simultaneously, press twice quickly to see the secondary error code.
User's Guide
Page 31
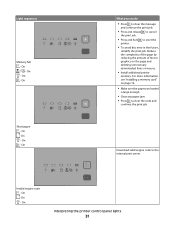
... you loaded is large enough. • Clear any paper jam. • Press to clear the code and continue the print job. Download valid engine code to reset the printer. • To avoid this error in the future, simplify the print job. On Short paper - Reduce the complexity of the page by reducing the... amount of text or graphics on page 16. • Make sure the paper you can do • Press to clear...
... you loaded is large enough. • Clear any paper jam. • Press to clear the code and continue the print job. Download valid engine code to reset the printer. • To avoid this error in the future, simplify the print job. On Short paper - Reduce the complexity of the page by reducing the... amount of text or graphics on page 16. • Make sure the paper you can do • Press to clear...

User's Guide
Page 34
... panel lights 34 Press and release twice quickly to display the secondary jam light sequence which can do to continue printing. Printer control panel Lights and buttons 1 Error 2 Jam 3 Load paper 4 Toner 5 Ready 6 Continue 7 Stop Secondary paper jam sequences on , a paper jam has occurred. On - Once the jam is removed. On - Be sure to check all areas of the...
... panel lights 34 Press and release twice quickly to display the secondary jam light sequence which can do to continue printing. Printer control panel Lights and buttons 1 Error 2 Jam 3 Load paper 4 Toner 5 Ready 6 Continue 7 Stop Secondary paper jam sequences on , a paper jam has occurred. On - Once the jam is removed. On - Be sure to check all areas of the...

User's Guide
Page 35
On Open the front door, and then open the rear door. 231.yy Paper jam - Blinking - Light sequence What you can do to access the jam Remove the photoconductor kit and toner cartridge unit. 201.yy Paper jam - On - On - On - On - On - On Interpreting the printer control panel lights 35 On Open the front door, and then open the rear door. 202.yy Paper jam -
On Open the front door, and then open the rear door. 231.yy Paper jam - Blinking - Light sequence What you can do to access the jam Remove the photoconductor kit and toner cartridge unit. 201.yy Paper jam - On - On - On - On - On - On Interpreting the printer control panel lights 35 On Open the front door, and then open the rear door. 202.yy Paper jam -
User's Guide
Page 36
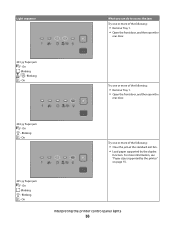
... function. Blinking - On Try one or more of the following: • Clear the jam at the standard exit bin. • Load paper supported by the printer" on page 55. 235.yy Paper jam - Blinking - Light sequence What you can do to access the jam Try one or more of the following: • Remove Tray 1. • Open...
... function. Blinking - On Try one or more of the following: • Clear the jam at the standard exit bin. • Load paper supported by the printer" on page 55. 235.yy Paper jam - Blinking - Light sequence What you can do to access the jam Try one or more of the following: • Remove Tray 1. • Open...
User's Guide
Page 37
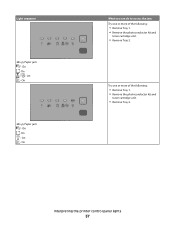
On - On - Try one or more of the following : • Remove Tray 1. • Remove the photoconductor kit and toner cartridge unit. • Remove Tray 2. On 24x.yy Paper jam - On - On What you can do to access the jam Try one or more of the following : • Remove Tray 1. • Remove the photoconductor kit and toner cartridge unit. • Remove Tray 2. On - On - Interpreting the printer control panel lights 37 Light sequence 24x.yy Paper jam - On -
On - On - Try one or more of the following : • Remove Tray 1. • Remove the photoconductor kit and toner cartridge unit. • Remove Tray 2. On 24x.yy Paper jam - On - On What you can do to access the jam Try one or more of the following : • Remove Tray 1. • Remove the photoconductor kit and toner cartridge unit. • Remove Tray 2. On - On - Interpreting the printer control panel lights 37 Light sequence 24x.yy Paper jam - On -
User's Guide
Page 38
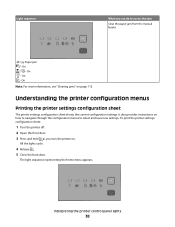
... also provides instructions on page 113. On Note: For more information, see "Clearing jams" on how to navigate through the configuration menus to access the jam Clear the paper jam from the manual feeder. 251.yy Paper jam - Light sequence What you turn the printer on. On - The light sequence representing the home menu appears. All the...
... also provides instructions on page 113. On Note: For more information, see "Clearing jams" on how to navigate through the configuration menus to access the jam Clear the paper jam from the manual feeder. 251.yy Paper jam - Light sequence What you turn the printer on. On - The light sequence representing the home menu appears. All the...
User's Guide
Page 65
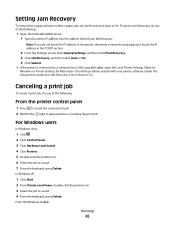
... 2 Wait for Macintosh. One of your printer software. In Windows XP: 1 Click Start. 2 From Printers and Faxes, double-click the printer icon. 3 Select the job to cancel. 7 From the keyboard, press Delete. Setting Jam Recovery To ensure that a page will reprint after a paper jam, set to Auto or On. Note: If... you do one of the following : • Open the Embedded Web Server: 1 Type the printer IP address into the address field of these utilities...
... 2 Wait for Macintosh. One of your printer software. In Windows XP: 1 Click Start. 2 From Printers and Faxes, double-click the printer icon. 3 Select the job to cancel. 7 From the keyboard, press Delete. Setting Jam Recovery To ensure that a page will reprint after a paper jam, set to Auto or On. Note: If... you do one of the following : • Open the Embedded Web Server: 1 Type the printer IP address into the address field of these utilities...
User's Guide
Page 96
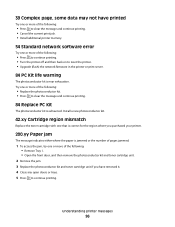
... the front door, and then remove the photoconductor kit and toner cartridge unit. 2 Remove the jam. 3 Replace the photoconductor kit and toner cartridge unit if you purchased your printer. 200.yy Paper jam The message indicates either where the paper is near exhaustion. Try one that is correct for the region where you have printed...
... the front door, and then remove the photoconductor kit and toner cartridge unit. 2 Remove the jam. 3 Replace the photoconductor kit and toner cartridge unit if you purchased your printer. 200.yy Paper jam The message indicates either where the paper is near exhaustion. Try one that is correct for the region where you have printed...
User's Guide
Page 97
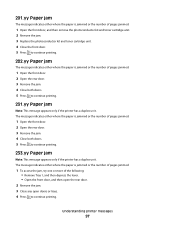
... front door. 2 Open the rear door. 3 Remove the jam. 4 Close both doors. 5 Press to continue printing. 233.yy Paper jam Note: This message appears only if the printer has a duplex unit. 201.yy Paper jam The message indicates either where the paper is jammed or the number of pages jammed. 1 Open the front door, and then remove the photoconductor...
... front door. 2 Open the rear door. 3 Remove the jam. 4 Close both doors. 5 Press to continue printing. 233.yy Paper jam Note: This message appears only if the printer has a duplex unit. 201.yy Paper jam The message indicates either where the paper is jammed or the number of pages jammed. 1 Open the front door, and then remove the photoconductor...
User's Guide
Page 98
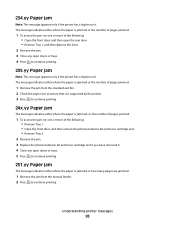
... either where the paper is jammed or the number of pages jammed. 1 Remove the jam from the standard exit bin. 2 Check the paper size to ensure that it is supported by the printer. 3 Press to continue printing. 24x.yy Paper jam The message indicates either where the paper is jammed, or the number of pages jammed. 1 To access the jam, try one...
... either where the paper is jammed or the number of pages jammed. 1 Remove the jam from the standard exit bin. 2 Check the paper size to ensure that it is supported by the printer. 3 Press to continue printing. 24x.yy Paper jam The message indicates either where the paper is jammed, or the number of pages jammed. 1 To access the jam, try one...
User's Guide
Page 114
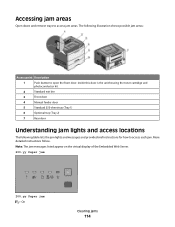
... open the front door. Note: The jam messages listed appear on the virtual display of the Embedded Web Server. 200.yy Paper jam 200.yy Paper jam - On Clearing jams 114 More detailed instructions follow. Accessing jam areas Open doors and remove trays to access each jam. The following table lists the jam lights and messages and provides brief...
... open the front door. Note: The jam messages listed appear on the virtual display of the Embedded Web Server. 200.yy Paper jam 200.yy Paper jam - On Clearing jams 114 More detailed instructions follow. Accessing jam areas Open doors and remove trays to access each jam. The following table lists the jam lights and messages and provides brief...
User's Guide
Page 115
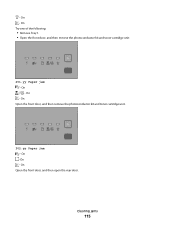
On - On Open the front door, and then open the rear door. On - On - On - - On - On Open the front door, and then remove the photoconductor kit and toner cartridge unit. 202.yy Paper jam - Clearing jams 115 On Try one of the following: • Remove Tray 1. • Open the front door, and then remove the photoconductor kit and toner cartridge unit. 201.yy Paper jam -
On - On Open the front door, and then open the rear door. On - On - On - - On - On Open the front door, and then remove the photoconductor kit and toner cartridge unit. 202.yy Paper jam - Clearing jams 115 On Try one of the following: • Remove Tray 1. • Open the front door, and then remove the photoconductor kit and toner cartridge unit. 201.yy Paper jam -

User's Guide
Page 116
Blinking - Blinking - On - 231.yy Paper jam - Blinking - On Try one of the following: • Remove Tray 1, and then depress the lever. • Open the front door, and then open the rear door. 233.yy Paper jam - On Open the front door, and then open the rear door. 234.yy Paper jam Clearing jams 116 On -
Blinking - Blinking - On - 231.yy Paper jam - Blinking - On Try one of the following: • Remove Tray 1, and then depress the lever. • Open the front door, and then open the rear door. 233.yy Paper jam - On Open the front door, and then open the rear door. 234.yy Paper jam Clearing jams 116 On -

User's Guide
Page 117
- Blinking - On Remove the jam from the standard exit bin. 24x.yy Paper jam - On - On - On Try one of the following : • Remove Tray 1. • Open the front door, and then remove the photoconductor kit and toner cartridge unit. • Remove Tray 2. Blinking - On - Blinking - On Try one of the following : • Open the front door, and then open the rear door. • Remove Tray 1, and then depress the lever. 235.yy Paper jam - On - Clearing jams 117 On -
- Blinking - On Remove the jam from the standard exit bin. 24x.yy Paper jam - On - On - On Try one of the following : • Remove Tray 1. • Open the front door, and then remove the photoconductor kit and toner cartridge unit. • Remove Tray 2. Blinking - On - Blinking - On Try one of the following : • Open the front door, and then open the rear door. • Remove Tray 1, and then depress the lever. 235.yy Paper jam - On - Clearing jams 117 On -

User's Guide
Page 118
On - On Remove the jam from the manual feeder. Clearing jams behind the photoconductor kit and toner cartridge 1 Push the release button, and then lower the front door. 251.yy Paper jam - Clearing jams 118 On - On -
On - On Remove the jam from the manual feeder. Clearing jams behind the photoconductor kit and toner cartridge 1 Push the release button, and then lower the front door. 251.yy Paper jam - Clearing jams 118 On - On -

User's Guide
Page 123
Clearing jams in the manual feeder Paper jammed in the manual feeder can usually be removed this way, check for jammed paper behind the photoconductor kit and toner cartridge" on page 118. Clearing jams 123 If the jam cannot be grasped and pulled straight out. For more information, see "Clearing jams behind the photoconductor kit and toner cartridge unit. 3 Insert the tray. 4 Press to continue printing.
Clearing jams in the manual feeder Paper jammed in the manual feeder can usually be removed this way, check for jammed paper behind the photoconductor kit and toner cartridge" on page 118. Clearing jams 123 If the jam cannot be grasped and pulled straight out. For more information, see "Clearing jams behind the photoconductor kit and toner cartridge unit. 3 Insert the tray. 4 Press to continue printing.
User's Guide
Page 129
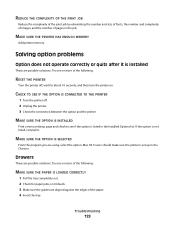
... program you are possible solutions. Try one or more of the following : MAKE SURE THE PAPER IS LOADED CORRECTLY 1 Pull the tray completely out. 2 Check for about 10 seconds, and then turn the printer on. If the option is installed These are aligned against the edges of pages in the... print job by eliminating the number and size of fonts, the number and complexity of images, and the number of the paper. 4 Insert the tray. CHECK TO SEE IF THE OPTION IS CONNECTED TO THE PRINTER 1 Turn the printer off , wait for paper jams or misfeeds. 3 Make sure the guides are possible solutions.
... program you are possible solutions. Try one or more of the following : MAKE SURE THE PAPER IS LOADED CORRECTLY 1 Pull the tray completely out. 2 Check for about 10 seconds, and then turn the printer on. If the option is installed These are aligned against the edges of pages in the... print job by eliminating the number and size of fonts, the number and complexity of images, and the number of the paper. 4 Insert the tray. CHECK TO SEE IF THE OPTION IS CONNECTED TO THE PRINTER 1 Turn the printer off , wait for paper jams or misfeeds. 3 Make sure the guides are possible solutions.


