
Quick Reference
Page 4
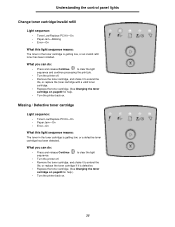
Common light sequences (continued) = On = Blinking = Slow blink Empty = Off Printer Condition Complex page Continue Toner Low / Error Replace PC Kit Load Paper Paper Jam Ready Cancel job/ Reset printer Load print media Load manual feeder Toner low Toner cartridge region mismatch Photoconductor kit life warning Replace photoconductor (printer hard stop) Programming engine code/ Programming system code Understanding the control panel lights 4
Common light sequences (continued) = On = Blinking = Slow blink Empty = Off Printer Condition Complex page Continue Toner Low / Error Replace PC Kit Load Paper Paper Jam Ready Cancel job/ Reset printer Load print media Load manual feeder Toner low Toner cartridge region mismatch Photoconductor kit life warning Replace photoconductor (printer hard stop) Programming engine code/ Programming system code Understanding the control panel lights 4
Quick Reference
Page 17
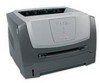
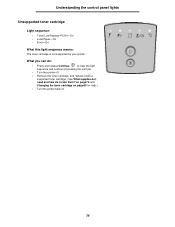
4 With the tray removed, press down on the green duplex flap to remove the jammed pages from the duplex area. 5 Install the 250-sheet tray. 6 Open the front door, and remove the print cartridge assembly. 1 2 3 Clearing jams 17
4 With the tray removed, press down on the green duplex flap to remove the jammed pages from the duplex area. 5 Install the 250-sheet tray. 6 Open the front door, and remove the print cartridge assembly. 1 2 3 Clearing jams 17
Quick Reference
Page 18
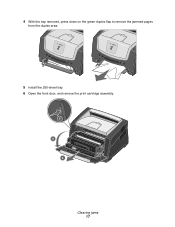
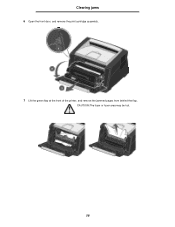
...be hot. 8 Open the rear exit door, and remove the jammed pages. 9 After you have cleared the jammed pages, reinstall the print cartridge assembly, and securely close all the printer doors. 10 Press Continue to Auto, the memory that holds the image of a page may not be reprinted, depending on the overall...the flap. Clearing jams 18 7 Lift the green flap at the front of the printer. CAUTION:The fuser or fuser area may be reused after the page is printed but before it has successfully exited the printer if that memory is set to resume printing. Note: Jam recovery is needed for ...
...be hot. 8 Open the rear exit door, and remove the jammed pages. 9 After you have cleared the jammed pages, reinstall the print cartridge assembly, and securely close all the printer doors. 10 Press Continue to Auto, the memory that holds the image of a page may not be reprinted, depending on the overall...the flap. Clearing jams 18 7 Lift the green flap at the front of the printer. CAUTION:The fuser or fuser area may be reused after the page is printed but before it has successfully exited the printer if that memory is set to resume printing. Note: Jam recovery is needed for ...
User's Guide
Page 4
... the toner cartridge ...80 Changing the photoconductor kit ...82 Recycling Lexmark products ...84 Chapter 9: Troubleshooting 85 General problems ...85 Lexmark Status Messenger Utility ...86 Selecting printer operating mode ......86 Turning on Reduced Curl mode ...86 Print quality problems ...87 Cleaning the printhead lens ...91 Notices ...93 Conventions ...93 Electronic emission notices ...93 Noise emission levels ...95 Product energy consumption ...95 Waste from Electrical and Electronic Equipment (WEEE) directive 96 Laser...
... the toner cartridge ...80 Changing the photoconductor kit ...82 Recycling Lexmark products ...84 Chapter 9: Troubleshooting 85 General problems ...85 Lexmark Status Messenger Utility ...86 Selecting printer operating mode ......86 Turning on Reduced Curl mode ...86 Print quality problems ...87 Cleaning the printhead lens ...91 Notices ...93 Conventions ...93 Electronic emission notices ...93 Noise emission levels ...95 Product energy consumption ...95 Waste from Electrical and Electronic Equipment (WEEE) directive 96 Laser...

User's Guide
Page 9
Understanding the control panel lights Common light sequences (continued) = On = Blinking = Slow blink Empty = Off Printer Condition Complex page Page Continue 14 Error Toner Low / Replace PC Kit Load Paper Paper Jam Ready Cancel job/ Reset printer 15 Load print media 15 Load manual feeder 16 Toner low 16 Toner cartridge region 17 mismatch Photoconductor kit life 17 warning Replace photoconductor 18 (printer hard stop) Programming engine 18 code/ Programming system code Invalid engine code / 19 Invalid network code 9
Understanding the control panel lights Common light sequences (continued) = On = Blinking = Slow blink Empty = Off Printer Condition Complex page Page Continue 14 Error Toner Low / Replace PC Kit Load Paper Paper Jam Ready Cancel job/ Reset printer 15 Load print media 15 Load manual feeder 16 Toner low 16 Toner cartridge region 17 mismatch Photoconductor kit life 17 warning Replace photoconductor 18 (printer hard stop) Programming engine 18 code/ Programming system code Invalid engine code / 19 Invalid network code 9

User's Guide
Page 16
...PC Kit-On What this light sequence means: The printer prompts you can do : • Press and release Continue to clear the light sequence and continue processing the print job. • Turn the printer off. • Remove the toner cartridge, and shake it to extend the life. •... Replace the toner cartridge. (See Changing the toner cartridge on page80 for help.) • Turn the printer back on. 16 What you can do : • ...
...PC Kit-On What this light sequence means: The printer prompts you can do : • Press and release Continue to clear the light sequence and continue processing the print job. • Turn the printer off. • Remove the toner cartridge, and shake it to extend the life. •... Replace the toner cartridge. (See Changing the toner cartridge on page80 for help.) • Turn the printer back on. 16 What you can do : • ...
User's Guide
Page 17
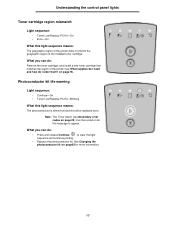
... sequence means: The geographic region of the printer does not match the geographic region of the printer (see Secondary error codes on page25) must be replaced soon. What you can do: Remove the toner cartridge, and install a new toner cartridge that matches the region of the installed toner cartridge. What you can do I order them...
... sequence means: The geographic region of the printer does not match the geographic region of the printer (see Secondary error codes on page25) must be replaced soon. What you can do: Remove the toner cartridge, and install a new toner cartridge that matches the region of the installed toner cartridge. What you can do I order them...
User's Guide
Page 24
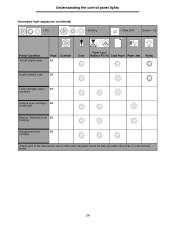
Understanding the control panel lights Secondary light sequences (continued) = On = Blinking = Slow blink Empty = Off Printer Condition Invalid engine code Page Continue 34 Error Toner Low / Replace PC Kit Load Paper Paper Jam Ready Invalid network code 34 Toner cartridge region 34 mismatch Change toner cartridge / 35 invalid refill Missing / Defective toner 35 cartridge Unsupported toner 36 cartridge *Paper jams at the input sensor can be either after the paper leaves the tray and enters the printer or in the manual feeder. 24
Understanding the control panel lights Secondary light sequences (continued) = On = Blinking = Slow blink Empty = Off Printer Condition Invalid engine code Page Continue 34 Error Toner Low / Replace PC Kit Load Paper Paper Jam Ready Invalid network code 34 Toner cartridge region 34 mismatch Change toner cartridge / 35 invalid refill Missing / Defective toner 35 cartridge Unsupported toner 36 cartridge *Paper jams at the input sensor can be either after the paper leaves the tray and enters the printer or in the manual feeder. 24
User's Guide
Page 26
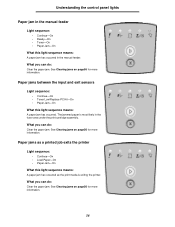
...-On • Paper Jam-On What this light sequence means: A paper jam has occurred in the fuser area under the print cartridge assembly. The jammed paper is exiting the printer. What you can do : Clear the paper jam. Paper jams between the input and exit sensors Light sequence: • Continue-On... light sequence means: A paper jam has occurred as the print media is most likely in the manual feeder. Paper jams as a printed job exits the printer Light sequence: • Continue-On • Load Paper-On • Paper Jam-On What this light sequence means: A paper jam has occurred. What ...
...-On • Paper Jam-On What this light sequence means: A paper jam has occurred in the fuser area under the print cartridge assembly. The jammed paper is exiting the printer. What you can do : Clear the paper jam. Paper jams between the input and exit sensors Light sequence: • Continue-On... light sequence means: A paper jam has occurred as the print media is most likely in the manual feeder. Paper jams as a printed job exits the printer Light sequence: • Continue-On • Load Paper-On • Paper Jam-On What this light sequence means: A paper jam has occurred. What ...
User's Guide
Page 34
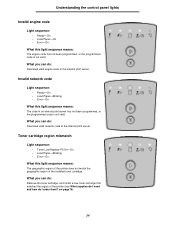
...Download valid network code to the internal print server. What you can do: Remove the toner cartridge, and install a new toner cartridge that matches the region of the installed toner cartridge. Toner cartridge region mismatch Light sequence: • Toner Low/Replace PC Kit-On • Load Paper...-Blinking • Error-On What this light sequence means: The geographic region of the printer does not match the geographic region of the printer (see What ...
...Download valid network code to the internal print server. What you can do: Remove the toner cartridge, and install a new toner cartridge that matches the region of the installed toner cartridge. Toner cartridge region mismatch Light sequence: • Toner Low/Replace PC Kit-On • Load Paper...-Blinking • Error-On What this light sequence means: The geographic region of the printer does not match the geographic region of the printer (see What ...
User's Guide
Page 35
...-On • Paper Jam-Blinking • Error-On What this light sequence means: The toner in the toner cartridge is defective. • Replace the toner cartridge. (See Changing the toner cartridge on page80 for help .) • Turn the printer back on . What you can do : • Press and release Continue sequence. Missing / Defective toner...
...-On • Paper Jam-Blinking • Error-On What this light sequence means: The toner in the toner cartridge is defective. • Replace the toner cartridge. (See Changing the toner cartridge on page80 for help .) • Turn the printer back on . What you can do : • Press and release Continue sequence. Missing / Defective toner...
User's Guide
Page 36
...8226; Toner Low/Replace PC Kit-On • Load Paper-On • Error-On What this light sequence means: The toner cartridge is not supported by your printer. What you can do: • Press and release Continue to clear the light sequence and continue processing the print job. •... Turn the printer off. • Remove the toner cartridge, and replace it with a supported toner cartridge. (See What supplies do I need and how do I order them? on page76 and Changing the toner cartridge on page80 for help.) • Turn the...
...8226; Toner Low/Replace PC Kit-On • Load Paper-On • Error-On What this light sequence means: The toner cartridge is not supported by your printer. What you can do: • Press and release Continue to clear the light sequence and continue processing the print job. •... Turn the printer off. • Remove the toner cartridge, and replace it with a supported toner cartridge. (See What supplies do I need and how do I order them? on page76 and Changing the toner cartridge on page80 for help.) • Turn the...
User's Guide
Page 40
... and hold Continue to the factory default values. To exit Hex Trace, turn off the printer. • Off* • On Help isolate print quality problems, such as streaking. cartridge information - Press and hold Continue to initiate this operation and return the photoconductor counter to ...change printer settings on jobs sent through a Universal Serial Bus (USB) port. Configuration menus ...
... and hold Continue to the factory default values. To exit Hex Trace, turn off the printer. • Off* • On Help isolate print quality problems, such as streaking. cartridge information - Press and hold Continue to initiate this operation and return the photoconductor counter to ...change printer settings on jobs sent through a Universal Serial Bus (USB) port. Configuration menus ...
User's Guide
Page 58
CAUTION:The fuser or fuser area may be hot. 58 Clearing jams 6 Open the front door, and remove the print cartridge assembly. 7 Lift the green flap at the front of the printer, and remove the jammed pages from behind the flap.
CAUTION:The fuser or fuser area may be hot. 58 Clearing jams 6 Open the front door, and remove the print cartridge assembly. 7 Lift the green flap at the front of the printer, and remove the jammed pages from behind the flap.
User's Guide
Page 59
...the overall memory usage of a page may not be reused after the page is printed but before it has successfully exited the printer if that holds the image of the printer. 59 Clearing jams 8 Open the rear exit door, and remove the jammed pages. 9 After you have cleared the jammed ...pages, reinstall the print cartridge assembly, and securely close all the printer doors. 10 Press Continue to Auto by default. When jam recovery is ...
...the overall memory usage of a page may not be reused after the page is printed but before it has successfully exited the printer if that holds the image of the printer. 59 Clearing jams 8 Open the rear exit door, and remove the jammed pages. 9 After you have cleared the jammed ...pages, reinstall the print cartridge assembly, and securely close all the printer doors. 10 Press Continue to Auto by default. When jam recovery is ...

User's Guide
Page 76
...How often the toner cartridge should be replaced depends on which together comprise the print cartridge assembly. In other countries or regions, visit the Lexmark online store at approximately 5% coverage), whereas the toner cartridge has to be ...replaced more frequently. Within the United States or Canada, you , call 1-800-539-6275. The recommended supplies specifically designed for use only in Latin America. *Declared yield value in accordance with ISO/IEC 19752 †Based on your printer...
...How often the toner cartridge should be replaced depends on which together comprise the print cartridge assembly. In other countries or regions, visit the Lexmark online store at approximately 5% coverage), whereas the toner cartridge has to be ...replaced more frequently. Within the United States or Canada, you , call 1-800-539-6275. The recommended supplies specifically designed for use only in Latin America. *Declared yield value in accordance with ISO/IEC 19752 †Based on your printer...
User's Guide
Page 78
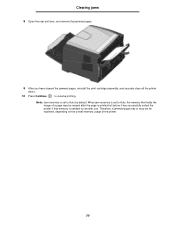
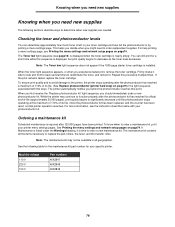
... photoconductor kit" light sequence, you experience faded print, remove the toner cartridge. For more information, see the instruction sheet that came with this stop ) on page9for the light sequence associated with your printer menu settings pages. See Printing the menu settings and network setup pages ...new supplies The following table for the maintenance kit part number for a short time while this sequence is left in your specific printer. The maintenance kit contains all geographies. The Toner low light sequence (see Printing the menu settings and network setup pages on ...
... photoconductor kit" light sequence, you experience faded print, remove the toner cartridge. For more information, see the instruction sheet that came with this stop ) on page9for the light sequence associated with your printer menu settings pages. See Printing the menu settings and network setup pages ...new supplies The following table for the maintenance kit part number for a short time while this sequence is left in your specific printer. The maintenance kit contains all geographies. The Toner low light sequence (see Printing the menu settings and network setup pages on ...
User's Guide
Page 80
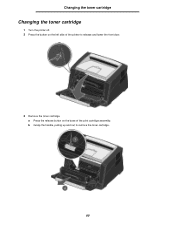
b Grasp the handle, pulling up and out to release and lower the front door. 3 Remove the toner cartridge. Changing the toner cartridge Changing the toner cartridge 1 Turn the printer off. 2 Press the button on the base of the printer to remove the toner cartridge. 80 a Press the release button on the left side of the print cartridge assembly.
b Grasp the handle, pulling up and out to release and lower the front door. 3 Remove the toner cartridge. Changing the toner cartridge Changing the toner cartridge 1 Turn the printer off. 2 Press the button on the base of the printer to remove the toner cartridge. 80 a Press the release button on the left side of the print cartridge assembly.
User's Guide
Page 81
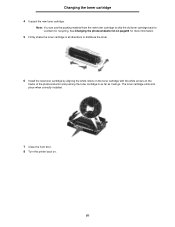
... when correctly installed. 7 Close the front door. 8 Turn the printer back on the tracks of the photoconductor and pushing the toner cartridge in all directions to Lexmark for recycling. See Changing the photoconductor kit on page82 for more information. 5 Firmly shake the toner cartridge in as far as it will go. Note: You can...
... when correctly installed. 7 Close the front door. 8 Turn the printer back on the tracks of the photoconductor and pushing the toner cartridge in all directions to Lexmark for recycling. See Changing the photoconductor kit on page82 for more information. 5 Firmly shake the toner cartridge in as far as it will go. Note: You can...
User's Guide
Page 82
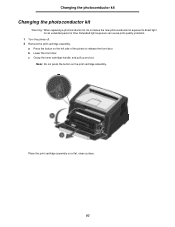
b Lower the front door. Place the print cartridge assembly on the print cartridge assembly. Extended light exposure can cause print quality problems. 1 Turn the printer off. 2 Remove the print cartridge assembly. c Grasp the toner cartridge handle, and pull up and out. Note: Do not press the button on a flat, clean surface. 82 Changing the photoconductor kit...
b Lower the front door. Place the print cartridge assembly on the print cartridge assembly. Extended light exposure can cause print quality problems. 1 Turn the printer off. 2 Remove the print cartridge assembly. c Grasp the toner cartridge handle, and pull up and out. Note: Do not press the button on a flat, clean surface. 82 Changing the photoconductor kit...

