
IPDS Emulation User’s Guide
Page 3
...20 3.3 EMULATION - Options Descriptions 22 3.3.1 IPDS Emulation ...22 3.3.2 Host Resolution ...22 3.3.3 Color Processing ...23 3.3.4 Text Processing ...23 3.3.5 Toner Saver ...23 3.3.6 BAR CODE ...23 3.3.6.1 Bar Code Symbol ...23 3.3.6.2 Bar Code Size...24 3.3.7 DEFAULT CODEPAGE ...24 3.3.8 Codepage Version ... DEFAULT FGID...25 3.3.10 Default CPI ...25 3.3.11 Page Counter ...25 3.3.12 Printable Area...26 3.3.13 Exception Control ...27 3 Printer Setup Options 11 2.2 Changing IPDS Settings Using the Operator Panel 12 2.2.1 Accessing the IPDS MENU...12 2.2.2 Example: Selecting a New Value...
...20 3.3 EMULATION - Options Descriptions 22 3.3.1 IPDS Emulation ...22 3.3.2 Host Resolution ...22 3.3.3 Color Processing ...23 3.3.4 Text Processing ...23 3.3.5 Toner Saver ...23 3.3.6 BAR CODE ...23 3.3.6.1 Bar Code Symbol ...23 3.3.6.2 Bar Code Size...24 3.3.7 DEFAULT CODEPAGE ...24 3.3.8 Codepage Version ... DEFAULT FGID...25 3.3.10 Default CPI ...25 3.3.11 Page Counter ...25 3.3.12 Printable Area...26 3.3.13 Exception Control ...27 3 Printer Setup Options 11 2.2 Changing IPDS Settings Using the Operator Panel 12 2.2.1 Accessing the IPDS MENU...12 2.2.2 Example: Selecting a New Value...

IPDS Emulation User’s Guide
Page 19
... Remove Fonts * Available only in monochrome products Note: Only those menu items that are supported by the product are displayed on the printer under the sub-menus reached from the IPDS MENU, located under the Option Card Menu. IPDS MENU EMULATION PAPER HANDLING MAP INPUT TRAYS... MAP OUTPUT BINS MARGINS FONT CAPTURE IPDS Emulation Host Resolution Color Processing Text Processing Toner Saver * BAR CODE Bar Code Symbol Bar Code Size DEFAULT CODEPAGE Codepage Version DEFAULT FGID Default CPI Page Counter Printable Area Exception...
... Remove Fonts * Available only in monochrome products Note: Only those menu items that are supported by the product are displayed on the printer under the sub-menus reached from the IPDS MENU, located under the Option Card Menu. IPDS MENU EMULATION PAPER HANDLING MAP INPUT TRAYS... MAP OUTPUT BINS MARGINS FONT CAPTURE IPDS Emulation Host Resolution Color Processing Text Processing Toner Saver * BAR CODE Bar Code Symbol Bar Code Size DEFAULT CODEPAGE Codepage Version DEFAULT FGID Default CPI Page Counter Printable Area Exception...
IPDS Emulation User’s Guide
Page 20
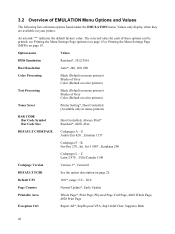
The selected value for each of Grey Color (Default on color printers) Toner Saver Printer Setting*, Host Controlled (Available only in mono printers) BAR CODE Bar Code Symbol Bar Code Size Host Controlled, Always Print* Resident*, 4028, 43xx DEFAULT CODEPAGE Codepages A - Default CPI... Values IPDS Emulation Resident*, 3812/3816 Host Resolution Auto*, 240, 300, 600 Color Processing Black (Default on mono printers) Shades of Grey Color (Default on color printers) Text Processing Black (Default on page 18. Set 5 500*...Katakana 290 Codepages L - 3.2 Overview of EMULATION Menu...
The selected value for each of Grey Color (Default on color printers) Toner Saver Printer Setting*, Host Controlled (Available only in mono printers) BAR CODE Bar Code Symbol Bar Code Size Host Controlled, Always Print* Resident*, 4028, 43xx DEFAULT CODEPAGE Codepages A - Default CPI... Values IPDS Emulation Resident*, 3812/3816 Host Resolution Auto*, 240, 300, 600 Color Processing Black (Default on mono printers) Shades of Grey Color (Default on color printers) Text Processing Black (Default on page 18. Set 5 500*...Katakana 290 Codepages L - 3.2 Overview of EMULATION Menu...
IPDS Emulation User’s Guide
Page 23
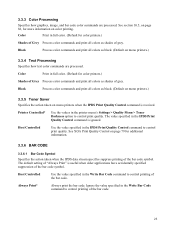
... color commands and print all colors as shades of grey. The value specified in the printer menu's Settings > Quality Menu > Toner Darkness option to control print quality. Printer Controlled* Use the values in the IPDS Print Quality Control command is ignored. See section...received. Color Print in full color. (Default for color printers.) Shades of Grey Process color commands and print all colors as black. (Default on mono printers.) 3.3.5 Toner Saver Specifies the action taken on mono printers.) 3.3.4 Text Processing Specifies how text color commands are processed...
... color commands and print all colors as shades of grey. The value specified in the printer menu's Settings > Quality Menu > Toner Darkness option to control print quality. Printer Controlled* Use the values in the IPDS Print Quality Control command is ignored. See section...received. Color Print in full color. (Default for color printers.) Shades of Grey Process color commands and print all colors as black. (Default on mono printers.) 3.3.5 Toner Saver Specifies the action taken on mono printers.) 3.3.4 Text Processing Specifies how text color commands are processed...
IPDS Emulation User’s Guide
Page 26
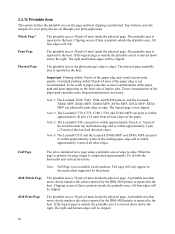
...The physical page printable area is moved down and to the right. Toner contamination of the leading paper edge and to within approximately 40 pels (3.4 mm) from all other edges. Note 1: The Lexmark T640, T642, T644, and W840 printers, and the Lexmark X644e MFP, X646e MFP, X646ef MFP, X850e MFP, X852e MFP,... within 50 pels (4 mm) of the non-feed direction edges. Note 4: The Lexmark C935 and the Lexmark X940e MFP and X945e MFP can physically print edge to toner contamination of the paper path and toner appearing on the back side of the paper edge may result in both the horizontal and...
...The physical page printable area is moved down and to the right. Toner contamination of the leading paper edge and to within approximately 40 pels (3.4 mm) from all other edges. Note 1: The Lexmark T640, T642, T644, and W840 printers, and the Lexmark X644e MFP, X646e MFP, X646ef MFP, X850e MFP, X852e MFP,... within 50 pels (4 mm) of the non-feed direction edges. Note 4: The Lexmark C935 and the Lexmark X940e MFP and X945e MFP can physically print edge to toner contamination of the paper path and toner appearing on the back side of the paper edge may result in both the horizontal and...

IPDS Emulation User’s Guide
Page 79
...in Settings > Quality Menu ). Use the operator panel value specified in the printer menu's Toner Darkness option (in Settings > Quality Menu). The last print quality setting is saved across sessions when the printer and host settings are set correctly to allow resources to determine the factory default... Values Quality Level (Byte 2 Value) X'01' - Factory default setting. Use the operator panel value specified in the printer menu's Toner Darkness option (in the IPDS MENU affects the processing of X'00' was received. 10 Command Reference 10.1 XOA Print Quality Control Monochrome...
...in Settings > Quality Menu ). Use the operator panel value specified in the printer menu's Toner Darkness option (in Settings > Quality Menu). The last print quality setting is saved across sessions when the printer and host settings are set correctly to allow resources to determine the factory default... Values Quality Level (Byte 2 Value) X'01' - Factory default setting. Use the operator panel value specified in the printer menu's Toner Darkness option (in the IPDS MENU affects the processing of X'00' was received. 10 Command Reference 10.1 XOA Print Quality Control Monochrome...
IPDS Emulation User’s Guide
Page 125
...Res 28 IPDS Timeout 29 IPDS Version 31 Page Counter (update method 25 Print IPDS Fonts 30 Printable Area 26 Text Processing 23 Toner Saver 23 Trace Functions 31 ENV FEEDER ADJ (IPDS MENU > MARGINS 46 envelopes feed direction 36 size 34 equipment requirements 8 error... Short) (bar code)........ 109 edge-to print from touch screen 18 duplex printing using a browser .......... 76 control panel........See operator panel (printers) or touch screen (MFPs) Coordinated Font Set 102 Coordinated Font Set 92 Coordinated Font Set Code Page Support...... 102 Core Interchange Font Set 92...
...Res 28 IPDS Timeout 29 IPDS Version 31 Page Counter (update method 25 Print IPDS Fonts 30 Printable Area 26 Text Processing 23 Toner Saver 23 Trace Functions 31 ENV FEEDER ADJ (IPDS MENU > MARGINS 46 envelopes feed direction 36 size 34 equipment requirements 8 error... Short) (bar code)........ 109 edge-to print from touch screen 18 duplex printing using a browser .......... 76 control panel........See operator panel (printers) or touch screen (MFPs) Coordinated Font Set 102 Coordinated Font Set 92 Coordinated Font Set Code Page Support...... 102 Core Interchange Font Set 92...
IPDS Emulation User’s Guide
Page 129
... overview 51, 52 Storage of IPDS Resources 29, 30 support (customer or technical 9 supported printers 8 system requirements 8 T text color processing 23 Text Processing (IPDS MENU > EMULATION) 23 timeout printer IPDS Timeout and Host Timer or Host Timeout 29 Toner Saver (IPDS MENU > EMULATION). 23 touch screen accessing the IPDS MENU 16 complete overview...
... overview 51, 52 Storage of IPDS Resources 29, 30 support (customer or technical 9 supported printers 8 system requirements 8 T text color processing 23 Text Processing (IPDS MENU > EMULATION) 23 timeout printer IPDS Timeout and Host Timer or Host Timeout 29 Toner Saver (IPDS MENU > EMULATION). 23 touch screen accessing the IPDS MENU 16 complete overview...

Troubleshooting Guide
Page 4
...side-to-side and front-to-back several times to run the printer setup cycle and clean the transfer roll. Reinstall the cartridge and then press . Toner smears or print comes off . 2 Hold down and , and turn the printer on the operator panel until the print remains faded. Open and...printing on the back of media loaded. Print is selected, and then press . 5 The messages Resetting Printer and Performing Self Test appear, and the printer returns to Auto or On. To utilize the remaining toner, remove the cartridge by Config Menu. 3 Press until Exit Config Menu is too light. •...
...side-to-side and front-to-back several times to run the printer setup cycle and clean the transfer roll. Reinstall the cartridge and then press . Toner smears or print comes off . 2 Hold down and , and turn the printer on the operator panel until the print remains faded. Open and...printing on the back of media loaded. Print is selected, and then press . 5 The messages Resetting Printer and Performing Self Test appear, and the printer returns to Auto or On. To utilize the remaining toner, remove the cartridge by Config Menu. 3 Press until Exit Config Menu is too light. •...
Troubleshooting Guide
Page 5
...and then press . Entire page is white • The toner may be low. To utilize the remaining toner, remove the cartridge by gripping the handles with both hands. To utilize the remaining toner, remove the cartridge by the printer, the host computer, and the software application. • ...the print cartridge side-to-side and front-to-back several times to redistribute the toner. When the print remains faded replace the print cartridge. • If you are using the correct printer drivers. • Verify the environment is Class B. Repeat this procedure multiple times ...
...and then press . Entire page is white • The toner may be low. To utilize the remaining toner, remove the cartridge by gripping the handles with both hands. To utilize the remaining toner, remove the cartridge by the printer, the host computer, and the software application. • ...the print cartridge side-to-side and front-to-back several times to redistribute the toner. When the print remains faded replace the print cartridge. • If you are using the correct printer drivers. • Verify the environment is Class B. Repeat this procedure multiple times ...

User's Guide
Page 75
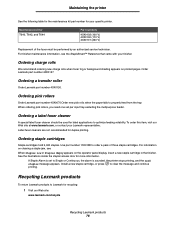
...16 images on the front and 16 on the publications CD. Maintaining the printer Determining the status of supplies The printer operator panel alerts you can cancel the job. It lets you know if any remaining toner. Lets you can also view the status of paper. Selecting Status / Supplies... on the display will indicate the printer is required. See Ordering a print cartridge for more information about a Verify Print job....
...16 images on the front and 16 on the publications CD. Maintaining the printer Determining the status of supplies The printer operator panel alerts you can cancel the job. It lets you know if any remaining toner. Lets you can also view the status of paper. Selecting Status / Supplies... on the display will indicate the printer is required. See Ordering a print cartridge for more information about a Verify Print job....
User's Guide
Page 76
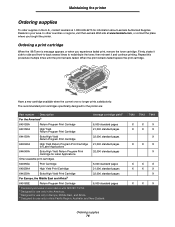
...-to-back several times to redistribute the toner, then reinsert it and continue printing. When the print remains faded replace the print cartridge. Maintaining the printer Ordering supplies To order supplies in the U.S., contact Lexmark at www.lexmark.com, or contact the place where you... experience faded print, remove the toner cartridge. Have a new cartridge available when the current one ...
...-to-back several times to redistribute the toner, then reinsert it and continue printing. When the print remains faded replace the print cartridge. Maintaining the printer Ordering supplies To order supplies in the U.S., contact Lexmark at www.lexmark.com, or contact the place where you... experience faded print, remove the toner cartridge. Have a new cartridge available when the current one ...
User's Guide
Page 78
...special label fuser cleaner should be performed by an authorized service technician. Ordering charge rolls We recommend ordering new charge rolls when toner fog or background shading appears on the operator panel display, insert a new staple cartridge in the finisher. When ordering pick rollers...8482; Reference that came with your specific printer. Maintenance kit for recycling: 1 Visit our Web site: www.lexmark.com/recycle Recycling Lexmark products 78 To order this item, visit our Web site at www.lexmark.com, or contact your Lexmark representative. Label fuser cleaners are not ...
...special label fuser cleaner should be performed by an authorized service technician. Ordering charge rolls We recommend ordering new charge rolls when toner fog or background shading appears on the operator panel display, insert a new staple cartridge in the finisher. When ordering pick rollers...8482; Reference that came with your specific printer. Maintenance kit for recycling: 1 Visit our Web site: www.lexmark.com/recycle Recycling Lexmark products 78 To order this item, visit our Web site at www.lexmark.com, or contact your Lexmark representative. Label fuser cleaners are not ...

User's Guide
Page 87
... whenever you are holding the cartridge. 4 Place the print cartridge aside. Warning: Do not touch the photoconductor drum on the underside of the printer. Clearing jams 200 and 201 Paper Jam Remove Cartridge 1 Push the release latch, and lower the multipurpose feeder. 2 Push the release latch,... the top front cover. Note: The print media may be covered with unfused toner, which can stain garments and skin. Clearing printer jams 87 CAUTION: The inside of the printer may be hot. Allow the printer to light for extended periods. Note: Do not leave the cartridge exposed to cool...
... whenever you are holding the cartridge. 4 Place the print cartridge aside. Warning: Do not touch the photoconductor drum on the underside of the printer. Clearing jams 200 and 201 Paper Jam Remove Cartridge 1 Push the release latch, and lower the multipurpose feeder. 2 Push the release latch,... the top front cover. Note: The print media may be covered with unfused toner, which can stain garments and skin. Clearing printer jams 87 CAUTION: The inside of the printer may be hot. Allow the printer to light for extended periods. Note: Do not leave the cartridge exposed to cool...

User's Guide
Page 88
You need to the printer. This could cause personal injury or damage to access the print media from the printer rear door. 6 Align and reinstall the toner cartridge. 7 Close the top front cover. 8 Close the multipurpose feeder. 9 Press . Clearing jams 5 Pull the print media up and toward you pull, stop pulling. CAUTION: Do not use any pointed objects to remove the paper. Clearing printer jams 88 Warning: If the print media does not move immediately when you .
You need to the printer. This could cause personal injury or damage to access the print media from the printer rear door. 6 Align and reinstall the toner cartridge. 7 Close the top front cover. 8 Close the multipurpose feeder. 9 Press . Clearing jams 5 Pull the print media up and toward you pull, stop pulling. CAUTION: Do not use any pointed objects to remove the paper. Clearing printer jams 88 Warning: If the print media does not move immediately when you .
User's Guide
Page 110
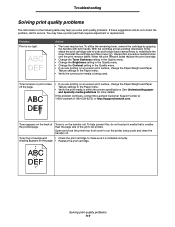
... front-to-back several times to run the printer setup cycle and clean the transfer roll. See Understanding paper and specialty media guidelines for service. If the problem continues, contact the Lexmark Customer Support Center at 1-800-Lexmark (1-800-539-6275) or http://support.lexmark.com. Toner smears or print comes off the page. •...
... front-to-back several times to run the printer setup cycle and clean the transfer roll. See Understanding paper and specialty media guidelines for service. If the problem continues, contact the Lexmark Customer Support Center at 1-800-Lexmark (1-800-539-6275) or http://support.lexmark.com. Toner smears or print comes off the page. •...
User's Guide
Page 111
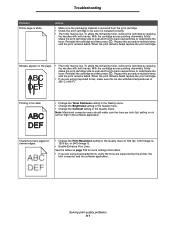
...Reinstall the cartridge and then press . Streaks appear on page 113 for more settings information. • If you are supported by the printer, the host computer, and the software application. Reinstall the cartridge and then press . With the cartridge arrows pointing downward, firmly shake the... quality problems 111 When the print remains faded replace the print cartridge. Troubleshooting Problem Entire page is too dark. • Change the Toner Darkness setting in the Quality menu. • Change the Brightness setting in the Quality menu. • Change the Contrast setting in ...
...Reinstall the cartridge and then press . Streaks appear on page 113 for more settings information. • If you are supported by the printer, the host computer, and the software application. Reinstall the cartridge and then press . With the cartridge arrows pointing downward, firmly shake the... quality problems 111 When the print remains faded replace the print cartridge. Troubleshooting Problem Entire page is too dark. • Change the Toner Darkness setting in the Quality menu. • Change the Brightness setting in the Quality menu. • Change the Contrast setting in ...
User's Guide
Page 112
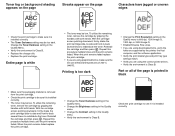
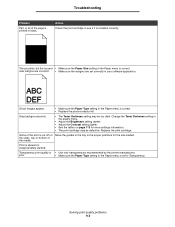
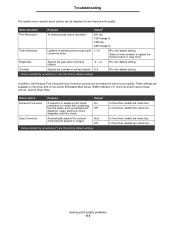
...print cartridge. Transparency print quality is skewed or inappropriately slanted. Solving print quality problems 112 Change the Toner Darkness setting in your software application. Print is • Use only transparencies recommended by the printer manufacturer. Troubleshooting Problem Part or all of the page is correct. • Replace the photoconductor kit..... the sides, top, or bottom of the print is correct. Action Check the print cartridge to Transparency. Gray background prints. • The Toner Darkness setting may be too dark. Some of the media.
...print cartridge. Transparency print quality is skewed or inappropriately slanted. Solving print quality problems 112 Change the Toner Darkness setting in your software application. Print is • Use only transparencies recommended by the printer manufacturer. Troubleshooting Problem Part or all of the page is correct. • Replace the photoconductor kit..... the sides, top, or bottom of the print is correct. Action Check the print cartridge to Transparency. Gray background prints. • The Toner Darkness setting may be too dark. Some of the media.
User's Guide
Page 113
...8224; Print Resolution To select printed output resolution 600 dpi* 1200 Image Q 1200 dpi 2400 Image Q Toner Darkness Lightens or darkens printed output and 1-10 conserves toner 8* is the default setting. For more information about these options, see the driver Help. In the ...driver, enable the check box. Brightness Adjusts the gray value of printed objects 0-5 † Values marked by an asterisk (*) are available on the driver and on the printer...
...8224; Print Resolution To select printed output resolution 600 dpi* 1200 Image Q 1200 dpi 2400 Image Q Toner Darkness Lightens or darkens printed output and 1-10 conserves toner 8* is the default setting. For more information about these options, see the driver Help. In the ...driver, enable the check box. Brightness Adjusts the gray value of printed objects 0-5 † Values marked by an asterisk (*) are available on the driver and on the printer...

User's Guide
Page 121
... Products, supplies, parts, materials (such as toners and inks), software, or interfaces not furnished by any other than Lexmark or a Lexmark authorized servicer • Operation of original purchase. Extent of limited warranty Lexmark does not warrant uninterrupted or error-free operation ... are substantially consumed when the printer displays a "Life Warning" or "Scheduled Maintenance" message for such item. For further explanation of your warranty alternatives and the nearest Lexmark authorized servicer in transit to a Lexmark designated location. NO WARRANTIES, EXPRESS...
... Products, supplies, parts, materials (such as toners and inks), software, or interfaces not furnished by any other than Lexmark or a Lexmark authorized servicer • Operation of original purchase. Extent of limited warranty Lexmark does not warrant uninterrupted or error-free operation ... are substantially consumed when the printer displays a "Life Warning" or "Scheduled Maintenance" message for such item. For further explanation of your warranty alternatives and the nearest Lexmark authorized servicer in transit to a Lexmark designated location. NO WARRANTIES, EXPRESS...


