
User Manual
Page 3
... new network Internal Solutions Port 65 Setting up serial printing...67 Minimizing your printer's environmental impact 70 Saving paper and toner...70 Using recycled paper...70 Conserving supplies...70 Saving energy...71 Using Eco...-Mode ...71 Adjusting Power Saver...72 Adjusting the brightness of the display ...73 Setting the standard exit bin light...73 Recycling...74 Recycling Lexmark products...74 Recycling Lexmark packaging...74 Returning Lexmark cartridges for reuse or recycling...75 Reducing printer...
... new network Internal Solutions Port 65 Setting up serial printing...67 Minimizing your printer's environmental impact 70 Saving paper and toner...70 Using recycled paper...70 Conserving supplies...70 Saving energy...71 Using Eco...-Mode ...71 Adjusting Power Saver...72 Adjusting the brightness of the display ...73 Setting the standard exit bin light...73 Recycling...74 Recycling Lexmark products...74 Recycling Lexmark packaging...74 Returning Lexmark cartridges for reuse or recycling...75 Reducing printer...

User Manual
Page 9
... status of supplies...232 Checking the status of supplies from the printer control panel 232 Checking the status of supplies from a network computer 232 Ordering supplies...233 Ordering toner cartridges...233 Ordering a photoconductor kit ...233 Ordering ADF replacement parts......234 Moving the printer to another location...234 Shipping the printer...235 Administrative support 236 Finding advanced networking and administrator ...
... status of supplies...232 Checking the status of supplies from the printer control panel 232 Checking the status of supplies from a network computer 232 Ordering supplies...233 Ordering toner cartridges...233 Ordering a photoconductor kit ...233 Ordering ADF replacement parts......234 Moving the printer to another location...234 Shipping the printer...235 Administrative support 236 Finding advanced networking and administrator ...
User Manual
Page 11
... held job(s 258 Unsupported disk ...258 Unsupported USB device, please remove ...258 Unsupported USB hub, please remove...258 USB/USB ...258 30 Invalid refill, change toner cartridge...258 31 Replace defective cartridge ...258 32 Cartridge part number unsupported by device ...258 34 Short paper ...258 35 Insufficient memory to support Resource...
... held job(s 258 Unsupported disk ...258 Unsupported USB device, please remove ...258 Unsupported USB hub, please remove...258 USB/USB ...258 30 Invalid refill, change toner cartridge...258 31 Replace defective cartridge ...258 32 Cartridge part number unsupported by device ...258 34 Short paper ...258 35 Insufficient memory to support Resource...
User Manual
Page 13
... black or white streaks...285 Print is too light ...285 Print is too dark...286 Streaked vertical lines ...287 Toner fog or background shading appears on the page 288 Toner rubs off...288 Toner specks...289 Transparency print quality is poor...289 Embedded Web Server does not open...289 Check the network connections...
... black or white streaks...285 Print is too light ...285 Print is too dark...286 Streaked vertical lines ...287 Toner fog or background shading appears on the page 288 Toner rubs off...288 Toner specks...289 Transparency print quality is poor...289 Embedded Web Server does not open...289 Check the network connections...
User Manual
Page 25
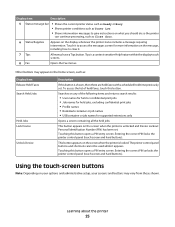
... panel (touch screen and hard buttons). Display item Description 5 Status message bar • Shows the current printer status such as Ready or Busy. • Shows printer conditions such as Toner Low. • Shows intervention messages to clear it. 7 Tips All menus have a Tips button. Touch it appears. Touching this button opens a PIN entry...
... panel (touch screen and hard buttons). Display item Description 5 Status message bar • Shows the current printer status such as Ready or Busy. • Shows printer conditions such as Toner Low. • Shows intervention messages to clear it. 7 Tips All menus have a Tips button. Touch it appears. Touching this button opens a PIN entry...
User Manual
Page 70
... onto one side of a single sheet of the Lexmark Web site at www.lexmark.com/environment • The Lexmark recycling program at www.lexmark.com/recycling By selecting certain printer settings or tasks, you may yield a greater environmental benefit. Minimizing your printer's environmental impact 70 Saving paper and toner Using recycled paper As an environmentally conscious company...
... onto one side of a single sheet of the Lexmark Web site at www.lexmark.com/environment • The Lexmark recycling program at www.lexmark.com/recycling By selecting certain printer settings or tasks, you may yield a greater environmental benefit. Minimizing your printer's environmental impact 70 Saving paper and toner Using recycled paper As an environmentally conscious company...
User Manual
Page 75
... locations: 1 Visit EPS Recycling International's Web site at www.lexmark.com/recycle. 2 From the Toner Cartridges section, select your country from landfills annually by the fax speaker and ringer. To Reduce printer noise. • You may not exist in Lexmark packaging is ready to Lexmark are reduced or disabled, including those made by making it...
... locations: 1 Visit EPS Recycling International's Web site at www.lexmark.com/recycle. 2 From the Toner Cartridges section, select your country from landfills annually by the fax speaker and ringer. To Reduce printer noise. • You may not exist in Lexmark packaging is ready to Lexmark are reduced or disabled, including those made by making it...
User Manual
Page 90
...paper before printing by storing it in its edges. Extend the time several days if the storage or transportation environment is too rough, then toner cannot fuse to use it properly. Grain is time to it . If paper is too smooth, then it is the tendency for 24...paper to moisture changes that can occur after the paper passes through the printer, where it can cause feeding problems. Smoothness Paper smoothness directly affects print quality. Moisture content The amount of paper to curl at www.lexmark.com/publications. This limits the exposure of moisture in .), we recommend ...
...paper before printing by storing it in its edges. Extend the time several days if the storage or transportation environment is too rough, then toner cannot fuse to use it properly. Grain is time to it . If paper is too smooth, then it is the tendency for 24...paper to moisture changes that can occur after the paper passes through the printer, where it can cause feeding problems. Smoothness Paper smoothness directly affects print quality. Moisture content The amount of paper to curl at www.lexmark.com/publications. This limits the exposure of moisture in .), we recommend ...
User Manual
Page 92
Lexmark has found no reason to discourage the use of today's recycled office papers, but generally the following property guidelines apply to recycled paper. • Low ...-to work very well in the direction of feed Recycled paper, paper of lower weight ( Before using chamber tests for different temperature and humidity conditions. Lexmark consistently tests its printers with recycled paper (20-100% post-consumer waste) and a variety of friction (0.4-0.6) • Sufficient bending resistance in laser...
Lexmark has found no reason to discourage the use of today's recycled office papers, but generally the following property guidelines apply to recycled paper. • Low ...-to work very well in the direction of feed Recycled paper, paper of lower weight ( Before using chamber tests for different temperature and humidity conditions. Lexmark consistently tests its printers with recycled paper (20-100% post-consumer waste) and a variety of friction (0.4-0.6) • Sufficient bending resistance in laser...
User Manual
Page 184
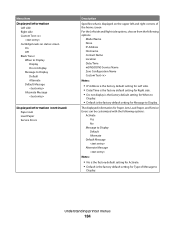
Menu item Displayed Information Left side Right side Custom Text Cartridge levels on status screen On Off Black Toner When to Display Display Do not display Message to Display Default Alternate Default Message Alternate Message Displayed Information (continued) Paper Jam Load Paper Service Errors .... • Do not display is the factory default setting for When to Display. • Default is the factory default setting for Message to Display. Understanding printer menus 184
Menu item Displayed Information Left side Right side Custom Text Cartridge levels on status screen On Off Black Toner When to Display Display Do not display Message to Display Default Alternate Default Message Alternate Message Displayed Information (continued) Paper Jam Load Paper Service Errors .... • Do not display is the factory default setting for When to Display. • Default is the factory default setting for Message to Display. Understanding printer menus 184

User Manual
Page 186
... a lower power state Note: 15 minutes is selected, rescan from the jammed page forward. Understanding printer menus 186 Single sounds three quick beeps. • Off is the factory default setting for Toner Alarm. Specifies how a scanned job should be reloaded if a paper jam occurs in the... printer and operating properly for specific jobs. Specifies the number of the image will be rescanned if any ...
... a lower power state Note: 15 minutes is selected, rescan from the jammed page forward. Understanding printer menus 186 Single sounds three quick beeps. • Off is the factory default setting for Toner Alarm. Specifies how a scanned job should be reloaded if a paper jam occurs in the... printer and operating properly for specific jobs. Specifies the number of the image will be rescanned if any ...
User Manual
Page 199
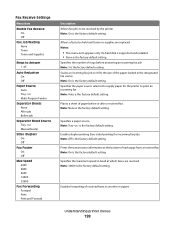
...Specifies the maximum speed in the designated fax source Note: On is the factory default setting. Enables duplex printing (two-sided printing) for the printer to print an incoming fax Note: Auto is the factory default setting. Enables forwarding of rings before or after a received fax. Specifies the ... fax job Note: 3 is the factory default setting. Fax Receive Settings Menu item Enable Fax Receive On Off Fax Job Waiting None Toner Toner and Supplies Rings to Answer 1-25 Auto Reduction On Off Paper Source Auto Tray Multi-Purpose Feeder Separator Sheets None After job Before job...
...Specifies the maximum speed in the designated fax source Note: On is the factory default setting. Enables duplex printing (two-sided printing) for the printer to print an incoming fax Note: Auto is the factory default setting. Enables forwarding of rings before or after a received fax. Specifies the ... fax job Note: 3 is the factory default setting. Fax Receive Settings Menu item Enable Fax Receive On Off Fax Job Waiting None Toner Toner and Supplies Rings to Answer 1-25 Auto Reduction On Off Paper Source Auto Tray Multi-Purpose Feeder Separator Sheets None After job Before job...

User Manual
Page 220
... architectural drawings, maps, electrical circuit diagrams, and flow charts Notes: • Off is the factory default setting. • Selecting a smaller number can help conserve toner. Understanding printer menus 220 Lightens or darkens the printed output Notes: • 8 is the factory default setting. • To set Enhance Fine Lines using N-up Border None...
... architectural drawings, maps, electrical circuit diagrams, and flow charts Notes: • Off is the factory default setting. • Selecting a smaller number can help conserve toner. Understanding printer menus 220 Lightens or darkens the printed output Notes: • 8 is the factory default setting. • To set Enhance Fine Lines using N-up Border None...

User Manual
Page 232
... a summary of supplies from a network computer Note: The computer must be connected to the same network as the printer. 1 Type the printer IP address into the address field of how much toner is not on the home screen, then print a menu settings page to review the status of supplies A message appears... on and Ready appears. 2 On the home screen, touch Status/Supplies. Checking the status of supplies from the printer control panel 1 Make sure the printer is on ...
... a summary of supplies from a network computer Note: The computer must be connected to the same network as the printer. 1 Type the printer IP address into the address field of how much toner is not on the home screen, then print a menu settings page to review the status of supplies A message appears... on and Ready appears. 2 On the home screen, touch Status/Supplies. Checking the status of supplies from the printer control panel 1 Make sure the printer is on ...
User Manual
Page 233
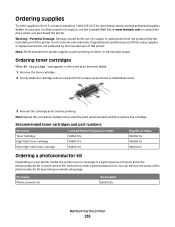
... A4-size plain paper. Recommended toner cartridges and part numbers Part name Toner Cartridge High Yield Toner Cartridge Extra High Yield Toner Cartridge Lexmark Return Program Cartridge X463A11G X463H11G X463X11G Regular cartridge X463A21G X463H21G X463X21G Ordering a photoconductor kit Depending on letter- Ordering supplies To order supplies in your printer model, the printer issues a message or a light sequence...
... A4-size plain paper. Recommended toner cartridges and part numbers Part name Toner Cartridge High Yield Toner Cartridge Extra High Yield Toner Cartridge Lexmark Return Program Cartridge X463A11G X463H11G X463X11G Regular cartridge X463A21G X463H21G X463X21G Ordering a photoconductor kit Depending on letter- Ordering supplies To order supplies in your printer model, the printer issues a message or a light sequence...
User Manual
Page 236
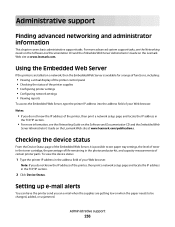
... the Embedded Web Server is possible to be changed, added, or unjammed. For more information, see paper tray settings, the level of toner in the toner cartridge, the percentage of life remaining in the TCP/IP section. 2 Click Device Status. Checking the device status From the Device Status ... photoconductor kit, and capacity measurements of your Web browser. Administrative support 236 Using the Embedded Web Server If the printer is installed on the Lexmark Web site at www.lexmark.com/publications. Notes: • If you an e-mail when the supplies are getting low or when the paper...
... the Embedded Web Server is possible to be changed, added, or unjammed. For more information, see paper tray settings, the level of toner in the toner cartridge, the percentage of life remaining in the TCP/IP section. 2 Click Device Status. Checking the device status From the Device Status ... photoconductor kit, and capacity measurements of your Web browser. Administrative support 236 Using the Embedded Web Server If the printer is installed on the Lexmark Web site at www.lexmark.com/publications. Notes: • If you an e-mail when the supplies are getting low or when the paper...
User Manual
Page 238
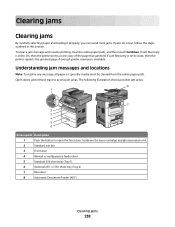
... paper path, and then touch Continue. or 550-sheet tray (Tray 2) 7 Rear door 8 Automatic Document Feeder (ADF) Clearing jams 238 Inside are the toner cartridge and photoconductor kit. 2 Standard exit bin 3 Front door 4 Manual or multipurpose feeder door 5 Standard 250-sheet tray (Tray 1) 6 Optional 250- ... remove trays to open the front door. If Jam Recovery is set to Auto, then the printer reprints the jammed page if enough printer memory is set to On, then the printer prints a new copy of the page that jammed. Clearing jams Clearing jams By carefully selecting paper...
... paper path, and then touch Continue. or 550-sheet tray (Tray 2) 7 Rear door 8 Automatic Document Feeder (ADF) Clearing jams 238 Inside are the toner cartridge and photoconductor kit. 2 Standard exit bin 3 Front door 4 Manual or multipurpose feeder door 5 Standard 250-sheet tray (Tray 1) 6 Optional 250- ... remove trays to open the front door. If Jam Recovery is set to Auto, then the printer reprints the jammed page if enough printer memory is set to On, then the printer prints a new copy of the page that jammed. Clearing jams Clearing jams By carefully selecting paper...
User Manual
Page 240
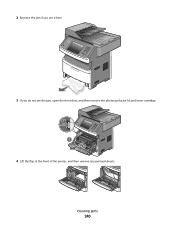
2 Remove the jam if you see it here. 3 If you do not see the jam, open the front door, and then remove the photoconductor kit and toner cartridge. 4 Lift the flap at the front of the printer, and then remove any jammed sheets. Clearing jams 240
2 Remove the jam if you see it here. 3 If you do not see the jam, open the front door, and then remove the photoconductor kit and toner cartridge. 4 Lift the flap at the front of the printer, and then remove any jammed sheets. Clearing jams 240
User Manual
Page 241
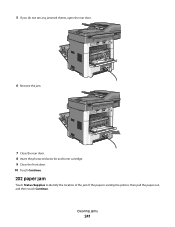
If the paper is exiting the printer, then pull the paper out, and then touch Continue. Clearing jams 241 5 If you do not see any jammed sheets, open the rear door. 6 Remove the jam. 7 Close the rear door. 8 Insert the photoconductor kit and toner cartridge. 9 Close the front door. 10 Touch Continue. 202 paper jam Touch Status/Supplies to identify the location of the jam.
If the paper is exiting the printer, then pull the paper out, and then touch Continue. Clearing jams 241 5 If you do not see any jammed sheets, open the rear door. 6 Remove the jam. 7 Close the rear door. 8 Insert the photoconductor kit and toner cartridge. 9 Close the front door. 10 Touch Continue. 202 paper jam Touch Status/Supplies to identify the location of the jam.
User Manual
Page 247
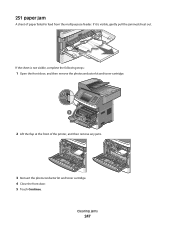
If it is not visible, complete the following steps: 1 Open the front door, and then remove the photoconductor kit and toner cartridge. 2 Lift the flap at the front of paper failed to feed from the multipurpose feeder. If the sheet is visible, gently pull the jammed sheet out. Clearing jams 247 251 paper jam A sheet of the printer, and then remove any jams. 3 Reinsert the photoconductor kit and toner cartridge. 4 Close the front door. 5 Touch Continue.
If it is not visible, complete the following steps: 1 Open the front door, and then remove the photoconductor kit and toner cartridge. 2 Lift the flap at the front of paper failed to feed from the multipurpose feeder. If the sheet is visible, gently pull the jammed sheet out. Clearing jams 247 251 paper jam A sheet of the printer, and then remove any jams. 3 Reinsert the photoconductor kit and toner cartridge. 4 Close the front door. 5 Touch Continue.

