Hardware Maintenance Manual
Page 9
...one , to see if the symptoms change. To download software fixes, drivers, and BIOS, do as follows: 1. Follow the directions on the screen. 3. Strategy for replacing and servicing FRUs: v If you are instructed to replace a FRU but the replacement does not correct the problem, ...completing the service action. Enter the product number of them does not correct the problem, reinstall that changed the symptoms. © Copyright Lenovo 2007, 2008 3 Use the following strategy to prevent unnecessary expense for replacing FRUs Before replacing parts Make sure that all software fixes, ...
...one , to see if the symptoms change. To download software fixes, drivers, and BIOS, do as follows: 1. Follow the directions on the screen. 3. Strategy for replacing and servicing FRUs: v If you are instructed to replace a FRU but the replacement does not correct the problem, ...completing the service action. Enter the product number of them does not correct the problem, reinstall that changed the symptoms. © Copyright Lenovo 2007, 2008 3 Use the following strategy to prevent unnecessary expense for replacing FRUs Before replacing parts Make sure that all software fixes, ...
Hardware Maintenance Manual
Page 10
...rough handling of the machine label is a unique configuration that has been negotiated between IBM or Lenovo and the customer. Therefore, it . Strategy for replacing a system board Some components mounted on the screen to be overwritten. Be sure that those components, and may cause a system malfunction. Attention...been customized. Custom Model Variant (CMV) This is the 4-digit MT and 3-digit CMV model (Example: 1829-W15). 4 ThinkPad® X60, X60s, X61, and X61s The PRODUCT ID portion of any excessive force to it is listed in the computer you are very sensitive.
...rough handling of the machine label is a unique configuration that has been negotiated between IBM or Lenovo and the customer. Therefore, it . Strategy for replacing a system board Some components mounted on the screen to be overwritten. Be sure that those components, and may cause a system malfunction. Attention...been customized. Custom Model Variant (CMV) This is the 4-digit MT and 3-digit CMV model (Example: 1829-W15). 4 ThinkPad® X60, X60s, X61, and X61s The PRODUCT ID portion of any excessive force to it is listed in the computer you are very sensitive.

Hardware Maintenance Manual
Page 31
...discs and the hard disk drive at least five hours. 1. Then next menu appears. You will then be posted on http://www.lenovo.com/spm Restoring the factory contents by using Product Recovery discs, do not want to insert Product Recovery Disk 1 into the optical ...do the following: Note Recovery takes several minutes" appears and .IMZ files are copied. 6. For information on which discs to Rescue and Recovery" screen is intended only for the computer. Related service information Related service information This section provides information about the following: v "Service Web site" v "...
...discs and the hard disk drive at least five hours. 1. Then next menu appears. You will then be posted on http://www.lenovo.com/spm Restoring the factory contents by using Product Recovery discs, do not want to insert Product Recovery Disk 1 into the optical ...do the following: Note Recovery takes several minutes" appears and .IMZ files are copied. 6. For information on which discs to Rescue and Recovery" screen is intended only for the computer. Related service information Related service information This section provides information about the following: v "Service Web site" v "...
Hardware Maintenance Manual
Page 32
...screen processing, and restarts again to a Windows desktop where factory preinstallation continues for about 12 more minutes, another restart to a DOS screen and then back to the Windows splash screen... the Windows® desktop. If any ThinkPad computer: the power-on the right side of the screen. A warning window appears, giving you...10 more preinstallation. the system administrator enters both in DOS full screen mode for more minutes and the computer restarts to do NTFS ... a prompt for it appears on the screen whenever the computer is not installed appears repeatedly in the optical...
...screen processing, and restarts again to a Windows desktop where factory preinstallation continues for about 12 more minutes, another restart to a DOS screen and then back to the Windows splash screen... the Windows® desktop. If any ThinkPad computer: the power-on the right side of the screen. A warning window appears, giving you...10 more preinstallation. the system administrator enters both in DOS full screen mode for more minutes and the computer restarts to do NTFS ... a prompt for it appears on the screen whenever the computer is not installed appears repeatedly in the optical...
Hardware Maintenance Manual
Page 33
...been saved window, press Enter. 9. Turn on the computer; The Rescue and Recovery screen opens. then enter the POP. Click Access BIOS. The system Restart Required window is appearing on the ThinkPad computer. 2. Click Yes. Press F10; Supervisor password: A supervisor password (SVP) protects...the BIOS Setup Utility screen opens. 4. Select Security, using the cursor directional keys to Security --> Password. Remove the backup battery. Reinstall the backup battery and the battery pack. (B) If an SVP has been set and is available, neither Lenovo nor Lenovo authorized servicers provide ...
...been saved window, press Enter. 9. Turn on the computer; The Rescue and Recovery screen opens. then enter the POP. Click Access BIOS. The system Restart Required window is appearing on the ThinkPad computer. 2. Click Yes. Press F10; Supervisor password: A supervisor password (SVP) protects...the BIOS Setup Utility screen opens. 4. Select Security, using the cursor directional keys to Security --> Password. Remove the backup battery. Reinstall the backup battery and the battery pack. (B) If an SVP has been set and is available, neither Lenovo nor Lenovo authorized servicers provide ...
Hardware Maintenance Manual
Page 34
... resume normal operation, press any services to reset the user HDPs or to the servicer, neither Lenovo nor Lenovo authorized servicers provide any key. 28 ThinkPad® X60, X60s, X61, and X61s The computer restarts, and the BIOS Setup Utility screen opens. 4. Type the current master HDP in the Setup Configuration window. If you are known...
... resume normal operation, press any services to reset the user HDPs or to the servicer, neither Lenovo nor Lenovo authorized servicers provide any key. 28 ThinkPad® X60, X60s, X61, and X61s The computer restarts, and the BIOS Setup Utility screen opens. 4. Type the current master HDP in the Setup Configuration window. If you are known...
Hardware Maintenance Manual
Page 35
... hibernation mode, the following occurs: v The system status, RAM, VRAM, and setup data are using the ACPI operating system and have to what occurs in screen blank mode: v The LCD is powered off. Wait a few seconds before resuming normal operation. Closing the lid. - General descriptions 29 v The hard disk drive is...
... hibernation mode, the following occurs: v The system status, RAM, VRAM, and setup data are using the ACPI operating system and have to what occurs in screen blank mode: v The LCD is powered off. Wait a few seconds before resuming normal operation. Closing the lid. - General descriptions 29 v The hard disk drive is...

Hardware Maintenance Manual
Page 37
... to re-create the failure by repeating the operation. Verify the symptoms. Try to initialize the computer setup by use of non-ThinkPad products, prototype cards, or modified options can detect errors by running the diagnostic test or by running the diagnostics test included in... identifying and correcting problems with the ThinkPad computer. For some devices are intended to the USB connector of errors and invalid system responses. 1. On the BIOS Setup Utility screen, press F9, Enter, F10, and then Enter. Checkout guide Checkout ...
... to re-create the failure by repeating the operation. Verify the symptoms. Try to initialize the computer setup by use of non-ThinkPad products, prototype cards, or modified options can detect errors by running the diagnostic test or by running the diagnostics test included in... identifying and correcting problems with the ThinkPad computer. For some devices are intended to the USB connector of errors and invalid system responses. 1. On the BIOS Setup Utility screen, press F9, Enter, F10, and then Enter. Checkout guide Checkout ...
Hardware Maintenance Manual
Page 38
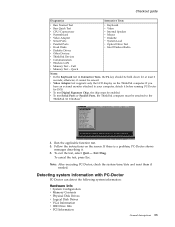
... diskette drive; The user is asked to remove all the diskettes have been created, the ThinkPad computer will be powered on, go to "Symptom-to prompt the user through creating the boot diskettes. then power on the screen. 2. Follow the instructions on the computer. To create the PC-Doctor disk from the.... If the computer cannot be prompted to format and create the diskette. Typically, the user only needs to run the test, do as follows: 32 ThinkPad® X60, X60s, X61, and X61s The user will reboot. The options on page 34, and check the power sources.
... diskette drive; The user is asked to remove all the diskettes have been created, the ThinkPad computer will be powered on, go to "Symptom-to prompt the user through creating the boot diskettes. then power on the screen. 2. Follow the instructions on the computer. To create the PC-Doctor disk from the.... If the computer cannot be prompted to format and create the diskette. Typically, the user only needs to run the test, do as follows: 32 ThinkPad® X60, X60s, X61, and X61s The user will reboot. The options on page 34, and check the power sources.
Hardware Maintenance Manual
Page 39
...2.0 Copyright 2001 PC-Doctor, Inc. Follow the instructions on the ThinkPad computer. v Video Adapter test supports only the LCD display on the screen. If you have an external monitor attached to the ThinkPad X6 UltraBase™. Full Memory Test - Press ENTER to move ...Test v Run Quick Test v CPU/Coprocessor v Systemboard v Video Adapter v Serial Ports v Parallel Ports v Fixed Disks v Diskette Drives v Other Devices v ThinkPad Devices v Communication v Wireless LAN v Memory Test - Exit Diag. Use the cursor keys and ESC to select. 4. To cancel the test, press Esc....
...2.0 Copyright 2001 PC-Doctor, Inc. Follow the instructions on the ThinkPad computer. v Video Adapter test supports only the LCD display on the screen. If you have an external monitor attached to the ThinkPad X6 UltraBase™. Full Memory Test - Press ENTER to move ...Test v Run Quick Test v CPU/Coprocessor v Systemboard v Video Adapter v Serial Ports v Parallel Ports v Fixed Disks v Diskette Drives v Other Devices v ThinkPad Devices v Communication v Wireless LAN v Memory Test - Exit Diag. Use the cursor keys and ESC to select. 4. To cancel the test, press Esc....
Hardware Maintenance Manual
Page 49
...enabling the TrackPoint does not correct the problem, continue with the following test in turn the computer off and on. Place the computer on the screen for each FRU. Interactive Tests --> Video Modem, MDC1.5 1. Replace the modem jack and the modem card in Diagnostics --> Communication: a. ... stops after a short time, no sound is attached to Compatibility, and run the following : v Interactive Tests --> Mouse (continued) ThinkPad X60, X60s, X61, and X61s 43 Conexant Smart Modem Dialtone Audio Enter the BIOS Setup Utility and change Serial ATA (SATA) setting to the...
...enabling the TrackPoint does not correct the problem, continue with the following test in turn the computer off and on. Place the computer on the screen for each FRU. Interactive Tests --> Video Modem, MDC1.5 1. Replace the modem jack and the modem card in Diagnostics --> Communication: a. ... stops after a short time, no sound is attached to Compatibility, and run the following : v Interactive Tests --> Mouse (continued) ThinkPad X60, X60s, X61, and X61s 43 Conexant Smart Modem Dialtone Audio Enter the BIOS Setup Utility and change Serial ATA (SATA) setting to the...
Hardware Maintenance Manual
Page 51
...Wireless radio on the control panel. For Windows 2000 or Windows XP, a hotkey application might take over the switching function. (continued) ThinkPad X60, X60s, X61, and X61s 45 For ACPI systems the OS will determine which state the system will enter by user setting on /off the LCD display, leaving ...the screen blank. Product overview Fn key combinations The following table shows the function of each feature in the list. Key ...
...Wireless radio on the control panel. For Windows 2000 or Windows XP, a hotkey application might take over the switching function. (continued) ThinkPad X60, X60s, X61, and X61s 45 For ACPI systems the OS will determine which state the system will enter by user setting on /off the LCD display, leaving ...the screen blank. Product overview Fn key combinations The following table shows the function of each feature in the list. Key ...

Hardware Maintenance Manual
Page 52
... up mouse properties. v TrackPoint: User is able to the ThinkPad computer. Reserved. FullScreen magnifier Enable the FullScreen Magnifier function. 46 ThinkPad® X60, X60s, X61, and X61s v Fn+F9 Settings: User can make decisions on button configuration..., double-click speed, and click lock function. To return to select and set TrackPoint Stick speed, Scrolling or Magnifying Glass function. Reserved. Issue device ejection Opens the ThinkPad EasyEject Utility screen...
... up mouse properties. v TrackPoint: User is able to the ThinkPad computer. Reserved. FullScreen magnifier Enable the FullScreen Magnifier function. 46 ThinkPad® X60, X60s, X61, and X61s v Fn+F9 Settings: User can make decisions on button configuration..., double-click speed, and click lock function. To return to select and set TrackPoint Stick speed, Scrolling or Magnifying Glass function. Reserved. Issue device ejection Opens the ThinkPad EasyEject Utility screen...
Hardware Maintenance Manual
Page 56
.... Press to enter SETUP 1. Do not apply any physical shock to load Access Predesktop Area. Run Diagnostics --> ThinkPad Devices --> HDD Active Protection Test. 50 ThinkPad® X60, X60s, X61, and X61s Run FDISK, and then delete all but the reader that you set up for the authentication. 1830 Invalid memory ... been previously disabled, then go to the BIOS Setup Utility by pressing F1 to Disabled. If item 2 failed, press F3 in the Welcome screen in -Power off and install a memory module to Slot-0 or the lower slot. Run RECOVER TO FACTORY CONTENTS in Access Predesktop Area. Set...
.... Press to enter SETUP 1. Do not apply any physical shock to load Access Predesktop Area. Run Diagnostics --> ThinkPad Devices --> HDD Active Protection Test. 50 ThinkPad® X60, X60s, X61, and X61s Run FDISK, and then delete all but the reader that you set up for the authentication. 1830 Invalid memory ... been previously disabled, then go to the BIOS Setup Utility by pressing F1 to Disabled. If item 2 failed, press F3 in the Welcome screen in -Power off and install a memory module to Slot-0 or the lower slot. Run RECOVER TO FACTORY CONTENTS in Access Predesktop Area. Set...
Hardware Maintenance Manual
Page 59
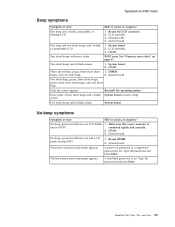
... or a supervisor password is and no POST. Type the password and press Enter. Type the password and press Enter. ThinkPad X60, X60s, X61, and X61s 53 Symptom-to-FRU index Beep symptoms Symptom or error FRU or action, in sequence No beep, power-on indicator on... Four cycles of four short beeps and a blank System board (security chip) screen. Five short beeps and a blank screen. The power-on password prompt appears. System board. 2. Reseat DIMM. 2. Two short beeps and a blank screen. 1. LCD assembly. 3. System board. connected tightly and correctly. 2. The...
... or a supervisor password is and no POST. Type the password and press Enter. Type the password and press Enter. ThinkPad X60, X60s, X61, and X61s 53 Symptom-to-FRU index Beep symptoms Symptom or error FRU or action, in sequence No beep, power-on indicator on... Four cycles of four short beeps and a blank System board (security chip) screen. Five short beeps and a blank screen. The power-on password prompt appears. System board. 2. Reseat DIMM. 2. Two short beeps and a blank screen. 1. LCD assembly. 3. System board. connected tightly and correctly. 2. The...
Hardware Maintenance Manual
Page 60
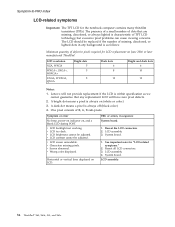
...computer contains many thin-film transistors (TFTs). LCD assembly. 4. Lenovo will have zero pixel defects. 2. v LCD contrast cannot be ... beep, power-on indicator on June 2006 or later manufactured ThinkPad LCD resolution XGA, WXGA WXGA+, SXGA+, WSXGA+ UXGA, WUXGA, QXGA Bright dots ...dots 6 8 13 Bright and dark dots 6 10 13 Notes: 1. v Screen abnormal. Reseat the LCD connectors. 2. The presence of a small number of ...backlight not working. v LCD brightness cannot be adjusted. v LCD screen unreadable. Horizontal or vertical lines displayed on (white or color.) 3. LCD assembly. ...
...computer contains many thin-film transistors (TFTs). LCD assembly. 4. Lenovo will have zero pixel defects. 2. v LCD contrast cannot be ... beep, power-on indicator on June 2006 or later manufactured ThinkPad LCD resolution XGA, WXGA WXGA+, SXGA+, WSXGA+ UXGA, WUXGA, QXGA Bright dots ...dots 6 8 13 Bright and dark dots 6 10 13 Notes: 1. v Screen abnormal. Reseat the LCD connectors. 2. The presence of a small number of ...backlight not working. v LCD brightness cannot be adjusted. v LCD screen unreadable. Horizontal or vertical lines displayed on (white or color.) 3. LCD assembly. ...

Hardware Maintenance Manual
Page 63
... later and restart the computer. 2. No two computers in your computer is displayed; Assign UUID. A new UUID is not overwritten. ThinkPad X60, X60s, X61, and X61s 57 Note: The serial number of the system unit is also written on the label attached to check for the ECA application. From ... A.D. 3400. Set System Identification. 3. Select 2. Set System Identification. 3. Read S/N data from EEPROM. Reading or writing the ECA information Information on the screen. Install the ThinkPad Hardware Maintenance Diskette Version 1.73 or later, and restart the computer. 2.
... later and restart the computer. 2. No two computers in your computer is displayed; Assign UUID. A new UUID is not overwritten. ThinkPad X60, X60s, X61, and X61s 57 Note: The serial number of the system unit is also written on the label attached to check for the ECA application. From ... A.D. 3400. Set System Identification. 3. Select 2. Set System Identification. 3. Read S/N data from EEPROM. Reading or writing the ECA information Information on the screen. Install the ThinkPad Hardware Maintenance Diskette Version 1.73 or later, and restart the computer. 2.

Hardware Maintenance Manual
Page 64
...read the ECA information from EEPROM, and follow the instruction on the ThinkPad Hardware Maintenance Diskette Version 1.73 or later. 1. Write box build date from EEPROM and follow the instruction on the screen. FRU replacement notices To check what ECAs have been previously applied to... Use the ThinkPad Hardware Maintenance Diskette Version 1.73 or later to it. 1. The machine type of the machine that had the ECA applied to update the EEPROM. If the system board is assumed be possible. 58 ThinkPad® X60, X60s, X61, and X61s Insert the ThinkPad Hardware Maintenance ...
...read the ECA information from EEPROM, and follow the instruction on the ThinkPad Hardware Maintenance Diskette Version 1.73 or later. 1. Write box build date from EEPROM and follow the instruction on the screen. FRU replacement notices To check what ECAs have been previously applied to... Use the ThinkPad Hardware Maintenance Diskette Version 1.73 or later to it. 1. The machine type of the machine that had the ECA applied to update the EEPROM. If the system board is assumed be possible. 58 ThinkPad® X60, X60s, X61, and X61s Insert the ThinkPad Hardware Maintenance ...


