(English) User Guide
Page 3
... power 29 Power-saving modes 29 Handling the battery 30 © Copyright Lenovo 2012 Connecting to the network 32 Ethernet connections 32 Wireless connections 32 Presentations and multimedia 36 Changing display settings 36 Connecting a projector or external display . . 36 Setting up a presentation 39 Using the Extend desktop function . . . . . 39 Using audio features 40 Using the integrated camera 40 Using an ExpressCard, a flash media card, or a smart card 41 Chapter 3. Recovery overview . . . . 61 Creating and using recovery media 61 Performing backup and recovery operations...
... power 29 Power-saving modes 29 Handling the battery 30 © Copyright Lenovo 2012 Connecting to the network 32 Ethernet connections 32 Wireless connections 32 Presentations and multimedia 36 Changing display settings 36 Connecting a projector or external display . . 36 Setting up a presentation 39 Using the Extend desktop function . . . . . 39 Using audio features 40 Using the integrated camera 40 Using an ExpressCard, a flash media card, or a smart card 41 Chapter 3. Recovery overview . . . . 61 Creating and using recovery media 61 Performing backup and recovery operations...

(English) User Guide
Page 4
... . . . . 128 Chapter 10. Getting support . . . . 147 Before you begin 105 Installing the Windows 7 operating system . . 106 Installing device drivers 107 ThinkPad Setup 108 Main menu 108 Config menu 109 Date/Time menu 115 Security menu 115 Startup menu 119 Restart menu 121 Updating your system UEFI BIOS . . . . . 121 Using system management 121 System management 122 Setting management features 122 Chapter 9. Preventing problems . . 125 General tips for preventing problems 125 ii User Guide Making sure device drivers are current . . . . . 126 Taking...
... . . . . 128 Chapter 10. Getting support . . . . 147 Before you begin 105 Installing the Windows 7 operating system . . 106 Installing device drivers 107 ThinkPad Setup 108 Main menu 108 Config menu 109 Date/Time menu 115 Security menu 115 Startup menu 119 Restart menu 121 Updating your system UEFI BIOS . . . . . 121 Using system management 121 System management 122 Setting management features 122 Chapter 9. Preventing problems . . 125 General tips for preventing problems 125 ii User Guide Making sure device drivers are current . . . . . 126 Taking...

(English) User Guide
Page 12
...Power supply statement DANGER Never remove the cover on ; External devices CAUTION: Do not connect or disconnect any external device cables other home or commercial appliances that you intend to use the outlet until it into a grounded electrical outlet. This is on a power supply or any component that enables.... Be sure that the power outlet you are installing. x User Guide Do not bend or modify the plug. Be sure that the power outlet provides the correct voltage and current for an approved outlet adapter or to disconnect external devices. otherwise, you cannot insert...
...Power supply statement DANGER Never remove the cover on ; External devices CAUTION: Do not connect or disconnect any external device cables other home or commercial appliances that you intend to use the outlet until it into a grounded electrical outlet. This is on a power supply or any component that enables.... Be sure that the power outlet you are installing. x User Guide Do not bend or modify the plug. Be sure that the power outlet provides the correct voltage and current for an approved outlet adapter or to disconnect external devices. otherwise, you cannot insert...

(English) User Guide
Page 21
... audio jack 5 Always On USB connector 2 Hard disk drive or solid state drive 4 Ethernet connector 6 Media card reader slot Chapter 1. 8 Fingerprint reader Some models have a fingerprint reader. Right-side view Figure 2. The fingerprint authentication technology enables you to interrupt the startup sequence of ThinkPad® function keys, such as turning on the ThinkLight light, locking the computer, managing the wireless connections, and so on the screen. For more information about Rescue and Recovery, see "Using the fingerprint reader" on...
... audio jack 5 Always On USB connector 2 Hard disk drive or solid state drive 4 Ethernet connector 6 Media card reader slot Chapter 1. 8 Fingerprint reader Some models have a fingerprint reader. Right-side view Figure 2. The fingerprint authentication technology enables you to interrupt the startup sequence of ThinkPad® function keys, such as turning on the ThinkLight light, locking the computer, managing the wireless connections, and so on the screen. For more information about Rescue and Recovery, see "Using the fingerprint reader" on...

(English) User Guide
Page 34
... a fingerprint reader, the Fingerprint Software program enables you to configure settings for a certain period of time. To open the Mobile Broadband Connect program, open Control Panel and click Network and Internet ➙ Lenovo - The integrated camera starts detecting facial feature when there is connected to the mobile broadband (3G) network through facial feature recognition. Internet Connection ➙ Setup Mobile Broadband. 16 User Guide Mobile Broadband Connect The Mobile Broadband Connect program enables your password and enable simple...
... a fingerprint reader, the Fingerprint Software program enables you to configure settings for a certain period of time. To open the Mobile Broadband Connect program, open Control Panel and click Network and Internet ➙ Lenovo - The integrated camera starts detecting facial feature when there is connected to the mobile broadband (3G) network through facial feature recognition. Internet Connection ➙ Setup Mobile Broadband. 16 User Guide Mobile Broadband Connect The Mobile Broadband Connect program enables your password and enable simple...
(English) User Guide
Page 47
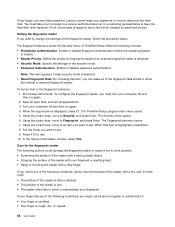
... computer might support the 30 Day Standby function. You can adjust your battery power With the Power Manager program, you can check the battery charging status at the Windows notification area. Understanding the power-saving modes • Screen blank The computer display requires considerable battery power. Using your work is saved to memory, and then the solid state drive or the hard disk drive and the computer display are several modes that is, use the combination...
... computer might support the 30 Day Standby function. You can adjust your battery power With the Power Manager program, you can check the battery charging status at the Windows notification area. Understanding the power-saving modes • Screen blank The computer display requires considerable battery power. Using your work is saved to memory, and then the solid state drive or the hard disk drive and the computer display are several modes that is, use the combination...

(English) User Guide
Page 55
... and turn on the list, stop the installation of both monitors. You can see only part of the screen at the same time, the resolution of this driver and use both by pressing Fn+F7. Change the display output location by moving the image with the following : 1. Note: If your monitor. 14. Click Advanced Settings. 6. If it is the same. If you set the external monitor type...
... and turn on the list, stop the installation of both monitors. You can see only part of the screen at the same time, the resolution of this driver and use both by pressing Fn+F7. Change the display output location by moving the image with the following : 1. Note: If your monitor. 14. Click Advanced Settings. 6. If it is the same. If you set the external monitor type...

(English) User Guide
Page 56
...; ThinkPad Mini Dock Series 3 • ThinkPad Mini Dock Series 3 with USB 3.0 • ThinkPad Mini Dock Plus Series 3 • ThinkPad Mini Dock Plus Series 3 with USB 3.0 Notes: • The screen mode that is attached to the expansion unit and the system works properly. To attach the DVI monitor, do the following : 1. The Intel Graphics and Media Control Panel window opens. 2. Select the external monitor and click Advanced Settings. 4. Click OK. Using the DVI monitor If...
...; ThinkPad Mini Dock Series 3 • ThinkPad Mini Dock Series 3 with USB 3.0 • ThinkPad Mini Dock Plus Series 3 • ThinkPad Mini Dock Plus Series 3 with USB 3.0 Notes: • The screen mode that is attached to the expansion unit and the system works properly. To attach the DVI monitor, do the following : 1. The Intel Graphics and Media Control Panel window opens. 2. Select the external monitor and click Advanced Settings. 4. Click OK. Using the DVI monitor If...

(English) User Guide
Page 69
... hard disk drive can be charged for parts and service. 9. You must take your passwords or recover data from the hard disk drive. Save all open files, and exit all applications. 3. When the logo screen is required, and a fee will be used only by using the cursor directional keys to the drive. Select Security, using the master password. Select Hard Disk 1 Password. 8. When a window for typing the new user hard disk password opens, type your passwords and keep them in the Enter New Password field...
... hard disk drive can be charged for parts and service. 9. You must take your passwords or recover data from the hard disk drive. Save all open files, and exit all applications. 3. When the logo screen is required, and a fee will be used only by using the cursor directional keys to the drive. Select Security, using the master password. Select Hard Disk 1 Password. 8. When a window for typing the new user hard disk password opens, type your passwords and keep them in the Enter New Password field...

(English) User Guide
Page 72
In the Setup Notice window that is displayed, press Enter to save configuration changes and exit. Select Yes to continue. 10. Set a power-on password as well as a hard disk password for your computer memory from unauthorized access by use of drive encryption software, such as Microsoft Windows BitLocker® Drive Encryption, which is installed in a safe place. For security, a longer password is an integral security feature of the Windows 7 operating system. To provide reliable...
In the Setup Notice window that is displayed, press Enter to save configuration changes and exit. Select Yes to continue. 10. Set a power-on password as well as a hard disk password for your computer memory from unauthorized access by use of drive encryption software, such as Microsoft Windows BitLocker® Drive Encryption, which is installed in a safe place. For security, a longer password is an integral security feature of the Windows 7 operating system. To provide reliable...

(English) User Guide
Page 73
... set a hard disk password for the security chip. • If you want to set in the Setup Confirmation window to the keys will not start. Save all open files, and exit all applications. 3. The Security Chip submenu opens. 7. When the item is displayed, press F1. If you can change the settings for the internal storage device. When the logo screen is highlighted, press Enter. 8. You will not be displayed...
... set a hard disk password for the security chip. • If you want to set in the Setup Confirmation window to the keys will not start. Save all open files, and exit all applications. 3. The Security Chip submenu opens. 7. When the item is displayed, press F1. If you can change the settings for the internal storage device. When the logo screen is highlighted, press Enter. 8. You will not be displayed...
(English) User Guide
Page 76
..., you forget your hard disk password, Lenovo cannot reset your computer off and then on again. 2. The Security menu opens. 6. If you can erase all applications. 3. Proof of purchase is attached. • Security Mode: Specify the settings of the reader with a dirty finger. Using the cursor keys, move to have the hard disk drive replaced. The ThinkPad Setup program main menu opens. 5. Care for fingerprint readers if an external fingerprint reader is required...
..., you forget your hard disk password, Lenovo cannot reset your computer off and then on again. 2. The Security menu opens. 6. If you can erase all applications. 3. Proof of purchase is attached. • Security Mode: Specify the settings of the reader with a dirty finger. Using the cursor keys, move to have the hard disk drive replaced. The ThinkPad Setup program main menu opens. 5. Care for fingerprint readers if an external fingerprint reader is required...
(English) User Guide
Page 80
... recovery media, connect the boot medium (memory key or other USB storage device) to the factory default settings, all your computer • On an attached external USB hard disk drive • On a network drive • On recordable discs (a recordable optical drive is displayed, repeatedly press and release the F12 key. Select the desired startup device and press Enter. You can restore the complete contents of your hard drive and select backup operation options. Using recovery media On the Windows 7 operating system operating system, you must use recovery media to restore...
... recovery media, connect the boot medium (memory key or other USB storage device) to the factory default settings, all your computer • On an attached external USB hard disk drive • On a network drive • On recordable discs (a recordable optical drive is displayed, repeatedly press and release the F12 key. Select the desired startup device and press Enter. You can restore the complete contents of your hard drive and select backup operation options. Using recovery media On the Windows 7 operating system operating system, you must use recovery media to restore...
(English) User Guide
Page 92
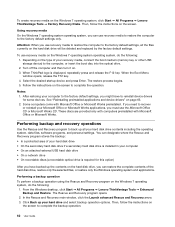
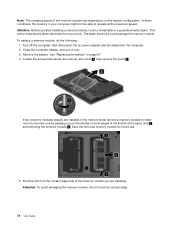
To replace a memory module, do not touch its contact edge. 74 User Guide Remove the battery. Loosen the screws that secure the memory slot cover 1 , then remove the cover 2 . Find the notch on page 67. 4. This action reduces any static electricity from the computer. 2. Save the removed memory module for the new one by pressing out on the latches on the system configuration. Close the computer display, and turn it over...
To replace a memory module, do not touch its contact edge. 74 User Guide Remove the battery. Loosen the screws that secure the memory slot cover 1 , then remove the cover 2 . Find the notch on page 67. 4. This action reduces any static electricity from the computer. 2. Save the removed memory module for the new one by pressing out on the latches on the system configuration. Close the computer display, and turn it over...

(English) User Guide
Page 93
... the socket, insert the memory module into place. 8. Connect the ac power adapter and all cables. The Installed memory item shows the total amount of about 20 degrees 1 ; then press it . 10. Reinstall the battery. When the logo screen is firmly fixed in firmly 2 . 7. Checking the total amount of memory installed in your computer. Chapter 6. Replacing devices 75 Reinstall the memory slot cover and tighten the screws to...
... the socket, insert the memory module into place. 8. Connect the ac power adapter and all cables. The Installed memory item shows the total amount of about 20 degrees 1 ; then press it . 10. Reinstall the battery. When the logo screen is firmly fixed in firmly 2 . 7. Checking the total amount of memory installed in your computer. Chapter 6. Replacing devices 75 Reinstall the memory slot cover and tighten the screws to...

(English) User Guide
Page 119
.... Note: If you attach the computer to a supported ThinkPad port replicator or docking station, disconnect the ac power adapter from theft. For the ThinkPad Mini Dock Plus Series 3 with step 2. 1. Make sure that the system lock key is a USB 3.0 connector for connecting a USB compatible devices. 9 External monitor connector: Connect an external monitor. 10 Security keyhole: Use a security cable lock that any operations involving devices that are connected to an Ethernet connector has been disconnected. •...
.... Note: If you attach the computer to a supported ThinkPad port replicator or docking station, disconnect the ac power adapter from theft. For the ThinkPad Mini Dock Plus Series 3 with step 2. 1. Make sure that the system lock key is a USB 3.0 connector for connecting a USB compatible devices. 9 External monitor connector: Connect an external monitor. 10 Security keyhole: Use a security cable lock that any operations involving devices that are connected to an Ethernet connector has been disconnected. •...

(English) User Guide
Page 123
... install a new operating system, install new device drivers, update your computer, you need to start Windows Recovery Environment (WinRE) in ThinkPad Setup. Before you want to install the supplement files and ThinkPad device drivers for the "cache" function purpose only. The UEFI BIOS features are in your system UEFI BIOS, or recover preinstalled software. Notes: • The process of installing the new operating system deletes all the subdirectories and files in the C:\SWTOOLS directory to a removable storage device...
... install a new operating system, install new device drivers, update your computer, you need to start Windows Recovery Environment (WinRE) in ThinkPad Setup. Before you want to install the supplement files and ThinkPad device drivers for the "cache" function purpose only. The UEFI BIOS features are in your system UEFI BIOS, or recover preinstalled software. Notes: • The process of installing the new operating system deletes all the subdirectories and files in the C:\SWTOOLS directory to a removable storage device...
(English) User Guide
Page 143
... ac power connected. - Entries might help you are easily installed. • Schedule system restore operations to updating for compatibility or known issues. • Keep a log book. Chapter 9. To check the hard disk drive capacity, click Start ➙ Computer. • Empty your recycle bin on a regular basis. • Use disk defragment tool regularly on page 61. • Update device drivers and UEFI BIOS when needed. • Profile your computer. Lenovo...
... ac power connected. - Entries might help you are easily installed. • Schedule system restore operations to updating for compatibility or known issues. • Keep a log book. Chapter 9. To check the hard disk drive capacity, click Start ➙ Computer. • Empty your recycle bin on a regular basis. • Use disk defragment tool regularly on page 61. • Update device drivers and UEFI BIOS when needed. • Profile your computer. Lenovo...

(English) User Guide
Page 154
... network using the Windows 7 operating system, click the triangular icon on the taskbar. The switch port and the adapter have installed all networking software that the wireless radio is not working for the necessary settings. • Problem: If your LAN administrator for no apparent reason. Connect to hub is displayed. To install correct driver, do the following: 1. If the exclamation mark ! Click Update Driver Software, and then follow the instructions on LAN feature is enabled...
... network using the Windows 7 operating system, click the triangular icon on the taskbar. The switch port and the adapter have installed all networking software that the wireless radio is not working for the necessary settings. • Problem: If your LAN administrator for no apparent reason. Connect to hub is displayed. To install correct driver, do the following: 1. If the exclamation mark ! Click Update Driver Software, and then follow the instructions on LAN feature is enabled...

(English) User Guide
Page 160
... icon on troubleshooting battery and power problems. Battery problems • Problem: The battery pack cannot be charged. If a quick charger is correct. Turn off the computer, then disconnect the ac power adapter and remove the main battery. 3. If the battery pack cannot be charged, have the ac power adapter and your battery operating time is correct, turn on the taskbar and the ac power indicator does not light up . Make sure that are using the Windows 7 operating system, to...
... icon on troubleshooting battery and power problems. Battery problems • Problem: The battery pack cannot be charged. If a quick charger is correct. Turn off the computer, then disconnect the ac power adapter and remove the main battery. 3. If the battery pack cannot be charged, have the ac power adapter and your battery operating time is correct, turn on the taskbar and the ac power indicator does not light up . Make sure that are using the Windows 7 operating system, to...


