Hardware Maintenance Manual
Page 5
... 56 © Copyright Lenovo 2007, 2008 Retaining serial numbers 56 Removing and replacing a FRU 59 1010 Battery pack 60 1020 Hard disk drive (2.5-inch) and HDD rubber rails 61 1030 DIMM cover 63 1040 DIMM 64 1050 Keyboard 65 1060 Upper case 69 1070 Fingerprint reader... panel and LCD cable 117 Locations 119 Front view for ThinkPad X60, X60s, X61, and X61s 119 Rear view for ThinkPad X60, X60s, X61, and X61s 120 Bottom view for ThinkPad X60, X60s, X61, and X61s 121 Rear View for ThinkPad X6 UltraBase . . . . 122 Bottom View for ThinkPad X6 UltraBase . . . 122 Parts list 123 Overall...
... 56 © Copyright Lenovo 2007, 2008 Retaining serial numbers 56 Removing and replacing a FRU 59 1010 Battery pack 60 1020 Hard disk drive (2.5-inch) and HDD rubber rails 61 1030 DIMM cover 63 1040 DIMM 64 1050 Keyboard 65 1060 Upper case 69 1070 Fingerprint reader... panel and LCD cable 117 Locations 119 Front view for ThinkPad X60, X60s, X61, and X61s 119 Rear view for ThinkPad X60, X60s, X61, and X61s 120 Bottom view for ThinkPad X60, X60s, X61, and X61s 121 Rear View for ThinkPad X6 UltraBase . . . . 122 Bottom View for ThinkPad X6 UltraBase . . . 122 Parts list 123 Overall...

Hardware Maintenance Manual
Page 12
... Type" select PARTS INFORMATION. Lenovo plans to transition to RoHS compliance well before the implementation date and expects its suppliers to be ready to view the complete list of FRUs at the time of the order. 6 ThinkPad® X60, X60s, X61, and X61s Using the HMM Use the ...and non-RoHS FRU part numbers with a different FRU part number that is automatically shipped by Category" select SERVICE PARTS. In all cases if the original FRU parts are identified with applicable machine type model and FRU will contain some RoHS compliant FRUs. Products sold in the...
... Type" select PARTS INFORMATION. Lenovo plans to transition to RoHS compliance well before the implementation date and expects its suppliers to be ready to view the complete list of FRUs at the time of the order. 6 ThinkPad® X60, X60s, X61, and X61s Using the HMM Use the ...and non-RoHS FRU part numbers with a different FRU part number that is automatically shipped by Category" select SERVICE PARTS. In all cases if the original FRU parts are identified with applicable machine type model and FRU will contain some RoHS compliant FRUs. Products sold in the...

Hardware Maintenance Manual
Page 31
In this case, you have one. This will take several minutes" appears and .IMZ files are processed. A warning appears, click Yes. Select I accept these terms and conditions and ... the computer is turned on appears. For information on which discs to insert a Product Recovery Supplemental Disk, if you must be posted on http://www.lenovo.com/spm Restoring the factory contents by using Product Recovery discs When the hard disk drive is replaced because of a failure, no Product Recovery program...
In this case, you have one. This will take several minutes" appears and .IMZ files are processed. A warning appears, click Yes. Select I accept these terms and conditions and ... the computer is turned on appears. For information on which discs to insert a Product Recovery Supplemental Disk, if you must be posted on http://www.lenovo.com/spm Restoring the factory contents by using Product Recovery discs When the hard disk drive is replaced because of a failure, no Product Recovery program...
Hardware Maintenance Manual
Page 43
... drive (2.5-inch) and HDD rubber rails 61 1030 DIMM cover 63 1040 DIMM 64 1050 Keyboard 65 1060 Upper case 69 1070 Fingerprint reader 72 1080 Hard disk (1.8-inch 73 1090 Hard disk housing (1.8-inch 74 1100 Wireless WAN...117 Locations 119 Front view for ThinkPad X60, X60s, X61, and X61s 119 Rear view for ThinkPad X60, X60s, X61, and X61s 120 Bottom view for ThinkPad X60, X60s, X61, and X61s 121 Rear View for ThinkPad X6 UltraBase . . . . 122 Bottom View for ThinkPad X6 UltraBase . . . 122... Tools 232 Power cords 232 Notices 234 Trademarks 235 © Copyright Lenovo 2007, 2008 37
... drive (2.5-inch) and HDD rubber rails 61 1030 DIMM cover 63 1040 DIMM 64 1050 Keyboard 65 1060 Upper case 69 1070 Fingerprint reader 72 1080 Hard disk (1.8-inch 73 1090 Hard disk housing (1.8-inch 74 1100 Wireless WAN...117 Locations 119 Front view for ThinkPad X60, X60s, X61, and X61s 119 Rear view for ThinkPad X60, X60s, X61, and X61s 120 Bottom view for ThinkPad X60, X60s, X61, and X61s 121 Rear View for ThinkPad X6 UltraBase . . . . 122 Bottom View for ThinkPad X6 UltraBase . . . 122... Tools 232 Power cords 232 Notices 234 Trademarks 235 © Copyright Lenovo 2007, 2008 37

Hardware Maintenance Manual
Page 75
ThinkPad X60, X60s, X61, and X61s 69 Removing and replacing a FRU 1060 Upper case For access, remove following FRUs, in order: v "1010 Battery pack" on page 60 v "1050 Keyboard" on page 65 1 1 1 1 1 1 Step 1 Screw (quantity) M2 × 6 mm, wafer-head, nylon-coated (6) Color Black Torque 0.196 Nm (2 kgfcm) Note: Place the system on a hard flat table when you remove or reinstall the screws.
ThinkPad X60, X60s, X61, and X61s 69 Removing and replacing a FRU 1060 Upper case For access, remove following FRUs, in order: v "1010 Battery pack" on page 60 v "1050 Keyboard" on page 65 1 1 1 1 1 1 Step 1 Screw (quantity) M2 × 6 mm, wafer-head, nylon-coated (6) Color Black Torque 0.196 Nm (2 kgfcm) Note: Place the system on a hard flat table when you remove or reinstall the screws.

Hardware Maintenance Manual
Page 77
Press down and gently lift upper case up, as shown in steps 3 and 4 , to remove upper case. 3 4 3 When installing: Follow the steps below to make sure that the upper case is installed firmly. 1 2 ThinkPad X60, X60s, X61, and X61s 71 Removing and replacing a FRU Note: Open the LCD at least 150 degrees.
Press down and gently lift upper case up, as shown in steps 3 and 4 , to remove upper case. 3 4 3 When installing: Follow the steps below to make sure that the upper case is installed firmly. 1 2 ThinkPad X60, X60s, X61, and X61s 71 Removing and replacing a FRU Note: Open the LCD at least 150 degrees.
Hardware Maintenance Manual
Page 78
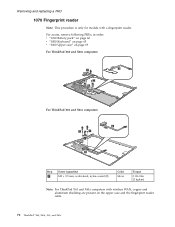
..." on page 60 v "1050 Keyboard" on page 65 v "1060 Upper case" on page 69 For ThinkPad X60 and X60s computers: 4 1 2 2 3 For ThinkPad X61 and X61s computers: 4 1 1 2 3 Step 2 Screw (quantity) M2 × 3.5 mm, wafer-head, nylon-coated (2) Color Silver Torque 0.196 Nm (2 kgfcm) Note: For ThinkPad X61 and X61s computers with a fingerprint reader. Removing and replacing a FRU 1070 Fingerprint...
..." on page 60 v "1050 Keyboard" on page 65 v "1060 Upper case" on page 69 For ThinkPad X60 and X60s computers: 4 1 2 2 3 For ThinkPad X61 and X61s computers: 4 1 1 2 3 Step 2 Screw (quantity) M2 × 3.5 mm, wafer-head, nylon-coated (2) Color Silver Torque 0.196 Nm (2 kgfcm) Note: For ThinkPad X61 and X61s computers with a fingerprint reader. Removing and replacing a FRU 1070 Fingerprint...
Hardware Maintenance Manual
Page 79
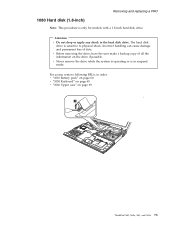
Incorrect handling can cause damage and permanent loss of all the information on page 69 1 2 ThinkPad X60, X60s, X61, and X61s 73 v Before removing the drive, have the user make a backup copy of data. v Never remove the drive while the system is operating or is only ... replacing a FRU 1080 Hard disk (1.8-inch) Note: This procedure is in order: v "1010 Battery pack" on page 60 v "1050 Keyboard" on page 65 v "1060 Upper case" on the drive if possible. The hard disk drive is sensitive to the hard disk drive.
Incorrect handling can cause damage and permanent loss of all the information on page 69 1 2 ThinkPad X60, X60s, X61, and X61s 73 v Before removing the drive, have the user make a backup copy of data. v Never remove the drive while the system is operating or is only ... replacing a FRU 1080 Hard disk (1.8-inch) Note: This procedure is in order: v "1010 Battery pack" on page 60 v "1050 Keyboard" on page 65 v "1060 Upper case" on the drive if possible. The hard disk drive is sensitive to the hard disk drive.
Hardware Maintenance Manual
Page 80
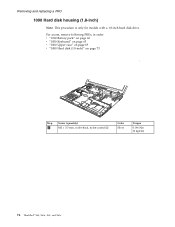
For access, remove following FRUs, in order: v "1010 Battery pack" on page 60 v "1050 Keyboard" on page 65 v "1060 Upper case" on page 69 v "1080 Hard disk (1.8-inch)" on page 73 1 2 Step 1 Screw (quantity) M2 × 3.5 mm, wafer-head, nylon-coated (2) Color Silver Torque 0.196 Nm (2 kgfcm) 74 ThinkPad® X60, X60s, X61, and X61s Removing and replacing a FRU 1090 Hard disk housing (1.8-inch) Note: This procedure is only for models with a 1.8-inch hard disk drive.
For access, remove following FRUs, in order: v "1010 Battery pack" on page 60 v "1050 Keyboard" on page 65 v "1060 Upper case" on page 69 v "1080 Hard disk (1.8-inch)" on page 73 1 2 Step 1 Screw (quantity) M2 × 3.5 mm, wafer-head, nylon-coated (2) Color Silver Torque 0.196 Nm (2 kgfcm) 74 ThinkPad® X60, X60s, X61, and X61s Removing and replacing a FRU 1090 Hard disk housing (1.8-inch) Note: This procedure is only for models with a 1.8-inch hard disk drive.
Hardware Maintenance Manual
Page 81
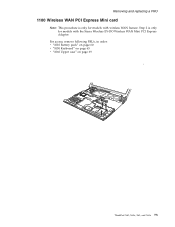
Removing and replacing a FRU 1100 Wireless WAN PCI Express Mini card Note: This procedure is only for models with the Sierra Wireless EV-DO Wireless WAN Mini PCI Express Adapter. For access, remove following FRUs, in order: v "1010 Battery pack" on page 60 v "1050 Keyboard" on page 65 v "1060 Upper case" on page 69 11 2 ThinkPad X60, X60s, X61, and X61s 75 Step 2 is only for models with wireless WAN feature.
Removing and replacing a FRU 1100 Wireless WAN PCI Express Mini card Note: This procedure is only for models with the Sierra Wireless EV-DO Wireless WAN Mini PCI Express Adapter. For access, remove following FRUs, in order: v "1010 Battery pack" on page 60 v "1050 Keyboard" on page 65 v "1060 Upper case" on page 69 11 2 ThinkPad X60, X60s, X61, and X61s 75 Step 2 is only for models with wireless WAN feature.

Hardware Maintenance Manual
Page 83
For access, remove following FRUs, in the system at one time, as they occupy the same slot. Removing and replacing a FRU 1110 Intel Turbo Memory card Note: Either a wireless WAN PCI Express Mini Card or an Intel Turbo Memory card can be installed in order: v "1010 Battery pack" on page 60 v "1050 Keyboard" on page 65 v "1060 Upper case" on page 69 1 2 Step 1 Screw (quantity) M2 × 2.5 mm, wafer-head, nylon-coated (2) Color Silver Torque 0.157 Nm (1.6 kgfcm) ThinkPad X60, X60s, X61, and X61s 77
For access, remove following FRUs, in the system at one time, as they occupy the same slot. Removing and replacing a FRU 1110 Intel Turbo Memory card Note: Either a wireless WAN PCI Express Mini Card or an Intel Turbo Memory card can be installed in order: v "1010 Battery pack" on page 60 v "1050 Keyboard" on page 65 v "1060 Upper case" on page 69 1 2 Step 1 Screw (quantity) M2 × 2.5 mm, wafer-head, nylon-coated (2) Color Silver Torque 0.157 Nm (1.6 kgfcm) ThinkPad X60, X60s, X61, and X61s 77
Hardware Maintenance Manual
Page 84
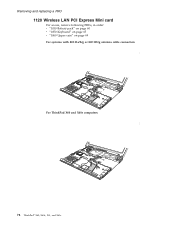
Removing and replacing a FRU 1120 Wireless LAN PCI Express Mini card For access, remove following FRUs, in order: v "1010 Battery pack" on page 60 v "1050 Keyboard" on page 65 v "1060 Upper case" on page 69 For systems with 802.11a/b/g or 802.11b/g antenna cable connection 1 For ThinkPad X60 and X60s computers: 3 2 78 ThinkPad® X60, X60s, X61, and X61s
Removing and replacing a FRU 1120 Wireless LAN PCI Express Mini card For access, remove following FRUs, in order: v "1010 Battery pack" on page 60 v "1050 Keyboard" on page 65 v "1060 Upper case" on page 69 For systems with 802.11a/b/g or 802.11b/g antenna cable connection 1 For ThinkPad X60 and X60s computers: 3 2 78 ThinkPad® X60, X60s, X61, and X61s
Hardware Maintenance Manual
Page 87
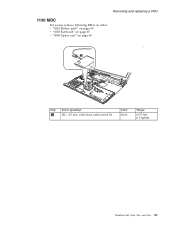
Removing and replacing a FRU 1130 MDC For access, remove following FRUs, in order: v "1010 Battery pack" on page 60 v "1050 Keyboard" on page 65 v "1060 Upper case" on page 69 2 1 31 Step 1 Screw (quantity) M2 × 3.5 mm, wafer-head, nylon-coated (2) Color Silver Torque 0.157 Nm (1.6 kgfcm) ThinkPad X60, X60s, X61, and X61s 81
Removing and replacing a FRU 1130 MDC For access, remove following FRUs, in order: v "1010 Battery pack" on page 60 v "1050 Keyboard" on page 65 v "1060 Upper case" on page 69 2 1 31 Step 1 Screw (quantity) M2 × 3.5 mm, wafer-head, nylon-coated (2) Color Silver Torque 0.157 Nm (1.6 kgfcm) ThinkPad X60, X60s, X61, and X61s 81
Hardware Maintenance Manual
Page 89
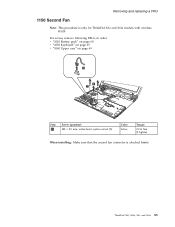
ThinkPad X60, X60s, X61, and X61s 83 Removing and replacing a FRU 1150 Second Fan Note: This procedure is attached firmly. For access, remove following FRUs, in order: v "1010 Battery pack" on page 60 v "1050 Keyboard" on page 65 v "1060 Upper case" on page 69 2 3 4 Step 1 Screw (quantity) M2 × 2.5 mm, wafer-head, nylon-coated (2) Color Silver Torque 0.196 Nm (2 kgfcm) When installing: Make sure that the second fan connector is only for ThinkPad X61 and X61s models with wireless WAN.
ThinkPad X60, X60s, X61, and X61s 83 Removing and replacing a FRU 1150 Second Fan Note: This procedure is attached firmly. For access, remove following FRUs, in order: v "1010 Battery pack" on page 60 v "1050 Keyboard" on page 65 v "1060 Upper case" on page 69 2 3 4 Step 1 Screw (quantity) M2 × 2.5 mm, wafer-head, nylon-coated (2) Color Silver Torque 0.196 Nm (2 kgfcm) When installing: Make sure that the second fan connector is only for ThinkPad X61 and X61s models with wireless WAN.
Hardware Maintenance Manual
Page 90
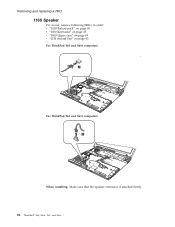
Removing and replacing a FRU 1160 Speaker For access, remove following FRUs, in order: v "1010 Battery pack" on page 60 v "1050 Keyboard" on page 65 v "1060 Upper case" on page 69 v "1150 Second Fan" on page 83 For ThinkPad X60 and X60s computers: 2 1 For ThinkPad X61 and X61s computers: 2 1 When installing: Make sure that the speaker connector is attached firmly. 84 ThinkPad® X60, X60s, X61, and X61s
Removing and replacing a FRU 1160 Speaker For access, remove following FRUs, in order: v "1010 Battery pack" on page 60 v "1050 Keyboard" on page 65 v "1060 Upper case" on page 69 v "1150 Second Fan" on page 83 For ThinkPad X60 and X60s computers: 2 1 For ThinkPad X61 and X61s computers: 2 1 When installing: Make sure that the speaker connector is attached firmly. 84 ThinkPad® X60, X60s, X61, and X61s
Hardware Maintenance Manual
Page 91
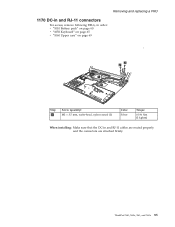
Removing and replacing a FRU 1170 DC-in and RJ-11 connectors For access, remove following FRUs, in order: v "1010 Battery pack" on page 60 v "1050 Keyboard" on page 65 v "1060 Upper case" on page 69 2 2 3 1 4 1 4 Step 2 Screw (quantity) M2 × 3.5 mm, wafer-head, nylon-coated (2) Color Silver Torque 0.196 Nm (2 kgfcm) When installing: Make sure that the DC-in and RJ-11 cables are routed properly and the connectors are attached firmly. ThinkPad X60, X60s, X61, and X61s 85
Removing and replacing a FRU 1170 DC-in and RJ-11 connectors For access, remove following FRUs, in order: v "1010 Battery pack" on page 60 v "1050 Keyboard" on page 65 v "1060 Upper case" on page 69 2 2 3 1 4 1 4 Step 2 Screw (quantity) M2 × 3.5 mm, wafer-head, nylon-coated (2) Color Silver Torque 0.196 Nm (2 kgfcm) When installing: Make sure that the DC-in and RJ-11 cables are routed properly and the connectors are attached firmly. ThinkPad X60, X60s, X61, and X61s 85

Hardware Maintenance Manual
Page 92
Then release the antenna cables in order: v "1010 Battery pack" on page 60 v "1050 Keyboard" on page 65 v "1060 Upper case" on page 69 v "1100 Wireless WAN PCI Express Mini card" on page 75 v "1120 Wireless LAN PCI Express Mini card" on page 78 Before removing LCD assembly, detach the connector 4 . Removing and replacing a FRU 1180 LCD assembly For access, remove following FRUs, in steps 6 to 9 . 11 4 2 3 Step 1 Screw (quantity) M2 × 3.5 mm, wafer-head, nylon-coated (2) (continued) Color Silver Torque 0.196 Nm (2 kgfcm) 86 ThinkPad® X60, X60s, X61, and X61s
Then release the antenna cables in order: v "1010 Battery pack" on page 60 v "1050 Keyboard" on page 65 v "1060 Upper case" on page 69 v "1100 Wireless WAN PCI Express Mini card" on page 75 v "1120 Wireless LAN PCI Express Mini card" on page 78 Before removing LCD assembly, detach the connector 4 . Removing and replacing a FRU 1180 LCD assembly For access, remove following FRUs, in steps 6 to 9 . 11 4 2 3 Step 1 Screw (quantity) M2 × 3.5 mm, wafer-head, nylon-coated (2) (continued) Color Silver Torque 0.196 Nm (2 kgfcm) 86 ThinkPad® X60, X60s, X61, and X61s

Hardware Maintenance Manual
Page 98
For 1.8-inch hard disk drive For 2.5-inch hard disk drive 92 ThinkPad® X60, X60s, X61, and X61s Removing and replacing a FRU 1190 Hard disk sub-card For access, remove following FRUs, in order: v "1010 Battery pack" on page 60 v "1020 Hard disk ...drive (2.5-inch) and HDD rubber rails" on page 61 v "1050 Keyboard" on page 65 v "1060 Upper case" on page 69 v "1080 Hard disk...
For 1.8-inch hard disk drive For 2.5-inch hard disk drive 92 ThinkPad® X60, X60s, X61, and X61s Removing and replacing a FRU 1190 Hard disk sub-card For access, remove following FRUs, in order: v "1010 Battery pack" on page 60 v "1020 Hard disk ...drive (2.5-inch) and HDD rubber rails" on page 61 v "1050 Keyboard" on page 65 v "1060 Upper case" on page 69 v "1080 Hard disk...
Hardware Maintenance Manual
Page 99
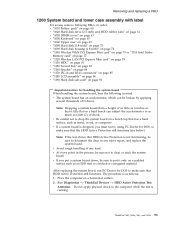
... as 6,000 G's of any reject report, and replace the system board. Run Diagnostics --> ThinkPad Devices --> HDD Active Protection Test. ThinkPad X60, X60s, X61, and X61s 93 Removing and replacing a FRU 1200 System board and lower case assembly with label For access, remove following in any kind. Note: If the test shows ... disk drive (2.5-inch) and HDD rubber rails" on page 61 v "1030 DIMM cover" on page 63 v "1050 Keyboard" on page 65 v "1060 Upper case" on page 69 v "1080 Hard disk (1.8-inch)" on page 73 v "1090 Hard disk housing (1.8-inch)" on page 74 v "1100 Wireless WAN PCI Express Mini...
... as 6,000 G's of any reject report, and replace the system board. Run Diagnostics --> ThinkPad Devices --> HDD Active Protection Test. ThinkPad X60, X60s, X61, and X61s 93 Removing and replacing a FRU 1200 System board and lower case assembly with label For access, remove following in any kind. Note: If the test shows ... disk drive (2.5-inch) and HDD rubber rails" on page 61 v "1030 DIMM cover" on page 63 v "1050 Keyboard" on page 65 v "1060 Upper case" on page 69 v "1080 Hard disk (1.8-inch)" on page 73 v "1090 Hard disk housing (1.8-inch)" on page 74 v "1100 Wireless WAN PCI Express Mini...
Hardware Maintenance Manual
Page 102
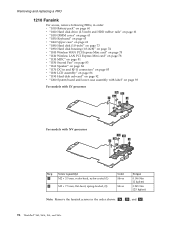
... and HDD rubber rails" on page 61 v "1030 DIMM cover" on page 63 v "1050 Keyboard" on page 65 v "1060 Upper case" on page 69 v "1080 Hard disk (1.8-inch)" on page 73 v "1090 Hard disk housing (1.8-inch)" on page 74 v "1100 ...page 85 v "1180 LCD assembly" on page 86 v "1190 Hard disk sub-card" on page 92 v "1200 System board and lower case assembly with label" on page 93 For models with LV processor 3b 3c 3a 2 4 1 For models with NV processor 3c 3b 3a 2...245 Nm (2.5 kgfcm) Note: Remove the fansink screws in the order shown: 3a , 3b , and 3c . 96 ThinkPad® X60, X60s, X61, and X61s
... and HDD rubber rails" on page 61 v "1030 DIMM cover" on page 63 v "1050 Keyboard" on page 65 v "1060 Upper case" on page 69 v "1080 Hard disk (1.8-inch)" on page 73 v "1090 Hard disk housing (1.8-inch)" on page 74 v "1100 ...page 85 v "1180 LCD assembly" on page 86 v "1190 Hard disk sub-card" on page 92 v "1200 System board and lower case assembly with label" on page 93 For models with LV processor 3b 3c 3a 2 4 1 For models with NV processor 3c 3b 3a 2...245 Nm (2.5 kgfcm) Note: Remove the fansink screws in the order shown: 3a , 3b , and 3c . 96 ThinkPad® X60, X60s, X61, and X61s


