Hardware Maintenance Manual
Page 5
...53 LCD-related symptoms 54 Intermittent problems 55 Undetermined problems 55 FRU replacement notices 56 Screw notices 56 © Copyright Lenovo 2007, 2008 Retaining serial numbers 56 Removing and replacing a FRU 59 1010 Battery pack 60 1020 Hard disk drive (2.5-inch) and HDD rubber rails... LCD cable 117 Locations 119 Front view for ThinkPad X60, X60s, X61, and X61s 119 Rear view for ThinkPad X60, X60s, X61, and X61s 120 Bottom view for ThinkPad X60, X60s, X61, and X61s 121 Rear View for ThinkPad X6 UltraBase . . . . 122 Bottom View for ThinkPad X6 UltraBase . . . 122 Parts list ...
...53 LCD-related symptoms 54 Intermittent problems 55 Undetermined problems 55 FRU replacement notices 56 Screw notices 56 © Copyright Lenovo 2007, 2008 Retaining serial numbers 56 Removing and replacing a FRU 59 1010 Battery pack 60 1020 Hard disk drive (2.5-inch) and HDD rubber rails... LCD cable 117 Locations 119 Front view for ThinkPad X60, X60s, X61, and X61s 119 Rear view for ThinkPad X60, X60s, X61, and X61s 120 Bottom view for ThinkPad X60, X60s, X61, and X61s 121 Rear View for ThinkPad X6 UltraBase . . . . 122 Bottom View for ThinkPad X6 UltraBase . . . 122 Parts list ...
Hardware Maintenance Manual
Page 33
The hard disk drive can be replaced for a scheduled fee. The system board must enter the SVP in the BIOS Setup Utility. For how to remove the battery pack, see "1140 Backup battery" on page 82. 4. For how to remove the power-on the ThinkPad computer. 2. then enter the POP. Note: To check ... get access to recover data from the hard disk drive. The user must be made available to the servicer, there is available, neither Lenovo nor Lenovo authorized servicers provide any services to reset either the user or the master HDP, or to the BIOS Setup Utility and change the system ...
The hard disk drive can be replaced for a scheduled fee. The system board must enter the SVP in the BIOS Setup Utility. For how to remove the battery pack, see "1140 Backup battery" on page 82. 4. For how to remove the power-on the ThinkPad computer. 2. then enter the POP. Note: To check ... get access to recover data from the hard disk drive. The user must be made available to the servicer, there is available, neither Lenovo nor Lenovo authorized servicers provide any services to reset either the user or the master HDP, or to the BIOS Setup Utility and change the system ...
Hardware Maintenance Manual
Page 40
...used, replace the port replicator. If you power on the computer. Connect the ac adapter. 4. Check that the battery pack supplies... following : 34 ThinkPad® X60, X60s, X61, and X61s Remove the battery pack. 3. Disconnect the ac adapter and install the charged battery pack. 7. Check... Surface Scan Hard Disk v Benchmark System v DOS Shell v Tech Support Form v Battery Rundown v View Test Log v Print Log v Save Log v Full Erase Hard ... operational charging" on page 35 v "Checking the battery pack" on page 35 v "Checking the backup battery" on , check the power cord of the categories...
...used, replace the port replicator. If you power on the computer. Connect the ac adapter. 4. Check that the battery pack supplies... following : 34 ThinkPad® X60, X60s, X61, and X61s Remove the battery pack. 3. Disconnect the ac adapter and install the charged battery pack. 7. Check... Surface Scan Hard Disk v Benchmark System v DOS Shell v Tech Support Form v Battery Rundown v View Test Log v Print Log v Save Log v Full Erase Hard ... operational charging" on page 35 v "Checking the battery pack" on page 35 v "Checking the backup battery" on , check the power cord of the categories...

Hardware Maintenance Manual
Page 41
... does not always indicate a defect. Checking operational charging To check whether the battery charges properly during operation, use a discharged battery pack or a battery pack that less than 50% of battery power remaining is not correct, replace the ac adapter. 4. Power off the computer. 2. Measure the output voltage...from the computer and leave it at the plug of its capacity. Then reinstall the battery pack. Perform operational charging. If the charge indicator still does not turn on , replace the system board. After it cools down, reinstall and recharge it return to the next...
... does not always indicate a defect. Checking operational charging To check whether the battery charges properly during operation, use a discharged battery pack or a battery pack that less than 50% of battery power remaining is not correct, replace the ac adapter. 4. Power off the computer. 2. Measure the output voltage...from the computer and leave it at the plug of its capacity. Then reinstall the battery pack. Perform operational charging. If the charge indicator still does not turn on , replace the system board. After it cools down, reinstall and recharge it return to the next...
Hardware Maintenance Manual
Page 42
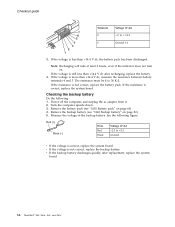
... on page 60). 4. If the voltage is still less than +14.4 V dc after replacement, replace the system board. 36 ThinkPad® X60, X60s, X61, and X61s Turn the computer upside down. 3. If the resistance is less than +14.4 V dc, measure the resistance between battery terminals 4 and 5. See the following : 1. Power off the computer, and unplug the...
... on page 60). 4. If the voltage is still less than +14.4 V dc after replacement, replace the system board. 36 ThinkPad® X60, X60s, X61, and X61s Turn the computer upside down. 3. If the resistance is less than +14.4 V dc, measure the resistance between battery terminals 4 and 5. See the following : 1. Power off the computer, and unplug the...
Hardware Maintenance Manual
Page 43
... system unit 57 Retaining the UUID 57 Reading or writing the ECA information . . 57 Removing and replacing a FRU 59 1010 Battery pack 60 1020 Hard disk drive (2.5-inch) and HDD rubber rails 61 1030 DIMM cover 63 1040... 117 Locations 119 Front view for ThinkPad X60, X60s, X61, and X61s 119 Rear view for ThinkPad X60, X60s, X61, and X61s 120 Bottom view for ThinkPad X60, X60s, X61, and X61s 121 Rear View for ThinkPad X6 UltraBase . . . . 122 Bottom View for ThinkPad X6 UltraBase . . . 122...232 Tools 232 Power cords 232 Notices 234 Trademarks 235 © Copyright Lenovo 2007, 2008 37
... system unit 57 Retaining the UUID 57 Reading or writing the ECA information . . 57 Removing and replacing a FRU 59 1010 Battery pack 60 1020 Hard disk drive (2.5-inch) and HDD rubber rails 61 1030 DIMM cover 63 1040... 117 Locations 119 Front view for ThinkPad X60, X60s, X61, and X61s 119 Rear view for ThinkPad X60, X60s, X61, and X61s 120 Bottom view for ThinkPad X60, X60s, X61, and X61s 121 Rear View for ThinkPad X6 UltraBase . . . . 122 Bottom View for ThinkPad X6 UltraBase . . . 122...232 Tools 232 Power cords 232 Notices 234 Trademarks 235 © Copyright Lenovo 2007, 2008 37
Hardware Maintenance Manual
Page 49
Replace the modem jack and the modem card in turn the computer off and on. Then, run Diagnostics --> ThinkPad Devices --> HDD Active Protection...Keyboard 1. Note: Do not apply any physical shock to the TrackPointing Stick. Power Diagnostics --> ThinkPad Devices --> AC Adapter, Battery 1 (Battery 2) LCD unit 1. Make sure the modem is not a hardware problem. Interactive Tests -->...Other Devices --> Analog Devices HDA CODEC Test Speaker Interactive Tests --> Internal Speaker Note: (For X61/X61s only) Once Modem/Audio test is done, if no service action is running. If the ...
Replace the modem jack and the modem card in turn the computer off and on. Then, run Diagnostics --> ThinkPad Devices --> HDD Active Protection...Keyboard 1. Note: Do not apply any physical shock to the TrackPointing Stick. Power Diagnostics --> ThinkPad Devices --> AC Adapter, Battery 1 (Battery 2) LCD unit 1. Make sure the modem is not a hardware problem. Interactive Tests -->...Other Devices --> Analog Devices HDA CODEC Test Speaker Interactive Tests --> Internal Speaker Note: (For X61/X61s only) Once Modem/Audio test is done, if no service action is running. If the ...

Hardware Maintenance Manual
Page 54
...-Shadow RAM fails at offset nnnn. System board. Replace the backup battery and run BIOS Setup Utility to reset the time and date. 48 ThinkPad® X60, X60s, X61, and X61s Press to ignore the warning message. 2. Charge the backup battery for more than 8 hours by connecting the ac... adapter. 2. Charge the backup battery for more than 8 hours by connecting the ac ...
...-Shadow RAM fails at offset nnnn. System board. Replace the backup battery and run BIOS Setup Utility to reset the time and date. 48 ThinkPad® X60, X60s, X61, and X61s Press to ignore the warning message. 2. Charge the backup battery for more than 8 hours by connecting the ac... adapter. 2. Charge the backup battery for more than 8 hours by connecting the ac ...
Hardware Maintenance Manual
Page 55
... more than 8 hours by connecting the ac adapter. 2. Replace the backup battery and run BIOS Setup Utility to reset the time and date. 3. System board. 1. DIMM. 2. System board. 1. Remove the daughter card that you installed. 2. System board. 1. CPU. 2. DIMM. 2. ThinkPad X60, X60s, X61, and X61s 49 System board. 1. Load "Setup Default" in -Power off and...
... more than 8 hours by connecting the ac adapter. 2. Replace the backup battery and run BIOS Setup Utility to reset the time and date. 3. System board. 1. DIMM. 2. System board. 1. Remove the daughter card that you installed. 2. System board. 1. CPU. 2. DIMM. 2. ThinkPad X60, X60s, X61, and X61s 49 System board. 1. Load "Setup Default" in -Power off and...
Hardware Maintenance Manual
Page 61
...(See "Power system checkout" on the computer. 5. Battery pack e. External diskette drive or optical drive g. Turn on page 34.) 1. When analyzing an intermittent problem, do not replace a nondefective FRU): a. Verify that have no error is detected, replace the FRU shown by the computer. Visually check each ...Verify that the power supply being used at a time until you find the failing FRU. 7. LCD assembly ThinkPad X60, X60s, X61, and X61s 55 If any damaged FRU. 3. Replace any error is detected, do not isolate FRUs that no more errors exist. Rerun the test to verify ...
...(See "Power system checkout" on the computer. 5. Battery pack e. External diskette drive or optical drive g. Turn on page 34.) 1. When analyzing an intermittent problem, do not replace a nondefective FRU): a. Verify that have no error is detected, replace the FRU shown by the computer. Visually check each ...Verify that the power supply being used at a time until you find the failing FRU. 7. LCD assembly ThinkPad X60, X60s, X61, and X61s 55 If any damaged FRU. 3. Replace any error is detected, do not isolate FRUs that no more errors exist. Rerun the test to verify ...
Hardware Maintenance Manual
Page 65
...replacing...replacing a FRU. When replacing a FRU, use in the steps for rattling sounds. Before touching it, establish personal grounding by touching a ground point with one hand or by the arrow in the drawing. 7. ThinkPad X60, X60s, X61, and X61s... 59 Any such FRUs are listed. 4. For information about connecting and arranging internal cables, see "Locations" on page 56. 3. When turning a screw to replace.... 6. Attention: After replacing a FRU, do not... Removing and replacing a FRU Removing and replacing a FRU This...to replacement. DANGER Before ...
...replacing...replacing a FRU. When replacing a FRU, use in the steps for rattling sounds. Before touching it, establish personal grounding by touching a ground point with one hand or by the arrow in the drawing. 7. ThinkPad X60, X60s, X61, and X61s... 59 Any such FRUs are listed. 4. For information about connecting and arranging internal cables, see "Locations" on page 56. 3. When turning a screw to replace.... 6. Attention: After replacing a FRU, do not... Removing and replacing a FRU Removing and replacing a FRU This...to replacement. DANGER Before ...
Hardware Maintenance Manual
Page 66
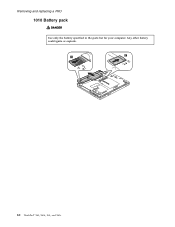
Any other battery could ignite or explode. 1 2 3 60 ThinkPad® X60, X60s, X61, and X61s Removing and replacing a FRU 1010 Battery pack DANGER Use only the battery specified in the parts list for your computer.
Any other battery could ignite or explode. 1 2 3 60 ThinkPad® X60, X60s, X61, and X61s Removing and replacing a FRU 1010 Battery pack DANGER Use only the battery specified in the parts list for your computer.
Hardware Maintenance Manual
Page 67
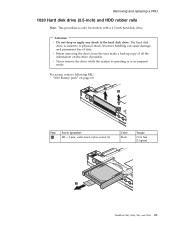
...drop or apply any shock to physical shock. v Before removing the drive, have the user make a backup copy of data. Removing and replacing a FRU 1020 Hard disk drive (2.5-inch) and HDD rubber rails Note: This procedure is sensitive to the hard disk drive. Incorrect handling ... 1 Screw (quantity) M3 × 3 mm, wafer-head, nylon-coated (1) Color Black Torque 0.196 Nm (2 kgfcm) 3 ThinkPad X60, X60s, X61, and X61s 61 For access, remove following FRU: v "1010 Battery pack" on the drive if possible. The hard disk drive is only for models with a 2.5-inch hard disk drive. v Never...
...drop or apply any shock to physical shock. v Before removing the drive, have the user make a backup copy of data. Removing and replacing a FRU 1020 Hard disk drive (2.5-inch) and HDD rubber rails Note: This procedure is sensitive to the hard disk drive. Incorrect handling ... 1 Screw (quantity) M3 × 3 mm, wafer-head, nylon-coated (1) Color Black Torque 0.196 Nm (2 kgfcm) 3 ThinkPad X60, X60s, X61, and X61s 61 For access, remove following FRU: v "1010 Battery pack" on the drive if possible. The hard disk drive is only for models with a 2.5-inch hard disk drive. v Never...

Hardware Maintenance Manual
Page 69
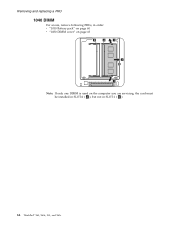
Removing and replacing a FRU 1030 DIMM cover For access, remove following FRU: v "1010 Battery pack" on page 60 Note: Loosen the screws 1 , but do not remove them. 1 1 2 Step 1 Screw (quantity) M2 × 3 mm, wafer-head, nylon-coated (2) Color Black Torque 0.157 Nm (1.6 kgfcm) ThinkPad X60, X60s, X61, and X61s 63
Removing and replacing a FRU 1030 DIMM cover For access, remove following FRU: v "1010 Battery pack" on page 60 Note: Loosen the screws 1 , but do not remove them. 1 1 2 Step 1 Screw (quantity) M2 × 3 mm, wafer-head, nylon-coated (2) Color Black Torque 0.157 Nm (1.6 kgfcm) ThinkPad X60, X60s, X61, and X61s 63
Hardware Maintenance Manual
Page 70
Removing and replacing a FRU 1040 DIMM For access, remove following FRUs, in order: v "1010 Battery pack" on page 60 v "1030 DIMM cover" on page 63 b a 1 2 1 Note: If only one DIMM is used on the computer you are servicing, the card must be installed in SLOT-0 ( a ), but not in SLOT-1 ( b ). 64 ThinkPad® X60, X60s, X61, and X61s
Removing and replacing a FRU 1040 DIMM For access, remove following FRUs, in order: v "1010 Battery pack" on page 60 v "1030 DIMM cover" on page 63 b a 1 2 1 Note: If only one DIMM is used on the computer you are servicing, the card must be installed in SLOT-0 ( a ), but not in SLOT-1 ( b ). 64 ThinkPad® X60, X60s, X61, and X61s
Hardware Maintenance Manual
Page 71
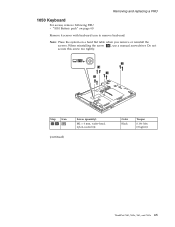
Removing and replacing a FRU 1050 Keyboard For access, remove following FRU: v "1010 Battery pack" on a hard flat table when you remove or reinstall the screws. Note: Place the system on page 60 Remove 4 screws with keyboard icon to remove keyboard. Do not secure this screw too tightly. 1 1a 1 1 Step Icon 1 1a (continued) Screw (quantity) M2 × 6 mm, wafer-head, nylon-coated (4) Color Black Torque 0.196 Nm (2 kgfcm) ThinkPad X60, X60s, X61, and X61s 65 When reinstalling the screw 1a , use a manual screwdriver.
Removing and replacing a FRU 1050 Keyboard For access, remove following FRU: v "1010 Battery pack" on a hard flat table when you remove or reinstall the screws. Note: Place the system on page 60 Remove 4 screws with keyboard icon to remove keyboard. Do not secure this screw too tightly. 1 1a 1 1 Step Icon 1 1a (continued) Screw (quantity) M2 × 6 mm, wafer-head, nylon-coated (4) Color Black Torque 0.196 Nm (2 kgfcm) ThinkPad X60, X60s, X61, and X61s 65 When reinstalling the screw 1a , use a manual screwdriver.

Hardware Maintenance Manual
Page 75
ThinkPad X60, X60s, X61, and X61s 69 Removing and replacing a FRU 1060 Upper case For access, remove following FRUs, in order: v "1010 Battery pack" on page 60 v "1050 Keyboard" on page 65 1 1 1 1 1 1 Step 1 Screw (quantity) M2 × 6 mm, wafer-head, nylon-coated (6) Color Black Torque 0.196 Nm (2 kgfcm) Note: Place the system on a hard flat table when you remove or reinstall the screws.
ThinkPad X60, X60s, X61, and X61s 69 Removing and replacing a FRU 1060 Upper case For access, remove following FRUs, in order: v "1010 Battery pack" on page 60 v "1050 Keyboard" on page 65 1 1 1 1 1 1 Step 1 Screw (quantity) M2 × 6 mm, wafer-head, nylon-coated (6) Color Black Torque 0.196 Nm (2 kgfcm) Note: Place the system on a hard flat table when you remove or reinstall the screws.
Hardware Maintenance Manual
Page 78
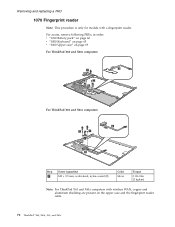
For access, remove following FRUs, in order: v "1010 Battery pack" on page 60 v "1050 Keyboard" on page 65 v "1060 Upper case" on the upper case and the fingerprint reader cable. 72 ThinkPad® X60, X60s, X61, and X61s Removing and replacing a FRU 1070 Fingerprint reader Note: This procedure is only for models with wireless WAN, copper...
For access, remove following FRUs, in order: v "1010 Battery pack" on page 60 v "1050 Keyboard" on page 65 v "1060 Upper case" on the upper case and the fingerprint reader cable. 72 ThinkPad® X60, X60s, X61, and X61s Removing and replacing a FRU 1070 Fingerprint reader Note: This procedure is only for models with wireless WAN, copper...
Hardware Maintenance Manual
Page 79
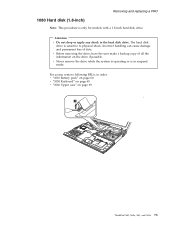
...user make a backup copy of data. The hard disk drive is sensitive to the hard disk drive. Removing and replacing a FRU 1080 Hard disk (1.8-inch) Note: This procedure is in order: v "1010 Battery pack" on page 60 v "1050 Keyboard" on page 65 v "1060 Upper case" on the drive if possible.... Attention v Do not drop or apply any shock to physical shock. Incorrect handling can cause damage and permanent loss of all the information on page 69 1 2 ThinkPad X60, X60s, X61, and X61s 73 v...
...user make a backup copy of data. The hard disk drive is sensitive to the hard disk drive. Removing and replacing a FRU 1080 Hard disk (1.8-inch) Note: This procedure is in order: v "1010 Battery pack" on page 60 v "1050 Keyboard" on page 65 v "1060 Upper case" on the drive if possible.... Attention v Do not drop or apply any shock to physical shock. Incorrect handling can cause damage and permanent loss of all the information on page 69 1 2 ThinkPad X60, X60s, X61, and X61s 73 v...
Hardware Maintenance Manual
Page 80
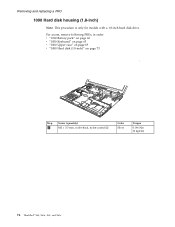
Removing and replacing a FRU 1090 Hard disk housing (1.8-inch) Note: This procedure is only for models with a 1.8-inch hard disk drive. For access, remove following FRUs, in order: v "1010 Battery pack" on page 60 v "1050 Keyboard" on page 65 v "1060 Upper case" on page 69 v "1080 Hard disk (1.8-inch)" on page 73 1 2 Step 1 Screw (quantity) M2 × 3.5 mm, wafer-head, nylon-coated (2) Color Silver Torque 0.196 Nm (2 kgfcm) 74 ThinkPad® X60, X60s, X61, and X61s
Removing and replacing a FRU 1090 Hard disk housing (1.8-inch) Note: This procedure is only for models with a 1.8-inch hard disk drive. For access, remove following FRUs, in order: v "1010 Battery pack" on page 60 v "1050 Keyboard" on page 65 v "1060 Upper case" on page 69 v "1080 Hard disk (1.8-inch)" on page 73 1 2 Step 1 Screw (quantity) M2 × 3.5 mm, wafer-head, nylon-coated (2) Color Silver Torque 0.196 Nm (2 kgfcm) 74 ThinkPad® X60, X60s, X61, and X61s


