
Hardware Maintenance Manual
Page 5
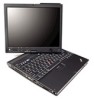
...information about replacing RoHS ...ThinkPad X60 Tablet and X61 Tablet . . 33 Product overview 34 Specifications 34 Status indicators 37 FRU tests 39 Fn key... combinations 41 Symptom-to-FRU index 43 Numeric error codes 43 Error messages 47 Beep symptoms 48 No-beep symptoms 48 LCD-related symptoms 49 Intermittent problems 50 Undetermined problems 50 FRU replacement notices 51 Screw notices 51 Retaining serial numbers 51 Removing and replacing...1090 Palm rest for X61 Tablet 68 1100 Keyboard bezel for X61 Tablet . . ...ThinkPad X6 Tablet UltraBase). . . 106 Bottom view (ThinkPad...
...information about replacing RoHS ...ThinkPad X60 Tablet and X61 Tablet . . 33 Product overview 34 Specifications 34 Status indicators 37 FRU tests 39 Fn key... combinations 41 Symptom-to-FRU index 43 Numeric error codes 43 Error messages 47 Beep symptoms 48 No-beep symptoms 48 LCD-related symptoms 49 Intermittent problems 50 Undetermined problems 50 FRU replacement notices 51 Screw notices 51 Retaining serial numbers 51 Removing and replacing...1090 Palm rest for X61 Tablet 68 1100 Keyboard bezel for X61 Tablet . . ...ThinkPad X6 Tablet UltraBase). . . 106 Bottom view (ThinkPad...
Hardware Maintenance Manual
Page 29
...replaced for a scheduled fee. Turn off the computer. 2. For how to the BIOS Setup Utility and change the system configuration. Turn on the computer and wait until the POST ends. Note: To check whether the ThinkPad...no master HDP is available, neither Lenovo nor Lenovo authorized servicers provide any services to ...keys to Security --> Password. then leave the Enter New Password field blank, and press Enter twice. 8. If no service procedure to the hard disk drive. The user must be used for a scheduled fee. How to remove the battery pack, see "1060 Backup battery" on the ThinkPad...
...replaced for a scheduled fee. Turn off the computer. 2. For how to the BIOS Setup Utility and change the system configuration. Turn on the computer and wait until the POST ends. Note: To check whether the ThinkPad...no master HDP is available, neither Lenovo nor Lenovo authorized servicers provide any services to ...keys to Security --> Password. then leave the Enter New Password field blank, and press Enter twice. 8. If no service procedure to the hard disk drive. The user must be used for a scheduled fee. How to remove the battery pack, see "1060 Backup battery" on the ThinkPad...
Hardware Maintenance Manual
Page 30
The hard disk drive can be made available to the servicer, neither Lenovo nor Lenovo authorized servicers provide any key. then, while the "To interrupt normal startup, press the blue ... Recovery screen opens. For the other models, enter the master HDP. Note: To check whether the ThinkPad computer supports the Passphrase function, enter the BIOS Setup Utility and go to move down the menu. ... Attention: If User only mode is selected and the user HDP has been forgotten and cannot be replaced for a scheduled fee. The system Restart Required window is available on the "Turn off . If...
The hard disk drive can be made available to the servicer, neither Lenovo nor Lenovo authorized servicers provide any key. then, while the "To interrupt normal startup, press the blue ... Recovery screen opens. For the other models, enter the master HDP. Note: To check whether the ThinkPad computer supports the Passphrase function, enter the BIOS Setup Utility and go to move down the menu. ... Attention: If User only mode is selected and the user HDP has been forgotten and cannot be replaced for a scheduled fee. The system Restart Required window is available on the "Turn off . If...
Hardware Maintenance Manual
Page 39
...ThinkPad X60 Tablet and X61 Tablet Product overview 34 Specifications 34 Status indicators 37 FRU tests 39 Fn key combinations 41 Symptom-to-FRU index 43 Numeric error codes 43 Error messages 47 Beep symptoms 48 No-beep symptoms 48 LCD-related symptoms 49 Intermittent problems 50 Undetermined problems 50 FRU replacement...unit 52 Retaining the UUID 52 Reading or writing the ECA information . . 52 Removing and replacing a FRU 54 1010 Battery pack 55 1020 Hard disk drive slot cover, hard disk drive ... Power cords 157 Notices 158 Trademarks 159 © Copyright Lenovo 2007 33
...ThinkPad X60 Tablet and X61 Tablet Product overview 34 Specifications 34 Status indicators 37 FRU tests 39 Fn key combinations 41 Symptom-to-FRU index 43 Numeric error codes 43 Error messages 47 Beep symptoms 48 No-beep symptoms 48 LCD-related symptoms 49 Intermittent problems 50 Undetermined problems 50 FRU replacement...unit 52 Retaining the UUID 52 Reading or writing the ECA information . . 52 Removing and replacing a FRU 54 1010 Battery pack 55 1020 Hard disk drive slot cover, hard disk drive ... Power cords 157 Notices 158 Trademarks 159 © Copyright Lenovo 2007 33

Hardware Maintenance Manual
Page 45
...displayed at the lower left of the screen, press F1 to the ThinkPad computer, detach it. Replace the modem jack and the modem card in turn, and run this...Diagnostics --> ThinkPad Devices --> ExpressCard slot. Turn on the computer. 3. If the ThinkPad X6 Tablet UltraBase is heard in Diagnostics --> Communication: a. Turn on the computer. 3. Using cursor keys, select ...change Serial ATA (SATA) setting to start the diagnostic program. (continued) ThinkPad X60 Tablet and X61 Tablet 39 Power Diagnostics --> ThinkPad Devices --> AC Adapter, Battery 1 (Battery 2) LCD unit 1. Diagnostics ...
...displayed at the lower left of the screen, press F1 to the ThinkPad computer, detach it. Replace the modem jack and the modem card in turn, and run this...Diagnostics --> ThinkPad Devices --> ExpressCard slot. Turn on the computer. 3. If the ThinkPad X6 Tablet UltraBase is heard in Diagnostics --> Communication: a. Turn on the computer. 3. Using cursor keys, select ...change Serial ATA (SATA) setting to start the diagnostic program. (continued) ThinkPad X60 Tablet and X61 Tablet 39 Power Diagnostics --> ThinkPad Devices --> AC Adapter, Battery 1 (Battery 2) LCD unit 1. Diagnostics ...

Hardware Maintenance Manual
Page 70
To make sure that the keyboard edges are under the frame as shown in place. 3. Attach the keyboard connector firmly. 2. Then press the keys to slide the keyboard toward you. 4. Secure the keyboard by tightening the screws from the bottom side of the keyboard is housed firmly, gently press the keys with your thumbs and try to latch the keyboard firmly in this figure. Make sure that the front side of the computer. 64 MT 6363, 6364, 6365, 6366, 6367, 6368, 7762, 7763, 7764, 7767, 7768, and 7769 Removing and replacing a FRU When installing: 1.
To make sure that the keyboard edges are under the frame as shown in place. 3. Attach the keyboard connector firmly. 2. Then press the keys to slide the keyboard toward you. 4. Secure the keyboard by tightening the screws from the bottom side of the keyboard is housed firmly, gently press the keys with your thumbs and try to latch the keyboard firmly in this figure. Make sure that the front side of the computer. 64 MT 6363, 6364, 6365, 6366, 6367, 6368, 7762, 7763, 7764, 7767, 7768, and 7769 Removing and replacing a FRU When installing: 1.
Hardware Maintenance Manual
Page 5
...information about replacing RoHS ...ThinkPad X60 Tablet and X61 Tablet . . 33 Product overview 34 Specifications 34 Status indicators 37 FRU tests 39 Fn key... combinations 41 Symptom-to-FRU index 43 Numeric error codes 43 Error messages 47 Beep symptoms 48 No-beep symptoms 48 LCD-related symptoms 49 Intermittent problems 50 Undetermined problems 50 FRU replacement notices 51 Screw notices 51 Retaining serial numbers 51 Removing and replacing...1090 Palm rest for X61 Tablet 68 1100 Keyboard bezel for X61 Tablet . . ...ThinkPad X6 Tablet UltraBase). . . 106 Bottom view (ThinkPad...
...information about replacing RoHS ...ThinkPad X60 Tablet and X61 Tablet . . 33 Product overview 34 Specifications 34 Status indicators 37 FRU tests 39 Fn key... combinations 41 Symptom-to-FRU index 43 Numeric error codes 43 Error messages 47 Beep symptoms 48 No-beep symptoms 48 LCD-related symptoms 49 Intermittent problems 50 Undetermined problems 50 FRU replacement notices 51 Screw notices 51 Retaining serial numbers 51 Removing and replacing...1090 Palm rest for X61 Tablet 68 1100 Keyboard bezel for X61 Tablet . . ...ThinkPad X6 Tablet UltraBase). . . 106 Bottom view (ThinkPad...

Hardware Maintenance Manual
Page 29
... disk drive can be replaced for a scheduled fee. Turn off the computer. 2. Remove the battery pack. For how to remove the backup battery, see "1010 Battery pack" on the ThinkPad computer. 2. Reinstall the...-left of the screen, press the ThinkVantage® button. Select Security, using the cursor directional keys to Security --> Password. Select Power-On Password. 7. Type the current SVP in the Setup...be made available to the servicer, there is no master HDP is available, neither Lenovo nor Lenovo authorized servicers provide any services to reset either the user or the master HDP,...
... disk drive can be replaced for a scheduled fee. Turn off the computer. 2. Remove the battery pack. For how to remove the backup battery, see "1010 Battery pack" on the ThinkPad computer. 2. Reinstall the...-left of the screen, press the ThinkVantage® button. Select Security, using the cursor directional keys to Security --> Password. Select Power-On Password. 7. Type the current SVP in the Setup...be made available to the servicer, there is no master HDP is available, neither Lenovo nor Lenovo authorized servicers provide any services to reset either the user or the master HDP,...

Hardware Maintenance Manual
Page 30
... How to remove the hard-disk password Attention: If User only mode is selected and the user HDP has been forgotten and cannot be replaced for a scheduled fee. then, while the "To interrupt normal startup, press the blue ThinkVantage button" message is displayed. 3. For the... 6366, 6367, 6368, 7762, 7763, 7764, 7767, 7768, and 7769 Turn on the ThinkPad computer. 2. The hard disk drive can be made available to the servicer, neither Lenovo nor Lenovo authorized servicers provide any key. then enter the master HDP. The computer restarts, and the BIOS Setup Utility screen opens. ...
... How to remove the hard-disk password Attention: If User only mode is selected and the user HDP has been forgotten and cannot be replaced for a scheduled fee. then, while the "To interrupt normal startup, press the blue ThinkVantage button" message is displayed. 3. For the... 6366, 6367, 6368, 7762, 7763, 7764, 7767, 7768, and 7769 Turn on the ThinkPad computer. 2. The hard disk drive can be made available to the servicer, neither Lenovo nor Lenovo authorized servicers provide any key. then enter the master HDP. The computer restarts, and the BIOS Setup Utility screen opens. ...

Hardware Maintenance Manual
Page 39
.... SXGA+ TFT with digitizer . . . . . 127 12.1-in . ThinkPad X60 Tablet and X61 Tablet Product overview 34 Specifications 34 Status indicators 37 FRU tests 39 Fn key combinations 41 Symptom-to-FRU index 43 Numeric error codes 43 Error messages 47 ...number of the system unit 52 Retaining the UUID 52 Reading or writing the ECA information . . 52 Removing and replacing a FRU 54 1010 Battery pack 55 1020 Hard disk drive slot cover, hard disk drive rubber rails, and ... 156 Common parts list 156 Tools 156 Power cords 157 Notices 158 Trademarks 159 © Copyright Lenovo 2007 33
.... SXGA+ TFT with digitizer . . . . . 127 12.1-in . ThinkPad X60 Tablet and X61 Tablet Product overview 34 Specifications 34 Status indicators 37 FRU tests 39 Fn key combinations 41 Symptom-to-FRU index 43 Numeric error codes 43 Error messages 47 ...number of the system unit 52 Retaining the UUID 52 Reading or writing the ECA information . . 52 Removing and replacing a FRU 54 1010 Battery pack 55 1020 Hard disk drive slot cover, hard disk drive rubber rails, and ... 156 Common parts list 156 Tools 156 Power cords 157 Notices 158 Trademarks 159 © Copyright Lenovo 2007 33
Hardware Maintenance Manual
Page 45
... computer. 3. While the message, "To interrupt normal startup, press the blue ThinkVangate button," is running. Using cursor keys, select Main hard disk drive or Ultrabay hard disk drive. 6. Turn on the computer. 3. Keyboard 1. To diagnose...Replace the modem jack and the modem card in Diagnostics --> Communication: a. PC Card slot Diagnostics --> Systemboard --> PCMCIA ExpressCard slot 1. Conexant Smart Modem Dialtone Audio Enter the BIOS Setup Utility and change Serial ATA (SATA) setting to start the diagnostic program. (continued) ThinkPad X60 Tablet and X61...
... computer. 3. While the message, "To interrupt normal startup, press the blue ThinkVangate button," is running. Using cursor keys, select Main hard disk drive or Ultrabay hard disk drive. 6. Turn on the computer. 3. Keyboard 1. To diagnose...Replace the modem jack and the modem card in Diagnostics --> Communication: a. PC Card slot Diagnostics --> Systemboard --> PCMCIA ExpressCard slot 1. Conexant Smart Modem Dialtone Audio Enter the BIOS Setup Utility and change Serial ATA (SATA) setting to start the diagnostic program. (continued) ThinkPad X60 Tablet and X61...

Hardware Maintenance Manual
Page 70
Removing and replacing a FRU When installing: 1. To make sure that the keyboard edges are under the frame as shown in place. 3. Attach the keyboard connector firmly. 2. Make sure that the front side of the computer. 64 MT 6363, 6364, 6365, 6366, 6367, 6368, 7762, 7763, 7764, 7767, 7768, and 7769 Then press the keys to slide the keyboard toward you. 4. Secure the keyboard by tightening the screws from the bottom side of the keyboard is housed firmly, gently press the keys with your thumbs and try to latch the keyboard firmly in this figure.
Removing and replacing a FRU When installing: 1. To make sure that the keyboard edges are under the frame as shown in place. 3. Attach the keyboard connector firmly. 2. Make sure that the front side of the computer. 64 MT 6363, 6364, 6365, 6366, 6367, 6368, 7762, 7763, 7764, 7767, 7768, and 7769 Then press the keys to slide the keyboard toward you. 4. Secure the keyboard by tightening the screws from the bottom side of the keyboard is housed firmly, gently press the keys with your thumbs and try to latch the keyboard firmly in this figure.


