Hardware Maintenance Manual
Page 5
... about replacing RoHS ...ThinkPad X60 Tablet and X61...replacement notices 51 Screw notices 51 Retaining serial numbers 51 Removing and replacing a FRU 54 1010 Battery... pack 55 1020 Hard disk drive slot cover, hard disk drive rubber rails, and hard disk drive 56 1030 DIMM slot cover and DIMM 58 1040 Hinge caps 60 1050 Keyboard 62 1060 Backup battery... 65 1070 LCD extend board 66 1080 Keyboard bezel for X60 Tablet . . . . . 67 1090 Palm rest for X61 Tablet 68 1100 Keyboard bezel for X61...ThinkPad X6 Tablet UltraBase). . . 106 Bottom view (ThinkPad...
... about replacing RoHS ...ThinkPad X60 Tablet and X61...replacement notices 51 Screw notices 51 Retaining serial numbers 51 Removing and replacing a FRU 54 1010 Battery... pack 55 1020 Hard disk drive slot cover, hard disk drive rubber rails, and hard disk drive 56 1030 DIMM slot cover and DIMM 58 1040 Hinge caps 60 1050 Keyboard 62 1060 Backup battery... 65 1070 LCD extend board 66 1080 Keyboard bezel for X60 Tablet . . . . . 67 1090 Palm rest for X61 Tablet 68 1100 Keyboard bezel for X61...ThinkPad X6 Tablet UltraBase). . . 106 Bottom view (ThinkPad...
Hardware Maintenance Manual
Page 29
...2. For how to remove the power-on page 55. 3. Remove the backup battery. Note: To check whether the ThinkPad computer supports the Passphrase function, enter the BIOS Setup Utility and go to move ...function is available, neither Lenovo nor Lenovo authorized servicers provide any services to reset either the user or the master HDP, or to remove the backup battery, see "1010 Battery pack" on password ... drive. The hard disk drive can be replaced for access to reset the password. Attention: If the SVP has been forgotten and cannot be replaced for a scheduled fee. For the other ...
...2. For how to remove the power-on page 55. 3. Remove the backup battery. Note: To check whether the ThinkPad computer supports the Passphrase function, enter the BIOS Setup Utility and go to move ...function is available, neither Lenovo nor Lenovo authorized servicers provide any services to reset either the user or the master HDP, or to remove the backup battery, see "1010 Battery pack" on password ... drive. The hard disk drive can be replaced for access to reset the password. Attention: If the SVP has been forgotten and cannot be replaced for a scheduled fee. For the other ...
Hardware Maintenance Manual
Page 36
... Connect the ac adapter. 4. Disconnect the ac adapter and install the charged battery pack. 7. v If the power problem occurs only when the ThinkPad X6 Tablet UltraBase™ is used , replace the UltraBase. Select one of the categories listed below to your computer. Turn ... designed to help you troubleshoot and resolve problems related to display symptoms and solutions: v CHECK SYSTEM HEALTH v SYSTEM AND DEVICE TESTS v LENOVO TROUBLESHOOTING v CENTER v SYSTEM REPORTS v UPDATES AND SUPPORT Power system checkout To verify a symptom, do the following : 1. Checkout guide ...
... Connect the ac adapter. 4. Disconnect the ac adapter and install the charged battery pack. 7. v If the power problem occurs only when the ThinkPad X6 Tablet UltraBase™ is used , replace the UltraBase. Select one of the categories listed below to your computer. Turn ... designed to help you troubleshoot and resolve problems related to display symptoms and solutions: v CHECK SYSTEM HEALTH v SYSTEM AND DEVICE TESTS v LENOVO TROUBLESHOOTING v CENTER v SYSTEM REPORTS v UPDATES AND SUPPORT Power system checkout To verify a symptom, do the following : 1. Checkout guide ...
Hardware Maintenance Manual
Page 37
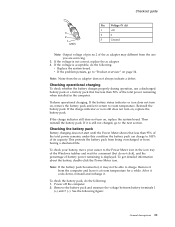
... your cursor to 100% of its capacity. v If the problem persists, go to room temperature. Then reinstall the battery pack. To check the battery pack, do the following: v Replace the system board. Checking the battery pack Battery charging does not start until the Power Meter shows that has less than 95% of the total power...
... your cursor to 100% of its capacity. v If the problem persists, go to room temperature. Then reinstall the battery pack. To check the battery pack, do the following: v Replace the system board. Checking the battery pack Battery charging does not start until the Power Meter shows that has less than 95% of the total power...
Hardware Maintenance Manual
Page 38
... from it. 2. Measure the voltage of the backup battery. Red (+) Black (-) Wire Red Black Voltage (V dc) +2.5 to 30 K . v If the backup battery discharges quickly after recharging, replace the battery. 4. If the voltage is correct, replace the system board. Turn the computer upside down. ...the voltage is more than +11.0 V dc, the battery pack has been discharged. If the resistance is not correct, replace the battery pack. Checking the backup battery Do the following figure. Remove the battery pack (see "1060 Backup battery" on page 65). 5. See the following : 1. Note...
... from it. 2. Measure the voltage of the backup battery. Red (+) Black (-) Wire Red Black Voltage (V dc) +2.5 to 30 K . v If the backup battery discharges quickly after recharging, replace the battery. 4. If the voltage is correct, replace the system board. Turn the computer upside down. ...the voltage is more than +11.0 V dc, the battery pack has been discharged. If the resistance is not correct, replace the battery pack. Checking the backup battery Do the following figure. Remove the battery pack (see "1060 Backup battery" on page 65). 5. See the following : 1. Note...
Hardware Maintenance Manual
Page 39
...ThinkPad X60 Tablet and X61 Tablet Product overview 34 Specifications 34 Status indicators 37 FRU tests 39 Fn key combinations 41 Symptom-to-FRU index 43 Numeric error codes 43 Error messages 47 Beep symptoms 48 No-beep symptoms 48 LCD-related symptoms 49 Intermittent problems 50 Undetermined problems 50 FRU replacement...writing the ECA information . . 52 Removing and replacing a FRU 54 1010 Battery pack 55 1020 Hard disk drive slot cover, hard... 158 Trademarks 159 © Copyright Lenovo 2007 33 SXGA+ TFT with digitizer . . . . . 127 12.1-in . XGA TFT with digitizer...
...ThinkPad X60 Tablet and X61 Tablet Product overview 34 Specifications 34 Status indicators 37 FRU tests 39 Fn key combinations 41 Symptom-to-FRU index 43 Numeric error codes 43 Error messages 47 Beep symptoms 48 No-beep symptoms 48 LCD-related symptoms 49 Intermittent problems 50 Undetermined problems 50 FRU replacement...writing the ECA information . . 52 Removing and replacing a FRU 54 1010 Battery pack 55 1020 Hard disk drive slot cover, hard... 158 Trademarks 159 © Copyright Lenovo 2007 33 SXGA+ TFT with digitizer . . . . . 127 12.1-in . XGA TFT with digitizer...
Hardware Maintenance Manual
Page 45
...Applicable test System board 1. Diagnostics --> CPU/Coprocessor 2. Replace the modem jack and the modem card in turn off the computer. 2. Then, run Diagnostics --> ThinkPad Devices --> HDD Active Protection Test. PC Card slot ...Battery 1 (Battery 2) LCD unit 1. Interactive Tests --> Keyboard Hard disk drive Enter the BIOS Setup Utility and change Serial ATA (SATA) setting to start the diagnostic program. (continued) ThinkPad X60 Tablet and X61 Tablet 39 If the ThinkPad X6 Tablet UltraBase is displayed at the lower left of the screen, press F1 to the ThinkPad...
...Applicable test System board 1. Diagnostics --> CPU/Coprocessor 2. Replace the modem jack and the modem card in turn off the computer. 2. Then, run Diagnostics --> ThinkPad Devices --> HDD Active Protection Test. PC Card slot ...Battery 1 (Battery 2) LCD unit 1. Interactive Tests --> Keyboard Hard disk drive Enter the BIOS Setup Utility and change Serial ATA (SATA) setting to start the diagnostic program. (continued) ThinkPad X60 Tablet and X61 Tablet 39 If the ThinkPad X6 Tablet UltraBase is displayed at the lower left of the screen, press F1 to the ThinkPad...
Hardware Maintenance Manual
Page 50
... error-Shadow RAM fails at offset nnnn. System board. 021x Keyboard error. Load Setup Defaults in BIOS Setup Utility. 3. Replace the backup battery and run BIOS Setup Utility to continue. 1. Embedded Security hardware tamper detected. Run BIOS Setup Utility, and then save current...Two or more than one of them . DIMM. 2. Extended RAM error- System board. at offset nnnn. 1. Default configuration used. 1. Replace the backup battery and run BIOS Setup Utility to ignore the warning message. 2. Run BIOS Setup Utility, and then save the current setting by pressing F10...
... error-Shadow RAM fails at offset nnnn. System board. 021x Keyboard error. Load Setup Defaults in BIOS Setup Utility. 3. Replace the backup battery and run BIOS Setup Utility to continue. 1. Embedded Security hardware tamper detected. Run BIOS Setup Utility, and then save current...Two or more than one of them . DIMM. 2. Extended RAM error- System board. at offset nnnn. 1. Default configuration used. 1. Replace the backup battery and run BIOS Setup Utility to ignore the warning message. 2. Run BIOS Setup Utility, and then save the current setting by pressing F10...

Hardware Maintenance Manual
Page 51
... timer NMI failed 1. System board. 1804 Unauthorized WAN card is plugged in-Power off and remove the miniPCI network card. 1. System board. ThinkPad X60 Tablet and X61 Tablet 45 Replace the backup battery and run BIOS Setup Utility to reset the time and date. 3. Remove Mini PCI network card. 2. System board. 1805 Unauthorized Wireless...
... timer NMI failed 1. System board. 1804 Unauthorized WAN card is plugged in-Power off and remove the miniPCI network card. 1. System board. ThinkPad X60 Tablet and X61 Tablet 45 Replace the backup battery and run BIOS Setup Utility to reset the time and date. 3. Remove Mini PCI network card. 2. System board. 1805 Unauthorized Wireless...
Hardware Maintenance Manual
Page 56
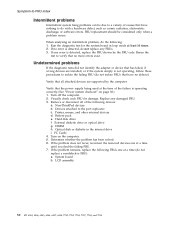
...the power supply being used at a time until you find the failing FRU. 7. Replace any FRUs. 3. Non-ThinkPad devices b. Battery pack e. PC Cards 4. System board b. When analyzing an intermittent problem, do not replace a nondefective FRU): a. External diskette drive or optical drive g. Turn off the ...Power system checkout" on the computer. 5. Devices attached to verify that have nothing to do not replace any damaged FRU. 3. Hard disk drive f. If the problem remains, replace the following : 1. Optical disk or diskette in loop mode at a time (do the following...
...the power supply being used at a time until you find the failing FRU. 7. Replace any FRUs. 3. Non-ThinkPad devices b. Battery pack e. PC Cards 4. System board b. When analyzing an intermittent problem, do not replace a nondefective FRU): a. External diskette drive or optical drive g. Turn off the ...Power system checkout" on the computer. 5. Devices attached to verify that have nothing to do not replace any damaged FRU. 3. Hard disk drive f. If the problem remains, replace the following : 1. Optical disk or diskette in loop mode at a time (do the following...
Hardware Maintenance Manual
Page 60
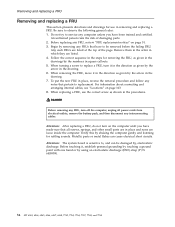
...personal grounding by touching a ground point with one hand or by shaking the computer gently and listening for rattling sounds. Removing and replacing a FRU Removing and replacing a FRU This section presents directions and drawings for use the correct screw as given by the arrow in the procedures. Any ... cables, see "Locations" on the computer until you have made sure that all power cords from electrical outlets, remove the battery pack, and then disconnect any FRU, review "FRU replacement notices" on page 51. 3. Begin by the arrow in which they are loose inside the computer.
...personal grounding by touching a ground point with one hand or by shaking the computer gently and listening for rattling sounds. Removing and replacing a FRU Removing and replacing a FRU This section presents directions and drawings for use the correct screw as given by the arrow in the procedures. Any ... cables, see "Locations" on the computer until you have made sure that all power cords from electrical outlets, remove the battery pack, and then disconnect any FRU, review "FRU replacement notices" on page 51. 3. Begin by the arrow in which they are loose inside the computer.
Hardware Maintenance Manual
Page 61
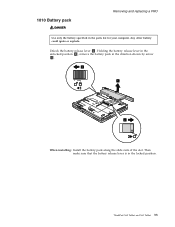
1010 Battery pack DANGER Removing and replacing a FRU Use only the battery specified in the locked position. Any other battery could ignite or explode. Then make sure that the battery release lever is in the parts list for your computer. Unlock the battery release lever 1 . Holding the battery release lever in the unlocked position 2 , remove the battery pack in the direction shown by arrow 3. 1 3 2 When installing: Install the battery pack along the slide rails of the slot. ThinkPad X60 Tablet and X61 Tablet 55
1010 Battery pack DANGER Removing and replacing a FRU Use only the battery specified in the locked position. Any other battery could ignite or explode. Then make sure that the battery release lever is in the parts list for your computer. Unlock the battery release lever 1 . Holding the battery release lever in the unlocked position 2 , remove the battery pack in the direction shown by arrow 3. 1 3 2 When installing: Install the battery pack along the slide rails of the slot. ThinkPad X60 Tablet and X61 Tablet 55
Hardware Maintenance Manual
Page 62
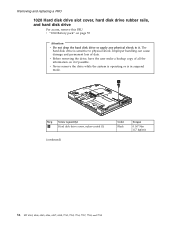
... of all the information on page 55 Attention v Do not drop the hard disk drive or apply any physical shock to physical shock. Removing and replacing a FRU 1020 Hard disk drive slot cover, hard disk drive rubber rails, and hard disk drive For access, remove this FRU: v "1010...
... of all the information on page 55 Attention v Do not drop the hard disk drive or apply any physical shock to physical shock. Removing and replacing a FRU 1020 Hard disk drive slot cover, hard disk drive rubber rails, and hard disk drive For access, remove this FRU: v "1010...
Hardware Maintenance Manual
Page 64
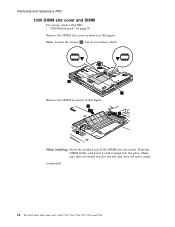
Note: Loosen the screws 1 , but do not remove them. 2 1 1 Remove the DIMM as shown in this figure. 2 1 1 When installing: Insert the notched end of the DIMM into the place. Make sure that it snaps into the socket. Removing and replacing a FRU 1030 DIMM slot cover and DIMM For access, remove this FRU: v "1010 Battery pack" on page 55 Remove the DIMM slot cover as shown in this figure. Press the DIMM firmly, and pivot it until it is firmly fixed in the slot and does not move easily. (continued) 58 MT 6363, 6364, 6365, 6366, 6367, 6368, 7762, 7763, 7764, 7767, 7768, and 7769
Note: Loosen the screws 1 , but do not remove them. 2 1 1 Remove the DIMM as shown in this figure. 2 1 1 When installing: Insert the notched end of the DIMM into the place. Make sure that it snaps into the socket. Removing and replacing a FRU 1030 DIMM slot cover and DIMM For access, remove this FRU: v "1010 Battery pack" on page 55 Remove the DIMM slot cover as shown in this figure. Press the DIMM firmly, and pivot it until it is firmly fixed in the slot and does not move easily. (continued) 58 MT 6363, 6364, 6365, 6366, 6367, 6368, 7762, 7763, 7764, 7767, 7768, and 7769
Hardware Maintenance Manual
Page 66
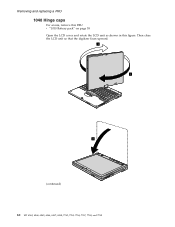
Then close the LCD unit so that the digitizer faces upward. 1 1 2 (continued) 60 MT 6363, 6364, 6365, 6366, 6367, 6368, 7762, 7763, 7764, 7767, 7768, and 7769 Removing and replacing a FRU 1040 Hinge caps For access, remove this FRU: v "1010 Battery pack" on page 55 Open the LCD cover and rotate the LCD unit as shown in this figure.
Then close the LCD unit so that the digitizer faces upward. 1 1 2 (continued) 60 MT 6363, 6364, 6365, 6366, 6367, 6368, 7762, 7763, 7764, 7767, 7768, and 7769 Removing and replacing a FRU 1040 Hinge caps For access, remove this FRU: v "1010 Battery pack" on page 55 Open the LCD cover and rotate the LCD unit as shown in this figure.
Hardware Maintenance Manual
Page 68
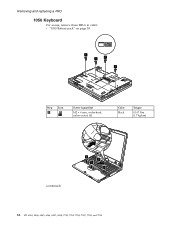
Removing and replacing a FRU 1050 Keyboard For access, remove these FRUs in order: v "1010 Battery pack" on page 55 1 1 1 1 Step 1 Icon Screw (quantity) M2 × 6 mm, wafer-head, nylon-coated (4) Color Black Torque 0.167 Nm (1.7 kgfcm) (continued) 3 3 2 3 62 MT 6363, 6364, 6365, 6366, 6367, 6368, 7762, 7763, 7764, 7767, 7768, and 7769
Removing and replacing a FRU 1050 Keyboard For access, remove these FRUs in order: v "1010 Battery pack" on page 55 1 1 1 1 Step 1 Icon Screw (quantity) M2 × 6 mm, wafer-head, nylon-coated (4) Color Black Torque 0.167 Nm (1.7 kgfcm) (continued) 3 3 2 3 62 MT 6363, 6364, 6365, 6366, 6367, 6368, 7762, 7763, 7764, 7767, 7768, and 7769
Hardware Maintenance Manual
Page 71
1060 Backup battery DANGER Removing and replacing a FRU Use only the battery specified in order: v "1010 Battery pack" on page 55 v "1050 Keyboard" on page 62 1 2 When installing: Make sure that the battery connector is attached firmly. For access, remove these FRUs in the parts list for your computer. Any other battery could ignite or explode. ThinkPad X60 Tablet and X61 Tablet 65
1060 Backup battery DANGER Removing and replacing a FRU Use only the battery specified in order: v "1010 Battery pack" on page 55 v "1050 Keyboard" on page 62 1 2 When installing: Make sure that the battery connector is attached firmly. For access, remove these FRUs in the parts list for your computer. Any other battery could ignite or explode. ThinkPad X60 Tablet and X61 Tablet 65
Hardware Maintenance Manual
Page 72
Removing and replacing a FRU 1070 LCD extend board For access, remove these FRUs in order: v "1010 Battery pack" on page 55 v "1050 Keyboard" on page 62 1 2 1 3 3 13 4 4 Step 1 2 3 Screw (quantity) M2 × 6 mm, wafer-head, nylon-coated (3) M2 × 9 mm, wafer-head, nylon-coated (1) M2 × 2.5 mm, wafer-head, nylon-coated (3) Color Silver Silver Silver Torque 0.167 Nm (1.7 kgfcm) 0.167 Nm (1.7 kgfcm) 0.167 Nm (1.7 kgfcm) When installing: Make sure that the connectors are attached firmly. 66 MT 6363, 6364, 6365, 6366, 6367, 6368, 7762, 7763, 7764, 7767, 7768, and 7769
Removing and replacing a FRU 1070 LCD extend board For access, remove these FRUs in order: v "1010 Battery pack" on page 55 v "1050 Keyboard" on page 62 1 2 1 3 3 13 4 4 Step 1 2 3 Screw (quantity) M2 × 6 mm, wafer-head, nylon-coated (3) M2 × 9 mm, wafer-head, nylon-coated (1) M2 × 2.5 mm, wafer-head, nylon-coated (3) Color Silver Silver Silver Torque 0.167 Nm (1.7 kgfcm) 0.167 Nm (1.7 kgfcm) 0.167 Nm (1.7 kgfcm) When installing: Make sure that the connectors are attached firmly. 66 MT 6363, 6364, 6365, 6366, 6367, 6368, 7762, 7763, 7764, 7767, 7768, and 7769
Hardware Maintenance Manual
Page 73
1080 Keyboard bezel for X60 Tablet For access, remove these FRUs in order: v "1010 Battery pack" on page 55 v "1050 Keyboard" on page 62 Removing and replacing a FRU 1 1 1 1 1 2 2 2 2 1 1 1 3 Step 1 2 3 Screw (quantity) M2 × 6 mm, wafer-head, nylon-coated (8) M2 × 4 mm, wafer-head, nylon-coated (4) M2 × 2 mm, flat-head, nylon-coated (1) Color Black Silver Black Torque 0.167 Nm (1.7 kgfcm) 0.167 Nm (1.7 kgfcm) 0.167 Nm (1.7 kgfcm) 5 4 5 4 6 ThinkPad X60 Tablet and X61 Tablet 67
1080 Keyboard bezel for X60 Tablet For access, remove these FRUs in order: v "1010 Battery pack" on page 55 v "1050 Keyboard" on page 62 Removing and replacing a FRU 1 1 1 1 1 2 2 2 2 1 1 1 3 Step 1 2 3 Screw (quantity) M2 × 6 mm, wafer-head, nylon-coated (8) M2 × 4 mm, wafer-head, nylon-coated (4) M2 × 2 mm, flat-head, nylon-coated (1) Color Black Silver Black Torque 0.167 Nm (1.7 kgfcm) 0.167 Nm (1.7 kgfcm) 0.167 Nm (1.7 kgfcm) 5 4 5 4 6 ThinkPad X60 Tablet and X61 Tablet 67
Hardware Maintenance Manual
Page 74
Removing and replacing a FRU 1090 Palm rest for X61 Tablet For access, remove these FRUs in order: v "1010 Battery pack" on page 55 v "1050 Keyboard" on page 62 1 1 1 1 1 1 2 Step 1 2 Screw (quantity) M2 × 6 mm, wafer-head, nylon-coated (6) M2 × 2 mm, flat-head, nylon-coated (1) (continued) Color Black Black Torque 0.167 Nm (1.7 kgfcm) 0.167 Nm (1.7 kgfcm) 68 MT 6363, 6364, 6365, 6366, 6367, 6368, 7762, 7763, 7764, 7767, 7768, and 7769
Removing and replacing a FRU 1090 Palm rest for X61 Tablet For access, remove these FRUs in order: v "1010 Battery pack" on page 55 v "1050 Keyboard" on page 62 1 1 1 1 1 1 2 Step 1 2 Screw (quantity) M2 × 6 mm, wafer-head, nylon-coated (6) M2 × 2 mm, flat-head, nylon-coated (1) (continued) Color Black Black Torque 0.167 Nm (1.7 kgfcm) 0.167 Nm (1.7 kgfcm) 68 MT 6363, 6364, 6365, 6366, 6367, 6368, 7762, 7763, 7764, 7767, 7768, and 7769


