Hardware Maintenance Manual
Page 1
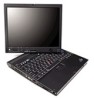
ThinkPad® X60 Tablet and X61 Tablet Hardware Maintenance Manual October 2007 This manual supports: ThinkPad X60 Tablet (MT 6363, 6364, 6365, 6366, 6367, and 6368) ThinkPad X61 Tablet (MT 7762, 7763, 7764, 7767, 7768, and 7769)
ThinkPad® X60 Tablet and X61 Tablet Hardware Maintenance Manual October 2007 This manual supports: ThinkPad X60 Tablet (MT 6363, 6364, 6365, 6366, 6367, and 6368) ThinkPad X61 Tablet (MT 7762, 7763, 7764, 7767, 7768, and 7769)
Hardware Maintenance Manual
Page 3
ThinkPad® X60 Tablet and X61 Tablet Hardware Maintenance Manual
ThinkPad® X60 Tablet and X61 Tablet Hardware Maintenance Manual
Hardware Maintenance Manual
Page 5
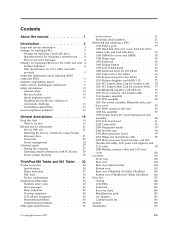
... the computer 27 Detecting system information with PC-Doctor . . 29 Power system checkout 30 ThinkPad X60 Tablet and X61 Tablet . . 33 Product overview 34 Specifications 34 Status indicators 37 FRU... 58 1040 Hinge caps 60 1050 Keyboard 62 1060 Backup battery 65 1070 LCD extend board 66 1080 Keyboard bezel for X60 Tablet . . . . . 67 1090 Palm rest for X61 Tablet 68 1100 Keyboard bezel for X61 Tablet . ...104 Rear view (tablet mode 104 Bottom view 105 Rear view (ThinkPad X6 Tablet UltraBase). . . 106 Bottom view (ThinkPad X6 Tablet UltraBase) 106 Parts list 107 Overall 108 LCD FRUs...
... the computer 27 Detecting system information with PC-Doctor . . 29 Power system checkout 30 ThinkPad X60 Tablet and X61 Tablet . . 33 Product overview 34 Specifications 34 Status indicators 37 FRU... 58 1040 Hinge caps 60 1050 Keyboard 62 1060 Backup battery 65 1070 LCD extend board 66 1080 Keyboard bezel for X60 Tablet . . . . . 67 1090 Palm rest for X61 Tablet 68 1100 Keyboard bezel for X61 Tablet . ...104 Rear view (tablet mode 104 Bottom view 105 Rear view (ThinkPad X6 Tablet UltraBase). . . 106 Bottom view (ThinkPad X6 Tablet UltraBase) 106 Parts list 107 Overall 108 LCD FRUs...
Hardware Maintenance Manual
Page 7
..., be sure to troubleshoot problems. The manual is intended for ThinkPad® X60 Tablet and X61 Tablet (MT 6363, 6364, 6365, 6366, 6367, 6368, 7762, 7763, 7764, 7767, 7768, and 7769) products. Important This manual is divided into ... review the safety information under "Safety notices: multilingual translations" on page 7, "Safety information" on page 13, and "Laser compliance statement" on page 17. © Copyright Lenovo 2007 1
..., be sure to troubleshoot problems. The manual is intended for ThinkPad® X60 Tablet and X61 Tablet (MT 6363, 6364, 6365, 6366, 6367, 6368, 7762, 7763, 7764, 7767, 7768, and 7769) products. Important This manual is divided into ... review the safety information under "Safety notices: multilingual translations" on page 7, "Safety information" on page 13, and "Laser compliance statement" on page 17. © Copyright Lenovo 2007 1
Hardware Maintenance Manual
Page 39
...tablet mode 104 Bottom view 105 Rear view (ThinkPad X6 Tablet UltraBase). . . 106 Bottom view (ThinkPad X6 Tablet UltraBase) 106 Parts list 107 Overall 108 LCD FRUs 126 12.1-in. ThinkPad X60 Tablet and X61 Tablet Product overview 34 Specifications... cable 96 2070 Micro processor board/inverter card FFC (flexible flat cable), LCD panel with digitizer 139 Keyboard 146 For X60 Tablet 146 For X61 Tablet 147 Recovery discs 148 Windows XP Tablet Edition CDs . . . . . 148 Windows... parts list 156 Tools 156 Power cords 157 Notices 158 Trademarks 159 © Copyright Lenovo 2007 33
...tablet mode 104 Bottom view 105 Rear view (ThinkPad X6 Tablet UltraBase). . . 106 Bottom view (ThinkPad X6 Tablet UltraBase) 106 Parts list 107 Overall 108 LCD FRUs 126 12.1-in. ThinkPad X60 Tablet and X61 Tablet Product overview 34 Specifications... cable 96 2070 Micro processor board/inverter card FFC (flexible flat cable), LCD panel with digitizer 139 Keyboard 146 For X60 Tablet 146 For X61 Tablet 147 Recovery discs 148 Windows XP Tablet Edition CDs . . . . . 148 Windows... parts list 156 Tools 156 Power cords 157 Notices 158 Trademarks 159 © Copyright Lenovo 2007 33
Hardware Maintenance Manual
Page 40
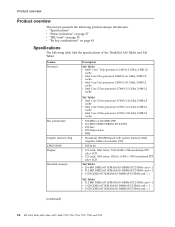
...37 v "FRU tests" on page 39 v "Fn key combinations" on page 41 Specifications The following table lists the specifications of the ThinkPad X60 Tablet and X61 Tablet: Feature Processor Description X60 Tablet v Intel® Core™ Solo processor L1400 (1.2 GHz), 2-MB L2 cache v Intel Core Duo processor L2400 (1.66 GHz), ...v 12.1-inch, 16M colors, XGA (1024 × 768 resolution) TFT color LCD v 12.1-inch, 16M colors, SXGA+ (1400 × 1050 resolution) TFT color LCD X60 Tablet v 256-MB DDR2-667 SDRAM SO-DIMM (PC2-5300) card × 1 v 512-MB DDR2-667 SDRAM SO-DIMM (PC2-5300) card × 1 v...
...37 v "FRU tests" on page 39 v "Fn key combinations" on page 41 Specifications The following table lists the specifications of the ThinkPad X60 Tablet and X61 Tablet: Feature Processor Description X60 Tablet v Intel® Core™ Solo processor L1400 (1.2 GHz), 2-MB L2 cache v Intel Core Duo processor L2400 (1.66 GHz), ...v 12.1-inch, 16M colors, XGA (1024 × 768 resolution) TFT color LCD v 12.1-inch, 16M colors, SXGA+ (1400 × 1050 resolution) TFT color LCD X60 Tablet v 256-MB DDR2-667 SDRAM SO-DIMM (PC2-5300) card × 1 v 512-MB DDR2-667 SDRAM SO-DIMM (PC2-5300) card × 1 v...
Hardware Maintenance Manual
Page 41
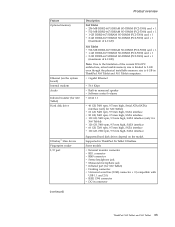
...architecture, actual usable memory size is limited to 3 GB even though the physical installable memory size is 4 GB in connector (continued) ThinkPad X60 Tablet and X61 Tablet 35 Product overview Feature Optional memory Ethernet (on the model. v Gigabit Ethernet v 56.6 Kbps v Built-..., SATA interface Supported hard disk drives depend on the system board) Internal modem Audio Infrared transfer (for X60 Tablet) v Docking connector v Universal serial bus (USB) connector × 3 (compatible with USB 1.1 and 2.0) v IEEE 1394 connector v DC-in ThinkPad X60 Tablet and X61 Tablet computers.
...architecture, actual usable memory size is limited to 3 GB even though the physical installable memory size is 4 GB in connector (continued) ThinkPad X60 Tablet and X61 Tablet 35 Product overview Feature Optional memory Ethernet (on the model. v Gigabit Ethernet v 56.6 Kbps v Built-..., SATA interface Supported hard disk drives depend on the system board) Internal modem Audio Infrared transfer (for X60 Tablet) v Docking connector v Universal serial bus (USB) connector × 3 (compatible with USB 1.1 and 2.0) v IEEE 1394 connector v DC-in ThinkPad X60 Tablet and X61 Tablet computers.
Hardware Maintenance Manual
Page 43
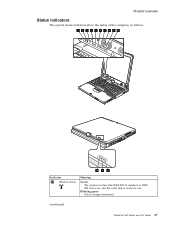
Blinking green: Data is ready for use. Product overview Status indicators The system status indicators show the status of the computer, as follows: 1 2 3 4 5 6 7 8 9 10 10 9 8 Indicator 1 Wireless status Meaning Green: The wireless feature (the IEEE 802.11 standard or IEEE 802.11n) is on, and the radio link is being transmitted. (continued) ThinkPad X60 Tablet and X61 Tablet 37
Blinking green: Data is ready for use. Product overview Status indicators The system status indicators show the status of the computer, as follows: 1 2 3 4 5 6 7 8 9 10 10 9 8 Indicator 1 Wireless status Meaning Green: The wireless feature (the IEEE 802.11 standard or IEEE 802.11n) is on, and the radio link is being transmitted. (continued) ThinkPad X60 Tablet and X61 Tablet 37
Hardware Maintenance Manual
Page 45
... to start the diagnostic program. (continued) ThinkPad X60 Tablet and X61 Tablet 39 Power Diagnostics --> ThinkPad Devices --> AC Adapter, Battery 1 (Battery 2) LCD unit 1. Make sure the modem is heard in this test. Run Diagnostics --> ThinkPad Devices --> ExpressCard slot. To diagnose the hard...the hard disk drive without starting up correctly. 2. Using cursor keys, select HDD diagnostic program. Press enter. 5. Press Enter to the ThinkPad computer, detach it. Diagnostics --> CPU/Coprocessor 2. Place the computer on the computer. Then, run this case, turn , and run...
... to start the diagnostic program. (continued) ThinkPad X60 Tablet and X61 Tablet 39 Power Diagnostics --> ThinkPad Devices --> AC Adapter, Battery 1 (Battery 2) LCD unit 1. Make sure the modem is heard in this test. Run Diagnostics --> ThinkPad Devices --> ExpressCard slot. To diagnose the hard...the hard disk drive without starting up correctly. 2. Using cursor keys, select HDD diagnostic program. Press enter. 5. Press Enter to the ThinkPad computer, detach it. Diagnostics --> CPU/Coprocessor 2. Place the computer on the computer. Then, run this case, turn , and run...
Hardware Maintenance Manual
Page 47
... without pressing a function key. Product overview Fn key combinations The following device drivers must be installed on the computer beforehand: v ThinkPad Power Management driver v OnScreen Display Utility v Wireless device drivers Fn+F6 Reserved. When you press Fn+F5, a list of keys... a power scheme appears. Notes: 1. This combination of wireless features is displayed. You can quickly change the settings. (continued) ThinkPad X60 Tablet and X61 Tablet 41 Fn+F3 Select a power scheme that has been created by pressing Fn+F3. Key combination Description Fn+F1...
... without pressing a function key. Product overview Fn key combinations The following device drivers must be installed on the computer beforehand: v ThinkPad Power Management driver v OnScreen Display Utility v Wireless device drivers Fn+F6 Reserved. When you press Fn+F5, a list of keys... a power scheme appears. Notes: 1. This combination of wireless features is displayed. You can quickly change the settings. (continued) ThinkPad X60 Tablet and X61 Tablet 41 Fn+F3 Select a power scheme that has been created by pressing Fn+F3. Key combination Description Fn+F1...
Hardware Maintenance Manual
Page 49
...data access error-The access to EEPROM is displayed for that device. Invalid RFID configuration information area-The EEPROM checksum is not correct. 2. ThinkPad X60 Tablet and X61 Tablet 43 The most likely cause is not correct. Do not replace a nondefective FRU. Numeric error codes Symptom or error ..., in sequence 0175 Bad CRC1, stop POST task-The checksum of the CRS2 setting save the current setting by diagnostic codes in the ThinkPad notebook computers, see the manual for each error detected in the computer. System board. 0182 1. Enter BIOS Setup and load Setup Enter...
...data access error-The access to EEPROM is displayed for that device. Invalid RFID configuration information area-The EEPROM checksum is not correct. 2. ThinkPad X60 Tablet and X61 Tablet 43 The most likely cause is not correct. Do not replace a nondefective FRU. Numeric error codes Symptom or error ..., in sequence 0175 Bad CRC1, stop POST task-The checksum of the CRS2 setting save the current setting by diagnostic codes in the ThinkPad notebook computers, see the manual for each error detected in the computer. System board. 0182 1. Enter BIOS Setup and load Setup Enter...

Hardware Maintenance Manual
Page 51
.... 3. Load "Setup Default" in BIOS Setup Utility. 2. System board. 02F4 EISA CMOS not writable. 1. System board. 02F5 DMA test failed. 1. Remove Mini PCI network card. 2. ThinkPad X60 Tablet and X61 Tablet 45 Charge the backup battery for more than 8 hours by running BIOS Setup Utility. 0260 System timer error. 1. Replace the backup...
.... 3. Load "Setup Default" in BIOS Setup Utility. 2. System board. 02F4 EISA CMOS not writable. 1. System board. 02F5 DMA test failed. 1. Remove Mini PCI network card. 2. ThinkPad X60 Tablet and X61 Tablet 45 Charge the backup battery for more than 8 hours by running BIOS Setup Utility. 0260 System timer error. 1. Replace the backup...
Hardware Maintenance Manual
Page 53
... Setup Utility. 2. Backup battery. 3. If memory size has been changed, re-create the hibernation file. 1. System board. System board. Device Error. 1. Reinstall the operation system. ThinkPad X60 Tablet and X61 Tablet 47
... Setup Utility. 2. Backup battery. 3. If memory size has been changed, re-create the hibernation file. 1. System board. System board. Device Error. 1. Reinstall the operation system. ThinkPad X60 Tablet and X61 Tablet 47
Hardware Maintenance Manual
Page 55
...contrast cannot be adjusted. Horizontal or vertical lines displayed on , and a blank LCD during POST. System board. 1. LCD assembly. 4. ThinkPad X60 Tablet and X61 Tablet 49 One pixel consists of missing, discolored, or lighted dots in sequence System board. 1. v LCD brightness cannot ...be adjusted. Reseat the LCD connectors. 2. LCD assembly. 3. v Wrong color displayed. Lenovo will not provide replacement if the LCD is characteristic of TFT LCD technology, but excessive pixel problems can cause viewing concerns. v LCD too...
...contrast cannot be adjusted. Horizontal or vertical lines displayed on , and a blank LCD during POST. System board. 1. LCD assembly. 4. ThinkPad X60 Tablet and X61 Tablet 49 One pixel consists of missing, discolored, or lighted dots in sequence System board. 1. v LCD brightness cannot ...be adjusted. Reseat the LCD connectors. 2. LCD assembly. 3. v Wrong color displayed. Lenovo will not provide replacement if the LCD is characteristic of TFT LCD technology, but excessive pixel problems can cause viewing concerns. v LCD too...
Hardware Maintenance Manual
Page 57
...notices FRU replacement notices This section contains notices related to the "Torque" column for the P/N, see "Miscellaneous parts" on page 52 ThinkPad X60 Tablet and X61 Tablet 51 Do the following descriptions: v "Restoring the serial number of the screws are harder to plastic Turn an ...section) v Torque driver If you have a torque screwdriver, tighten all of the system unit" on page 155) in the table. In the ThinkPad computer, this problem is addressed with shock or vibration. v Each one . v Use a torque screwdriver if you have the following country specifications....
...notices FRU replacement notices This section contains notices related to the "Torque" column for the P/N, see "Miscellaneous parts" on page 52 ThinkPad X60 Tablet and X61 Tablet 51 Do the following descriptions: v "Restoring the serial number of the screws are harder to plastic Turn an ...section) v Torque driver If you have a torque screwdriver, tighten all of the system unit" on page 155) in the table. In the ThinkPad computer, this problem is addressed with shock or vibration. v Each one . v Use a torque screwdriver if you have the following country specifications....

Hardware Maintenance Manual
Page 59
... 6. To read the ECA information from EEPROM, and follow the instruction on the screen. If the system board is assumed be possible. ThinkPad X60 Tablet and X61 Tablet 53 The machine type of the ECA is inoperable, this will not be the same as the machine type of the...'s application. If the system board is stored in the EEPROM. Read box build date from EEPROM and follow the instruction on the screen. Insert the ThinkPad Hardware Maintenance Diskette Version 1.73 or later, and restart the computer. 2. To write box build date, select 4. Set ECA Information. 3. To read...
... 6. To read the ECA information from EEPROM, and follow the instruction on the screen. If the system board is assumed be possible. ThinkPad X60 Tablet and X61 Tablet 53 The machine type of the ECA is inoperable, this will not be the same as the machine type of the...'s application. If the system board is stored in the EEPROM. Read box build date from EEPROM and follow the instruction on the screen. Insert the ThinkPad Hardware Maintenance Diskette Version 1.73 or later, and restart the computer. 2. To write box build date, select 4. Set ECA Information. 3. To read...
Hardware Maintenance Manual
Page 61
ThinkPad X60 Tablet and X61 Tablet 55 Unlock the battery release lever 1 . 1010 Battery pack DANGER Removing and replacing a FRU Use only the battery specified in the direction shown by arrow 3. 1 3 2 When installing: Install the battery pack along the slide rails of the slot. Any other battery could ignite or explode. Holding the battery release lever in the unlocked position 2 , remove the battery pack in the parts list for your computer. Then make sure that the battery release lever is in the locked position.
ThinkPad X60 Tablet and X61 Tablet 55 Unlock the battery release lever 1 . 1010 Battery pack DANGER Removing and replacing a FRU Use only the battery specified in the direction shown by arrow 3. 1 3 2 When installing: Install the battery pack along the slide rails of the slot. Any other battery could ignite or explode. Holding the battery release lever in the unlocked position 2 , remove the battery pack in the parts list for your computer. Then make sure that the battery release lever is in the locked position.

Hardware Maintenance Manual
Page 63
Removing and replacing a FRU Remove the hard disk drive slot cover in step 6 . 6 6 When installing: The rubber rails on the hard disk drive must be installed properly. Remove the hard disk drive rubber rails in step 2 and 3 . 2 3 4 5 When installing: Make sure that the hard disk drive connector is attached firmly. Otherwise the drive cannot be attached to the replacement drive. ThinkPad X60 Tablet and X61 Tablet 57
Removing and replacing a FRU Remove the hard disk drive slot cover in step 6 . 6 6 When installing: The rubber rails on the hard disk drive must be installed properly. Remove the hard disk drive rubber rails in step 2 and 3 . 2 3 4 5 When installing: Make sure that the hard disk drive connector is attached firmly. Otherwise the drive cannot be attached to the replacement drive. ThinkPad X60 Tablet and X61 Tablet 57

Hardware Maintenance Manual
Page 65
Removing and replacing a FRU If the SIM card has been inserted in its slot, remove it before you start the servicing. 3 1 2 ThinkPad X60 Tablet and X61 Tablet 59
Removing and replacing a FRU If the SIM card has been inserted in its slot, remove it before you start the servicing. 3 1 2 ThinkPad X60 Tablet and X61 Tablet 59

Hardware Maintenance Manual
Page 67
First remove the hinge cap (large). Removing and replacing a FRU 4 3 Before removing the hinge cap (small) in step 5 , rotate the LCD unit back to the original position, and close the LCD cover. 6 5 ThinkPad X60 Tablet and X61 Tablet 61
First remove the hinge cap (large). Removing and replacing a FRU 4 3 Before removing the hinge cap (small) in step 5 , rotate the LCD unit back to the original position, and close the LCD cover. 6 5 ThinkPad X60 Tablet and X61 Tablet 61


