Hardware Maintenance Manual
Page 3
... the ECA information . . . 57 Chapter 8. Removing and replacing a FRU 59 Before servicing ThinkPad X200 Tablet and X201 Tablet 60 1010 Digitizer pen 61 1020 Battery pack 61 1030 ...Hard disk drive (HDD) cover, HDD, and HDD rubber rails or solid state drive (SSD) and storage converter 62 1040 DIMM 65 1050 Hinge caps 67 1060 Keyboard...the factory contents by using PC-Doctor for DOS. . . . 24 Lenovo ThinkVantage Toolbox (Lenovo System Toolbox 27 PC-Doctor for Windows 27 PC-Doctor for wireless WAN ....
... the ECA information . . . 57 Chapter 8. Removing and replacing a FRU 59 Before servicing ThinkPad X200 Tablet and X201 Tablet 60 1010 Digitizer pen 61 1020 Battery pack 61 1030 ...Hard disk drive (HDD) cover, HDD, and HDD rubber rails or solid state drive (SSD) and storage converter 62 1040 DIMM 65 1050 Hinge caps 67 1060 Keyboard...the factory contents by using PC-Doctor for DOS. . . . 24 Lenovo ThinkVantage Toolbox (Lenovo System Toolbox 27 PC-Doctor for Windows 27 PC-Doctor for wireless WAN ....

Hardware Maintenance Manual
Page 44
... resume by PC Card device.) • The time set on the resume timer elapses. Note: The computer does not accept any action to be replaced next. 38 Hardware Maintenance Manual • The ring indicator (RI) is listed first, in boldface type. Pressing the power button. - Hibernation mode ...following conditions: • If a "hibernation time" has been set on the timer, and if the user does not do any operation with the keyboard, the TrackPoint, the hard disk drive, the parallel connector, or the diskette drive within that action. - Wait a few seconds before taking any input...
... resume by PC Card device.) • The time set on the resume timer elapses. Note: The computer does not accept any action to be replaced next. 38 Hardware Maintenance Manual • The ring indicator (RI) is listed first, in boldface type. Pressing the power button. - Hibernation mode ...following conditions: • If a "hibernation time" has been set on the timer, and if the user does not do any operation with the keyboard, the TrackPoint, the hard disk drive, the parallel connector, or the diskette drive within that action. - Wait a few seconds before taking any input...
Hardware Maintenance Manual
Page 75
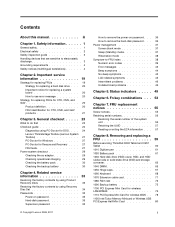
Table 14. Removing and replacing a FRU 69 Removal steps of keyboard Step 1 Icon Screw (quantity) M2 × 6 mm, wafer-head, nylon-coated (4) Color Black Torque 0.181 Nm (1.85 kgfcm) Chapter 8.
Table 14. Removing and replacing a FRU 69 Removal steps of keyboard Step 1 Icon Screw (quantity) M2 × 6 mm, wafer-head, nylon-coated (4) Color Black Torque 0.181 Nm (1.85 kgfcm) Chapter 8.

Hardware Maintenance Manual
Page 77
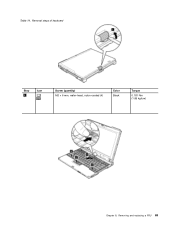
Removal steps of the computer. 1070 Extension cable card For access, remove these FRUs in order: • "1020 Battery pack" on page 61 • "1060 Keyboard" on page 68 Chapter 8. Removing and replacing a FRU 71 Table 14. Secure the keyboard by tightening the screws from the bottom side of keyboard (continued) 3. To make sure that the front side of the keyboard is housed firmly, gently press the keys with your thumbs and try to slide the keyboard toward you. 4.
Removal steps of the computer. 1070 Extension cable card For access, remove these FRUs in order: • "1020 Battery pack" on page 61 • "1060 Keyboard" on page 68 Chapter 8. Removing and replacing a FRU 71 Table 14. Secure the keyboard by tightening the screws from the bottom side of keyboard (continued) 3. To make sure that the front side of the keyboard is housed firmly, gently press the keys with your thumbs and try to slide the keyboard toward you. 4.

Hardware Maintenance Manual
Page 81
1090 Backup battery DANGER Use only the battery specified in order: • "1020 Battery pack" on page 61 • "1060 Keyboard" on page 68 • "1080 Palm rest" on page 72 Table 17. Any other battery could ignite or explode. Removing and replacing a FRU 75 Removal steps of backup battery Chapter 8. For access, remove these FRUs in the parts list for your computer.
1090 Backup battery DANGER Use only the battery specified in order: • "1020 Battery pack" on page 61 • "1060 Keyboard" on page 68 • "1080 Palm rest" on page 72 Table 17. Any other battery could ignite or explode. Removing and replacing a FRU 75 Removal steps of backup battery Chapter 8. For access, remove these FRUs in the parts list for your computer.

Hardware Maintenance Manual
Page 89
1140 Keyboard bezel For access, remove these FRUs in order: • "1010 Digitizer pen" on page 61 • "1020 Battery pack" on page 61 • "1060 Keyboard" on page 68 • "1080 Palm rest" on page 72 Table 22. Removing and replacing a FRU 83 Removal steps of keyboard bezel Step 1 2 Screw (quantity) M2 × 6 mm, wafer-head, nylon-coated (3) M2 × 3.5 mm, wafer-head, nylon-coated (4) Color Black Silver Torque 0.181 Nm (1.85 kgfcm) 0.181 Nm (1.85 kgfcm) Chapter 8.
1140 Keyboard bezel For access, remove these FRUs in order: • "1010 Digitizer pen" on page 61 • "1020 Battery pack" on page 61 • "1060 Keyboard" on page 68 • "1080 Palm rest" on page 72 Table 22. Removing and replacing a FRU 83 Removal steps of keyboard bezel Step 1 2 Screw (quantity) M2 × 6 mm, wafer-head, nylon-coated (3) M2 × 3.5 mm, wafer-head, nylon-coated (4) Color Black Silver Torque 0.181 Nm (1.85 kgfcm) 0.181 Nm (1.85 kgfcm) Chapter 8.

Hardware Maintenance Manual
Page 91
Table 22. Removal steps of rough handling. Removing and replacing a FRU 85 Then remove the keyboard bezel in order: • "1010 Digitizer pen" on page 61 • "1020 Battery pack" on page 61 • "1060 Keyboard" on page 68 • "1080 Palm rest" on page 72 • "1110 PCI Express ...Mini Card for wireless WAN" on page 78 • "1140 Keyboard bezel" on page 83 Chapter 8. Attention: When you service the keyboard bezel, avoid any kind of keyboard bezel (continued) In step 5 , detach the claws. When installing: Make sure that all the claws are...
Table 22. Removal steps of rough handling. Removing and replacing a FRU 85 Then remove the keyboard bezel in order: • "1010 Digitizer pen" on page 61 • "1020 Battery pack" on page 61 • "1060 Keyboard" on page 68 • "1080 Palm rest" on page 72 • "1110 PCI Express ...Mini Card for wireless WAN" on page 78 • "1140 Keyboard bezel" on page 83 Chapter 8. Attention: When you service the keyboard bezel, avoid any kind of keyboard bezel (continued) In step 5 , detach the claws. When installing: Make sure that all the claws are...

Hardware Maintenance Manual
Page 93
Removal steps of I/O card assembly (continued) Turn the I/O card over, and then disconnect the cable from the flip-lock ZIF connector. 1160 USB sub card For access, remove these FRUs in order: • "1010 Digitizer pen" on page 61 • "1020 Battery pack" on page 61 • "1060 Keyboard" on page 68 • "1080 Palm rest" on page 72 • "1140 Keyboard bezel" on page 83 Chapter 8. Removing and replacing a FRU 87 Table 23.
Removal steps of I/O card assembly (continued) Turn the I/O card over, and then disconnect the cable from the flip-lock ZIF connector. 1160 USB sub card For access, remove these FRUs in order: • "1010 Digitizer pen" on page 61 • "1020 Battery pack" on page 61 • "1060 Keyboard" on page 68 • "1080 Palm rest" on page 72 • "1140 Keyboard bezel" on page 83 Chapter 8. Removing and replacing a FRU 87 Table 23.

Hardware Maintenance Manual
Page 95
Removal steps of LCD assembly Step Screw (quantity) Color Torque Chapter 8. Removing and replacing a FRU 89 Removal steps of USB sub card (continued) When installing: Route the cable as shown in ...1010 Digitizer pen" on page 61 • "1020 Battery pack" on page 61 • "1050 Hinge caps" on page 67 • "1060 Keyboard" on page 68 • "1070 Extension cable card" on page 71 • "1080 Palm rest" on page 72 • "1100 PCI ...1120 Intel Turbo Memory Minicard or Wireless USB PCI Express Half-Mini Card" on page 80 • "1140 Keyboard bezel" on page 83 Table 25. Table 24.
Removal steps of LCD assembly Step Screw (quantity) Color Torque Chapter 8. Removing and replacing a FRU 89 Removal steps of USB sub card (continued) When installing: Route the cable as shown in ...1010 Digitizer pen" on page 61 • "1020 Battery pack" on page 61 • "1050 Hinge caps" on page 67 • "1060 Keyboard" on page 68 • "1070 Extension cable card" on page 71 • "1080 Palm rest" on page 72 • "1100 PCI ...1120 Intel Turbo Memory Minicard or Wireless USB PCI Express Half-Mini Card" on page 80 • "1140 Keyboard bezel" on page 83 Table 25. Table 24.

Hardware Maintenance Manual
Page 104
...-Mini Card" on page 80 • "1130 Bluetooth daughter card (BDC-2.1)" on page 82 • "1140 Keyboard bezel" on page 83 • "1150 I /O Controller Hub) b CPU c MCH (Memory Controller Hub)... Active Protection still functions (see below). Removal steps of rough handling. Run Diagnostics ➙ ThinkPad Devices ➙ HDD Active Protection Test. Attention: Do not apply physical shock to make sure...put a system board down, be sure to document the drop in any reject report, and replace the system board. • Avoid rough handling of any kind of system board and ExpressCard ...
...-Mini Card" on page 80 • "1130 Bluetooth daughter card (BDC-2.1)" on page 82 • "1140 Keyboard bezel" on page 83 • "1150 I /O Controller Hub) b CPU c MCH (Memory Controller Hub)... Active Protection still functions (see below). Removal steps of rough handling. Run Diagnostics ➙ ThinkPad Devices ➙ HDD Active Protection Test. Attention: Do not apply physical shock to make sure...put a system board down, be sure to document the drop in any reject report, and replace the system board. • Avoid rough handling of any kind of system board and ExpressCard ...

Hardware Maintenance Manual
Page 107
... Turbo Memory Minicard or Wireless USB PCI Express Half-Mini Card" on page 80 • "1130 Bluetooth daughter card (BDC-2.1)" on page 82 • "1140 Keyboard bezel" on page 83 • "1150 I/O card assembly" on page 85 • "1160 USB sub card" on page 87 • "1170 LCD assembly..." on page 92 Table 28. Removal steps of base cover and speaker assembly Remove the speaker assembly from the base cover assembly. Removing and replacing a FRU 101 Chapter 8. When installing: Route the speaker cables along the cable guides as shown in connector, fan, digitizer pen case, and pen...
... Turbo Memory Minicard or Wireless USB PCI Express Half-Mini Card" on page 80 • "1130 Bluetooth daughter card (BDC-2.1)" on page 82 • "1140 Keyboard bezel" on page 83 • "1150 I/O card assembly" on page 85 • "1160 USB sub card" on page 87 • "1170 LCD assembly..." on page 92 Table 28. Removal steps of base cover and speaker assembly Remove the speaker assembly from the base cover assembly. Removing and replacing a FRU 101 Chapter 8. When installing: Route the speaker cables along the cable guides as shown in connector, fan, digitizer pen case, and pen...

Hardware Maintenance Manual
Page 115
Table 32. Removing and replacing a FRU 109 Removal steps of inverter card (continued) Step 1 Screw (quantity) M2 × 3.5 mm, wafer-head,... pen" on page 61 • "1020 Battery pack" on page 61 • "1050 Hinge caps" on page 67 • "1060 Keyboard" on page 68 • "1070 Extension cable card" on page 71 • "1080 Palm rest" on page 72 • "1100...page 78 • "1120 Intel Turbo Memory Minicard or Wireless USB PCI Express Half-Mini Card" on page 80 • "1140 Keyboard bezel" on page 83 • "1170 LCD assembly" on page 89 • "2010 LCD front bezel" on page 103 &#...
Table 32. Removing and replacing a FRU 109 Removal steps of inverter card (continued) Step 1 Screw (quantity) M2 × 3.5 mm, wafer-head,... pen" on page 61 • "1020 Battery pack" on page 61 • "1050 Hinge caps" on page 67 • "1060 Keyboard" on page 68 • "1070 Extension cable card" on page 71 • "1080 Palm rest" on page 72 • "1100...page 78 • "1120 Intel Turbo Memory Minicard or Wireless USB PCI Express Half-Mini Card" on page 80 • "1140 Keyboard bezel" on page 83 • "1170 LCD assembly" on page 89 • "2010 LCD front bezel" on page 103 &#...

Hardware Maintenance Manual
Page 117
• "1140 Keyboard bezel" on page 83 • "1170 LCD assembly" on page 89 • "2010 LCD front bezel" on page 103 • "2020 Micro-Processor card" on ...-head, nylon-coated (4) M2 × 3 mm, flat-head, nylon-coated (6) - Torque 0.392 Nm (4 kgfcm) 0.181 Nm (1.85 kgfcm) 0.181 Nm (1.85 kgfcm) Chapter 8. Removing and replacing a FRU 111
• "1140 Keyboard bezel" on page 83 • "1170 LCD assembly" on page 89 • "2010 LCD front bezel" on page 103 • "2020 Micro-Processor card" on ...-head, nylon-coated (4) M2 × 3 mm, flat-head, nylon-coated (6) - Torque 0.392 Nm (4 kgfcm) 0.181 Nm (1.85 kgfcm) 0.181 Nm (1.85 kgfcm) Chapter 8. Removing and replacing a FRU 111

Hardware Maintenance Manual
Page 123
... pen" on page 61 • "1020 Battery pack" on page 61 • "1050 Hinge caps" on page 67 • "1060 Keyboard" on page 68 • "1070 Extension cable card" on page 71 • "1080 Palm rest" on page 72 • "1100 ... page 78 • "1120 Intel Turbo Memory Minicard or Wireless USB PCI Express Half-Mini Card" on page 80 • "1140 Keyboard bezel" on page 83 • "1170 LCD assembly" on page 89 • "2010 LCD front bezel" on page 103 •... and R, and LCD cable" on page 110 • "2060 Integrated camera" on page 116 Chapter 8. Removing and replacing a FRU 117 Table 36.
... pen" on page 61 • "1020 Battery pack" on page 61 • "1050 Hinge caps" on page 67 • "1060 Keyboard" on page 68 • "1070 Extension cable card" on page 71 • "1080 Palm rest" on page 72 • "1100 ... page 78 • "1120 Intel Turbo Memory Minicard or Wireless USB PCI Express Half-Mini Card" on page 80 • "1140 Keyboard bezel" on page 83 • "1170 LCD assembly" on page 89 • "2010 LCD front bezel" on page 103 •... and R, and LCD cable" on page 110 • "2060 Integrated camera" on page 116 Chapter 8. Removing and replacing a FRU 117 Table 36.

Hardware Maintenance Manual
Page 135
...reader and touchpad. - two asterisks (**) means that the part is a Self-service CRU; Installation of the replacement CRU. You may include the memory module, wireless card, keyboard, and palm rest with OP are concealed by more than two screws. and (2) you may be required to ...not a CRU. You may request that Lenovo installs an Optional-service CRU according to you can be used for all types or models, unless specific types or models are specified. • FRU with a replacement part you . Chapter 10. ThinkPad computers contain the following lists of the service...
...reader and touchpad. - two asterisks (**) means that the part is a Self-service CRU; Installation of the replacement CRU. You may include the memory module, wireless card, keyboard, and palm rest with OP are concealed by more than two screws. and (2) you may be required to ...not a CRU. You may request that Lenovo installs an Optional-service CRU according to you can be used for all types or models, unless specific types or models are specified. • FRU with a replacement part you . Chapter 10. ThinkPad computers contain the following lists of the service...

(English) Service and Troubleshooting Guide
Page 33
...do as a screwdriver. then click Access Help. Customer Replaceable Units (CRUs) Customer Replaceable Units (CRUs) are computer parts that are safe for replacing all self-service CRUs. Online Access Help and Lenovo Internet Support site, http:// www.lenovo.com/CRUs, provide instructions for several critical CRUs. ... screws. Both types of two screws, whereas optional-service CRUs require some products, such components as memory, wireless cards, notebook keyboards, and palm rests with fingerprint reader and touchpad may be CRUs. In some technical skill, as well as tools such as ...
...do as a screwdriver. then click Access Help. Customer Replaceable Units (CRUs) Customer Replaceable Units (CRUs) are computer parts that are safe for replacing all self-service CRUs. Online Access Help and Lenovo Internet Support site, http:// www.lenovo.com/CRUs, provide instructions for several critical CRUs. ... screws. Both types of two screws, whereas optional-service CRUs require some products, such components as memory, wireless cards, notebook keyboards, and palm rests with fingerprint reader and touchpad may be CRUs. In some technical skill, as well as tools such as ...

(English) Service and Troubleshooting Guide
Page 34
... only 20 ThinkPad X201, X201s, and X201 Tablet Service and Troubleshooting Guide The following additional resource: v The Customer Support Center. Note: Use only computer parts provided by Lenovo. Setup Instructions Access Help AC adapter Power cord for AC adapter TrackPoint® cap Battery Storage device (HDD or SSD) Memory Optical drive Tablet digitizer pen (*1) Keyboard Palm...
... only 20 ThinkPad X201, X201s, and X201 Tablet Service and Troubleshooting Guide The following additional resource: v The Customer Support Center. Note: Use only computer parts provided by Lenovo. Setup Instructions Access Help AC adapter Power cord for AC adapter TrackPoint® cap Battery Storage device (HDD or SSD) Memory Optical drive Tablet digitizer pen (*1) Keyboard Palm...


