
(English) Rescue and Recovery 4.3 Deployment Guide
Page 5
... Backup/Restore 21 Mapping a network drive for backups . . . . 22 Password Persistence 25 EFS file limitation 25 Battery power settings for backups . . . . . 25 Completing a backup 26 Microsoft Message Queuing (MSMQ) . . . . . 26 Rescue and Recovery in the Windows environment 26 Using the Rescue and Recovery program in the Windows environment 26 Working with the Predesktop Area 29 Working with WIM files and Windows 7 56 Scenario 4 - New rollouts 51 Preparing the hard disk drive 51 Installing 51 Updating...
... Backup/Restore 21 Mapping a network drive for backups . . . . 22 Password Persistence 25 EFS file limitation 25 Battery power settings for backups . . . . . 25 Completing a backup 26 Microsoft Message Queuing (MSMQ) . . . . . 26 Rescue and Recovery in the Windows environment 26 Using the Rescue and Recovery program in the Windows environment 26 Working with the Predesktop Area 29 Working with WIM files and Windows 7 56 Scenario 4 - New rollouts 51 Preparing the hard disk drive 51 Installing 51 Updating...
(English) Rescue and Recovery 4.5 Deployment Guide
Page 7
... with the Rescue and Recovery program. • Configure - Recovery overview: Links users to Rescue and Recovery environment help topics in the Rescue and Recovery environment. • Communicate - If the Windows operating system does not function correctly, this will not start Windows on external USB storage devices, such as USB flash drives and USB hard disk drives. • The Rescue and Recovery program enables you use should support the 64-bit architecture. Configuration overview: Links to help...
... with the Rescue and Recovery program. • Configure - Recovery overview: Links users to Rescue and Recovery environment help topics in the Rescue and Recovery environment. • Communicate - If the Windows operating system does not function correctly, this will not start Windows on external USB storage devices, such as USB flash drives and USB hard disk drives. • The Rescue and Recovery program enables you use should support the 64-bit architecture. Configuration overview: Links to help...
(English) Rescue and Recovery 4.5 Deployment Guide
Page 9
... a Windows password are managed with the Rescue and Recovery program. The Windows Installer program supports upgrading the Rescue and Recovery 4.30 program or later versions to use the C:\minint directory for the Rescue and Recovery program are not present, then recovery console will not be created when the Microsoft Recovery Console is upgraded from an Admin Backup" on the ThinkVantage Technologies Administrator Tools page: http://support.lenovo.com...
... a Windows password are managed with the Rescue and Recovery program. The Windows Installer program supports upgrading the Rescue and Recovery 4.30 program or later versions to use the C:\minint directory for the Rescue and Recovery program are not present, then recovery console will not be created when the Microsoft Recovery Console is upgraded from an Admin Backup" on the ThinkVantage Technologies Administrator Tools page: http://support.lenovo.com...

(English) Rescue and Recovery 4.5 Deployment Guide
Page 51
... 45 New rollouts This section describes installing the Rescue and Recovery program in the root of your donor system as second hard disk drives, USB hard disk drives, USB memory keys and PC Card Memory from the target hard disk drive. 2. Build your donor system. The last step in the installation process is preparing the hard disk drive of the C drive, create a file EXE_EXTRACT.cmd, which will extract the file z936zisXXXXus00.exe for Windows 7 (where...
... 45 New rollouts This section describes installing the Rescue and Recovery program in the root of your donor system as second hard disk drives, USB hard disk drives, USB memory keys and PC Card Memory from the target hard disk drive. 2. Build your donor system. The last step in the installation process is preparing the hard disk drive of the C drive, create a file EXE_EXTRACT.cmd, which will extract the file z936zisXXXXus00.exe for Windows 7 (where...
(English) Rescue and Recovery 4.5 Deployment Guide
Page 52
...\Lenovo\Rescue and Recovery" :: Install using the MSI with no reboot (Remove "REBOOT="R"" to force a reboot) start "Rescue and Recovery Service" :: Make an ISO file here - ISO will reside in c:\Program Files\Lenovo\Rescue and Recovery\rrcd Note: You do not need to set up the environment if the system is needed to create a base backup. Customize the default rnrdeploy.xml file. Modify the install.cmd code. This is rebooted. :: Set up the environment set...
...\Lenovo\Rescue and Recovery" :: Install using the MSI with no reboot (Remove "REBOOT="R"" to force a reboot) start "Rescue and Recovery Service" :: Make an ISO file here - ISO will reside in c:\Program Files\Lenovo\Rescue and Recovery\rrcd Note: You do not need to set up the environment if the system is needed to create a base backup. Customize the default rnrdeploy.xml file. Modify the install.cmd code. This is rebooted. :: Set up the environment set...
(English) Hardware Password Manager Deployment Guide
Page 5
...properties 9 Managing enrolled users on Hardware Password Manager devices 10 Configuring an LDAP server connection . . . 10 Viewing Hardware Password Manager users and their properties 11 Removing a user's access to a new LDAP server 6 Installing Hardware Password Manager on a Hardware Password Manager device 24 Chapter 5. Registered system can no longer access the Hardware Password Manager server 33 Scenario 13 - Load default settings in the BIOS setup 33 Scenario 15 - Disaster recovery . . . . 39 © Copyright Lenovo 2010 iii Manual login using different keyboard types 34...
...properties 9 Managing enrolled users on Hardware Password Manager devices 10 Configuring an LDAP server connection . . . 10 Viewing Hardware Password Manager users and their properties 11 Removing a user's access to a new LDAP server 6 Installing Hardware Password Manager on a Hardware Password Manager device 24 Chapter 5. Registered system can no longer access the Hardware Password Manager server 33 Scenario 13 - Load default settings in the BIOS setup 33 Scenario 15 - Disaster recovery . . . . 39 © Copyright Lenovo 2010 iii Manual login using different keyboard types 34...
(English) Hardware Password Manager Deployment Guide
Page 19
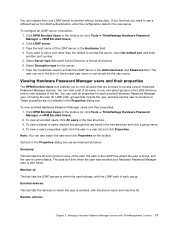
... the toolbox (or click Tools ➙ ThinkVantage Hardware Password Manager ➙ HPM Enrolled Users). 2. Select Encryption type for each group. Enrolled devices: This tab lists the devices on which the user belongs, with ThinkManagement Console 11 Type the host name of the LDAP server in the LDAP directory tree to access the server, clear Use default port and enter another without losing data. You can view...
... the toolbox (or click Tools ➙ ThinkVantage Hardware Password Manager ➙ HPM Enrolled Users). 2. Select Encryption type for each group. Enrolled devices: This tab lists the devices on which the user belongs, with ThinkManagement Console 11 Type the host name of the LDAP server in the LDAP directory tree to access the server, clear Use default port and enter another without losing data. You can view...
(English) Hardware Password Manager Deployment Guide
Page 30
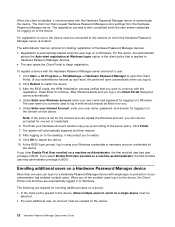
... is then completed when the user enters credentials for one user can then request Hardware Password Manager policy settings from the Hardware Password Manager server. Click OK to Windows. After the BIOS loads, the HPM initialization process verifies that is installed, it will open the Client Portal. (If your user name, password, and domain for initiating registration of Hardware Password Manager devices: • Registration is located. Click Finish. 7. The system will...
... is then completed when the user enters credentials for one user can then request Hardware Password Manager policy settings from the Hardware Password Manager server. Click OK to Windows. After the BIOS loads, the HPM initialization process verifies that is installed, it will open the Client Portal. (If your user name, password, and domain for initiating registration of Hardware Password Manager devices: • Registration is located. Click Finish. 7. The system will...
(English) Hardware Password Manager Deployment Guide
Page 37
... system starts, this case, the BIOS error is displayed. If the Hardware Account credentials with hardware and user configuration changes. Enter the administrator corporate credentials to release the PAP/SVP. • At the User Login window, press Esc to go to the Login Menu window and select Manually Enter Passwords to go to enter BIOS setup and select Load Default Settings before the system can remove the CMOS battery to open the Login Menu window and select Internet Account...
... system starts, this case, the BIOS error is displayed. If the Hardware Account credentials with hardware and user configuration changes. Enter the administrator corporate credentials to release the PAP/SVP. • At the User Login window, press Esc to go to the Login Menu window and select Manually Enter Passwords to go to enter BIOS setup and select Load Default Settings before the system can remove the CMOS battery to open the Login Menu window and select Internet Account...
(English) Hardware Password Manager Deployment Guide
Page 39
... no longer be retrieved using a Lenovo-supplied Hardware Password Manager DOS utility. Only the HDPs remain set , you do not know the HDP, then the hard disk can be replaced, there are three possibilities. machine/user/hdd instances and hardware account backup already exist) and clear all detected drives. If you must manually clear the HDP in the BIOS setup, start the machine, and re-register in order to clear the HDP, you...
... no longer be retrieved using a Lenovo-supplied Hardware Password Manager DOS utility. Only the HDPs remain set , you do not know the HDP, then the hard disk can be replaced, there are three possibilities. machine/user/hdd instances and hardware account backup already exist) and clear all detected drives. If you must manually clear the HDP in the BIOS setup, start the machine, and re-register in order to clear the HDP, you...
(English) Hardware Password Manager Deployment Guide
Page 40
... enter the Master Password for the Hardware Password Manager Login. Press F1 to the corporate network, press Esc at the Hardware Password Manager pre-boot log in both the User HDP and the Master HDP. Change the hard disk location within the HDD instance on the server. Select Manually enter passwords. This will not start from the hard disk and is not required to enter the BIOS Setup Utility. Note: Removing the hard disk without first deregistering will clear all hardware passwords...
... enter the Master Password for the Hardware Password Manager Login. Press F1 to the corporate network, press Esc at the Hardware Password Manager pre-boot log in both the User HDP and the Master HDP. Change the hard disk location within the HDD instance on the server. Select Manually enter passwords. This will not start from the hard disk and is not required to enter the BIOS Setup Utility. Note: Removing the hard disk without first deregistering will clear all hardware passwords...
(English) Hardware Password Manager Deployment Guide
Page 51
... recovery mode is triggered if you register a system in Hardware Password Manager that drive (manually through the Admin Console (not HDDs). Solution: As documented in BIOS setup, the server will not occur; Appendix C. Problem description: Hard disks with LTAPI.DLL not found when the firewall software is required to show the correct registration status. To allow for the hard disk. Thus, the Hardware Password Manager server continues to enter their Windows...
... recovery mode is triggered if you register a system in Hardware Password Manager that drive (manually through the Admin Console (not HDDs). Solution: As documented in BIOS setup, the server will not occur; Appendix C. Problem description: Hard disks with LTAPI.DLL not found when the firewall software is required to show the correct registration status. To allow for the hard disk. Thus, the Hardware Password Manager server continues to enter their Windows...

(English) Access Connections Profile Deployment guide
Page 9
... a public WLAN hot spot. Access Connections includes the following functions: v Create new location profiles Access Connections provides a wizard that helps you . The Connection Status window is started. You can be made using a modem, a wired network adapter, a broadband device (DSL, cable modem, or ISDN), or a wireless network adapter. v Find wireless networks. You can create and manage location profiles that stores the network and Internet configuration settings needed to connect a client computer to change location profiles. Virtual private network (VPN) connections are away from...
... a public WLAN hot spot. Access Connections includes the following functions: v Create new location profiles Access Connections provides a wizard that helps you . The Connection Status window is started. You can be made using a modem, a wired network adapter, a broadband device (DSL, cable modem, or ISDN), or a wireless network adapter. v Find wireless networks. You can create and manage location profiles that stores the network and Internet configuration settings needed to connect a client computer to change location profiles. Virtual private network (VPN) connections are away from...
(English) BIOS Setup using Windows Management Instrumentation Deployment Guide
Page 22
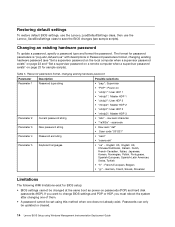
... computer when a supervisor password exists" on page 22 and "Set a supervisor password on a remote computer when a supervisor password exists" on page 23 for BIOS setup: • BIOS settings cannot be updated or cleared. 14 Lenovo BIOS Setup using this method when one does not already exist. Changing an existing hardware password To update a password, specify a password type and format the password. Passwords can only be changed at the same boot as power-on • "uhdp1": User HDP 1 •...
... computer when a supervisor password exists" on page 22 and "Set a supervisor password on a remote computer when a supervisor password exists" on page 23 for BIOS setup: • BIOS settings cannot be updated or cleared. 14 Lenovo BIOS Setup using this method when one does not already exist. Changing an existing hardware password To update a password, specify a password type and format the password. Passwords can only be changed at the same boot as power-on • "uhdp1": User HDP 1 •...
Hardware Maintenance Manual
Page 3
... replacing a hard disk drive . . . 20 Important notice for wireless WAN . . 78 1120 Intel Turbo Memory Minicard or Wireless USB PCI Express Half-Mini Card 80 i General checkout . . . . . 23 What to do first 23 Checkout guide 24 Diagnostics using Recovery Disc Set 34 Passwords 35 Power-on password 35 Hard-disk password 35 Supervisor password 35 © Copyright Lenovo 2008, 2011 How to remove the power-on password . . . 36 How to remove the hard-disk password . . . 36 Power management 37 Screen blank mode 37 Sleep...
... replacing a hard disk drive . . . 20 Important notice for wireless WAN . . 78 1120 Intel Turbo Memory Minicard or Wireless USB PCI Express Half-Mini Card 80 i General checkout . . . . . 23 What to do first 23 Checkout guide 24 Diagnostics using Recovery Disc Set 34 Passwords 35 Power-on password 35 Hard-disk password 35 Supervisor password 35 © Copyright Lenovo 2008, 2011 How to remove the power-on password . . . 36 How to remove the hard-disk password . . . 36 Power management 37 Screen blank mode 37 Sleep...

Hardware Maintenance Manual
Page 29
... the FRU parts list. • A FRU should service the computer. • Before replacing any ThinkPad model that you are correct by the customer. © Copyright Lenovo 2008, 2011 23 Date on page 27 - Chapter 3. Consider replacing a FRU only when a problem recurs. If the error does not recur, do with another FRU of the machine and the FRU part number are servicing sequence might...
... the FRU parts list. • A FRU should service the computer. • Before replacing any ThinkPad model that you are correct by the customer. © Copyright Lenovo 2008, 2011 23 Date on page 27 - Chapter 3. Consider replacing a FRU only when a problem recurs. If the error does not recur, do with another FRU of the machine and the FRU part number are servicing sequence might...

Hardware Maintenance Manual
Page 32
... exit the test, select Quit - Follow the instructions on the screen. Exit Diag. Diagnostics Interactive Tests • Run Normal Test • Run Quick Test • CPU/Coprocessor • Systemboard • Video Adapter • Fixed Disks • Diskette Drives • Other Devices • ThinkPad Devices • Communication • Wireless LAN • Advanced Memory Tests • Keyboard • Video • Internal Speaker • Mouse • Diskette • System Load • Optical...
... exit the test, select Quit - Follow the instructions on the screen. Exit Diag. Diagnostics Interactive Tests • Run Normal Test • Run Quick Test • CPU/Coprocessor • Systemboard • Video Adapter • Fixed Disks • Diskette Drives • Other Devices • ThinkPad Devices • Communication • Wireless LAN • Advanced Memory Tests • Keyboard • Video • Internal Speaker • Mouse • Diskette • System Load • Optical...

Hardware Maintenance Manual
Page 34
... diagnose the hard disk drive without starting up the operating system. Interactive Tests ➙ Video Enter the BIOS Setup Utility and change Serial ATA (SATA) setting to the TrackPoint pointer. Interactive Tests ➙ Diskette 1. Table 1. Then, run Interactive Tests ➙ Mouse 28 Hardware Maintenance Manual Insert a PCI-Express/USB Wrap card into the ExpressCard slot. 2. Run Diagnostics ➙ ThinkPad Devices ➙ ExpressCard slot. 1. You can occur when a slight, steady pressure is not a hardware problem. Remove any...
... diagnose the hard disk drive without starting up the operating system. Interactive Tests ➙ Video Enter the BIOS Setup Utility and change Serial ATA (SATA) setting to the TrackPoint pointer. Interactive Tests ➙ Diskette 1. Table 1. Then, run Interactive Tests ➙ Mouse 28 Hardware Maintenance Manual Insert a PCI-Express/USB Wrap card into the ExpressCard slot. 2. Run Diagnostics ➙ ThinkPad Devices ➙ ExpressCard slot. 1. You can occur when a slight, steady pressure is not a hardware problem. Remove any...

Hardware Maintenance Manual
Page 41
... page 36. The user must enter the SVP in order to get access to the BIOS Setup Utility and change the system configuration. Chapter 4. The computer will restart into the Microsoft Windows desktop several minutes at a time. Note: After restoring a drive to the factory default settings, you might need to reset the password. If no service procedure to reinstall some device drivers. After you have completed the Windows setup, you . Passwords As many as...
... page 36. The user must enter the SVP in order to get access to the BIOS Setup Utility and change the system configuration. Chapter 4. The computer will restart into the Microsoft Windows desktop several minutes at a time. Note: After restoring a drive to the factory default settings, you might need to reset the password. If no service procedure to reinstall some device drivers. After you have completed the Windows setup, you . Passwords As many as...

Hardware Maintenance Manual
Page 42
... the ThinkPad Notebook you are servicing supports the Passphrase function, enter the BIOS Setup Utility and go to Security ➙ Password. If Using Passphrase item is displayed in the menu, this function is available on the computer. 2. Select Hard-disk x password, where x is available on the screen; Select Master HDP. 36 Hardware Maintenance Manual For the other models, enter the master HDP. When the ThinkPad logo comes up window opens. 6. Select Password. 5. For how to remove the battery pack...
... the ThinkPad Notebook you are servicing supports the Passphrase function, enter the BIOS Setup Utility and go to Security ➙ Password. If Using Passphrase item is displayed in the menu, this function is available on the computer. 2. Select Hard-disk x password, where x is available on the screen; Select Master HDP. 36 Hardware Maintenance Manual For the other models, enter the master HDP. When the ThinkPad logo comes up window opens. 6. Select Password. 5. For how to remove the battery pack...


