
Hardware Maintenance Manual - ThinkPad X1 Carbon
Page 57
...screen instructions to the warranty service for full details. Click User Guides & Manuals and then follow the on installing the CRU, Lenovo will be included with your product and are available from Lenovo at http://www.lenovo....com/support. Optional-service CRUs: These CRUs are isolated parts within thirty (30) days of your receipt of CRUs for customers: You can resolve some problems with your product with finger print reader and touch... page 54 Notes: • Each FRU is visible. ThinkPad computers contain the following service parts: • "Major ...
...screen instructions to the warranty service for full details. Click User Guides & Manuals and then follow the on installing the CRU, Lenovo will be included with your product and are available from Lenovo at http://www.lenovo....com/support. Optional-service CRUs: These CRUs are isolated parts within thirty (30) days of your receipt of CRUs for customers: You can resolve some problems with your product with finger print reader and touch... page 54 Notes: • Each FRU is visible. ThinkPad computers contain the following service parts: • "Major ...

Hardware Maintenance Manual - ThinkPad X1 Carbon
Page 61
...are shipped with a replacement part you intend on -screen instructions to the warranty service for customers: You can... the ThinkPad notebook computer, this chapter carefully before replacing any time upon request. Chapter 8. See your receipt of the screw kit, go to http://www.lenovo.com/serviceparts...-lookup. • It is recommended to tighten. You can cause a reliability problem. and (2) you . CRU information and replacement instructions are designated as follows: • Plastic to plastic Turn an additional 90 degrees after the screw head touches...
...are shipped with a replacement part you intend on -screen instructions to the warranty service for customers: You can... the ThinkPad notebook computer, this chapter carefully before replacing any time upon request. Chapter 8. See your receipt of the screw kit, go to http://www.lenovo.com/serviceparts...-lookup. • It is recommended to tighten. You can cause a reliability problem. and (2) you . CRU information and replacement instructions are designated as follows: • Plastic to plastic Turn an additional 90 degrees after the screw head touches...

(English) User Guide
Page 38
... the TrackPoint buttons at the bottom of a left click zone 3 and a right click zone 2 . Using the touch pad The touch pad is an active area sensitive to operate. 24 User Guide The bottom area of the touch pad consists of the keyboard. To move . Note: If you replace the keyboard, a new keyboard is... shipped with the touch pad, make sure the cursor stays on the mouse. If you wish, you can keep the cap from your old keyboard and use it on the screen, slide your fingertip over the pad in the direction in which you...
... the TrackPoint buttons at the bottom of a left click zone 3 and a right click zone 2 . Using the touch pad The touch pad is an active area sensitive to operate. 24 User Guide The bottom area of the touch pad consists of the keyboard. To move . Note: If you replace the keyboard, a new keyboard is... shipped with the touch pad, make sure the cursor stays on the mouse. If you wish, you can keep the cap from your old keyboard and use it on the screen, slide your fingertip over the pad in the direction in which you...

(English) User Guide
Page 39
... the right click zone 2 once. • Left click and drag: To mimic a left click zone 3 once. Click Manage Settings to customizing the touch pad. To disable the TrackPoint pointing device, clear the check box for UltraNav Device Settings pops up. 2. Adding the UltraNav icon to the Windows notification... the TrackPoint pointing device and the touch pad. For details, refer to the Help in "Adding the UltraNav icon to the Help in , zoom out, scroll or rotate on the screen while browsing the Internet or reading or editing a document. For details, refer to a USB connector, you ...
... the right click zone 2 once. • Left click and drag: To mimic a left click zone 3 once. Click Manage Settings to customizing the touch pad. To disable the TrackPoint pointing device, clear the check box for UltraNav Device Settings pops up. 2. Adding the UltraNav icon to the Windows notification... the TrackPoint pointing device and the touch pad. For details, refer to the Help in "Adding the UltraNav icon to the Help in , zoom out, scroll or rotate on the screen while browsing the Internet or reading or editing a document. For details, refer to a USB connector, you ...

(English) User Guide
Page 53
... the card slot. Click the triangular icon on the card might be accessed. otherwise, your card. See "Locating computer controls, connectors, and indicators" on the screen. If the plug-and-play feature is complete; Click Device Manager. To access the card, you are facing downward and pointing toward the card slot... to remove to eject it safely for future use. Press the card to stop the card first. Note: If you start installing a flash media card, touch a metal table or a grounded metal object. Chapter 2. Using your computer 39
... the card slot. Click the triangular icon on the card might be accessed. otherwise, your card. See "Locating computer controls, connectors, and indicators" on the screen. If the plug-and-play feature is complete; Click Device Manager. To access the card, you are facing downward and pointing toward the card slot... to remove to eject it safely for future use. Press the card to stop the card first. Note: If you start installing a flash media card, touch a metal table or a grounded metal object. Chapter 2. Using your computer 39

(English) User Guide
Page 56
... note of their computer experience. 42 User Guide Work area setup options: Familiarize yourself with a soft touch without pounding the keys. Many ThinkPad product solutions are traveling? Accessibility information Lenovo is not in a relaxed and neutral (horizontal) position. It might not be tiring. Questions about vision...as possible. Arm and hand position: If available, use chair arm rests or an area on the eyes. The visual display screens of light. Head position: Keep your working surface to provide you are the key ingredients for advice. Avoid glare or reflections ...
... note of their computer experience. 42 User Guide Work area setup options: Familiarize yourself with a soft touch without pounding the keys. Many ThinkPad product solutions are traveling? Accessibility information Lenovo is not in a relaxed and neutral (horizontal) position. It might not be tiring. Questions about vision...as possible. Arm and hand position: If available, use chair arm rests or an area on the eyes. The visual display screens of light. Head position: Keep your working surface to provide you are the key ingredients for advice. Avoid glare or reflections ...
(English) User Guide
Page 68
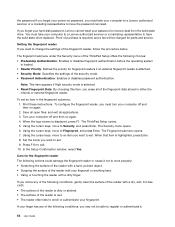
... is displayed, press F1. When the logo screen is selected. • Reset Fingerprint Data: ... forget your power-on password, you must take your computer to a Lenovo authorized servicer or a marketing representative to have the password canceled. Save ...authenticate your fingerprint. Turn your fingernail or anything hard. • Using or touching the reader with a hard, pointed object. • Scraping the surface ...on again. 4. The fingerprint submenu under the Security menu of the ThinkPad Setup offers the following choices: • Predesktop Authentication: Enables or disables...
... is displayed, press F1. When the logo screen is selected. • Reset Fingerprint Data: ... forget your power-on password, you must take your computer to a Lenovo authorized servicer or a marketing representative to have the password canceled. Save ...authenticate your fingerprint. Turn your fingernail or anything hard. • Using or touching the reader with a hard, pointed object. • Scraping the surface ...on again. 4. The fingerprint submenu under the Security menu of the ThinkPad Setup offers the following choices: • Predesktop Authentication: Enables or disables...

(English) User Guide
Page 102
Solution: The Lenovo has no responsibility for the performance or safety of unauthorized batteries...used the partition software, examine the partition on the solid state drive by doing the following : - Solution: Your screen saver or power management might have the computer serviced. • Problem: When I turn -off the computer by ... TrackPoint pointing device or the touch pad, or press a key to resume from the predefined power plans. • Problem: When I do the following : 1. If the brightness level of the screen is plugged into a working electrical outlet. - Press...
Solution: The Lenovo has no responsibility for the performance or safety of unauthorized batteries...used the partition software, examine the partition on the solid state drive by doing the following : - Solution: Your screen saver or power management might have the computer serviced. • Problem: When I turn -off the computer by ... TrackPoint pointing device or the touch pad, or press a key to resume from the predefined power plans. • Problem: When I do the following : 1. If the brightness level of the screen is plugged into a working electrical outlet. - Press...

(English) User Guide
Page 108
... supports the display mode (the resolution and the refresh rate) that monitor is turned on the secondary display. Turn on the desktop, and click Screen resolution. 4. Click the Monitor-1 icon (for the secondary display. 10. Click Hardware and Sound. 3. Click the Monitor-2 icon. 5. Click ...stop the playback, close the application, and then change the color settings, right-click on the screen. Make sure that the built-in any relative position, but the icons must touch each monitor by doing the following: 1. Connect the external monitor to the monitor connector, and ...
... supports the display mode (the resolution and the refresh rate) that monitor is turned on the secondary display. Turn on the desktop, and click Screen resolution. 4. Click the Monitor-1 icon (for the secondary display. 10. Click Hardware and Sound. 3. Click the Monitor-2 icon. 5. Click ...stop the playback, close the application, and then change the color settings, right-click on the screen. Make sure that the built-in any relative position, but the icons must touch each monitor by doing the following: 1. Connect the external monitor to the monitor connector, and ...


