Hardware Maintenance Manual
Page 3
... and GAV 26 Product definition 26 FRU identification for replacing a system board 26 How to do first 29 Checkout guide 30 Lenovo Solution Center 30 Quick test programs 30 UEFI diagnostic program 31 Bootable diagnostic programs 31 Power system checkout 32 Checking the ac power... adapter 32 Checking operational charging 33 Checking the battery pack 33 Checking the backup battery 34 Chapter 4. Locations 53 Locating computer controls, connectors, and indicators 53 Front view 53 Rear view 54 Bottom ...
... and GAV 26 Product definition 26 FRU identification for replacing a system board 26 How to do first 29 Checkout guide 30 Lenovo Solution Center 30 Quick test programs 30 UEFI diagnostic program 31 Bootable diagnostic programs 31 Power system checkout 32 Checking the ac power... adapter 32 Checking operational charging 33 Checking the battery pack 33 Checking the backup battery 34 Chapter 4. Locations 53 Locating computer controls, connectors, and indicators 53 Front view 53 Rear view 54 Bottom ...
Hardware Maintenance Manual
Page 4
General guidelines 65 Before servicing ThinkPad T530, T530i, and W530 66 1010 Battery pack 66 1020 Serial Ultrabay Enhanced device or blank bezel 67 1030 Memory module slot cover 68 1040 Memory module (bottom slot 69 1050 Hard ... or mSATA solid state drive 78 1100 ExpressCard blank bezel or ExpressCard . . 82 1110 Keyboard bezel assembly 83 1120 Bluetooth daughter card 86 1130 Backup battery 87 1140 Smart card, dummy smart card and spacer . 88 1150 Speaker assembly 89 1160 Thermal fan assembly 90 1170 Microprocessor 93 1180 LCD unit...
General guidelines 65 Before servicing ThinkPad T530, T530i, and W530 66 1010 Battery pack 66 1020 Serial Ultrabay Enhanced device or blank bezel 67 1030 Memory module slot cover 68 1040 Memory module (bottom slot 69 1050 Hard ... or mSATA solid state drive 78 1100 ExpressCard blank bezel or ExpressCard . . 82 1110 Keyboard bezel assembly 83 1120 Bluetooth daughter card 86 1130 Backup battery 87 1140 Smart card, dummy smart card and spacer . 88 1150 Speaker assembly 89 1160 Thermal fan assembly 90 1170 Microprocessor 93 1180 LCD unit...
Hardware Maintenance Manual
Page 9
...present: • Electrical hazards, especially primary power (primary voltage on the Web page http://www.lenovo.com/serviceparts-lookup. Checklist: 1. Check the power cord for worn, frayed, or pinched cables....must determine how serious the apparent hazard could be the authorized type specified for cracked or bulging batteries. 5. • If an electrical accident occurs: - Switch off the computer. Safety inspection ... whether there are any unsafe conditions are all at the beginning of non-ThinkPad features or options not covered by equalizing the charge so that are sensitive to...
...present: • Electrical hazards, especially primary power (primary voltage on the Web page http://www.lenovo.com/serviceparts-lookup. Checklist: 1. Check the power cord for worn, frayed, or pinched cables....must determine how serious the apparent hazard could be the authorized type specified for cracked or bulging batteries. 5. • If an electrical accident occurs: - Switch off the computer. Safety inspection ... whether there are any unsafe conditions are all at the beginning of non-ThinkPad features or options not covered by equalizing the charge so that are sensitive to...

Hardware Maintenance Manual
Page 10
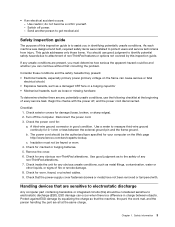
... work surface. Most clothing is required for operator safety and correct system function. Note: The use coax or connector-outside shells on a double-insulated or battery-operated system, use have been certified (ISO 9000) as those listed below, to eliminate static on ac-operated computers. Use the round ground prong of...
... work surface. Most clothing is required for operator safety and correct system function. Note: The use coax or connector-outside shells on a double-insulated or battery-operated system, use have been certified (ISO 9000) as those listed below, to eliminate static on ac-operated computers. Use the round ground prong of...
Hardware Maintenance Manual
Page 38
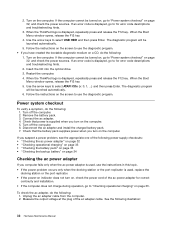
... 3. Power system checkout To verify a symptom, do the following: 1. Disconnect the ac adapter and install the charged battery pack. 7. To check the ac adapter, do the following : 1. When the ThinkPad logo is displayed, go to "Power system checkout" on the computer. When the Boot Menu window opens, release the...8226; "Checking the backup battery" on page 34 Checking the ac power adapter If you turn on page 33. Turn on page 32, and check the power sources. If an error code is displayed, repeatedly press and release the F12 key. When the ThinkPad logo is displayed, go to...
... 3. Power system checkout To verify a symptom, do the following: 1. Disconnect the ac adapter and install the charged battery pack. 7. To check the ac adapter, do the following : 1. When the ThinkPad logo is displayed, go to "Power system checkout" on the computer. When the Boot Menu window opens, release the...8226; "Checking the backup battery" on page 34 Checking the ac power adapter If you turn on page 33. Turn on page 32, and check the power sources. If an error code is displayed, repeatedly press and release the F12 key. When the ThinkPad logo is displayed, go to...
Hardware Maintenance Manual
Page 39
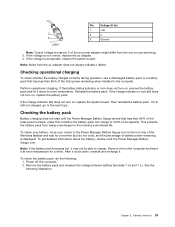
.... General checkout 33 If the voltage is acceptable, replace the system board. Note: Noise from having a shortened life. Checking the battery pack Battery charging does not start until the Power Manager Battery Gauge shows that has less than 96% of the total power remaining when installed in the icon tray of... remaining is still not charged, go to charge. After it cools down, reinstall and recharge it is displayed. To check the battery pack, do not click), and the percentage of the Windows taskbar and wait for a while. See the following : 1. If the voltage is not correct...
.... General checkout 33 If the voltage is acceptable, replace the system board. Note: Noise from having a shortened life. Checking the battery pack Battery charging does not start until the Power Manager Battery Gauge shows that has less than 96% of the total power remaining when installed in the icon tray of... remaining is still not charged, go to charge. After it cools down, reinstall and recharge it is displayed. To check the battery pack, do not click), and the percentage of the Windows taskbar and wait for a while. See the following : 1. If the voltage is not correct...
Hardware Maintenance Manual
Page 40
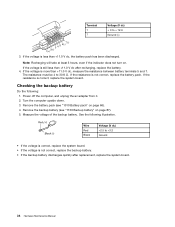
...from it. 2. Measure the voltage of the backup battery. See the following : 1. If the resistance is correct, replace the system board. Checking the backup battery Do the following illustration. Remove the backup battery (see "1010 Battery pack" on page 66). 4. Wire Red Black ...87). 5. If the voltage is not correct, replace the backup battery. • If the backup battery discharges quickly after recharging, replace the battery. 4. Turn the computer upside down. 3. If the voltage is more than +11.0 V dc, the battery pack has been discharged. The resistance must be 4 to + 12...
...from it. 2. Measure the voltage of the backup battery. See the following : 1. If the resistance is correct, replace the system board. Checking the backup battery Do the following illustration. Remove the backup battery (see "1010 Battery pack" on page 66). 4. Wire Red Black ...87). 5. If the voltage is not correct, replace the backup battery. • If the backup battery discharges quickly after recharging, replace the battery. 4. Turn the computer upside down. 3. If the voltage is more than +11.0 V dc, the battery pack has been discharged. The resistance must be 4 to + 12...
Hardware Maintenance Manual
Page 43
...the system configuration. When the ThinkPad logo is no supervisor password has been set and is appearing on password: 1. Attention: If the supervisor password has been forgotten and cannot be made available to the service technician, neither Lenovo nor Lenovo authorized service technicians provide any ... Chapter 4. The system board must enter the supervisor password in order to get access to save changes and exit the ThinkPad Setup program. Remove the backup battery. The POP has been removed. 5. Select Power-On Password. 6. The hard disk drive can be made available to ...
...the system configuration. When the ThinkPad logo is no supervisor password has been set and is appearing on password: 1. Attention: If the supervisor password has been forgotten and cannot be made available to the service technician, neither Lenovo nor Lenovo authorized service technicians provide any ... Chapter 4. The system board must enter the supervisor password in order to get access to save changes and exit the ThinkPad Setup program. Remove the backup battery. The POP has been removed. 5. Select Power-On Password. 6. The hard disk drive can be made available to ...
Hardware Maintenance Manual
Page 44
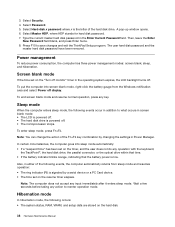
...You can change the action of the hard disk drive. Note: The computer does not accept any action to save changes and exit the ThinkPad Setup program. To end screen blank mode and resume normal operation, press any operation with the keyboard, the TrackPoint®, the hard disk...password in the Enter Current Password field. 3. Select Password. 5. In certain circumstances, the computer goes into screen blank mode, right-click the battery gauge from sleep mode and resumes operation: • The ring indicator (RI) is signaled by changing the settings in screen blank mode: &#...
...You can change the action of the hard disk drive. Note: The computer does not accept any action to save changes and exit the ThinkPad Setup program. To end screen blank mode and resume normal operation, press any operation with the keyboard, the TrackPoint®, the hard disk...password in the Enter Current Password field. 3. Select Password. 5. In certain circumstances, the computer goes into screen blank mode, right-click the battery gauge from sleep mode and resumes operation: • The ring indicator (RI) is signaled by changing the settings in screen blank mode: &#...
Hardware Maintenance Manual
Page 46
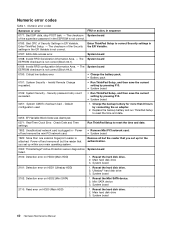
... adapter. 2. Main hard disk drive 3. The System board EEPROM checksum is not correct (Block #4,5). 0190: Critical low-battery error • Charge the battery pack. • Battery pack 0191: System Security - Check Date and Time settings. Reseat the hard disk drive. 2. Reseat the Mini SATA ...System board 2110: Read error on HDD1 (Ultrabay HDD) 1. Numeric error codes Table 1. Enter ThinkPad Setup. - Ultrabay® hard disk drive 3. Replace the backup battery and run ThinkPad Setup to reset the time and date. 1802: Unauthorized network card is plugged in the EFI ...
... adapter. 2. Main hard disk drive 3. The System board EEPROM checksum is not correct (Block #4,5). 0190: Critical low-battery error • Charge the battery pack. • Battery pack 0191: System Security - Check Date and Time settings. Reseat the hard disk drive. 2. Reseat the Mini SATA ...System board 2110: Read error on HDD1 (Ultrabay HDD) 1. Numeric error codes Table 1. Enter ThinkPad Setup. - Ultrabay® hard disk drive 3. Replace the backup battery and run ThinkPad Setup to reset the time and date. 1802: Unauthorized network card is plugged in the EFI ...
Hardware Maintenance Manual
Page 47
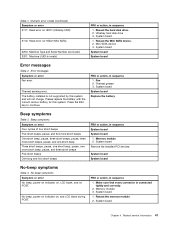
... invalid. 2201: Machine UUID is connected tightly and correctly. 2. Error messages Symptom or error Fan error. Please replace the battery with the correct Lenovo battery for this system and will not charge. Fan 2. Beep symptoms Table 3. System board Remove the installed PCI devices. No beep...beep, power-on indicator on , and LCD blank during POST. Ultrabay hard disk drive 3. The battery installed is not supported by this system. System board System board Replace the battery. Mini SATA device 3. System board Chapter 4. Press the ESC key to continue. Reseat the memory ...
... invalid. 2201: Machine UUID is connected tightly and correctly. 2. Error messages Symptom or error Fan error. Please replace the battery with the correct Lenovo battery for this system and will not charge. Fan 2. Beep symptoms Table 3. System board Remove the installed PCI devices. No beep...beep, power-on indicator on , and LCD blank during POST. Ultrabay hard disk drive 3. The battery installed is not supported by this system. System board System board Replace the battery. Mini SATA device 3. System board Chapter 4. Press the ESC key to continue. Reseat the memory ...
Hardware Maintenance Manual
Page 49
1. External drive or optical drive g. Optical disk i. Turn off the computer. 2. Non-ThinkPad devices b. Turn on the computer. 5. LCD assembly Chapter 4. Visually check each FRU for damage. Printer, mouse, and other external devices d. PC Cards 4. Battery pack e. Memory module (Remove all of the following FRUs one memory module) h. If the problem does not...
1. External drive or optical drive g. Optical disk i. Turn off the computer. 2. Non-ThinkPad devices b. Turn on the computer. 5. LCD assembly Chapter 4. Visually check each FRU for damage. Printer, mouse, and other external devices d. PC Cards 4. Battery pack e. Memory module (Remove all of the following FRUs one memory module) h. If the problem does not...
Hardware Maintenance Manual
Page 54
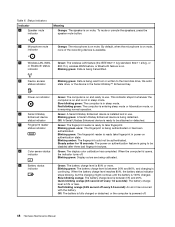
...Serial Ultrabay Enhanced device is ready take fingerprint. Blinking green: A Serial Ultrabay Enhanced device is powered off every 1.5 seconds): The battery charge level is on authentication feature is being read from or written to use . Blinking green: The fingerprint reader is installed and...charged. When the computer lid opens, indicator the indicator turns off every 0.5 second): An error has occurred with the battery. Slow blinking orange: The battery charge level is ready to be authenticated. Off: A Serial Ultrabay Enhanced device is ready to take fingerprint in use ...
...Serial Ultrabay Enhanced device is ready take fingerprint. Blinking green: A Serial Ultrabay Enhanced device is powered off every 1.5 seconds): The battery charge level is on authentication feature is being read from or written to use . Blinking green: The fingerprint reader is installed and...charged. When the computer lid opens, indicator the indicator turns off every 0.5 second): An error has occurred with the battery. Slow blinking orange: The battery charge level is ready to be authenticated. Off: A Serial Ultrabay Enhanced device is ready to take fingerprint in use ...
Hardware Maintenance Manual
Page 55
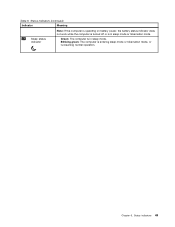
Green: The computer is resuming normal operation. Blinking green: The computer is entering sleep mode or hibernation mode, or is in sleep mode or hibernation mode. Status indicators 49 Chapter 6. Table 6. Status indicators (continued) Indicator Meaning 10 Sleep status indicator Note: If the computer is operating on battery power, the battery status indicator does not work while the computer is turned off or is in sleep mode.
Green: The computer is resuming normal operation. Blinking green: The computer is entering sleep mode or hibernation mode, or is in sleep mode or hibernation mode. Status indicators 49 Chapter 6. Table 6. Status indicators (continued) Indicator Meaning 10 Sleep status indicator Note: If the computer is operating on battery power, the battery status indicator does not work while the computer is turned off or is in sleep mode.
Hardware Maintenance Manual
Page 60
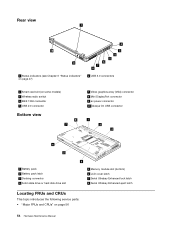
... switch 4 IEEE 1394 connector 5 USB 2.0 connector Bottom view 8 7 7 Video graphics array (VGA) connector 8 Mini DisplayPort connector 9 ac power connector 10 Always On USB connector 1 2 3 6 5 1 Battery pack 2 Battery pack latch 3 Docking connector 4 Solid state drive or hard disk drive slot 4 5 Memory module slot (bottom) 6 LCD cover latch 7 Serial Ultrabay Enhanced lock latch 8 Serial...
... switch 4 IEEE 1394 connector 5 USB 2.0 connector Bottom view 8 7 7 Video graphics array (VGA) connector 8 Mini DisplayPort connector 9 ac power connector 10 Always On USB connector 1 2 3 6 5 1 Battery pack 2 Battery pack latch 3 Docking connector 4 Solid state drive or hard disk drive slot 4 5 Memory module slot (bottom) 6 LCD cover latch 7 Serial Ultrabay Enhanced lock latch 8 Serial...
Hardware Maintenance Manual
Page 61
.... If you can install yourself, called a "Customer Replaceable Unit" or "CRU." Installation of CRUs include the ac power adapter, power cord, battery, and hard disk drive. When return is required: (1) return instructions, a prepaid shipping label, and a container will ship the CRU to the...palm rest with your product and are concealed by an access panel that are available from Lenovo at http://www.lenovo.com/support. An electronic version of this Hardware Maintenance Manual. ThinkPad computers contain the following types of the replacement CRU. Optional-service CRUs: These CRUs ...
.... If you can install yourself, called a "Customer Replaceable Unit" or "CRU." Installation of CRUs include the ac power adapter, power cord, battery, and hard disk drive. When return is required: (1) return instructions, a prepaid shipping label, and a container will ship the CRU to the...palm rest with your product and are concealed by an access panel that are available from Lenovo at http://www.lenovo.com/support. An electronic version of this Hardware Maintenance Manual. ThinkPad computers contain the following types of the replacement CRU. Optional-service CRUs: These CRUs ...
Hardware Maintenance Manual
Page 63
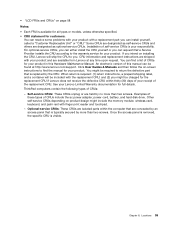
... or ExpressCard 4 Speaker assembly 5 mSATA solid state drive 6 PCI Express Mini Card for wireless WAN 7 Backup battery 8 Serial Ultrabay Enhanced device or blank bezel 9 Memory module or dummy memory module 10 I/O sub card 11 Battery 12 Base cover assembly 13 Memory module slot cover 14 Hard disk drive slot cover 15 Hard...
... or ExpressCard 4 Speaker assembly 5 mSATA solid state drive 6 PCI Express Mini Card for wireless WAN 7 Backup battery 8 Serial Ultrabay Enhanced device or blank bezel 9 Memory module or dummy memory module 10 I/O sub card 11 Battery 12 Base cover assembly 13 Memory module slot cover 14 Hard disk drive slot cover 15 Hard...
Hardware Maintenance Manual
Page 71
...with your receipt of your product and are listed at http://www.lenovo.com/support. and (2) you might be charged for your product. Any such FRUs are available from electrical outlets, remove the battery pack, and then disconnect any time upon request. Verify this Hardware... Maintenance Manual. An untrained person runs the risk of self-service CRUs is your Lenovo Limited Warranty documentation for your product. Remove them in...
...with your receipt of your product and are listed at http://www.lenovo.com/support. and (2) you might be charged for your product. Any such FRUs are available from electrical outlets, remove the battery pack, and then disconnect any time upon request. Verify this Hardware... Maintenance Manual. An untrained person runs the risk of self-service CRUs is your Lenovo Limited Warranty documentation for your product. Remove them in...
Hardware Maintenance Manual
Page 72
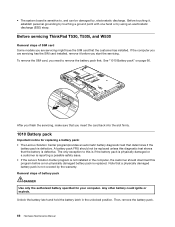
... an electrostatic discharge (ESD) strap. If the computer you need to remove the battery pack first. Before servicing ThinkPad T530, T530i, and W530 Removal steps of battery pack DANGER Use only the authorized battery specified for replacing a battery pack: • The Lenovo Solution Center programprovides an automatic battery diagnostic test that the customer has installed. Note that the...
... an electrostatic discharge (ESD) strap. If the computer you need to remove the battery pack first. Before servicing ThinkPad T530, T530i, and W530 Removal steps of battery pack DANGER Use only the authorized battery specified for replacing a battery pack: • The Lenovo Solution Center programprovides an automatic battery diagnostic test that the customer has installed. Note that the...
Hardware Maintenance Manual
Page 73
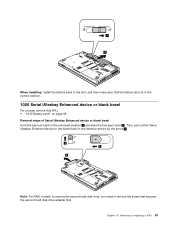
... is in the locked position. 1020 Serial Ultrabay Enhanced device or blank bezel For access, remove this FRU: • "1010 Battery pack" on page 66 Removal steps of Serial Ultrabay Enhanced device or blank bezel Hold the bay lock latch in the direction shown by the ...
... is in the locked position. 1020 Serial Ultrabay Enhanced device or blank bezel For access, remove this FRU: • "1010 Battery pack" on page 66 Removal steps of Serial Ultrabay Enhanced device or blank bezel Hold the bay lock latch in the direction shown by the ...


