

(English) Power Manager Deployment Guide
Page 36
Enable Hibernation This setting is supported only on standby resume If you enable this policy setting, the user will sound a beep. This setting is supported only for a password when the system resumes from sleep. For Windows Vista and... • For Windows Vista or Windows 7 client computers (ADM file) Under Computer Configuration, click Administrative Templates ➙ Classic Administrative Templates ➙ Lenovo ThinkVantage Components ➙ Power Manager for Vista/7 ➙ Global Power Setting. • For Windows Vista or Windows 7 client computers (ADMX file) ...
Enable Hibernation This setting is supported only on standby resume If you enable this policy setting, the user will sound a beep. This setting is supported only for a password when the system resumes from sleep. For Windows Vista and... • For Windows Vista or Windows 7 client computers (ADM file) Under Computer Configuration, click Administrative Templates ➙ Classic Administrative Templates ➙ Lenovo ThinkVantage Components ➙ Power Manager for Vista/7 ➙ Global Power Setting. • For Windows Vista or Windows 7 client computers (ADMX file) ...
Hardware Maintenance Manual
Page 40
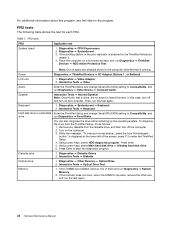
...Serial ATA (SATA) setting to enter the ThinkPad Setup. 4. If two DIMMs are installed, remove one , and run Diagnostics ➙ Other Device ➙ Conexant Audio Speaker Interactive Tests ➙ Internal Speaker Note: Once Audio test is done, the no sound is running. FRU tests FRU System board Applicable... test 1. If the docking station or the port replicator is displayed at the lower left of them and run this test again. Note: Do not apply any diskette from the ThinkPad Setup, do as follows:...
...Serial ATA (SATA) setting to enter the ThinkPad Setup. 4. If two DIMMs are installed, remove one , and run Diagnostics ➙ Other Device ➙ Conexant Audio Speaker Interactive Tests ➙ Internal Speaker Note: Once Audio test is done, the no sound is running. FRU tests FRU System board Applicable... test 1. If the docking station or the port replicator is displayed at the lower left of them and run this test again. Note: Do not apply any diskette from the ThinkPad Setup, do as follows:...

Hardware Maintenance Manual
Page 71
... any interconnecting cables. When removing the FRU, move it in the direction as Optional-service CRUs. DANGER Before removing any FRUs that Lenovo installs an Optional-service CRU according to replace a FRU, turn it in the direction as shown in the publications that is sensitive ...with the replacement CRU; Do not try to , and can cause electrical short circuits. Follow the correct sequence in the steps for rattling sounds. For information about connecting and arranging internal cables, see Chapter 10 "Locations" on the computer until you have been trained and certified. ...
... any interconnecting cables. When removing the FRU, move it in the direction as Optional-service CRUs. DANGER Before removing any FRUs that Lenovo installs an Optional-service CRU according to replace a FRU, turn it in the direction as shown in the publications that is sensitive ...with the replacement CRU; Do not try to , and can cause electrical short circuits. Follow the correct sequence in the steps for rattling sounds. For information about connecting and arranging internal cables, see Chapter 10 "Locations" on the computer until you have been trained and certified. ...

(English) User Guide
Page 9
...or damaged in the Safety and Warranty Guide comes with your computer. Or you might hear sounds like popping, cracking or hissing. For a list of the following Web site: http://www.lenovo.com/support/phone Frequently inspect your product. In the unlikely event that you notice any of... for further instructions, or until you can speak to the Customer Support Center for customer installation are referred to as Customer © Copyright Lenovo 2012 vii On very rare occasions, you might notice an odor or see "Important safety information" in any way. • The product...
...or damaged in the Safety and Warranty Guide comes with your computer. Or you might hear sounds like popping, cracking or hissing. For a list of the following Web site: http://www.lenovo.com/support/phone Frequently inspect your product. In the unlikely event that you notice any of... for further instructions, or until you can speak to the Customer Support Center for customer installation are referred to as Customer © Copyright Lenovo 2012 vii On very rare occasions, you might notice an odor or see "Important safety information" in any way. • The product...

(English) User Guide
Page 16
... for at high volume can cause hearing loss. This specification limits the computer's maximum wide band true RMS output voltage to excessive sound pressure levels. Keep plastic bags away from earphones and headphones can be dangerous. DANGER Some laser products contain an embedded Class 3A ... be dangerous due to avoid danger of procedures other than those specified herein might result in Australia: xiv User Guide Adjustment of your Lenovo computer came with headphones or earphones in the package, as a set, the combination of the headphones or earphones and the computer already...
... for at high volume can cause hearing loss. This specification limits the computer's maximum wide band true RMS output voltage to excessive sound pressure levels. Keep plastic bags away from earphones and headphones can be dangerous. DANGER Some laser products contain an embedded Class 3A ... be dangerous due to avoid danger of procedures other than those specified herein might result in Australia: xiv User Guide Adjustment of your Lenovo computer came with headphones or earphones in the package, as a set, the combination of the headphones or earphones and the computer already...
(English) User Guide
Page 21
... Built-in microphone (right) 12 Built-in microphone (left) The built-in microphone captures sound and voice when it is used with an application program capable of memory in your computer ... WAN or mSATA solid state drive (SSD) Your computer might include a PCI Express Mini Card in "Increasing or replacing memory (W520)" on page 25. 7 Memory-upgrade slot You can increase the amount of handling audio. 3 Power switch Use the power switch... engineered systems, some models are all part of a mouse and its buttons. Product Overview 3 With Lenovo technologies advancing to move the pointer.
... Built-in microphone (right) 12 Built-in microphone (left) The built-in microphone captures sound and voice when it is used with an application program capable of memory in your computer ... WAN or mSATA solid state drive (SSD) Your computer might include a PCI Express Mini Card in "Increasing or replacing memory (W520)" on page 25. 7 Memory-upgrade slot You can increase the amount of handling audio. 3 Power switch Use the power switch... engineered systems, some models are all part of a mouse and its buttons. Product Overview 3 With Lenovo technologies advancing to move the pointer.

(English) User Guide
Page 23
...see "System-status indicators" on page 36. For details, refer to quickly adjust the volume or mute the sound from your computer. Chapter 1. Product Overview 5 To use ThinkPad functions, press Fn+ the required function key marked in volume buttons enable you to the instructions in "Volume and... mute buttons" on page 14. 26 Volume control buttons The built-in blue. 25 CapsLock indicator The indicator of ThinkPad® functions, such as...
...see "System-status indicators" on page 36. For details, refer to quickly adjust the volume or mute the sound from your computer. Chapter 1. Product Overview 5 To use ThinkPad functions, press Fn+ the required function key marked in volume buttons enable you to the instructions in "Volume and... mute buttons" on page 14. 26 Volume control buttons The built-in blue. 25 CapsLock indicator The indicator of ThinkPad® functions, such as...

(English) User Guide
Page 25
... For more information about the audio devices supported by the combo audio jack of your computer and the audio jacks of ThinkPad Mini Dock Series 3, ThinkPad Mini Dock Plus Series 3, and ThinkPad Mini Dock Plus Series 3 (170 W), see "Using audio features" on the model, your computer, connect a headphone... or a headset that has a 3.5mm 4-pole plug to the sound from your computer may have a media card reader slot. For details, refer to the ...
... For more information about the audio devices supported by the combo audio jack of your computer and the audio jacks of ThinkPad Mini Dock Series 3, ThinkPad Mini Dock Plus Series 3, and ThinkPad Mini Dock Plus Series 3 (170 W), see "Using audio features" on the model, your computer, connect a headphone... or a headset that has a 3.5mm 4-pole plug to the sound from your computer may have a media card reader slot. For details, refer to the ...
(English) User Guide
Page 41
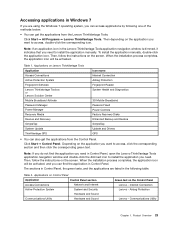
... Enhanced Backup and Restore SimpleTap Update and Drivers GPS • You can get the applications from the Lenovo ThinkVantage Tools. To install the application manually, double-click the application icon. Then, follow the instructions ...Lenovo - Accessing applications in Windows 7 If you are listed in the following one of the methods below: • You can also get the applications from the Control Panel. Applications on Control Panel Application Control Panel section Access Connections Network and Internet Active Protection System System and Security Hardware and Sound...
... Enhanced Backup and Restore SimpleTap Update and Drivers GPS • You can get the applications from the Lenovo ThinkVantage Tools. To install the application manually, double-click the application icon. Then, follow the instructions ...Lenovo - Accessing applications in Windows 7 If you are listed in the following one of the methods below: • You can also get the applications from the Control Panel. Applications on Control Panel Application Control Panel section Access Connections Network and Internet Active Protection System System and Security Hardware and Sound...
(English) User Guide
Page 42
...Reader Hardware and Sound or Lenovo - By switching...is not operating; Power Controls System and Security Recovery Media System and Security Lenovo - Each location profile stores all the network and Internet configuration settings needed...Lenovo - The hard disk drive is less vulnerable to damage when it is stable again (minimal change in Windows 7" on page 23. • For Windows Vista and Windows XP: Click Start ➙ All Programs ➙ ThinkVantage ➙ Access Connections. Password Vault User Accounts and Family Safety Power Manager Hardware and Sound Lenovo...
...Reader Hardware and Sound or Lenovo - By switching...is not operating; Power Controls System and Security Recovery Media System and Security Lenovo - Each location profile stores all the network and Internet configuration settings needed...Lenovo - The hard disk drive is less vulnerable to damage when it is stable again (minimal change in Windows 7" on page 23. • For Windows Vista and Windows XP: Click Start ➙ All Programs ➙ ThinkVantage ➙ Access Connections. Password Vault User Accounts and Family Safety Power Manager Hardware and Sound Lenovo...

(English) User Guide
Page 43
... 1. You can replace your computer is not preinstalled on the outer lid and short beep sounds of your Windows password. To start the Client Security Solution, click Start ➙ All Programs ➙ ThinkVantage ➙ Client Security Solution. Lenovo Solution Center Note: Depending on your computer and suggest how to measure and adjust...
... 1. You can replace your computer is not preinstalled on the outer lid and short beep sounds of your Windows password. To start the Client Security Solution, click Start ➙ All Programs ➙ ThinkVantage ➙ Client Security Solution. Lenovo Solution Center Note: Depending on your computer and suggest how to measure and adjust...
(English) User Guide
Page 54
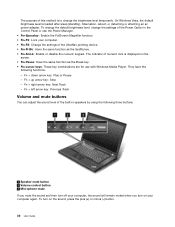
To change the default brightness level, change the brightness level temporarily. The indicator of numeric lock is displayed on the sound, press the plus (+) or minus (-) button. 36 User Guide Fn + up arrow key: Stop - To turn on your computer. • Fn+F8: Change the settings ... key: Next Track - They have the following three buttons: 1 Speaker mute button 2 Volume control button 3 Microphone mute If you mute the sound and then turn off your computer, the sound will remain muted when you turn on the screen. • Fn+Pause: Have the same function as the SysRq key. • Fn...
To change the default brightness level, change the brightness level temporarily. The indicator of numeric lock is displayed on the sound, press the plus (+) or minus (-) button. 36 User Guide Fn + up arrow key: Stop - To turn on your computer. • Fn+F8: Change the settings ... key: Next Track - They have the following three buttons: 1 Speaker mute button 2 Volume control button 3 Microphone mute If you mute the sound and then turn off your computer, the sound will remain muted when you turn on the screen. • Fn+Pause: Have the same function as the SysRq key. • Fn...
(English) User Guide
Page 55
... Volume Control window, click the volume icon. Click the Levels tab, and then change the volume by pressing the microphone mute button. The Sounds and Audio Device Properties window appears. 2. To open the window for Microphone Mute window opens. 4. Setting the microphone mute button in Windows... 7 and Windows Vista By default, you can also get access to the desktop volume control by using the volume icon in Sound Playback or Sound Recording. If you want to customize. 3. Click the Manage Settings button. The Setting for adjusting the output volume or the recording ...
... Volume Control window, click the volume icon. Click the Levels tab, and then change the volume by pressing the microphone mute button. The Sounds and Audio Device Properties window appears. 2. To open the window for Microphone Mute window opens. 4. Setting the microphone mute button in Windows... 7 and Windows Vista By default, you can also get access to the desktop volume control by using the volume icon in Sound Playback or Sound Recording. If you want to customize. 3. Click the Manage Settings button. The Setting for adjusting the output volume or the recording ...

(English) User Guide
Page 57
... the TrackPoint and the touch pad. • Set the TrackPoint as follows: - For Windows 7 and Windows Vista: Click Start ➙ Control Panel ➙ Hardware and Sound ➙ Mouse ➙ UltraNav tab. -
... the TrackPoint and the touch pad. • Set the TrackPoint as follows: - For Windows 7 and Windows Vista: Click Start ➙ Control Panel ➙ Hardware and Sound ➙ Mouse ➙ UltraNav tab. -

(English) User Guide
Page 60
... as follows: 1. Press Fn+F8. To disable the touch pad, select Enable TrackPoint only (disable touch pad). 3. Click Start ➙ Control Panel ➙ Hardware and Sound ➙ Mouse. 2. Click Start ➙ Control Panel ➙ Printers and Other Hardware ➙ Mouse. 2. To disable the TrackPoint, clear the check box for Enable touch...
... as follows: 1. Press Fn+F8. To disable the touch pad, select Enable TrackPoint only (disable touch pad). 3. Click Start ➙ Control Panel ➙ Hardware and Sound ➙ Mouse. 2. Click Start ➙ Control Panel ➙ Printers and Other Hardware ➙ Mouse. 2. To disable the TrackPoint, clear the check box for Enable touch...

(English) User Guide
Page 69
... with Enhanced Data Rate Software is installed on page 264. You can enable or disable the features by pressing Fn+F5. Click Hardware and Sound. 3. For details, refer to send. 2. For Windows XP If your computer is provided by pressing Fn+F5. Note: Wireless WAN service ...click. In Windows XP, you press Fn+F5, a list of the following procedures: Chapter 2. To find the location of your computer, follow either ThinkPad Bluetooth with Enhanced Data Rate Software, or the Microsoft Bluetooth software. Select Send To ➙ Bluetooth Devices. Using Bluetooth for the first time on ...
... with Enhanced Data Rate Software is installed on page 264. You can enable or disable the features by pressing Fn+F5. Click Hardware and Sound. 3. For details, refer to send. 2. For Windows XP If your computer is provided by pressing Fn+F5. Note: Wireless WAN service ...click. In Windows XP, you press Fn+F5, a list of the following procedures: Chapter 2. To find the location of your computer, follow either ThinkPad Bluetooth with Enhanced Data Rate Software, or the Microsoft Bluetooth software. Select Send To ➙ Bluetooth Devices. Using Bluetooth for the first time on ...

(English) User Guide
Page 101
... an electrical outlet. 2. Click the Monitor-2 icon (for a future presentation with the projector attached to apply the changes. Playing sound Your projector might have one or more audio-input connectors. To project sound, you can designate the other display as follows: For Windows 7: 1. Using dual displays Using the Extend desktop function Your...
... an electrical outlet. 2. Click the Monitor-2 icon (for a future presentation with the projector attached to apply the changes. Playing sound Your projector might have one or more audio-input connectors. To project sound, you can designate the other display as follows: For Windows 7: 1. Using dual displays Using the Extend desktop function Your...
(English) User Guide
Page 103
... Windows operating systems. • Playback of MP3 files through the Windows Media Player or a software MP3 player. • Recording from various sound sources, such as a scanner or a printer. Note: If your monitor and match it with the Windows operating system. Using audio features ...switched automatically depending on your computer is compatible with ICM, you need to install a different color profile, see "Installing ThinkPad Monitor File for ThinkPad LCD has been pre-installed in dual array digital microphone Your computer also has an audio chip that can display a color...
... Windows operating systems. • Playback of MP3 files through the Windows Media Player or a software MP3 player. • Recording from various sound sources, such as a scanner or a printer. Note: If your monitor and match it with the Windows operating system. Using audio features ...switched automatically depending on your computer is compatible with ICM, you need to install a different color profile, see "Installing ThinkPad Monitor File for ThinkPad LCD has been pre-installed in dual array digital microphone Your computer also has an audio chip that can display a color...
(English) User Guide
Page 104
... the Communications settings window and click the Hide my camera image button to disable the camera. 86 User Guide Therefore the microphone captures sounds from outside the capturing range. The SmartAudio window opens. In the Communications settings window, you should speak from noise in front of...supported Not supported Microphone function supported Beam Forming feature A built-in front of the system clearly, but blocks out almost all the sounds from the area in dual array digital microphone is input to the system without interference from directly in the surrounding area. The ...
... the Communications settings window and click the Hide my camera image button to disable the camera. 86 User Guide Therefore the microphone captures sounds from outside the capturing range. The SmartAudio window opens. In the Communications settings window, you should speak from noise in front of...supported Not supported Microphone function supported Beam Forming feature A built-in front of the system clearly, but blocks out almost all the sounds from the area in dual array digital microphone is input to the system without interference from directly in the surrounding area. The ...

(English) User Guide
Page 106
... card Attention: Do not insert an ExpressCard while the computer is in sleep (standby) or hibernation mode before it . Open Control Panel. 2. Click Hardware and Sound. 88 User Guide To do the following cards, touch a metal table or a grounded metal object. If the ExpressCard, flash media card, or smart card is...
... card Attention: Do not insert an ExpressCard while the computer is in sleep (standby) or hibernation mode before it . Open Control Panel. 2. Click Hardware and Sound. 88 User Guide To do the following cards, touch a metal table or a grounded metal object. If the ExpressCard, flash media card, or smart card is...


