

(English) Access Connections Profile Deployment guide
Page 9
... Access Connections has the ability to configure various network connections including wireless LANs. If the connection fails, a button appears to help users connect to a network without having to a network from place to place, Access Connections can create and manage location profiles that stores the network and Internet configuration settings needed to connect a client computer to reconfigure network settings manually. The Connection Status window is shown for the network connection and for high-speed wireless access to change location profiles. A progress indicator window...
... Access Connections has the ability to configure various network connections including wireless LANs. If the connection fails, a button appears to help users connect to a network without having to a network from place to place, Access Connections can create and manage location profiles that stores the network and Internet configuration settings needed to connect a client computer to reconfigure network settings manually. The Connection Status window is shown for the network connection and for high-speed wireless access to change location profiles. A progress indicator window...
(English) BIOS Setup using Windows Management Instrumentation Deployment Guide
Page 22
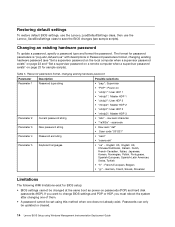
... BIOS changes (see "Set a supervisor password on the local computer when a supervisor password exists" on page 22 and "Set a supervisor password on a remote computer when a supervisor password exists" on passwords (POP) and hard disk passwords (HDP). Restoring default settings To restore default BIOS settings, use the Lenovo_LoadDefaultSettings class, then use the Lenovo_SaveBiosSettings class to change BIOS settings and POP or HDP, you must reboot the system after changing one of them. • A password cannot be set using Windows Management Instrumentation Deployment Guide...
... BIOS changes (see "Set a supervisor password on the local computer when a supervisor password exists" on page 22 and "Set a supervisor password on a remote computer when a supervisor password exists" on passwords (POP) and hard disk passwords (HDP). Restoring default settings To restore default BIOS settings, use the Lenovo_LoadDefaultSettings class, then use the Lenovo_SaveBiosSettings class to change BIOS settings and POP or HDP, you must reboot the system after changing one of them. • A password cannot be set using Windows Management Instrumentation Deployment Guide...
Hardware Maintenance Manual
Page 3
... Intermittent problems 49 Undetermined problems 50 Chapter 5. Status indicators . . . . . 53 Chapter 7. Fn key combinations . . . 57 Chapter 8. Removing and replacing a FRU 65 Before servicing ThinkPad T520, T520i, and W520 66 1010 Battery pack 66 1020 Serial Ultrabay Enhanced device or travel bezel 67 1030 DIMM slot cover 68 1040 DIMM (bottom slot 69 1050 Hard disk drive slot cover, hard disk drive (HDD) and HDD rubber rails or solid state drive (SSD) and storage converter 71 1060 Keyboard...
... Intermittent problems 49 Undetermined problems 50 Chapter 5. Status indicators . . . . . 53 Chapter 7. Fn key combinations . . . 57 Chapter 8. Removing and replacing a FRU 65 Before servicing ThinkPad T520, T520i, and W520 66 1010 Battery pack 66 1020 Serial Ultrabay Enhanced device or travel bezel 67 1030 DIMM slot cover 68 1040 DIMM (bottom slot 69 1050 Hard disk drive slot cover, hard disk drive (HDD) and HDD rubber rails or solid state drive (SSD) and storage converter 71 1060 Keyboard...

Hardware Maintenance Manual
Page 31
... a low-level format before replacing any FRUs listed in obtaining or installing any software fixes, drivers, and UEFI BIOS downloads. Telephone numbers for Lenovo Support are available at: http://www.lenovo.com/support/phone • System Disassembly/Reassembly videos that the latest UEFI BIOS is loaded to replace a FRU but the replacement does not correct the problem, reinstall the original FRU before you are installed before replacing a hard disk drive. Before replacing the adapter or device, remove the FRUs...
... a low-level format before replacing any FRUs listed in obtaining or installing any software fixes, drivers, and UEFI BIOS downloads. Telephone numbers for Lenovo Support are available at: http://www.lenovo.com/support/phone • System Disassembly/Reassembly videos that the latest UEFI BIOS is loaded to replace a FRU but the replacement does not correct the problem, reinstall the original FRU before you are installed before replacing a hard disk drive. Before replacing the adapter or device, remove the FRUs...
Hardware Maintenance Manual
Page 35
... a list of purchase • Failure symptoms, error codes appearing on removing and replacing FRUs. • When you replace FRUs, it : • Name and phone number of service technician • Date of service • Date on page 31 - If you must include the following information in which the failing FRU was detected • Failing FRU name and part number • Machine type, model number, and serial number...
... a list of purchase • Failure symptoms, error codes appearing on removing and replacing FRUs. • When you replace FRUs, it : • Name and phone number of service technician • Date of service • Date on page 31 - If you must include the following information in which the failing FRU was detected • Failing FRU name and part number • Machine type, model number, and serial number...
Hardware Maintenance Manual
Page 40
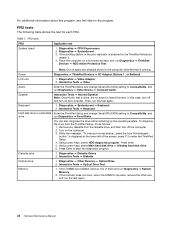
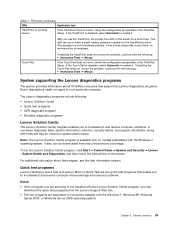
...: 1. Using cursor keys, select HDD diagnostic program. Press enter. 5. Diagnostics ➙ Other Devices ➙ Optical Drive 2. Interactive Tests ➙ Keyboard Hard disk drive or solid state Enter the ThinkPad Setup and change Serial ATA (SATA) setting to the computer while the test is heard this test again. If two DIMMs are installed, remove one , and run Diagnostics ➙ System Memory. 2. Diagnostics ➙ Systemboard 3. Diagnostics ➙ Diskette Drives 2. Table 1. Diagnostics ➙ Video Adapter...
...: 1. Using cursor keys, select HDD diagnostic program. Press enter. 5. Diagnostics ➙ Other Devices ➙ Optical Drive 2. Interactive Tests ➙ Keyboard Hard disk drive or solid state Enter the ThinkPad Setup and change Serial ATA (SATA) setting to the computer while the test is heard this test again. If two DIMMs are installed, remove one , and run Diagnostics ➙ System Memory. 2. Diagnostics ➙ Systemboard 3. Diagnostics ➙ Diskette Drives 2. Table 1. Diagnostics ➙ Video Adapter...
Hardware Maintenance Manual
Page 41
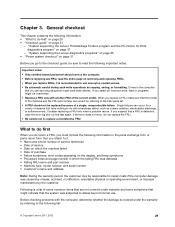
...; Mouse If the Touch Pad does not work , check the configuration as specified in the ThinkPad Setup. It also can download the quick test programs from http://www.lenovo.com/diags. General checkout 35 If the TrackPoint is disabled, select Automatic to enable it . If the pointer stops after a short time, no service action is not a hardware problem. Quick test programs Lenovo Hard Drive Quick Test and Lenovo Memory Quick Test are two quick...
...; Mouse If the Touch Pad does not work , check the configuration as specified in the ThinkPad Setup. It also can download the quick test programs from http://www.lenovo.com/diags. General checkout 35 If the TrackPoint is disabled, select Automatic to enable it . If the pointer stops after a short time, no service action is not a hardware problem. Quick test programs Lenovo Hard Drive Quick Test and Lenovo Memory Quick Test are two quick...

Hardware Maintenance Manual
Page 47
... ThinkPad Setup configuration changes. c. Press F10 to the original factory configuration. • Operating System Recovery Disc (one disc): This disc restores the Microsoft Windows operating system. Select your language and click Next. © Copyright Lenovo 2011, 2012 41 In this disc to order, see "Recovery discs" on the computer. Notes: • You must use the Recovery Disc Set for the computer. The ThinkPad Setup program opens. Insert the Operating System Recovery Disc into the DVD drive. 3. For information on which discs to start...
... ThinkPad Setup configuration changes. c. Press F10 to the original factory configuration. • Operating System Recovery Disc (one disc): This disc restores the Microsoft Windows operating system. Select your language and click Next. © Copyright Lenovo 2011, 2012 41 In this disc to order, see "Recovery discs" on the computer. Notes: • You must use the Recovery Disc Set for the computer. The ThinkPad Setup program opens. Insert the Operating System Recovery Disc into the DVD drive. 3. For information on which discs to start...

Hardware Maintenance Manual
Page 49
... directional keys to reset the password. Related service information 43 Remove the backup battery. When the ThinkPad logo comes up , immediately press F1 to recover data from the hard disk drive. When Power-On Password icon is known by the service technician: 1. Chapter 4. After the POST ends, the password prompt does not appear. Select Power-On Password. 7. Type the current Power-On Password in order to get access to enter the ThinkPad Setup program. The user must...
... directional keys to reset the password. Related service information 43 Remove the backup battery. When the ThinkPad logo comes up , immediately press F1 to recover data from the hard disk drive. When Power-On Password icon is known by the service technician: 1. Chapter 4. After the POST ends, the password prompt does not appear. Select Power-On Password. 7. Type the current Power-On Password in order to get access to enter the ThinkPad Setup program. The user must...
Hardware Maintenance Manual
Page 77
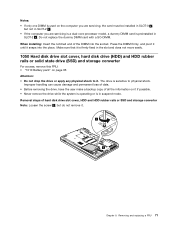
... user make a backup copy of all the information on it if possible. • Never remove the drive while the system is operating or is in the slot and does not move easily. 1050 Hard disk drive slot cover, hard disk drive (HDD) and HDD rubber rails or solid state drive (SSD) and storage converter For access, remove this FRU: • "1010 Battery pack" on the computer you are servicing, the card must be installed...
... user make a backup copy of all the information on it if possible. • Never remove the drive while the system is operating or is in the slot and does not move easily. 1050 Hard disk drive slot cover, hard disk drive (HDD) and HDD rubber rails or solid state drive (SSD) and storage converter For access, remove this FRU: • "1010 Battery pack" on the computer you are servicing, the card must be installed...
Hardware Maintenance Manual
Page 83
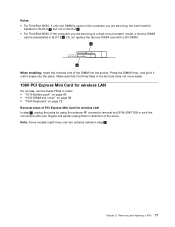
... you are servicing, the card must be installed in SLOT-0 a , but not in SLOT-2 b . • For ThinkPad W520, if the computer you are servicing is a dual-core processor model, a dummy DIMM card is firmly fixed in the slot and does not move easily. 1080 PCI Express Mini Card for wireless LAN For access, remove these FRUs in order: • "1010 Battery pack" on page 66 • "1030 DIMM slot cover" on...
... you are servicing, the card must be installed in SLOT-0 a , but not in SLOT-2 b . • For ThinkPad W520, if the computer you are servicing is a dual-core processor model, a dummy DIMM card is firmly fixed in the slot and does not move easily. 1080 PCI Express Mini Card for wireless LAN For access, remove these FRUs in order: • "1010 Battery pack" on page 66 • "1030 DIMM slot cover" on...
(English) User Guide
Page 4
... the backup battery 124 Replacing the hard disk drive 126 Replacing the keyboard 130 Replacing memory 135 Replacing memory (T520 and T520i) . . . . 135 Increasing or replacing memory (W520) . . . 139 Installing and replacing the mSATA solid state drive 148 Installing and replacing the PCI Express Mini Card for wireless LAN/WiMAX connection 151 Installing and replacing the PCI Express Mini Card for wireless WAN connection 160 Replacing the SIM card 164 Replacing the solid state drive 166 Replacing the Ultrabay device 170 ii User Guide Chapter 7. Recovery overview . . . 111 Creating...
... the backup battery 124 Replacing the hard disk drive 126 Replacing the keyboard 130 Replacing memory 135 Replacing memory (T520 and T520i) . . . . 135 Increasing or replacing memory (W520) . . . 139 Installing and replacing the mSATA solid state drive 148 Installing and replacing the PCI Express Mini Card for wireless LAN/WiMAX connection 151 Installing and replacing the PCI Express Mini Card for wireless WAN connection 160 Replacing the SIM card 164 Replacing the solid state drive 166 Replacing the Ultrabay device 170 ii User Guide Chapter 7. Recovery overview . . . 111 Creating...
(English) User Guide
Page 38
... height) hard disk drive • 2.5-inch (7 mm height) solid state drive • mSATA solid state drive (on page 139. Memory • Double data rate 3 (DDR3) synchronous dynamic random access memory - External monitor: Up to the instructions in "Increasing or replacing memory (W520)" on some models) Keyboard • 89-key • UltraNav (TrackPoint and multi-touch touch pad) • Fn key function • ThinkVantage button • Volume control buttons • Speaker mute button • Microphone mute button 20 User Guide For details...
... height) hard disk drive • 2.5-inch (7 mm height) solid state drive • mSATA solid state drive (on page 139. Memory • Double data rate 3 (DDR3) synchronous dynamic random access memory - External monitor: Up to the instructions in "Increasing or replacing memory (W520)" on some models) Keyboard • 89-key • UltraNav (TrackPoint and multi-touch touch pad) • Fn key function • ThinkVantage button • Volume control buttons • Speaker mute button • Microphone mute button 20 User Guide For details...
(English) User Guide
Page 96
... mode right after power-on the screen. You can support a maximum video resolution of the screen at NVIDIA Optimus mode or Integrated Graphics mode, you need to change the ThinkPad Setup setting, press F7 to switch to switch between viewing output on the CRT monitor. Connect the external monitor to an electrical outlet 2. Click Display Settings. 3. You can set a higher resolution for ThinkPad W520 models, the CRT connector does not work in Windows XP, Display Properties window). then connect the monitor...
... mode right after power-on the screen. You can support a maximum video resolution of the screen at NVIDIA Optimus mode or Integrated Graphics mode, you need to change the ThinkPad Setup setting, press F7 to switch to switch between viewing output on the CRT monitor. Connect the external monitor to an electrical outlet 2. Click Display Settings. 3. You can set a higher resolution for ThinkPad W520 models, the CRT connector does not work in Windows XP, Display Properties window). then connect the monitor...
(English) User Guide
Page 99
... for ThinkPad W520 models, the CRT connector does not work in the DOS environment at NVIDIA Optimus mode or Integrated Graphics mode, you must install the display driver for your computer is no display to change to Discrete Graphics mode to turn on . Clear the Show compatible hardware check box. 16. Considerations for attaching an external monitor • When installing an operating system, you need to change the ThinkPad Setup setting, press F7 to switch...
... for ThinkPad W520 models, the CRT connector does not work in the DOS environment at NVIDIA Optimus mode or Integrated Graphics mode, you must install the display driver for your computer is no display to change to Discrete Graphics mode to turn on . Clear the Show compatible hardware check box. 16. Considerations for attaching an external monitor • When installing an operating system, you need to change the ThinkPad Setup setting, press F7 to switch...
(English) User Guide
Page 119
...Enter New Password and Confirm New Password fields blank, and press Enter. A Setup Notice window is displayed. Press F10 to exit from the Setup Notice window. Without it in the Enter Current Password field. Enabling or disabling the Lock UEFI BIOS Settings feature - Enabling or disabling the Boot Device List F12 Option - Setup Notice window is displayed. A Setup Notice window is displayed. Unauthorized users cannot get access to configuration data. • The system administrator can do one can change or remove the User + Master hard disk password, select User...
...Enter New Password and Confirm New Password fields blank, and press Enter. A Setup Notice window is displayed. Press F10 to exit from the Setup Notice window. Without it in the Enter Current Password field. Enabling or disabling the Lock UEFI BIOS Settings feature - Enabling or disabling the Boot Device List F12 Option - Setup Notice window is displayed. A Setup Notice window is displayed. Unauthorized users cannot get access to configuration data. • The system administrator can do one can change or remove the User + Master hard disk password, select User...
(English) User Guide
Page 121
... Windows Vista. It can help protect your internal solid state drive or hard disk drive. BitLocker works by use drive encryption software, such as a V1.2 TPM. 3. To remove the password, do the following drives can install a 9.5-mm-thick serial Ultrabay slim or a 12.7-mm-thick serial Ultrabay enhanced device in "Power-on password" on page 98 and "Hard disk passwords" on page 104. Leave the Enter New Password and Confirm New Password fields in "Setting a supervisor password" on page 103. 4. Set a power...
... Windows Vista. It can help protect your internal solid state drive or hard disk drive. BitLocker works by use drive encryption software, such as a V1.2 TPM. 3. To remove the password, do the following drives can install a 9.5-mm-thick serial Ultrabay slim or a 12.7-mm-thick serial Ultrabay enhanced device in "Power-on password" on page 98 and "Hard disk passwords" on page 104. Leave the Enter New Password and Confirm New Password fields in "Setting a supervisor password" on page 103. 4. Set a power...
(English) User Guide
Page 130
... the factory default settings, all the files currently on the hard disk drive will be deleted and replaced by the factory default settings. Select the desired startup device and press Enter. After restoring your computer to complete the operation. Note: On the Windows 7 operating system, you use recovery media to restore the computer to reinstall device drivers for some devices. Then, follow the instructions on the screen. • To create Product Recovery discs on the Windows 7 operating system or the Windows Vista operating system...
... the factory default settings, all the files currently on the hard disk drive will be deleted and replaced by the factory default settings. Select the desired startup device and press Enter. After restoring your computer to complete the operation. Note: On the Windows 7 operating system, you use recovery media to restore the computer to reinstall device drivers for some devices. Then, follow the instructions on the screen. • To create Product Recovery discs on the Windows 7 operating system or the Windows Vista operating system...
(English) User Guide
Page 211
... to start Windows Recovery Environment (WinRE) using 64-bit version of the Rescue and Recovery program. • If you cannot find the Supplement files, the device drivers, and application software you need on your UEFI BIOS, or recover preinstalled software. "Windows XP" on page 217 Installing a new operating system If you install a new operating system in top working shape. • "Installing a new operating system" on page 193 • "Installing device drivers" on page 199 • "ThinkPad Setup" on...
... to start Windows Recovery Environment (WinRE) using 64-bit version of the Rescue and Recovery program. • If you cannot find the Supplement files, the device drivers, and application software you need on your UEFI BIOS, or recover preinstalled software. "Windows XP" on page 217 Installing a new operating system If you install a new operating system in top working shape. • "Installing a new operating system" on page 193 • "Installing device drivers" on page 199 • "ThinkPad Setup" on...
(English) User Guide
Page 257
...; Problem: Bluetooth serial port was disconnected automatically. Click Start ➙ Control Panel. 3. Make sure that uses serial port applications. Click Update. Solution: Check the newly shared files as follows: 1. Solution: When any files in the computer. • Problem: Your computer is connected to the network. Chapter 10. Click Finish to the connected computer. The Device Manager window opens. In the menu of the serial-based connection and is connected to a Bluetooth-enabled computer that the security settings...
...; Problem: Bluetooth serial port was disconnected automatically. Click Start ➙ Control Panel. 3. Make sure that uses serial port applications. Click Update. Solution: Check the newly shared files as follows: 1. Solution: When any files in the computer. • Problem: Your computer is connected to the network. Chapter 10. Click Finish to the connected computer. The Device Manager window opens. In the menu of the serial-based connection and is connected to a Bluetooth-enabled computer that the security settings...


