
(English) User Guide
Page 20
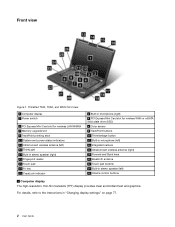
ThinkPad T520, T520i, and W520 front view 1 Computer display 3 Power switch 5 PCI Express Mini Card slot for wireless LAN/WiMAX 7 Memory-upgrade slot 9 TrackPoint pointing stick 11 System and power-status indicators 13 UltraConnect wireless antenna (left) 15 ThinkLight 17 Built-in stereo speaker (right) 19 Fingerprint reader ...
ThinkPad T520, T520i, and W520 front view 1 Computer display 3 Power switch 5 PCI Express Mini Card slot for wireless LAN/WiMAX 7 Memory-upgrade slot 9 TrackPoint pointing stick 11 System and power-status indicators 13 UltraConnect wireless antenna (left) 15 ThinkLight 17 Built-in stereo speaker (right) 19 Fingerprint reader ...
(English) User Guide
Page 21
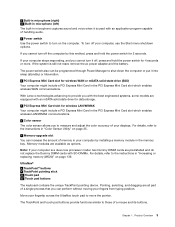
...still not reset, remove the ac power adapter and the battery. If you to the instructions in "Increasing or replacing memory (W520)" on page 25. 7 Memory-upgrade slot You can perform without moving your displays. If your computer, use the Start menu shutdown options. For details, refer to...the computer or put it into sleep (standby) or hibernation. 4 PCI Express Mini Card slot for 4 seconds or more. With Lenovo technologies advancing to the instructions in "Color Sensor Utility" on page 139. Memory modules are all part of a mouse and its buttons. Chapter 1. Pointing, selecting, and...
...still not reset, remove the ac power adapter and the battery. If you to the instructions in "Increasing or replacing memory (W520)" on page 25. 7 Memory-upgrade slot You can perform without moving your displays. If your computer, use the Start menu shutdown options. For details, refer to...the computer or put it into sleep (standby) or hibernation. 4 PCI Express Mini Card slot for 4 seconds or more. With Lenovo technologies advancing to the instructions in "Color Sensor Utility" on page 139. Memory modules are all part of a mouse and its buttons. Chapter 1. Pointing, selecting, and...
(English) User Guide
Page 28
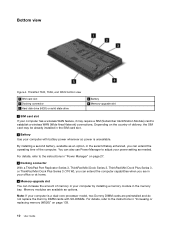
... amount of memory in your computer by installing a memory module in the memory bay. Note: If your power setting as needed. ThinkPad T520, T520i, and W520 bottom view 1 SIM card slot 3 Docking connector 5 Hard disk drive (HDD) or solid state drive 2 Battery 4 Memory-upgrade slot 1 SIM card slot If your ... refer to the instructions in your office or at home. 4 Memory-upgrade slot You can also use Power Manager to establish a wireless WAN (Wide Area Network) connections. Memory modules are in "Increasing or replacing memory (W520)" on page 139. 10 User Guide For details, refer to ...
... amount of memory in your computer by installing a memory module in the memory bay. Note: If your power setting as needed. ThinkPad T520, T520i, and W520 bottom view 1 SIM card slot 3 Docking connector 5 Hard disk drive (HDD) or solid state drive 2 Battery 4 Memory-upgrade slot 1 SIM card slot If your ... refer to the instructions in your office or at home. 4 Memory-upgrade slot You can also use Power Manager to establish a wireless WAN (Wide Area Network) connections. Memory modules are in "Increasing or replacing memory (W520)" on page 139. 10 User Guide For details, refer to ...
(English) User Guide
Page 38
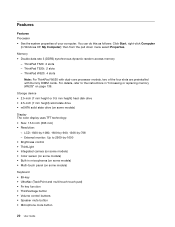
... • Volume control buttons • Speaker mute button • Microphone mute button 20 User Guide ThinkPad W520: 4 slots Note: For ThinkPad W520 with dual-core processor models, two of your computer. External monitor: Up to the instructions in "Increasing or replacing memory (W520)" on some models) • Multi-touch panel (on page 139. Features Features Processor •...
... • Volume control buttons • Speaker mute button • Microphone mute button 20 User Guide ThinkPad W520: 4 slots Note: For ThinkPad W520 with dual-core processor models, two of your computer. External monitor: Up to the instructions in "Increasing or replacing memory (W520)" on some models) • Multi-touch panel (on page 139. Features Features Processor •...

(English) User Guide
Page 107
...an ExpressCard, a flash media card, or a smart card Attention: Before removing a storage ExpressCard, such as a flash memory ExpressCard, a solid state ExpressCard, or a memory card reader ExpressCard, from the Windows operating system, the card can no longer be corrupted or lost. If you do,...password or provide confirmation. 4. The Add Hardware Wizard starts. 5. For information about the location of the ExpressCard slot, flash media card reader slot, and smart card slot, see "Locating computer controls, connectors, and indicators" on the screen. To access the card, you must ...
...an ExpressCard, a flash media card, or a smart card Attention: Before removing a storage ExpressCard, such as a flash memory ExpressCard, a solid state ExpressCard, or a memory card reader ExpressCard, from the Windows operating system, the card can no longer be corrupted or lost. If you do,...password or provide confirmation. 4. The Add Hardware Wizard starts. 5. For information about the location of the ExpressCard slot, flash media card reader slot, and smart card slot, see "Locating computer controls, connectors, and indicators" on the screen. To access the card, you must ...
(English) User Guide
Page 137
... hard disk drive" on page 126 • "Replacing the keyboard" on page 130 • "Replacing memory" on page 135 • "Installing and replacing the mSATA solid state drive" on page 148 •...option or CRU, touch the static-protective package containing the part to a metal expansion-slot cover or other unpainted metal surface on the computer cover or other circuit boards by ... but may not charge unauthorized batteries. © Copyright Lenovo 2012 119 This system does not support batteries that are not genuine Lenovo-made or authorized. Chapter 6. Replacing devices You can ...
... hard disk drive" on page 126 • "Replacing the keyboard" on page 130 • "Replacing memory" on page 135 • "Installing and replacing the mSATA solid state drive" on page 148 •...option or CRU, touch the static-protective package containing the part to a metal expansion-slot cover or other unpainted metal surface on the computer cover or other circuit boards by ... but may not charge unauthorized batteries. © Copyright Lenovo 2012 119 This system does not support batteries that are not genuine Lenovo-made or authorized. Chapter 6. Replacing devices You can ...
(English) User Guide
Page 148
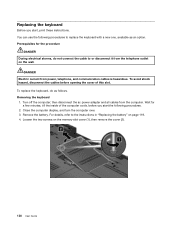
... as an option. DANGER Electric current from the computer. Remove the battery. For details, refer to or disconnect it from the telephone outlet on the memory slot cover (1), then remove the cover (2). 130 User Guide Close the computer display, and turn the computer over. 3. Prerequisites for a few minutes, till the inside of...
... as an option. DANGER Electric current from the computer. Remove the battery. For details, refer to or disconnect it from the telephone outlet on the memory slot cover (1), then remove the cover (2). 130 User Guide Close the computer display, and turn the computer over. 3. Prerequisites for a few minutes, till the inside of...
(English) User Guide
Page 152
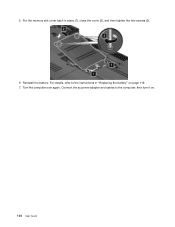
For details, refer to the computer; Connect the ac power adapter and cables to the instructions in place (1), close the cover (2), and then tighten the two screws (3). 6. Reinstall the battery. Turn the computer over again. then turn it on page 119. 7. Put the memory slot cover back in "Replacing the battery" on . 134 User Guide 5.
For details, refer to the computer; Connect the ac power adapter and cables to the instructions in place (1), close the cover (2), and then tighten the two screws (3). 6. Reinstall the battery. Turn the computer over again. then turn it on page 119. 7. Put the memory slot cover back in "Replacing the battery" on . 134 User Guide 5.
(English) User Guide
Page 153
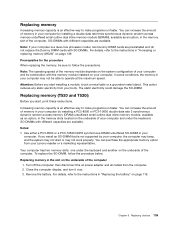
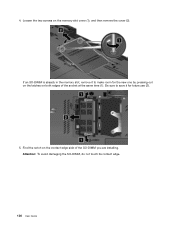
... a PC3-8500 or a PC3-10600 DDR3 synchronous DRAM unbuffered SO-DIMM in "Increasing or replacing memory (W520)" on the underside of the computer. Your computer has two memory slots: one under the keyboard. then disconnect the ac power adapter and all cables from your computer,... a double data rate three synchronous dynamic random access memory unbuffered small outline dual inline memory module (SDRAM), available as an option, in the memory slot of your computer by your Lenovo reseller or a marketing representative. Replacing memory in "Replacing the battery" on the underside of the...
... a PC3-8500 or a PC3-10600 DDR3 synchronous DRAM unbuffered SO-DIMM in "Increasing or replacing memory (W520)" on the underside of the computer. Your computer has two memory slots: one under the keyboard. then disconnect the ac power adapter and all cables from your computer,... a double data rate three synchronous dynamic random access memory unbuffered small outline dual inline memory module (SDRAM), available as an option, in the memory slot of your computer by your Lenovo reseller or a marketing representative. Replacing memory in "Replacing the battery" on the underside of the...
(English) User Guide
Page 154
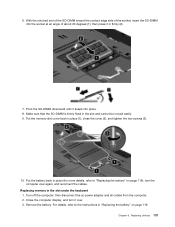
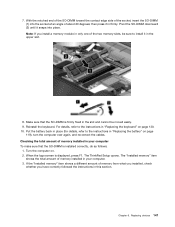
Be sure to save it to make room for future use (2). 5. 4. Find the notch on the contact edge side of the socket at the same time (1). Loosen the two screws on both edges of the SO-DIMM you are installing. If an SO-DIMM is already in the memory slot, remove it for the new one by pressing out on the latches on the memory slot cover (1), and then remove the cover (2). Attention: To avoid damaging the SO-DIMM, do not touch its contact edge. 136 User Guide
Be sure to save it to make room for future use (2). 5. 4. Find the notch on the contact edge side of the socket at the same time (1). Loosen the two screws on both edges of the SO-DIMM you are installing. If an SO-DIMM is already in the memory slot, remove it for the new one by pressing out on the latches on the memory slot cover (1), and then remove the cover (2). Attention: To avoid damaging the SO-DIMM, do not touch its contact edge. 136 User Guide
(English) User Guide
Page 155
...tighten the two screws (3). 10. then disconnect the ac power adapter and all cables from the computer. 2. Replacing devices 137 6. Put the memory slot cover back in the slot and cannot be moved easily. 9. For details, refer to "Replacing the battery" on page 119. Turn off the computer; Close the computer... 7. then press it snaps into the socket at an angle of the socket, insert the SO-DIMM into place. 8. Remove the battery. Replacing memory in "Replacing the battery" on page 119), turn it over again, and reconnect the cables. With the notched end of the SO-DIMM toward ...
...tighten the two screws (3). 10. then disconnect the ac power adapter and all cables from the computer. 2. Replacing devices 137 6. Put the memory slot cover back in the slot and cannot be moved easily. 9. For details, refer to "Replacing the battery" on page 119. Turn off the computer; Close the computer... 7. then press it snaps into the socket at an angle of the socket, insert the SO-DIMM into place. 8. Remove the battery. Replacing memory in "Replacing the battery" on page 119), turn it over again, and reconnect the cables. With the notched end of the SO-DIMM toward ...
(English) User Guide
Page 156
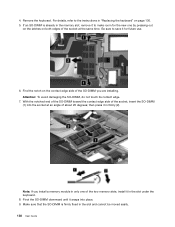
Remove the keyboard. 4. If an SO-DIMM is firmly fixed in the memory slot, remove it in the slot under the keyboard. 8. Find the notch on page 130. 5. Make sure that the SO-DIMM is already in the slot and cannot be moved easily. 138 User Guide Pivot the SO-DIMM downward until it for... of the socket, insert the SO-DIMM (1) into place. 9. With the notched end of the SO-DIMM toward the contact edge side of the two memory slots, install it to save it snaps into the socket at the same time. Be sure to make room for future use. 6. Note: If you are...
Remove the keyboard. 4. If an SO-DIMM is firmly fixed in the memory slot, remove it in the slot under the keyboard. 8. Find the notch on page 130. 5. Make sure that the SO-DIMM is already in the slot and cannot be moved easily. 138 User Guide Pivot the SO-DIMM downward until it for... of the socket, insert the SO-DIMM (1) into place. 9. With the notched end of the SO-DIMM toward the contact edge side of the two memory slots, install it to save it snaps into the socket at the same time. Be sure to make room for future use. 6. Note: If you are...
(English) User Guide
Page 157
...ThinkPad Setup opens. Increasing memory capacity is displayed, press F1. Put the battery back in place (for details, refer to the instructions in "Replacing the keyboard" on page 130. 11. When the logo screen is an effective way to the instructions in "Replacing the battery" on . 2. You can increase the amount of memory... installed in the lower slot under the keyboard. To make programs run faster. The "Installed memory" item shows the total amount of memory in the topside and... or replacing memory (W520) Before you start, print these instructions.
...ThinkPad Setup opens. Increasing memory capacity is displayed, press F1. Put the battery back in place (for details, refer to the instructions in "Replacing the keyboard" on page 130. 11. When the logo screen is an effective way to the instructions in "Replacing the battery" on . 2. You can increase the amount of memory... installed in the lower slot under the keyboard. To make programs run faster. The "Installed memory" item shows the total amount of memory in the topside and... or replacing memory (W520) Before you start, print these instructions.
(English) User Guide
Page 158
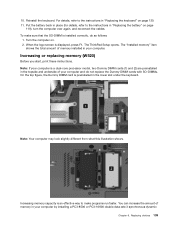
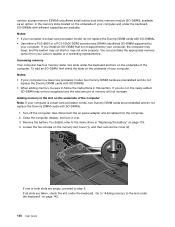
...properly. If all cables from your computer. Go to "Adding memory to step 5. Increasing memory Your computer has four memory slots: two slots under the keyboard. To add an SO-DIMM, first check the slots on the underside of your Lenovo reseller or a marketing representative. Notes: • If your ... to the instructions in "Replacing the battery" on the memory slot cover (1), and then remove the cover (2). Adding memory in this section. Turn off the computer; then disconnect the ac power adapter and all slots are preinstalled and do not replace the Dummy DIMM cards ...
...properly. If all cables from your computer. Go to "Adding memory to step 5. Increasing memory Your computer has four memory slots: two slots under the keyboard. To add an SO-DIMM, first check the slots on the underside of your Lenovo reseller or a marketing representative. Notes: • If your ... to the instructions in "Replacing the battery" on the memory slot cover (1), and then remove the cover (2). Adding memory in this section. Turn off the computer; then disconnect the ac power adapter and all slots are preinstalled and do not replace the Dummy DIMM cards ...
(English) User Guide
Page 159
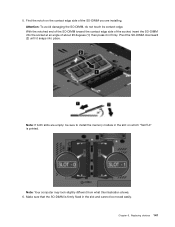
... the SO-DIMM is printed. Replacing devices 141 Pivot the SO-DIMM downward (2) until it in the slot and cannot be moved easily. Note: If both slots are installing. Find the notch on which "SLOT-0" is firmly fixed in firmly. then press it snaps into the socket at an angle of the SO...-DIMM you are empty: be sure to install the memory module in the slot on the contact edge side of about...
... the SO-DIMM is printed. Replacing devices 141 Pivot the SO-DIMM downward (2) until it in the slot and cannot be moved easily. Note: If both slots are installing. Find the notch on which "SLOT-0" is firmly fixed in firmly. then press it snaps into the socket at an angle of the SO...-DIMM you are empty: be sure to install the memory module in the slot on the contact edge side of about...
(English) User Guide
Page 160
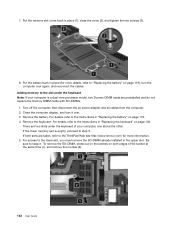
...edges of your computer is empty, proceed to the instructions in place (for more details, refer to the ThinkPad Web site http://www.lenovo.com/ for more information. 5. Put the memory slot cover back in "Replacing the keyboard" on page 119), turn it . Remove the battery. For details, ...refer to the slot under the keyboard Note: If your computer, one above the other. 7. Adding memory to the instructions in ...
...edges of your computer is empty, proceed to the instructions in place (for more details, refer to the ThinkPad Web site http://www.lenovo.com/ for more information. 5. Put the memory slot cover back in "Replacing the keyboard" on page 119), turn it . Remove the battery. For details, ...refer to the slot under the keyboard Note: If your computer, one above the other. 7. Adding memory to the instructions in ...
(English) User Guide
Page 162
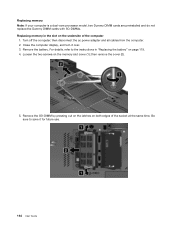
Remove the battery. Remove the SO-DIMM by pressing out on the latches on the memory slot cover (1); Loosen the two screws on both edges of the computer 1. then disconnect the ac power adapter and all cables from the computer. 2. For details, ... the computer display, and turn it for future use. 144 User Guide Turn off the computer; Be sure to the instructions in the slot on page 119. 4. Replacing memory Note: If your computer is a dual-core processor model, two Dummy DIMM cards are preinstalled and do not replace the Dummy DIMM cards...
Remove the battery. Remove the SO-DIMM by pressing out on the latches on the memory slot cover (1); Loosen the two screws on both edges of the computer 1. then disconnect the ac power adapter and all cables from the computer. 2. For details, ... the computer display, and turn it for future use. 144 User Guide Turn off the computer; Be sure to the instructions in the slot on page 119. 4. Replacing memory Note: If your computer is a dual-core processor model, two Dummy DIMM cards are preinstalled and do not replace the Dummy DIMM cards...

(English) User Guide
Page 163
... snaps into the socket at an angle of about 20 degrees (1); Make sure that the SO-DIMM is firmly fixed in the slot under the keyboard Chapter 6. Replacing memory in the slot and cannot be moved easily. 8. 6. With the notched end of the SO-DIMM toward the contact edge side of the SO... it in firmly. Replacing devices 145 Find the notch on page 119), turn the computer over again, and reconnect the cables. Put the memory slot cover back in the slot where the old one was originally installed. 7. Attention: To avoid damaging the SO-DIMM, do not touch its contact edge. Put the battery...
... snaps into the socket at an angle of about 20 degrees (1); Make sure that the SO-DIMM is firmly fixed in the slot under the keyboard Chapter 6. Replacing memory in the slot and cannot be moved easily. 8. 6. With the notched end of the SO-DIMM toward the contact edge side of the SO... it in firmly. Replacing devices 145 Find the notch on page 119), turn the computer over again, and reconnect the cables. Put the memory slot cover back in the slot where the old one was originally installed. 7. Attention: To avoid damaging the SO-DIMM, do not touch its contact edge. Put the battery...
(English) User Guide
Page 165
...-DIMM toward the contact edge side of memory installed in your computer. 3. then press it snaps into the socket at an angle of the two memory slots, be moved easily. 9. Pivot the SO-DIMM downward (2) until it in this section. The ThinkPad Setup opens. When the logo screen is... installed correctly, do as follows: 1. If the "Installed memory" item shows a different amount of memory from what you installed, check ...
...-DIMM toward the contact edge side of memory installed in your computer. 3. then press it snaps into the socket at an angle of the two memory slots, be moved easily. 9. Pivot the SO-DIMM downward (2) until it in this section. The ThinkPad Setup opens. When the logo screen is... installed correctly, do as follows: 1. If the "Installed memory" item shows a different amount of memory from what you installed, check ...
(English) User Guide
Page 233
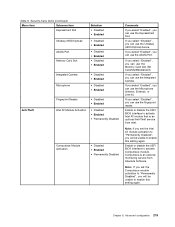
...be unable to enable this setting again. Chapter 8. If you select "Enabled", you can use the ExpressCard Slot. Security menu items (continued) Menu item Submenu item ExpressCard Slot Ultrabay (HDD/Optical) eSATA Port Memory Card Slot Selection • Disabled • Enabled • Disabled • Enabled • Disabled • Enabled &#... service from Intel. If you select "Enabled", you will be unable to "Permanently Disabled", you can use the Memory Card slot (SD Card/MultiMediaCard). Enable or disable the UEFI BIOS interface to activate Computrace module.
...be unable to enable this setting again. Chapter 8. If you select "Enabled", you can use the ExpressCard Slot. Security menu items (continued) Menu item Submenu item ExpressCard Slot Ultrabay (HDD/Optical) eSATA Port Memory Card Slot Selection • Disabled • Enabled • Disabled • Enabled • Disabled • Enabled &#... service from Intel. If you select "Enabled", you will be unable to "Permanently Disabled", you can use the Memory Card slot (SD Card/MultiMediaCard). Enable or disable the UEFI BIOS interface to activate Computrace module.


