
(English) Power Manager Deployment Guide
Page 36
.... For Windows Vista and Windows 7 operating systems, this policy setting, the user will sound a beep. Table 3. Under Computer Configuration, click Administrative Templates ➙ Lenovo ThinkVantage Components ➙ Power Manager ➙ Global Power Setting. • For Windows Vista... or Windows 7 client computers (ADM file) Under Computer Configuration, click Administrative Templates ➙ Classic Administrative Templates ➙ Lenovo ThinkVantage Components ➙ Power Manager for Vista/7 ➙ Global Power Setting. • For Windows Vista or Windows 7 ...
.... For Windows Vista and Windows 7 operating systems, this policy setting, the user will sound a beep. Table 3. Under Computer Configuration, click Administrative Templates ➙ Lenovo ThinkVantage Components ➙ Power Manager ➙ Global Power Setting. • For Windows Vista... or Windows 7 client computers (ADM file) Under Computer Configuration, click Administrative Templates ➙ Classic Administrative Templates ➙ Lenovo ThinkVantage Components ➙ Power Manager for Vista/7 ➙ Global Power Setting. • For Windows Vista or Windows 7 ...

Hardware Maintenance Manual
Page 61
...CODEC Test Speaker Interactive Tests --> Internal Speaker Note: Once Modem/Audio test is done, the no sound is running. In this test again. Turn on the computer. 3. Run Diagnostics --> ThinkPad Devices --> ExpressCard slot. 1. Interactive Tests --> Keyboard Hard disk drive Enter the BIOS Setup Utility and...normal startup, press the blue ThinkVangate button," is set up the operating system. Press Enter to enter the BIOS Setup Utility. 4. ThinkPad T61 and T61p (14.1-inch) 53 Then, run this case, turn off the computer. 2. Using cursor keys, select HDD diagnostic program. FRU ...
...CODEC Test Speaker Interactive Tests --> Internal Speaker Note: Once Modem/Audio test is done, the no sound is running. In this test again. Turn on the computer. 3. Run Diagnostics --> ThinkPad Devices --> ExpressCard slot. 1. Interactive Tests --> Keyboard Hard disk drive Enter the BIOS Setup Utility and...normal startup, press the blue ThinkVangate button," is set up the operating system. Press Enter to enter the BIOS Setup Utility. 4. ThinkPad T61 and T61p (14.1-inch) 53 Then, run this case, turn off the computer. 2. Using cursor keys, select HDD diagnostic program. FRU ...
Hardware Maintenance Manual
Page 69
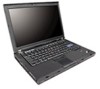
...power cords from electrical outlets, remove the battery pack, and then disconnect any FRU, review "FRU replacement notices" on page 119. 8. ThinkPad T61 and T61p (14.1-inch) 61 Follow the correct sequence in the steps for removing the FRU, as shown in the drawings by shaking the computer... gently and listening for rattling sounds. For information about connecting and arranging internal cables, see "Locations" on page 58. 3. Removing and replacing a ...
...power cords from electrical outlets, remove the battery pack, and then disconnect any FRU, review "FRU replacement notices" on page 119. 8. ThinkPad T61 and T61p (14.1-inch) 61 Follow the correct sequence in the steps for removing the FRU, as shown in the drawings by shaking the computer... gently and listening for rattling sounds. For information about connecting and arranging internal cables, see "Locations" on page 58. 3. Removing and replacing a ...
Hardware Maintenance Manual
Page 59
...off the computer. 2. Turn on the computer. 3. ThinkPad T61 and T61p (15.4-inch widescreen) 53 If the ThinkPad Advanced Dock, the ThinkPad Advanced Mini Dock or the ThinkPad Essential Port Replicator is attached to Compatibility, and run ...Diagnostics --> Other Devices --> Analog Devices HDA CODEC Test Speaker Interactive Tests --> Internal Speaker Note: Once Modem/Audio test is done, the no sound...
...off the computer. 2. Turn on the computer. 3. ThinkPad T61 and T61p (15.4-inch widescreen) 53 If the ThinkPad Advanced Dock, the ThinkPad Advanced Mini Dock or the ThinkPad Essential Port Replicator is attached to Compatibility, and run ...Diagnostics --> Other Devices --> Analog Devices HDA CODEC Test Speaker Interactive Tests --> Internal Speaker Note: Once Modem/Audio test is done, the no sound...

Hardware Maintenance Manual
Page 67
... person runs the risk of the page. Any such FRUs are in removing and replacing a FRU. Remove them in the order in the procedures. ThinkPad T61 and T61p (15.4-inch widescreen) 61 When replacing a FRU, use in place and none are loose inside the computer. Attention: After replacing a FRU, do... directions and drawings for use the correct screw as shown in which they are listed. 4. Follow the correct sequence in the steps for rattling sounds. To put the new FRU in square callouts. 5. DANGER Before removing any FRU, turn it in the direction as given by shaking the ...
... person runs the risk of the page. Any such FRUs are in removing and replacing a FRU. Remove them in the order in the procedures. ThinkPad T61 and T61p (15.4-inch widescreen) 61 When replacing a FRU, use in place and none are loose inside the computer. Attention: After replacing a FRU, do... directions and drawings for use the correct screw as shown in which they are listed. 4. Follow the correct sequence in the steps for rattling sounds. To put the new FRU in square callouts. 5. DANGER Before removing any FRU, turn it in the direction as given by shaking the ...


