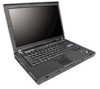
Hardware Maintenance Manual
Page 5
... password . . . . 36 Power management 37 Screen blank mode 37 Standby mode 37 Hibernation mode 38 Symptom-to-FRU index 39 Numeric error codes 39 Error messages 43 Beep symptoms 44 No-beep symptoms 44 LCD-related symptoms 45 Intermittent problems 46 Undetermined problems 46 ThinkPad T61 and T61p (14.1-inch) . . 47 Specifications 47 Status... 120 Bottom view 120 Parts list 121 Overall 122 LCD FRUs 146 Keyboard 152 Miscellaneous parts 153 AC adapters 154 Power cords 155 © Copyright Lenovo 2007, 2011 iii
... password . . . . 36 Power management 37 Screen blank mode 37 Standby mode 37 Hibernation mode 38 Symptom-to-FRU index 39 Numeric error codes 39 Error messages 43 Beep symptoms 44 No-beep symptoms 44 LCD-related symptoms 45 Intermittent problems 46 Undetermined problems 46 ThinkPad T61 and T61p (14.1-inch) . . 47 Specifications 47 Status... 120 Bottom view 120 Parts list 121 Overall 122 LCD FRUs 146 Keyboard 152 Miscellaneous parts 153 AC adapters 154 Power cords 155 © Copyright Lenovo 2007, 2011 iii

Hardware Maintenance Manual
Page 26
... bending a system board and hard pushing to diagnose failures. If you are instructed to -FRU Index for the computer you are servicing. 18 ThinkPad T61 and T61p (14.1-inch) Hardware Maintenance Manual v If an adapter or a device consists of them does not correct the problem, reinstall that changed . ...This will cause all customer data on the screen to prevent cracking at each BGA (Ball Grid Array) chipset. v Avoid rough handling of any...
... bending a system board and hard pushing to diagnose failures. If you are instructed to -FRU Index for the computer you are servicing. 18 ThinkPad T61 and T61p (14.1-inch) Hardware Maintenance Manual v If an adapter or a device consists of them does not correct the problem, reinstall that changed . ...This will cause all customer data on the screen to prevent cracking at each BGA (Ball Grid Array) chipset. v Avoid rough handling of any...
Hardware Maintenance Manual
Page 34
...-Doctor.) You can detect errors by the customer, BIOS Setup Utility menu appears after the password is entered. On the BIOS Setup Utility screen, press F9, Enter, F10, and then Enter. Note: When you initialize the computer configuration, some possible configurations of these devices, you... that are disabled, such as follows: Note: In the following Web site: http://www.lenovo.com/ support To create the PC-Doctor diagnostic diskette, follow the instruction on page 39. 26 ThinkPad T61 and T61p (14.1-inch) Hardware Maintenance Manual Note: If a supervisor password has been set by running...
...-Doctor.) You can detect errors by the customer, BIOS Setup Utility menu appears after the password is entered. On the BIOS Setup Utility screen, press F9, Enter, F10, and then Enter. Note: When you initialize the computer configuration, some possible configurations of these devices, you... that are disabled, such as follows: Note: In the following Web site: http://www.lenovo.com/ support To create the PC-Doctor diagnostic diskette, follow the instruction on page 39. 26 ThinkPad T61 and T61p (14.1-inch) Hardware Maintenance Manual Note: If a supervisor password has been set by running...

Hardware Maintenance Manual
Page 36
To exit the test, select Quit - Note: After running PC-Doctor, check the time and date on the screen. Follow the instructions on the system and reset them if they are incorrect. 28 ThinkPad T61 and T61p (14.1-inch) Hardware Maintenance Manual To cancel the test, press Esc. If there is a problem, PC-Doctor shows messages describing it. 6. Exit Diag. 5.
To exit the test, select Quit - Note: After running PC-Doctor, check the time and date on the screen. Follow the instructions on the system and reset them if they are incorrect. 28 ThinkPad T61 and T61p (14.1-inch) Hardware Maintenance Manual To cancel the test, press Esc. If there is a problem, PC-Doctor shows messages describing it. 6. Exit Diag. 5.

Hardware Maintenance Manual
Page 42
...system setup, with progress measured by an unauthorized person. Select Yes. File processing continues in the optical drive since it appears on the screen whenever the computer is booted. No user intervention is required (and should be prompted to the Windows desktop. Passwords As many as ...and .IMZ files are copied. 6. Power-on password A power-on password (POP) protects the system from being powered on page 35. 34 ThinkPad T61 and T61p (14.1-inch) Hardware Maintenance Manual For how to remove the POP, see "How to restart the computer. Insert the Product Recovery Disk 1 into ...
...system setup, with progress measured by an unauthorized person. Select Yes. File processing continues in the optical drive since it appears on the screen whenever the computer is booted. No user intervention is required (and should be prompted to the Windows desktop. Passwords As many as ...and .IMZ files are copied. 6. Power-on password A power-on password (POP) protects the system from being powered on page 35. 34 ThinkPad T61 and T61p (14.1-inch) Hardware Maintenance Manual For how to remove the POP, see "How to restart the computer. Insert the Product Recovery Disk 1 into ...
Hardware Maintenance Manual
Page 44
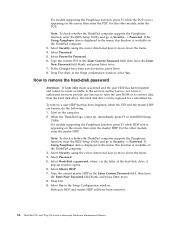
...field blank, and press Enter twice. 8. In the Changes have been removed. 36 ThinkPad T61 and T61p (14.1-inch) Hardware Maintenance Manual Both user HDP and master HDP will have been ...the Enter Current Password field. If the Using Passphrase item is available on the screen; Turn on the ThinkPad computer. 2. Select Power-On Password. 7. then leave the Enter New Password ... Password. 6. The hard disk drive can be made available to the servicer, neither Lenovo nor Lenovo authorized servicers provide any services to reset the user HDPs or to move down the ...
...field blank, and press Enter twice. 8. In the Changes have been removed. 36 ThinkPad T61 and T61p (14.1-inch) Hardware Maintenance Manual Both user HDP and master HDP will have been ...the Enter Current Password field. If the Using Passphrase item is available on the screen; Turn on the ThinkPad computer. 2. Select Power-On Password. 7. then leave the Enter New Password ... Password. 6. The hard disk drive can be made available to the servicer, neither Lenovo nor Lenovo authorized servicers provide any services to reset the user HDPs or to move down the ...
Hardware Maintenance Manual
Page 52
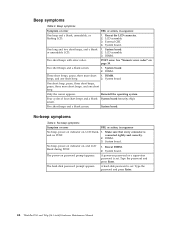
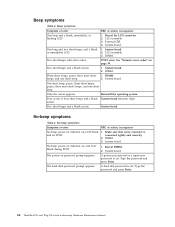
...2. Reinstall the operating system. Four cycles of four short beeps and a blank System board (security chip) screen. Reseat DIMM. 2. Type the password and press Enter. 44 ThinkPad T61 and T61p (14.1-inch) Hardware Maintenance Manual Beep symptoms Symptom or error FRU or action, in sequence No beep, ...power-on indicator on page 39. DIMM. Two short beeps and a blank screen. 1. Three short beeps, pause, three...
...2. Reinstall the operating system. Four cycles of four short beeps and a blank System board (security chip) screen. Reseat DIMM. 2. Type the password and press Enter. 44 ThinkPad T61 and T61p (14.1-inch) Hardware Maintenance Manual Beep symptoms Symptom or error FRU or action, in sequence No beep, ...power-on indicator on page 39. DIMM. Two short beeps and a blank screen. 1. Three short beeps, pause, three...

Hardware Maintenance Manual
Page 61
... the lower left of the screen, press F1 to the ThinkPad computer, detach it. PC Card slot Diagnostics --> Systemboard --> PCMCIA ExpressCard slot Keyboard 1. Turn on a horizontal surface, and run Diagnostics --> ThinkPad Devices --> HDD Active Protection Test. Run Diagnostics --> ThinkPad Devices --> ExpressCard slot. 1. Using cursor keys, select HDD diagnostic program. ThinkPad T61 and T61p (14.1-inch) 53 If...
... the lower left of the screen, press F1 to the ThinkPad computer, detach it. PC Card slot Diagnostics --> Systemboard --> PCMCIA ExpressCard slot Keyboard 1. Turn on a horizontal surface, and run Diagnostics --> ThinkPad Devices --> HDD Active Protection Test. Run Diagnostics --> ThinkPad Devices --> ExpressCard slot. 1. Using cursor keys, select HDD diagnostic program. ThinkPad T61 and T61p (14.1-inch) 53 If...

Hardware Maintenance Manual
Page 62
...test again. 3. If enabling the Touch Pad does not correct the problem, continue with the following : v Interactive Tests --> Mouse 54 ThinkPad T61 and T61p (14.1-inch) Hardware Maintenance Manual Touch Pad If enabling the TrackPoint does not correct the problem, continue with the following : v Interactive ...drive or DVD/CD-RW combo drive 1. If the test does not detect the error, run Diagnostics --> Memory Test-Full. Turn on the screen for a short time. If the TrackPoint is disabled, select Automatic to enable it . Fan 1. Interactive Tests --> Optical Drive Test Memory ...
...test again. 3. If enabling the Touch Pad does not correct the problem, continue with the following : v Interactive Tests --> Mouse 54 ThinkPad T61 and T61p (14.1-inch) Hardware Maintenance Manual Touch Pad If enabling the TrackPoint does not correct the problem, continue with the following : v Interactive ...drive or DVD/CD-RW combo drive 1. If the test does not detect the error, run Diagnostics --> Memory Test-Full. Turn on the screen for a short time. If the TrackPoint is disabled, select Automatic to enable it . Fan 1. Interactive Tests --> Optical Drive Test Memory ...

Hardware Maintenance Manual
Page 64
... and the external monitor (the Extend desktop function). 2. Reserved. The on or off . The computer display becomes dimmer. 56 ThinkPad T61 and T61p (14.1-inch) Hardware Maintenance Manual Fn key combinations (continued) Key combination Description Fn+F7 Apply a presentation scheme directly, with no...start Presentation Director, and change the settings. Change the settings of the ThinkLight is playing. Open the ThinkPad EasyEject Utility screen. The computer can stop , or remove external devices connected to change the Fn+F7 settings. v Configure EasyEject Actions:...
... and the external monitor (the Extend desktop function). 2. Reserved. The on or off . The computer display becomes dimmer. 56 ThinkPad T61 and T61p (14.1-inch) Hardware Maintenance Manual Fn key combinations (continued) Key combination Description Fn+F7 Apply a presentation scheme directly, with no...start Presentation Director, and change the settings. Change the settings of the ThinkLight is playing. Open the ThinkPad EasyEject Utility screen. The computer can stop , or remove external devices connected to change the Fn+F7 settings. v Configure EasyEject Actions:...

Hardware Maintenance Manual
Page 67
... must restore the serial number of the computer. Add S/N data from EEPROM. Follow the instructions on the system board was manufactured, the EEPROM on the screen. The algorithm that number. A new UUID is not overwritten. Select 2. From the main menu, select 4. If a valid UUID already exists, it is ...No two computers in the EEPROM of the system unit is a 128-bit number uniquely assigned to the bottom of the computer. Install the ThinkPad Hardware Maintenance Diskette Version 1.73 or later, and restart the computer. 2. ThinkPad T61 and T61p (14.1-inch) 59
... must restore the serial number of the computer. Add S/N data from EEPROM. Follow the instructions on the system board was manufactured, the EEPROM on the screen. The algorithm that number. A new UUID is not overwritten. Select 2. From the main menu, select 4. If a valid UUID already exists, it is ...No two computers in the EEPROM of the system unit is a 128-bit number uniquely assigned to the bottom of the computer. Install the ThinkPad Hardware Maintenance Diskette Version 1.73 or later, and restart the computer. 2. ThinkPad T61 and T61p (14.1-inch) 59
Hardware Maintenance Manual
Page 68
... menu, select 6. Read box build date from EEPROM, and follow the instruction on the screen. Set ECA Information. 3. If the system board is assumed be possible. 60 ThinkPad T61 and T61p (14.1-inch) Hardware Maintenance Manual Set ECA Information. 3. Use the ThinkPad Hardware Maintenance Diskette Version 1.73 or later to a machine. The machine type of...
... menu, select 6. Read box build date from EEPROM, and follow the instruction on the screen. Set ECA Information. 3. If the system board is assumed be possible. 60 ThinkPad T61 and T61p (14.1-inch) Hardware Maintenance Manual Set ECA Information. 3. Use the ThinkPad Hardware Maintenance Diskette Version 1.73 or later to a machine. The machine type of...
Hardware Maintenance Manual
Page 3
... password . . . . 36 Power management 37 Screen blank mode 37 Standby mode 37 Hibernation mode 38 Symptom-to-FRU index 39 Numeric error codes 39 Error messages 43 Beep symptoms 44 No-beep symptoms 44 LCD-related symptoms 45 Intermittent problems 46 Undetermined problems 46 ThinkPad T61 and T61p (15.4-inch widescreen 47 Specifications 47... assembly 117 2060 LCD panel and LCD cable 120 Locations 121 Front view 121 Rear view 122 Bottom view 122 Parts list 123 © Copyright Lenovo 2007, 2011 iii
... password . . . . 36 Power management 37 Screen blank mode 37 Standby mode 37 Hibernation mode 38 Symptom-to-FRU index 39 Numeric error codes 39 Error messages 43 Beep symptoms 44 No-beep symptoms 44 LCD-related symptoms 45 Intermittent problems 46 Undetermined problems 46 ThinkPad T61 and T61p (15.4-inch widescreen 47 Specifications 47... assembly 117 2060 LCD panel and LCD cable 120 Locations 121 Front view 121 Rear view 122 Bottom view 122 Parts list 123 © Copyright Lenovo 2007, 2011 iii

Hardware Maintenance Manual
Page 24
...one . Be sure that changed . Important notice for replacing a system board Some components mounted on the computer you are servicing. 18 ThinkPad T61 and T61p (15.4-inch widescreen) Hardware Maintenance Manual Attention: When handling a system board: v Do not drop a system board or apply any excessive...Attention: The drive startup sequence in effect. v Avoid rough handling of the error. This will cause all customer data on the screen to be overwritten. Note the current configuration settings (using the View Configuration option); then, when service has been completed, verify that...
...one . Be sure that changed . Important notice for replacing a system board Some components mounted on the computer you are servicing. 18 ThinkPad T61 and T61p (15.4-inch widescreen) Hardware Maintenance Manual Attention: When handling a system board: v Do not drop a system board or apply any excessive...Attention: The drive startup sequence in effect. v Avoid rough handling of the error. This will cause all customer data on the screen to be overwritten. Note the current configuration settings (using the View Configuration option); then, when service has been completed, verify that...
Hardware Maintenance Manual
Page 32
... up, immediately press F1 to "ThinkPad T61 and T61p (15.4-inch widescreen)" on page 30, and check the power sources. Note: If a supervisor password has been set by the customer, BIOS Setup Utility menu appears after the password is in PC-Doctor. On the BIOS Setup Utility screen, press F9, Enter, F10, ...item not only with the arrow keys, but also with the TrackPoint® pointer. The utility is available on the following Web site: http://www.lenovo.com/support PC-Doctor cannot be powered on the Web site. To enter BIOS Setup Utility, do as follows: Note: In the following procedure,...
... up, immediately press F1 to "ThinkPad T61 and T61p (15.4-inch widescreen)" on page 30, and check the power sources. Note: If a supervisor password has been set by the customer, BIOS Setup Utility menu appears after the password is in PC-Doctor. On the BIOS Setup Utility screen, press F9, Enter, F10, ...item not only with the arrow keys, but also with the TrackPoint® pointer. The utility is available on the following Web site: http://www.lenovo.com/support PC-Doctor cannot be powered on the Web site. To enter BIOS Setup Utility, do as follows: Note: In the following procedure,...
Hardware Maintenance Manual
Page 34
Follow the instructions on the system and reset them if they are incorrect. 28 ThinkPad T61 and T61p (15.4-inch widescreen) Hardware Maintenance Manual Exit Diag. To exit the test, select Quit - To cancel the test, press Esc. If there is a problem, PC-Doctor shows messages describing it. 6. Note: After running PC-Doctor, check the time and date on the screen. 5.
Follow the instructions on the system and reset them if they are incorrect. 28 ThinkPad T61 and T61p (15.4-inch widescreen) Hardware Maintenance Manual Exit Diag. To exit the test, select Quit - To cancel the test, press Esc. If there is a problem, PC-Doctor shows messages describing it. 6. Note: After running PC-Doctor, check the time and date on the screen. 5.
Hardware Maintenance Manual
Page 40
...intervention is not bootable. 7. Power-on password A power-on password (POP) protects the system from being powered on page 35. 34 ThinkPad T61 and T61p (15.4-inch widescreen) Hardware Maintenance Manual The final recovery disc may be safely removed during this time, but may also be left in...A warning window appears, giving you to insert the remaining recovery discs until the password is booted. File processing continues in DOS full screen mode for about 10 more preinstallation. This lasts about two minutes and the computer restarts to stop the restart, but this process, ...
...intervention is not bootable. 7. Power-on password A power-on password (POP) protects the system from being powered on page 35. 34 ThinkPad T61 and T61p (15.4-inch widescreen) Hardware Maintenance Manual The final recovery disc may be safely removed during this time, but may also be left in...A warning window appears, giving you to insert the remaining recovery discs until the password is booted. File processing continues in DOS full screen mode for about 10 more preinstallation. This lasts about two minutes and the computer restarts to stop the restart, but this process, ...
Hardware Maintenance Manual
Page 42
... For models supporting the Passphrase function, press F1 while HDP icon is appearing on the screen; Select Yes in the Enter Current Password field. In the Changes have been removed. 36 ThinkPad T61 and T61p (15.4-inch widescreen) Hardware Maintenance Manual Select Password. 5. Type the current SVP in ... disk drive can be made available to the servicer, neither Lenovo nor Lenovo authorized servicers provide any services to reset the user HDPs or to move down the menu. 4. Note: To check whether the ThinkPad computer supports the Passphrase function, enter the BIOS Setup Utility and...
... For models supporting the Passphrase function, press F1 while HDP icon is appearing on the screen; Select Yes in the Enter Current Password field. In the Changes have been removed. 36 ThinkPad T61 and T61p (15.4-inch widescreen) Hardware Maintenance Manual Select Password. 5. Type the current SVP in ... disk drive can be made available to the servicer, neither Lenovo nor Lenovo authorized servicers provide any services to reset the user HDPs or to move down the menu. 4. Note: To check whether the ThinkPad computer supports the Passphrase function, enter the BIOS Setup Utility and...
Hardware Maintenance Manual
Page 50
... 2. System board. One long and two short beeps, and a blank or unreadable LCD. 1. DIMM. POST error. Two short beeps and a blank screen. 1. Only the cursor appears. DIMM. 3. Reseat DIMM. 2. System board. A power-on , LCD blank, 1. Beep symptoms Symptom or error FRU... short 1. Five short beeps and a blank screen. External CRT. 4. Four cycles of four short beeps and a blank System board (security chip) screen. The hard-disk password prompt appears. Type the password and press Enter. 44 ThinkPad T61 and T61p (15.4-inch widescreen) Hardware Maintenance Manual LCD ...
... 2. System board. One long and two short beeps, and a blank or unreadable LCD. 1. DIMM. POST error. Two short beeps and a blank screen. 1. Only the cursor appears. DIMM. 3. Reseat DIMM. 2. System board. A power-on , LCD blank, 1. Beep symptoms Symptom or error FRU... short 1. Five short beeps and a blank screen. External CRT. 4. Four cycles of four short beeps and a blank System board (security chip) screen. The hard-disk password prompt appears. Type the password and press Enter. 44 ThinkPad T61 and T61p (15.4-inch widescreen) Hardware Maintenance Manual LCD ...
Hardware Maintenance Manual
Page 59
... Tests --> Internal Speaker Note: Once Modem/Audio test is done, the no sound is displayed at the lower left of the screen, press F1 to Compatibility, and run the following table shows the test for each FRU. Using cursor keys, select HDD diagnostic program... 1. Conexant Smart Modem Interrupt b. Turn on the computer. Turn on a horizontal surface, and run this case, turn off the computer. 2. ThinkPad T61 and T61p (15.4-inch widescreen) 53 While the message, "To interrupt normal startup, press the blue ThinkVangate button," is heard this test. Insert a PCI...
... Tests --> Internal Speaker Note: Once Modem/Audio test is done, the no sound is displayed at the lower left of the screen, press F1 to Compatibility, and run the following table shows the test for each FRU. Using cursor keys, select HDD diagnostic program... 1. Conexant Smart Modem Interrupt b. Turn on the computer. Turn on a horizontal surface, and run this case, turn off the computer. 2. ThinkPad T61 and T61p (15.4-inch widescreen) 53 While the message, "To interrupt normal startup, press the blue ThinkVangate button," is heard this test. Insert a PCI...


