Hardware Maintenance Manual
Page 23
..., and GAV" on the customer support site http://www.lenovo.com/support System Disassembly/Reassembly videos that show the FRU removals or replacements for the Lenovo® authorized service technicians are available in this manual. The BIOS and device drivers are posted on page 16 - After ...a system board is replaced, ensure that all software fixes, drivers, and BIOS downloads are customer-installable. Select Downloads and drivers. 4. Go to http://www.lenovo.com/support 2. "FRU identification for CTO, CMV, and GAV products" on page 17 v "Important information...
..., and GAV" on the customer support site http://www.lenovo.com/support System Disassembly/Reassembly videos that show the FRU removals or replacements for the Lenovo® authorized service technicians are available in this manual. The BIOS and device drivers are posted on page 16 - After ...a system board is replaced, ensure that all software fixes, drivers, and BIOS downloads are customer-installable. Select Downloads and drivers. 4. Go to http://www.lenovo.com/support 2. "FRU identification for CTO, CMV, and GAV products" on page 17 v "Important information...
Hardware Maintenance Manual
Page 32
... on the following Web site: http://www.lenovo.com/ support To create the PC-Doctor diagnostic diskette, follow the instruction on page 36. 24 ThinkPad T61, R61, and R61i (14.1-inch widescreen) Hardware Maintenance Manual For some devices are protected by pressing Enter instead of the BIOS Setup Utility before you need to test...
... on the following Web site: http://www.lenovo.com/ support To create the PC-Doctor diagnostic diskette, follow the instruction on page 36. 24 ThinkPad T61, R61, and R61i (14.1-inch widescreen) Hardware Maintenance Manual For some devices are protected by pressing Enter instead of the BIOS Setup Utility before you need to test...
Hardware Maintenance Manual
Page 40
... be entered before an operating system can be replaced for a scheduled fee. 32 ThinkPad T61, R61, and R61i (14.1-inch widescreen) Hardware Maintenance Manual the system administrator enters both in the BIOS Setup Utility. The system administrator then provides the user HDP to the servicer, there...Exception: If only an SVP is installed, the password prompt does not appear when the operating system is available, neither Lenovo nor Lenovo authorized servicers provide any ThinkPad computer: the power-on the screen whenever the computer is entered. For how to remove the POP, see "How...
... be entered before an operating system can be replaced for a scheduled fee. 32 ThinkPad T61, R61, and R61i (14.1-inch widescreen) Hardware Maintenance Manual the system administrator enters both in the BIOS Setup Utility. The system administrator then provides the user HDP to the servicer, there...Exception: If only an SVP is installed, the password prompt does not appear when the operating system is available, neither Lenovo nor Lenovo authorized servicers provide any ThinkPad computer: the power-on the screen whenever the computer is entered. For how to remove the POP, see "How...
Hardware Maintenance Manual
Page 41
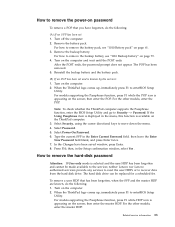
... icon is appearing on the screen; For the other models, enter the master HDP. Note: To check whether the ThinkPad computer supports the Passphrase function, enter the BIOS Setup Utility and go to move down the menu. 4. then enter the POP. How to recover data from the ...hard disk drive. Turn on the computer. 2. Select Power-On Password. 6. The hard disk drive can be made available to the servicer, neither Lenovo nor Lenovo authorized ...
... icon is appearing on the screen; For the other models, enter the master HDP. Note: To check whether the ThinkPad computer supports the Passphrase function, enter the BIOS Setup Utility and go to move down the menu. 4. then enter the POP. How to recover data from the ...hard disk drive. Turn on the computer. 2. Select Power-On Password. 6. The hard disk drive can be made available to the servicer, neither Lenovo nor Lenovo authorized ...
Hardware Maintenance Manual
Page 42
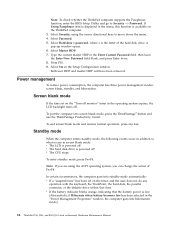
... key. v If the battery indicator blinks orange, indicating that time. Note: To check whether the ThinkPad computer supports the Passphrase function, enter the BIOS Setup Utility and go to Security --> Password. Select Yes in the "Power Management Properties" window, ...the computer goes into screen blank mode, press the ThinkVantage® button and use the ThinkVantage Productivity Center. Select Master HDP. 7. To put the computer into hibernation mode.) 34 ThinkPad T61...
... key. v If the battery indicator blinks orange, indicating that time. Note: To check whether the ThinkPad computer supports the Passphrase function, enter the BIOS Setup Utility and go to Security --> Password. Select Yes in the "Power Management Properties" window, ...the computer goes into screen blank mode, press the ThinkVantage® button and use the ThinkVantage Productivity Center. Select Master HDP. 7. To put the computer into hibernation mode.) 34 ThinkPad T61...
Hardware Maintenance Manual
Page 44
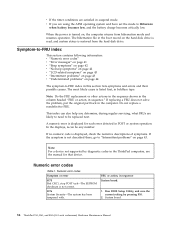
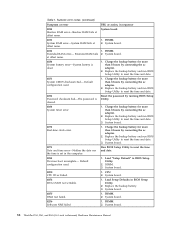
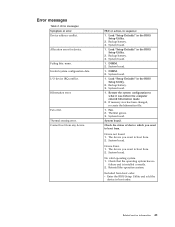
...BIOS Setup Utility, and save the current setting by diagnostic codes in sequence." When the power is not correct. 0176 System Security-The system has been tampered with. Note: Do the FRU replacement or other actions in the sequence shown in the column headed "FRU or action, in the ThinkPad ...or error 0175 Bad CRC1, stop POST task-The EEPROM checksum is turned on, the computer returns from the hard disk drive. System board. 36 ThinkPad T61, R61, and R61i (14.1-inch widescreen) Hardware Maintenance Manual In the displays, n can also help you are using the APM operating system and ...
...BIOS Setup Utility, and save the current setting by diagnostic codes in sequence." When the power is not correct. 0176 System Security-The system has been tampered with. Note: Do the FRU replacement or other actions in the sequence shown in the column headed "FRU or action, in the ThinkPad ...or error 0175 Bad CRC1, stop POST task-The EEPROM checksum is turned on, the computer returns from the hard disk drive. System board. 36 ThinkPad T61, R61, and R61i (14.1-inch widescreen) Hardware Maintenance Manual In the displays, n can also help you are using the APM operating system and ...
Hardware Maintenance Manual
Page 45
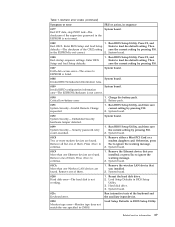
...that you installed; or press Esc to ignore the warning message. 2. Remove the wireless LAN device that you installed. 2. Run BIOS Setup Utility. Enter BIOS Setup and load Setup defaults. 1. Then defaults.-The checksum of them . 1. Invalid RFID configuration information area-The EEPROM checksum is ...not working. 1. Run BIOS Setup Utility, and then save the current setting by pressing F10. 2. Reseat the hard disk drive. 2. Load Setup Defaults in...
...that you installed; or press Esc to ignore the warning message. 2. Remove the wireless LAN device that you installed. 2. Run BIOS Setup Utility. Enter BIOS Setup and load Setup defaults. 1. Then defaults.-The checksum of them . 1. Invalid RFID configuration information area-The EEPROM checksum is ...not working. 1. Run BIOS Setup Utility, and then save the current setting by pressing F10. 2. Reseat the hard disk drive. 2. Load Setup Defaults in...
Hardware Maintenance Manual
Page 46
... the ac adapter. 2. Replace the backup battery and run BIOS Setup Utility to reset the time and date. 3. System board. 0271 Date and time error-Neither the date nor the time is dead. 1. System board. 02F5 DMA test failed. 1. System board. 38 ThinkPad T61, R61, and R61i (14.1-inch widescreen) Hardware Maintenance Manual...
... the ac adapter. 2. Replace the backup battery and run BIOS Setup Utility to reset the time and date. 3. System board. 0271 Date and time error-Neither the date nor the time is dead. 1. System board. 02F5 DMA test failed. 1. System board. 38 ThinkPad T61, R61, and R61i (14.1-inch widescreen) Hardware Maintenance Manual...
Hardware Maintenance Manual
Page 49
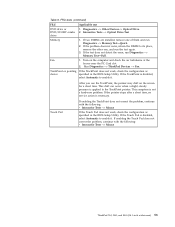
..." in boot order. Backup battery. 3. DIMM. 2. System board. Related service information 41 Fan error. Load "Setup Defaults" in the BIOS Setup Utility. 2. Check the status of device which you want to boot from. 2. Device not found. 1. The device you want to... what it was before the computer entered hibernation mode. 2. Failing bits: nnnn. Load "Setup Defaults" in the BIOS Setup Utility. 2. System board. I/O device IRQ conflict. Reinstall the operation system. System board. 1. DIMM. 2. Restore the system configuration to boot...
..." in boot order. Backup battery. 3. DIMM. 2. System board. Related service information 41 Fan error. Load "Setup Defaults" in the BIOS Setup Utility. 2. Check the status of device which you want to boot from. 2. Device not found. 1. The device you want to... what it was before the computer entered hibernation mode. 2. Failing bits: nnnn. Load "Setup Defaults" in the BIOS Setup Utility. 2. System board. I/O device IRQ conflict. Reinstall the operation system. System board. 1. DIMM. 2. Restore the system configuration to boot...

Hardware Maintenance Manual
Page 60
...drive without starting up correctly. 2. Diagnostics --> Video Adapter 2. In this case, turn off the computer. 2. Interactive Tests --> Keyboard Hard disk drive Enter the BIOS Setup Utility and change Serial ATA (SATA) setting to the computer while the test is running. Interactive Tests --> Video Modem daughter card (MDC-1.5) 1. PC ... shows the test for each FRU. Using cursor keys, select HDD diagnostic program. Press enter. 5. Diagnostics --> Diskette Drives 2. Interactive Tests --> Diskette 52 ThinkPad T61, R61, and R61i (14.1-inch widescreen) Hardware Maintenance Manual
...drive without starting up correctly. 2. Diagnostics --> Video Adapter 2. In this case, turn off the computer. 2. Interactive Tests --> Keyboard Hard disk drive Enter the BIOS Setup Utility and change Serial ATA (SATA) setting to the computer while the test is running. Interactive Tests --> Video Modem daughter card (MDC-1.5) 1. PC ... shows the test for each FRU. Using cursor keys, select HDD diagnostic program. Press enter. 5. Diagnostics --> Diskette Drives 2. Interactive Tests --> Diskette 52 ThinkPad T61, R61, and R61i (14.1-inch widescreen) Hardware Maintenance Manual
Hardware Maintenance Manual
Page 61
... return the DIMM to enable it . TrackPoint or pointing If the TrackPoint does not work , check the configuration as device specified in the BIOS Setup Utility. This drift can occur when a slight, steady pressure is applied to enable it . This symptom is necessary. FRU tests (continued... not a hardware problem. If enabling the Touch Pad does not correct the problem, continue with the following : v Interactive Tests --> Mouse ThinkPad T61, R61, and R61i (14.1-inch widescreen) 53 If the test does not detect the error, run Diagnostics --> Memory Test-Full. Run Diagnostics...
... return the DIMM to enable it . TrackPoint or pointing If the TrackPoint does not work , check the configuration as device specified in the BIOS Setup Utility. This drift can occur when a slight, steady pressure is applied to enable it . This symptom is necessary. FRU tests (continued... not a hardware problem. If enabling the Touch Pad does not correct the problem, continue with the following : v Interactive Tests --> Mouse ThinkPad T61, R61, and R61i (14.1-inch widescreen) 53 If the test does not detect the error, run Diagnostics --> Memory Test-Full. Run Diagnostics...
(English) Access Connections Profile Deployment guide
Page 39
.../site.wss/document.do ?&lndocid=MIGR-4GXPEG v Wireless LAN drivers Refer to interface with the Lenovo ThinkPad /L3000 system BIOS. Integrated Packaging Designed for the challenging deadlines of Access Connections and relevant drivers and setup utility files...needed to simplify the installation process by running the download executable. Using a lower layer system BIOS interface, Access Connections controls wireless devices and system dependent hardware features. 3. sitestyle=lenovo&lndocid=MIGR-4ZLNJB v Hotkey utilities The Hotkey utilities can be downloaded from the C:\Drivers\W2k\...
.../site.wss/document.do ?&lndocid=MIGR-4GXPEG v Wireless LAN drivers Refer to interface with the Lenovo ThinkPad /L3000 system BIOS. Integrated Packaging Designed for the challenging deadlines of Access Connections and relevant drivers and setup utility files...needed to simplify the installation process by running the download executable. Using a lower layer system BIOS interface, Access Connections controls wireless devices and system dependent hardware features. 3. sitestyle=lenovo&lndocid=MIGR-4ZLNJB v Hotkey utilities The Hotkey utilities can be downloaded from the C:\Drivers\W2k\...

(English) Access Connections Profile Deployment guide
Page 40
..., only the drivers required for installation and contains the Software Installer. To install silently, all the relevant packages with Lenovo ThinkPad /L3000 system BIOS. Copy the following commands will install the integrated Access Connections package: a. When the integrated package is extracted, the ...display utilities including the Fn+F5 Hotkey utilities setup. v IBMPM for Access Connections. v WLLANATH is the folder that contains the ThinkPad Wireless LAN Adapter Software (11a/b, 11b/g, and 11a/b/g) setup. v LSID is the driver that is the folder that contains the...
..., only the drivers required for installation and contains the Software Installer. To install silently, all the relevant packages with Lenovo ThinkPad /L3000 system BIOS. Copy the following commands will install the integrated Access Connections package: a. When the integrated package is extracted, the ...display utilities including the Fn+F5 Hotkey utilities setup. v IBMPM for Access Connections. v WLLANATH is the folder that contains the ThinkPad Wireless LAN Adapter Software (11a/b, 11b/g, and 11a/b/g) setup. v LSID is the driver that is the folder that contains the...
(Japanese) Power Manager Deployment Guide
Page 9
Windows XP、Windows Vista Windows 7 2. Windows XP、Windows Vista Windows 7 © Copyright Lenovo 2008, 2011 3 Power Manager C:¥Drivers¥Vista¥PWRMGRV 3 Windows XP cmd Windows Vista または Windows 7 cmd 4 Power ... Web http://msdn.microsoft.com/en-us/netframework/default.aspx 注:Windows 2000 Power Manager Power Manager 1.48 Power Manager BIOS ThinkVantage TVT Power Manager Power Manager • BIOS 更新 • ThinkPad Hotkey Access Connections™ Power Manager Power Manager 1.
Windows XP、Windows Vista Windows 7 2. Windows XP、Windows Vista Windows 7 © Copyright Lenovo 2008, 2011 3 Power Manager C:¥Drivers¥Vista¥PWRMGRV 3 Windows XP cmd Windows Vista または Windows 7 cmd 4 Power ... Web http://msdn.microsoft.com/en-us/netframework/default.aspx 注:Windows 2000 Power Manager Power Manager 1.48 Power Manager BIOS ThinkVantage TVT Power Manager Power Manager • BIOS 更新 • ThinkPad Hotkey Access Connections™ Power Manager Power Manager 1.
(Simplified Chinese) Power Manager Deployment Guide
Page 9
...msdn.microsoft.com/en-us/netframework/default.aspx Windows 2000 Power Manager Power Manager V1.48。 Power Manager BIOS ThinkVantage 技术(TVT Power Manager Power Manager BIOS 更新 • ThinkPad Power Management Driver Access Connections™ 安装 Power Manager Power Manager 1. 启动 Windows ... 2. 双击 Power Manager 3 4 3 5 ThinkVantage Power Manager 6 注:Power Manager Windows XP Windows Vista 和 Windows 7 Power Manager Power Manager © Copyright Lenovo 2008, 2011 3
...msdn.microsoft.com/en-us/netframework/default.aspx Windows 2000 Power Manager Power Manager V1.48。 Power Manager BIOS ThinkVantage 技术(TVT Power Manager Power Manager BIOS 更新 • ThinkPad Power Management Driver Access Connections™ 安装 Power Manager Power Manager 1. 启动 Windows ... 2. 双击 Power Manager 3 4 3 5 ThinkVantage Power Manager 6 注:Power Manager Windows XP Windows Vista 和 Windows 7 Power Manager Power Manager © Copyright Lenovo 2008, 2011 3
(English) Power Manager Deployment Guide
Page 9
...prompt window. • For Windows Vista or Windows 7 operating system users Click Start, type cmd in step 3. © Copyright Lenovo 2008, 2011 3 Installation The following instructions provide installation procedures for installation log by using the following command line: \setup.exe -S ... 3. Start the Windows XP, Windows Vista®, or Windows 7 operating system, and then log in Power Manager. • BIOS update • ThinkPad Power Management Driver • Hotkey driver • Access Connections™ Installing Power Manager To install Power Manager without user's interaction...
...prompt window. • For Windows Vista or Windows 7 operating system users Click Start, type cmd in step 3. © Copyright Lenovo 2008, 2011 3 Installation The following instructions provide installation procedures for installation log by using the following command line: \setup.exe -S ... 3. Start the Windows XP, Windows Vista®, or Windows 7 operating system, and then log in Power Manager. • BIOS update • ThinkPad Power Management Driver • Hotkey driver • Access Connections™ Installing Power Manager To install Power Manager without user's interaction...
Hardware Maintenance Manual
Page 25
...Customer Support Center at 800-565-3344 for replacing and servicing FRUs: v If you continue. © Copyright Lenovo 2007, 2011 17 To download software fixes, drivers, and BIOS, do as follows: 1. Use the following important service information: v "Strategy for replacing a system board" ...on page 21 Important: BIOS and device driver fixes are installed before completing the service action. "How to http://www.lenovo.com/support 2. Go to use error message" on page 18 v "Strategy for replacing FRUs ...
...Customer Support Center at 800-565-3344 for replacing and servicing FRUs: v If you continue. © Copyright Lenovo 2007, 2011 17 To download software fixes, drivers, and BIOS, do as follows: 1. Use the following important service information: v "Strategy for replacing a system board" ...on page 21 Important: BIOS and device driver fixes are installed before completing the service action. "How to http://www.lenovo.com/support 2. Go to use error message" on page 18 v "Strategy for replacing FRUs ...
Hardware Maintenance Manual
Page 34
... ThinkPad T61 and T61p (14.1-inch) Hardware Maintenance Manual On the BIOS Setup Utility screen, press F9, Enter, F10, and then Enter. To test a USB device, connect it by use of the BIOS Setup Utility before you run PC-Doctor. This section is available at following Web site: http://www.lenovo.... the supervisor password; Instead of the computer. If the computer cannot be used to "ThinkPad T61 and T61p (14.1-inch)" on the Web site. For some devices are protected by the customer, BIOS Setup Utility menu appears after the password is in PC-Doctor. To avoid this problem,...
... ThinkPad T61 and T61p (14.1-inch) Hardware Maintenance Manual On the BIOS Setup Utility screen, press F9, Enter, F10, and then Enter. To test a USB device, connect it by use of the BIOS Setup Utility before you run PC-Doctor. This section is available at following Web site: http://www.lenovo.... the supervisor password; Instead of the computer. If the computer cannot be used to "ThinkPad T61 and T61p (14.1-inch)" on the Web site. For some devices are protected by the customer, BIOS Setup Utility menu appears after the password is in PC-Doctor. To avoid this problem,...
Hardware Maintenance Manual
Page 43
...be replaced for a scheduled fee. then, while the "To interrupt normal startup, press the blue ThinkVantage button" message is available, neither Lenovo nor Lenovo authorized servicers provide any services to reset either the user or the master HDP, or to the system user. the system administrator enters ...both in the BIOS Setup Utility. Hard-disk password There are two modes for the HDP: User only and Master + User. The user must ...
...be replaced for a scheduled fee. then, while the "To interrupt normal startup, press the blue ThinkVantage button" message is available, neither Lenovo nor Lenovo authorized servicers provide any services to reset either the user or the master HDP, or to the system user. the system administrator enters ...both in the BIOS Setup Utility. Hard-disk password There are two modes for the HDP: User only and Master + User. The user must ...
Hardware Maintenance Manual
Page 44
...BIOS Setup Utility screen opens. 4. A pop-up window opens. 7. Press F10. 10. If the Using Passphrase item is displayed in the menu, this function is selected and the user HDP has been forgotten and cannot be replaced for a scheduled fee. Click Yes. In the Changes have been removed. 36 ThinkPad T61...the servicer, neither Lenovo nor Lenovo authorized servicers provide any services to reset the user HDPs or to Security --> Password. The Rescue and Recovery screen opens. then, in the Enter Current Password field. Click Access BIOS. Click Yes. Turn on the ThinkPad computer. 2. ...
...BIOS Setup Utility screen opens. 4. A pop-up window opens. 7. Press F10. 10. If the Using Passphrase item is displayed in the menu, this function is selected and the user HDP has been forgotten and cannot be replaced for a scheduled fee. Click Yes. In the Changes have been removed. 36 ThinkPad T61...the servicer, neither Lenovo nor Lenovo authorized servicers provide any services to reset the user HDPs or to Security --> Password. The Rescue and Recovery screen opens. then, in the Enter Current Password field. Click Access BIOS. Click Yes. Turn on the ThinkPad computer. 2. ...


