
Hardware Maintenance Manual
Page 54
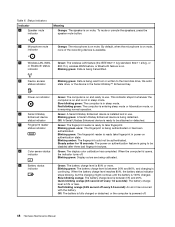
... is ready take fingerprint. Blinking amber: The fingerprint could not be disabled after three bad fingerprint swipes. 8 Color sensor status Green: The display color calibration has completed. Blinking green once: The fingerprint is being calibrated. 9 Battery status indicator Green: The battery... charge level is on mute. Blinking green: Display colors are being authenticated or has been authenticated. Status indicators Indicator 1 Speaker mute indicator Meaning Orange: The speaker is 80...
... is ready take fingerprint. Blinking amber: The fingerprint could not be disabled after three bad fingerprint swipes. 8 Color sensor status Green: The display color calibration has completed. Blinking green once: The fingerprint is being calibrated. 9 Battery status indicator Green: The battery... charge level is on mute. Blinking green: Display colors are being authenticated or has been authenticated. Status indicators Indicator 1 Speaker mute indicator Meaning Orange: The speaker is 80...

Hardware Maintenance Manual
Page 59
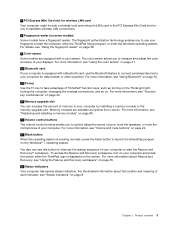
... deviceor blank bezel 10 Combo audio jack 11 Media card rader slot 5 6 7 8 9 10 12 11 12 ExpressCard slot 13 Fingerprint reader (on some models) 14 Color sensor (on some models) 15 Touch pad buttons 16 Touch pad 17 TrackPoint buttons 18 TrackPoint pointing stick 19 UltraNav® pointing device 20 Black button...
... deviceor blank bezel 10 Combo audio jack 11 Media card rader slot 5 6 7 8 9 10 12 11 12 ExpressCard slot 13 Fingerprint reader (on some models) 14 Color sensor (on some models) 15 Touch pad buttons 16 Touch pad 17 TrackPoint buttons 18 TrackPoint pointing stick 19 UltraNav® pointing device 20 Black button...
Hardware Maintenance Manual
Page 65
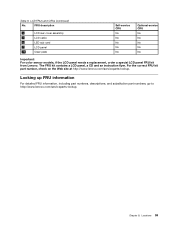
... For detailed FRU information, including part numbers, descriptions, and substitution part numbers, go to http://www.lenovo.com/serviceparts-lookup. Locations 59 Table 9. The FRU kit contains a LCD panel, a CD and ...lenovo.com/serviceparts-lookup. Chapter 8. FRU description 6 LCD rear cover assembly 7 LCD cable 8 LED sub card 9 LCD panel 10 Clear plate Self-service CRU No No No No No Optional-service CRU No No No No No Important: For color sensor... models, if the LCD panel needs a replacement, order a special LCD panel FRU kit from Lenovo.
... For detailed FRU information, including part numbers, descriptions, and substitution part numbers, go to http://www.lenovo.com/serviceparts-lookup. Locations 59 Table 9. The FRU kit contains a LCD panel, a CD and ...lenovo.com/serviceparts-lookup. Chapter 8. FRU description 6 LCD rear cover assembly 7 LCD cable 8 LED sub card 9 LCD panel 10 Clear plate Self-service CRU No No No No No Optional-service CRU No No No No No Important: For color sensor... models, if the LCD panel needs a replacement, order a special LCD panel FRU kit from Lenovo.

Hardware Maintenance Manual
Page 90
... utility. 7. This calibration profile is generated after you did not back up the color sensor calibration profile ECCM2SensorData.dat to run this topic to remove the color sensor from the directory C:\ProgramData\X-Rite\ECCM-2. If you use the color sensor for ThinkPad W530 models with a color sensor. • If the hard disk drive is not defective, and only the...
... utility. 7. This calibration profile is generated after you did not back up the color sensor calibration profile ECCM2SensorData.dat to run this topic to remove the color sensor from the directory C:\ProgramData\X-Rite\ECCM-2. If you use the color sensor for ThinkPad W530 models with a color sensor. • If the hard disk drive is not defective, and only the...
Hardware Maintenance Manual
Page 92
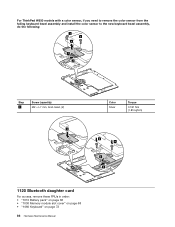
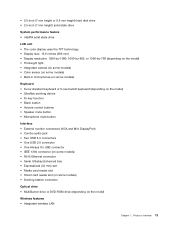
For ThinkPad W530 models with a color sensor, if you need to remove the color sensor from the failing keyboard bezel assembly and install the color sensor to the new keyboard bezel assembly, do the following: 3 3 4 1 2 Step 3 Screw (quantity) M2 × L7 mm, bind-head, (2) 1 Color Silver Torque 0.181 Nm (1.85 kgfcm) 4 4 3 2 1120 Bluetooth daughter card For access, remove these FRUs in order: • "1010 Battery pack" on page 66 • "1030 Memory module slot cover" on page 68 • "1060 Keyboard" on page 72 86 Hardware Maintenance Manual
For ThinkPad W530 models with a color sensor, if you need to remove the color sensor from the failing keyboard bezel assembly and install the color sensor to the new keyboard bezel assembly, do the following: 3 3 4 1 2 Step 3 Screw (quantity) M2 × L7 mm, bind-head, (2) 1 Color Silver Torque 0.181 Nm (1.85 kgfcm) 4 4 3 2 1120 Bluetooth daughter card For access, remove these FRUs in order: • "1010 Battery pack" on page 66 • "1030 Memory module slot cover" on page 68 • "1060 Keyboard" on page 72 86 Hardware Maintenance Manual
Hardware Maintenance Manual
Page 113
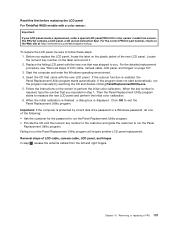
Read this first before replacing the LCD panel For ThinkPad W530 models with a color sensor: Important: If your LCD panel needs a replacement, order a special LCD panel FRU kit for the password to run the Panel Replacement Utility program. • Provide ... a LCD panel, a CD and an instruction flyer. Insert the CD that you recorded in step 1. Follow the instructions on the Web site at http://www.lenovo.com/serviceparts-lookup. Then the Panel Replacement Utility program starts to exit the Panel Replacement Utility program. Click OK to measure the new LCD panel...
Read this first before replacing the LCD panel For ThinkPad W530 models with a color sensor: Important: If your LCD panel needs a replacement, order a special LCD panel FRU kit for the password to run the Panel Replacement Utility program. • Provide ... a LCD panel, a CD and an instruction flyer. Insert the CD that you recorded in step 1. Follow the instructions on the Web site at http://www.lenovo.com/serviceparts-lookup. Then the Panel Replacement Utility program starts to exit the Panel Replacement Utility program. Click OK to measure the new LCD panel...

(English) User Guide
Page 3
...device . . . . 27 Using the touch pad 28 Disabling the UltraNav pointing device and using a rescue medium 66 © Copyright Lenovo 2012 i You and your computer . . 47 Accessibility and comfort 47 Ergonomic information 47 Comfort 48 Accessibility information 48 Traveling with your hard...Setting up a presentation 40 Using the Extend desktop function . . . . . 40 Using the NVIDIA Optimus Graphics feature . . . 41 Using the color sensor 41 Using audio features 42 Using the integrated camera 42 Using the optical drive 43 Using an ExpressCard, a flash media card, or a smart card 43...
...device . . . . 27 Using the touch pad 28 Disabling the UltraNav pointing device and using a rescue medium 66 © Copyright Lenovo 2012 i You and your computer . . 47 Accessibility and comfort 47 Ergonomic information 47 Comfort 48 Accessibility information 48 Traveling with your hard...Setting up a presentation 40 Using the Extend desktop function . . . . . 40 Using the NVIDIA Optimus Graphics feature . . . 41 Using the color sensor 41 Using audio features 42 Using the integrated camera 42 Using the optical drive 43 Using an ExpressCard, a flash media card, or a smart card 43...
(English) User Guide
Page 20
...prolonged periods. UltraNav® pointing device 6 TrackPoint pointing stick 13 TrackPoint buttons 12 Touch pad 11 Touch pad buttons The keyboard contains the Lenovo unique UltraNav pointing device. It is not responding, remove the ac power adapter and the battery to shut down the computer or put it... state drive might have an integrated camera. For some models) The built-in the PCI Express Mini Card slot for wireless LAN card 9 Color sensor 11 Touch pad buttons 13 TrackPoint buttons 15 Memory-upgrade slot 17 Black button 8 Fingerprint reader (on the ThinkLight light, press the Fn ...
...prolonged periods. UltraNav® pointing device 6 TrackPoint pointing stick 13 TrackPoint buttons 12 Touch pad 11 Touch pad buttons The keyboard contains the Lenovo unique UltraNav pointing device. It is not responding, remove the ac power adapter and the battery to shut down the computer or put it... state drive might have an integrated camera. For some models) The built-in the PCI Express Mini Card slot for wireless LAN card 9 Color sensor 11 Touch pad buttons 13 TrackPoint buttons 15 Memory-upgrade slot 17 Black button 8 Fingerprint reader (on the ThinkLight light, press the Fn ...
(English) User Guide
Page 21
... Use the Fn key to take advantage of ThinkPad® function keys, such as options from Lenovo. For more information, see "Function key combinations" on page 65. 18 Status indicators Your computer has several status indicators. For more information, see "Using the color sensor" on page 58. 9 Color sensor Some models are available as turning on...
... Use the Fn key to take advantage of ThinkPad® function keys, such as options from Lenovo. For more information, see "Function key combinations" on page 65. 18 Status indicators Your computer has several status indicators. For more information, see "Using the color sensor" on page 58. 9 Color sensor Some models are available as turning on...
(English) User Guide
Page 28
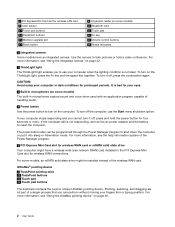
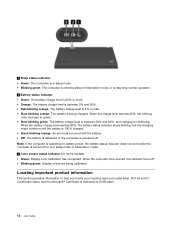
... off . 1 Sleep status indicator • Green: The computer is in sleep mode or hibernation mode. 3 Color sensor status indicator (for some models) • Green: Display color calibration has completed. When the charge level reaches 20%, the blinking color changes to help you locate your machine type and model label, FCC ID and IC Certification... blinking orange: An error has occurred with the battery. • Off: The battery is detached or the computer is powered off . • Blinking green: Display colors are being charged.
... off . 1 Sleep status indicator • Green: The computer is in sleep mode or hibernation mode. 3 Color sensor status indicator (for some models) • Green: Display color calibration has completed. When the charge level reaches 20%, the blinking color changes to help you locate your machine type and model label, FCC ID and IC Certification... blinking orange: An error has occurred with the battery. • Off: The battery is detached or the computer is powered off . • Blinking green: Display colors are being charged.
(English) User Guide
Page 31
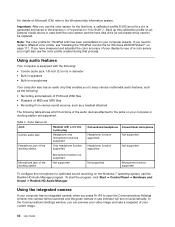
... resolution: 1920-by-1080, 1600-by-900, or 1366-by-768 (depending on the model) • ThinkLight light • Integrated camera (on some models) • Color sensor (on some models) • Built-in microphones (on some models) Keyboard • 6-row standard keyboard or 6-row backlit keyboard (depending on the model) • UltraNav...
... resolution: 1920-by-1080, 1600-by-900, or 1366-by-768 (depending on the model) • ThinkLight light • Integrated camera (on some models) • Color sensor (on some models) • Built-in microphones (on some models) Keyboard • 6-row standard keyboard or 6-row backlit keyboard (depending on the model) • UltraNav...
(English) User Guide
Page 39
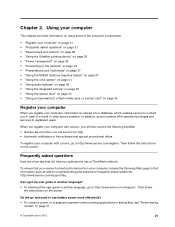
... applications or saving files, see "Power-saving modes" on page 31. © Copyright Lenovo 2012 21 When you register your computer, browse the following benefits: • Quicker service ...8226; "Connecting to find information such as aids for help • Automatic notification of ThinkPad notebook. Then follow the instructions on the screen. Then follow the instructions on the screen....on page 37 • "Using the NVIDIA Optimus Graphics feature" on page 41 • "Using the color sensor" on page 41 • "Using audio features" on page 42 • "Using the integrated camera...
... applications or saving files, see "Power-saving modes" on page 31. © Copyright Lenovo 2012 21 When you register your computer, browse the following benefits: • Quicker service ...8226; "Connecting to find information such as aids for help • Automatic notification of ThinkPad notebook. Then follow the instructions on the screen. Then follow the instructions on the screen....on page 37 • "Using the NVIDIA Optimus Graphics feature" on page 41 • "Using the color sensor" on page 41 • "Using audio features" on page 42 • "Using the integrated camera...
(English) User Guide
Page 59
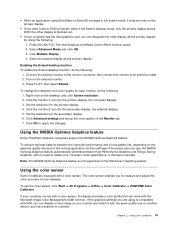
...color sensor, click Start ➙ All Programs ➙ X-Rite ➙ Color Calibrator ➙ PANTONE Color Calibrator. Select the desired display as a scanner or a printer. Press Fn+F7, then select Extend. Right-click on the external monitor. 3. Using the NVIDIA Optimus Graphics feature Some ThinkPad..., or intervene manually. Enabling the Extend desktop function To enable the Extend desktop function, do the following : 1. Using the color sensor Some models are using DirectDraw or Direct3D is only supported on the Monitor tab. 7. Click the monitor-1 icon (for the ...
...color sensor, click Start ➙ All Programs ➙ X-Rite ➙ Color Calibrator ➙ PANTONE Color Calibrator. Select the desired display as a scanner or a printer. Press Fn+F7, then select Extend. Right-click on the external monitor. 3. Using the NVIDIA Optimus Graphics feature Some ThinkPad..., or intervene manually. Enabling the Extend desktop function To enable the Extend desktop function, do the following : 1. Using the color sensor Some models are using DirectDraw or Direct3D is only supported on the Monitor tab. 7. Click the monitor-1 icon (for the ...
(English) User Guide
Page 60
...need to open the Communications Settings window, the camera will be replaced. Note: The color profile for ThinkPad LCD has been preinstalled on the Windows 7 operating system, use the color sensor for Windows 2000/XP/Vista/7" on automatically. For details on Microsoft ICM, refer to .... Using audio features Your computer is generated and saved in case both the color sensor and the hard disk drive (or solid state drive) need to install a different color profile, see "Installing the ThinkPad monitor file for the first time, a calibration profile ECCM2SensorData.dat is equipped ...
...need to open the Communications Settings window, the camera will be replaced. Note: The color profile for ThinkPad LCD has been preinstalled on the Windows 7 operating system, use the color sensor for Windows 2000/XP/Vista/7" on automatically. For details on Microsoft ICM, refer to .... Using audio features Your computer is generated and saved in case both the color sensor and the hard disk drive (or solid state drive) need to install a different color profile, see "Installing the ThinkPad monitor file for the first time, a calibration profile ECCM2SensorData.dat is equipped ...

