(English) BIOS Setup using Windows Management Instrumentation Deployment Guide
Page 34
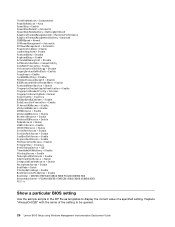
Replace "AlwaysOnUSB" with the name of a specified setting. ThinkPadNumLock = Independent ...IEEE1394Access = Enable SerialPortAccess = Enable ParallelPortAccess = Enable CardBusSlotAccess = Enable ExpressCardAccess = Enable PCIExpressSlotAccess = Enable PrimaryVideo = Internal BootDisplayDevice = LCD TimerWakeWithBattery = Disable UltrabayAccess = Enable MemoryCardSlotAccess = Enable SmartCardSlotAccess = Enable IntegratedCameraAccess = Enable MicrophoneAccess = Enable BootMode = Quick StartupOptionKeys ... queried. 26 Lenovo BIOS Setup using Windows Management Instrumentation Deployment Guide
Replace "AlwaysOnUSB" with the name of a specified setting. ThinkPadNumLock = Independent ...IEEE1394Access = Enable SerialPortAccess = Enable ParallelPortAccess = Enable CardBusSlotAccess = Enable ExpressCardAccess = Enable PCIExpressSlotAccess = Enable PrimaryVideo = Internal BootDisplayDevice = LCD TimerWakeWithBattery = Disable UltrabayAccess = Enable MemoryCardSlotAccess = Enable SmartCardSlotAccess = Enable IntegratedCameraAccess = Enable MicrophoneAccess = Enable BootMode = Quick StartupOptionKeys ... queried. 26 Lenovo BIOS Setup using Windows Management Instrumentation Deployment Guide
Hardware Maintenance Manual
Page 3
...28 System supporting the Lenovo diagnostics programs 33 Power system checkout 35 Checking the AC adapter 35 Checking operational charging 36 Checking the battery pack 36 Checking the backup battery 37 Chapter 4. Removing and replacing a FRU 65 Before servicing ThinkPad T400s, T410s, and T410si 65 1010... 44 Numeric error codes 45 Error messages 49 Beep symptoms 50 No-beep symptoms 51 LCD-related symptoms 51 Intermittent problems 52 Undetermined problems 52 Chapter 5. FRU replacement notices 61 Screw notices 61 Retaining serial numbers 62 Restoring the serial number of the ...
...28 System supporting the Lenovo diagnostics programs 33 Power system checkout 35 Checking the AC adapter 35 Checking operational charging 36 Checking the battery pack 36 Checking the backup battery 37 Chapter 4. Removing and replacing a FRU 65 Before servicing ThinkPad T400s, T410s, and T410si 65 1010... 44 Numeric error codes 45 Error messages 49 Beep symptoms 50 No-beep symptoms 51 LCD-related symptoms 51 Intermittent problems 52 Undetermined problems 52 Chapter 5. FRU replacement notices 61 Screw notices 61 Retaining serial numbers 62 Restoring the serial number of the ...

Hardware Maintenance Manual
Page 50
...on page 45 • "Error messages" on page 49 • "Beep symptoms" on page 50 • "No-beep symptoms" on page 51 • "LCD-related symptoms" on page 51 • "Intermittent problems" on page 52 • "Undetermined problems" on , the computer returns from the hard disk drive. The...to -FRU index in POST or system operation. Symptom-to-FRU index This section contains following actions as the event that action. - Do not replace a nondefective FRU. When the power is powered off. If no numeric code is displayed, check the narrative descriptions of the following: • ...
...on page 45 • "Error messages" on page 49 • "Beep symptoms" on page 50 • "No-beep symptoms" on page 51 • "LCD-related symptoms" on page 51 • "Intermittent problems" on page 52 • "Undetermined problems" on , the computer returns from the hard disk drive. The...to -FRU index in POST or system operation. Symptom-to-FRU index This section contains following actions as the event that action. - Do not replace a nondefective FRU. When the power is powered off. If no numeric code is displayed, check the narrative descriptions of the following: • ...

Hardware Maintenance Manual
Page 57
...Symptom or error No beep, power-on indicator on 1 January, 2008 or later. • Lenovo will not provide replacement if the LCD is characteristic of four short beeps and a blank screen. DIMM. 3. System board Reinstall the ...operating system. Type the password and press Enter. A hard-disk password is set . Notes: • This policy applies to all ThinkPad Notebooks purchased on , LCD blank, and no POST. LCD-related symptoms Important: The TFT LCD...
...Symptom or error No beep, power-on indicator on 1 January, 2008 or later. • Lenovo will not provide replacement if the LCD is characteristic of four short beeps and a blank screen. DIMM. 3. System board Reinstall the ...operating system. Type the password and press Enter. A hard-disk password is set . Notes: • This policy applies to all ThinkPad Notebooks purchased on , LCD blank, and no POST. LCD-related symptoms Important: The TFT LCD...

Hardware Maintenance Manual
Page 58
...LCD connectors. 2. System board. • LCD screen unreadable. • Characters missing pixels. • Screen abnormal. • Wrong color displayed. Rerun the test to a variety of the following : 1. Non-ThinkPad devices b. Printer, mouse, and other external devices d. Hard disk drive f. System board. If no error is detected, replace... procedures to isolate the failing FRU (do the following devices: a. LCD assembly. PC Cards 4. See important note for "LCD-related symptoms." 2. FRU replacement should be due to verify that the power supply being used at...
...LCD connectors. 2. System board. • LCD screen unreadable. • Characters missing pixels. • Screen abnormal. • Wrong color displayed. Rerun the test to a variety of the following : 1. Non-ThinkPad devices b. Printer, mouse, and other external devices d. Hard disk drive f. System board. If no error is detected, replace... procedures to isolate the failing FRU (do the following devices: a. LCD assembly. PC Cards 4. See important note for "LCD-related symptoms." 2. FRU replacement should be due to verify that the power supply being used at...

Hardware Maintenance Manual
Page 59
7. LCD assembly Chapter 4. If the problem remains, replace the following FRUs one at a time (do not replace a nondefective FRU): a. System board b. Related service information 53
7. LCD assembly Chapter 4. If the problem remains, replace the following FRUs one at a time (do not replace a nondefective FRU): a. System board b. Related service information 53

Hardware Maintenance Manual
Page 91
Removing and replacing a FRU 85 Torque 0.181 Nm (1.85 kgfcm) a 1150 LCD unit For access, remove these FRUs in the figure a . Removal steps of Bluetooth-wireless radio switch FPC 1 2 5 3 Step 3 Screw (quantity) M2 × 4 mm, bind-head, ...
Removing and replacing a FRU 85 Torque 0.181 Nm (1.85 kgfcm) a 1150 LCD unit For access, remove these FRUs in the figure a . Removal steps of Bluetooth-wireless radio switch FPC 1 2 5 3 Step 3 Screw (quantity) M2 × 4 mm, bind-head, ...

Hardware Maintenance Manual
Page 94
... a padded surface such as follows: 1. wireless radio switch FPC" on page 84 • "1150 LCD unit" on page 85 Removal steps of system board, fan assembly, and 34-mm ExpressCard slot frame ...2. Place the computer on the top side of the system board are extremely sensitive. Run Diagnostics ➙ ThinkPad Devices ➙ HDD Active Protection Test. • Avoid rough handling of any kind of rough handling. ...If the system supports PC-Doctor for DOS, after replacing the system board, run PC-Doctor for the HDD Active Protection System™ a 88 Hardware Maintenance Manual...
... a padded surface such as follows: 1. wireless radio switch FPC" on page 84 • "1150 LCD unit" on page 85 Removal steps of system board, fan assembly, and 34-mm ExpressCard slot frame ...2. Place the computer on the top side of the system board are extremely sensitive. Run Diagnostics ➙ ThinkPad Devices ➙ HDD Active Protection Test. • Avoid rough handling of any kind of rough handling. ...If the system supports PC-Doctor for DOS, after replacing the system board, run PC-Doctor for the HDD Active Protection System™ a 88 Hardware Maintenance Manual...

Hardware Maintenance Manual
Page 101
Removing and replacing a FRU 95 3 2 2 2 2 2 2 2 2020 LCD latch L and R For access, remove the following FRU: • "1010 Battery pack" on page 66 • "2010 LCD bezel assembly" on page 94 Removal steps of LCD latch L and R 1 1 When installing: Attach the LCD latch marked L to the left-hand side and the LCD latch marked R to the right-hand side. 2030 Integrated camera or microphone sub card For access, remove these FRUs, in order: • "1010 Battery pack" on page 66 • "2010 LCD bezel assembly" on page 94 Chapter 8.
Removing and replacing a FRU 95 3 2 2 2 2 2 2 2 2020 LCD latch L and R For access, remove the following FRU: • "1010 Battery pack" on page 66 • "2010 LCD bezel assembly" on page 94 Removal steps of LCD latch L and R 1 1 When installing: Attach the LCD latch marked L to the left-hand side and the LCD latch marked R to the right-hand side. 2030 Integrated camera or microphone sub card For access, remove these FRUs, in order: • "1010 Battery pack" on page 66 • "2010 LCD bezel assembly" on page 94 Chapter 8.
Hardware Maintenance Manual
Page 103
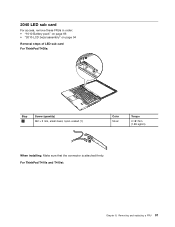
Removing and replacing a FRU 97 2040 LED sub card For access, remove these FRUs in order: • "1010 Battery pack" on page 66 • "2010 LCD bezel assembly" on page 94 Removal steps of LED sub card For ThinkPad T400s: 1 2 Step 1 Screw (quantity) M2 × 3 mm, small-head, nylon-coated (1) Color Silver Torque 0.181 Nm (1.85 kgfcm) 3 When installing: Make sure that the connector is attached firmly. For ThinkPad T410s and T410si: Chapter 8.
Removing and replacing a FRU 97 2040 LED sub card For access, remove these FRUs in order: • "1010 Battery pack" on page 66 • "2010 LCD bezel assembly" on page 94 Removal steps of LED sub card For ThinkPad T400s: 1 2 Step 1 Screw (quantity) M2 × 3 mm, small-head, nylon-coated (1) Color Silver Torque 0.181 Nm (1.85 kgfcm) 3 When installing: Make sure that the connector is attached firmly. For ThinkPad T410s and T410si: Chapter 8.

Hardware Maintenance Manual
Page 105
... When installing: When attaching the LCD panel to be damaged or a wire to the cover, press the left and right edges covered with metal gently with your fingers. DO NOT press the surface of the panel or apply any excessive force to the panel. Removing and replacing a FRU 99 a Removal steps... of LCD panel 1 Attention: Unplug the LCD cable with holding the left and right edges of the connector with your fingers. • DO NOT work by...
... When installing: When attaching the LCD panel to be damaged or a wire to the cover, press the left and right edges covered with metal gently with your fingers. DO NOT press the surface of the panel or apply any excessive force to the panel. Removing and replacing a FRU 99 a Removal steps... of LCD panel 1 Attention: Unplug the LCD cable with holding the left and right edges of the connector with your fingers. • DO NOT work by...

Hardware Maintenance Manual
Page 109
...; "1120 Keyboard bezel and speaker assembly" on page 81 • "1150 LCD unit" on page 85 • "2010 LCD bezel assembly" on page 94 • "2050 LCD panel" on page 98 • "2060 LCD cable" on page 100 • "2070 Hinge kit" on page 100 •...; "2080 LED cable" on page 101 Removal steps of antenna kit and LCD rear cover assembly 1 1 Step 1 Screw (quantity) M2 × 4 mm, bind-head, nylon-coated (2) 2 Color Black Torque 0.181 Nm... to be damaged by the cable guides, or a wire to any tension. Removing and replacing a FRU 103
...; "1120 Keyboard bezel and speaker assembly" on page 81 • "1150 LCD unit" on page 85 • "2010 LCD bezel assembly" on page 94 • "2050 LCD panel" on page 98 • "2060 LCD cable" on page 100 • "2070 Hinge kit" on page 100 •...; "2080 LED cable" on page 101 Removal steps of antenna kit and LCD rear cover assembly 1 1 Step 1 Screw (quantity) M2 × 4 mm, bind-head, nylon-coated (2) 2 Color Black Torque 0.181 Nm... to be damaged by the cable guides, or a wire to any tension. Removing and replacing a FRU 103

Hardware Maintenance Manual
Page 115
...ID column means that are available as xxU (where U is an example of a country designator) should be used for the replacement CRU if Lenovo does not receive the defective part within the computer that the part is your receipt of CRUs include the ac power adapter, power... of your responsibility; Parts list This chapter contains following types of CRUs in the CRU ID column. ThinkPad computers contain the following lists of the service parts. • "Overall" on page 110 • "LCD FRUs" on page 133 • "Keyboard" on page 138 • "Miscellaneous parts" on page...
...ID column means that are available as xxU (where U is an example of a country designator) should be used for the replacement CRU if Lenovo does not receive the defective part within the computer that the part is your receipt of CRUs include the ac power adapter, power... of your responsibility; Parts list This chapter contains following types of CRUs in the CRU ID column. ThinkPad computers contain the following lists of the service parts. • "Overall" on page 110 • "LCD FRUs" on page 133 • "Keyboard" on page 138 • "Miscellaneous parts" on page...


