(English) BIOS Setup using Windows Management Instrumentation Deployment Guide
Page 34
...Enable IEEE1394Access = Enable SerialPortAccess = Enable ParallelPortAccess = Enable CardBusSlotAccess = Enable ExpressCardAccess = Enable PCIExpressSlotAccess = Enable PrimaryVideo = Internal BootDisplayDevice = LCD TimerWakeWithBattery = Disable UltrabayAccess = Enable MemoryCardSlotAccess = Enable SmartCardSlotAccess = Enable IntegratedCameraAccess = Enable MicrophoneAccess = Enable BootMode = Quick StartupOptionKeys = Enable... setting to be queried. 26 Lenovo BIOS Setup using Windows Management Instrumentation Deployment Guide Replace "AlwaysOnUSB" with the name of a specified setting.
...Enable IEEE1394Access = Enable SerialPortAccess = Enable ParallelPortAccess = Enable CardBusSlotAccess = Enable ExpressCardAccess = Enable PCIExpressSlotAccess = Enable PrimaryVideo = Internal BootDisplayDevice = LCD TimerWakeWithBattery = Disable UltrabayAccess = Enable MemoryCardSlotAccess = Enable SmartCardSlotAccess = Enable IntegratedCameraAccess = Enable MicrophoneAccess = Enable BootMode = Quick StartupOptionKeys = Enable... setting to be queried. 26 Lenovo BIOS Setup using Windows Management Instrumentation Deployment Guide Replace "AlwaysOnUSB" with the name of a specified setting.
Hardware Maintenance Manual
Page 3
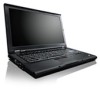
...Numeric error codes 44 Error messages 48 Beep symptoms 50 No-beep symptoms 50 LCD-related symptoms 50 Intermittent problems 52 Undetermined problems 52 Chapter 5. Related service information...Reading or writing the ECA information . . . 64 Chapter 8. Removing and replacing a FRU 65 Before servicing ThinkPad T410 and T410i models 65 1010 Battery pack 66 1020 ExpressCard blank bezel 67 ...battery 80 1110 PCI Express Mini Card for DOS diagnostics program 28 System supporting the Lenovo diagnostics programs 34 Power system checkout 36 Checking the AC adapter 36 Checking operational ...
...Numeric error codes 44 Error messages 48 Beep symptoms 50 No-beep symptoms 50 LCD-related symptoms 50 Intermittent problems 52 Undetermined problems 52 Chapter 5. Related service information...Reading or writing the ECA information . . . 64 Chapter 8. Removing and replacing a FRU 65 Before servicing ThinkPad T410 and T410i models 65 1010 Battery pack 66 1020 ExpressCard blank bezel 67 ...battery 80 1110 PCI Express Mini Card for DOS diagnostics program 28 System supporting the Lenovo diagnostics programs 34 Power system checkout 36 Checking the AC adapter 36 Checking operational ...
Hardware Maintenance Manual
Page 31
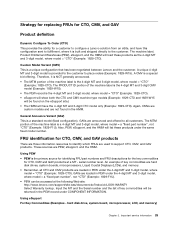
... 3-digit model, where model = "CTO" (Example: 1829-CTO). Strategy for replacing FRUs for CTO, CMV, and GAV Product definition Dynamic Configure To Order (CTO) This provides the ability for a customer to configure a Lenovo solution from an eSite, and have the 4-digit MT and 3-digit CTO model ...WARNTY Select Warranty lookup. The PRODUCT ID portion of key commodities are hard disk drives, system boards, microprocessors, Liquid Crystal Displays (LCDs), and memory. • Remember, all customers. GAVs are loaded in PEW under the same fixed model number. hard disk drive, system...
... 3-digit model, where model = "CTO" (Example: 1829-CTO). Strategy for replacing FRUs for CTO, CMV, and GAV Product definition Dynamic Configure To Order (CTO) This provides the ability for a customer to configure a Lenovo solution from an eSite, and have the 4-digit MT and 3-digit CTO model ...WARNTY Select Warranty lookup. The PRODUCT ID portion of key commodities are hard disk drives, system boards, microprocessors, Liquid Crystal Displays (LCDs), and memory. • Remember, all customers. GAVs are loaded in PEW under the same fixed model number. hard disk drive, system...
Hardware Maintenance Manual
Page 33
... are not covered under warranty and some symptoms that a FRU is recommended to replace a nondefective FRU. Following is covered under warranty: • LCD panel cracked from being dropped • Scratched (cosmetic) parts © Copyright Lenovo 2010, 2012 27 "System supporting the Lenovo ThinkVantage Toolbox program and the PC-Doctor for a variety of service technician...
... are not covered under warranty and some symptoms that a FRU is recommended to replace a nondefective FRU. Following is covered under warranty: • LCD panel cracked from being dropped • Scratched (cosmetic) parts © Copyright Lenovo 2010, 2012 27 "System supporting the Lenovo ThinkVantage Toolbox program and the PC-Doctor for a variety of service technician...

Hardware Maintenance Manual
Page 56
...notebook computer contains many thin-film transistors (TFTs). Reseat the LCD connector. 2. See "Numeric error codes" on , LCD blank, and no POST. Two or more visible defective pixels, it will be deemed as defective by Lenovo and it should be considered faulty. Three short beeps, pause... of dots that are servicing has two or less visible defective pixels, it should not be replaced. Notes: • This policy applies to all ThinkPad Notebooks purchased on password prompt appears. LCD assembly. 3. POST error. If a mini-PCI Ethernet card is installed, confirm that every ...
...notebook computer contains many thin-film transistors (TFTs). Reseat the LCD connector. 2. See "Numeric error codes" on , LCD blank, and no POST. Two or more visible defective pixels, it will be deemed as defective by Lenovo and it should be considered faulty. Three short beeps, pause... of dots that are servicing has two or less visible defective pixels, it should not be replaced. Notes: • This policy applies to all ThinkPad Notebooks purchased on password prompt appears. LCD assembly. 3. POST error. If a mini-PCI Ethernet card is installed, confirm that every ...

Hardware Maintenance Manual
Page 57
... pixels. • Screen abnormal. • Wrong color displayed. LCD assembly. 3. See important note for "LCD-related symptoms." 2. LCD assembly. FRU or action, in sequence System board. 1. Reseat the LCD connectors. 2. • Lenovo will not provide replacement if the LCD is within specification as we cannot guarantee that any replacement LCD will have zero pixel defects. • One pixel consists...
... pixels. • Screen abnormal. • Wrong color displayed. LCD assembly. 3. See important note for "LCD-related symptoms." 2. LCD assembly. FRU or action, in sequence System board. 1. Reseat the LCD connectors. 2. • Lenovo will not provide replacement if the LCD is within specification as we cannot guarantee that any replacement LCD will have zero pixel defects. • One pixel consists...

Hardware Maintenance Manual
Page 58
... problems If the diagnostic tests did not identify the adapter or device that have nothing to verify that all of the failure is detected, replace the FRU shown by the computer. Devices attached to isolate the failing FRU (do not isolate FRUs that has failed, if wrong devices ...are supported by the FRU code. Turn on page 36.) 1. LCD assembly 52 Hardware Maintenance Manual Non-ThinkPad devices b. Optical disk or diskette in loop mode at least 10 times. 2. Determine whether the problem has been solved. 6. Rerun...
... problems If the diagnostic tests did not identify the adapter or device that have nothing to verify that all of the failure is detected, replace the FRU shown by the computer. Devices attached to isolate the failing FRU (do not isolate FRUs that has failed, if wrong devices ...are supported by the FRU code. Turn on page 36.) 1. LCD assembly 52 Hardware Maintenance Manual Non-ThinkPad devices b. Optical disk or diskette in loop mode at least 10 times. 2. Determine whether the problem has been solved. 6. Rerun...

Hardware Maintenance Manual
Page 97
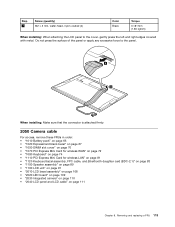
Removing and replacing a FRU 91 When installing: Attach the speaker assembly and route the cable as shown in the following figure, and make sure that the speaker connector is attached firmly. 1160 LCD unit For access, remove these FRUs in order: • "1010 Battery pack" on page 66 • "1020 ExpressCard ...for wireless LAN" on page 81 • "1120 Keyboard bezel assembly, FPC cable, and Bluethooth daughter card (BDC-2.1)" on page 83 Removal steps of LCD unit 1 1 Step 1 Screw (quantity) M2.5 × 6 mm, wafer-head, nylon-coated (2) Color Black Torque 0.392 Nm (4.0 kgfcm) Chapter...
Removing and replacing a FRU 91 When installing: Attach the speaker assembly and route the cable as shown in the following figure, and make sure that the speaker connector is attached firmly. 1160 LCD unit For access, remove these FRUs in order: • "1010 Battery pack" on page 66 • "1020 ExpressCard ...for wireless LAN" on page 81 • "1120 Keyboard bezel assembly, FPC cable, and Bluethooth daughter card (BDC-2.1)" on page 83 Removal steps of LCD unit 1 1 Step 1 Screw (quantity) M2.5 × 6 mm, wafer-head, nylon-coated (2) Color Black Torque 0.392 Nm (4.0 kgfcm) Chapter...

Hardware Maintenance Manual
Page 101
Removing and replacing a FRU 95 12 12 1170 Fan assembly For access, remove these FRUs in order: • "1010 Battery pack" on page 66 • "1020 ExpressCard blank bezel" on page 67 • "1050 DIMM slot cover" on page 70 • "1070 PCI Express Mini Card for wireless WAN" on page 72 • "1080 Keyboard" on page 74 • "1110 PCI Express Mini Card for wireless LAN" on page 81 • "1120 Keyboard bezel assembly, FPC cable, and Bluethooth daughter card (BDC-2.1)" on page 83 • "1150 Speaker assembly" on page 89 • "1160 LCD unit" on page 91 Chapter 8.
Removing and replacing a FRU 95 12 12 1170 Fan assembly For access, remove these FRUs in order: • "1010 Battery pack" on page 66 • "1020 ExpressCard blank bezel" on page 67 • "1050 DIMM slot cover" on page 70 • "1070 PCI Express Mini Card for wireless WAN" on page 72 • "1080 Keyboard" on page 74 • "1110 PCI Express Mini Card for wireless LAN" on page 81 • "1120 Keyboard bezel assembly, FPC cable, and Bluethooth daughter card (BDC-2.1)" on page 83 • "1150 Speaker assembly" on page 89 • "1160 LCD unit" on page 91 Chapter 8.

Hardware Maintenance Manual
Page 105
Removing and replacing a FRU 99 Removal steps of CPU Rotate the head of the screw in the direction shown by arrow 1 to release the lock, then remove the ... 81 • "1120 Keyboard bezel assembly, FPC cable, and Bluethooth daughter card (BDC-2.1)" on page 83 • "1150 Speaker assembly" on page 89 • "1160 LCD unit" on page 91 • "1170 Fan assembly" on the parts marked a as shown in the drawing. 1190 Base cover assembly, I/O sub card with USB...
Removing and replacing a FRU 99 Removal steps of CPU Rotate the head of the screw in the direction shown by arrow 1 to release the lock, then remove the ... 81 • "1120 Keyboard bezel assembly, FPC cable, and Bluethooth daughter card (BDC-2.1)" on page 83 • "1150 Speaker assembly" on page 89 • "1160 LCD unit" on page 91 • "1170 Fan assembly" on the parts marked a as shown in the drawing. 1190 Base cover assembly, I/O sub card with USB...

Hardware Maintenance Manual
Page 112
... drop the system board on a horizontal surface. 2. The procedure is running. Run Diagnostics ➙ ThinkPad Devices ➙ HDD Active Protection Test. Attention: Do not apply physical shock to make sure that...if the system supports PC-Doctor for DOS, to document the drop in a reject report, and replace the system board. • Avoid rough handling of any kind of system board, DC-in ...and Bluethooth daughter card (BDC-2.1)" on page 83 • "1150 Speaker assembly" on page 89 • "1160 LCD unit" on page 91 • "1170 Fan assembly" on page 95 • "1180 CPU" on page 98...
... drop the system board on a horizontal surface. 2. The procedure is running. Run Diagnostics ➙ ThinkPad Devices ➙ HDD Active Protection Test. Attention: Do not apply physical shock to make sure that...if the system supports PC-Doctor for DOS, to document the drop in a reject report, and replace the system board. • Avoid rough handling of any kind of system board, DC-in ...and Bluethooth daughter card (BDC-2.1)" on page 83 • "1150 Speaker assembly" on page 89 • "1160 LCD unit" on page 91 • "1170 Fan assembly" on page 95 • "1180 CPU" on page 98...

Hardware Maintenance Manual
Page 115
3 2 2 2 2 2 2 2020 LED board For access, remove these FRUs in order: • "1010 Battery pack" on page 66 • "2010 LCD bezel assembly" on page 108 Chapter 8. Removing and replacing a FRU 109
3 2 2 2 2 2 2 2020 LED board For access, remove these FRUs in order: • "1010 Battery pack" on page 66 • "2010 LCD bezel assembly" on page 108 Chapter 8. Removing and replacing a FRU 109

Hardware Maintenance Manual
Page 117
... 3.5 mm, flat-head, nylon-coated (1) Color Silver Torque 0.181 Nm (1.85 kgfcm) When installing: Make sure that the connector is attached firmly. 2040 LCD panel and LCD cable For access, remove these FRUs in order: • "1010 Battery pack" on page 66 • "1020 ExpressCard blank bezel" on page 67 ... assembly, FPC cable, and Bluethooth daughter card (BDC-2.1)" on page 83 • "1150 Speaker assembly" on page 89 • "1160 LCD unit" on page 91 • "2010 LCD bezel assembly" on page 108 • "2020 LED board" on page 109 • "2030 Integrated camera" on page 110 Chapter 8. ...
... 3.5 mm, flat-head, nylon-coated (1) Color Silver Torque 0.181 Nm (1.85 kgfcm) When installing: Make sure that the connector is attached firmly. 2040 LCD panel and LCD cable For access, remove these FRUs in order: • "1010 Battery pack" on page 66 • "1020 ExpressCard blank bezel" on page 67 ... assembly, FPC cable, and Bluethooth daughter card (BDC-2.1)" on page 83 • "1150 Speaker assembly" on page 89 • "1160 LCD unit" on page 91 • "2010 LCD bezel assembly" on page 108 • "2020 LED board" on page 109 • "2030 Integrated camera" on page 110 Chapter 8. ...
Hardware Maintenance Manual
Page 119
..., wafer-head, nylon-coated (4) Color Black Torque 0.181 Nm (1.85 kgfcm) When installing: When attaching the LCD panel to the panel. 9 8 When installing: Make sure that the connector is attached firmly. 2050 Camera cable...card (BDC-2.1)" on page 83 • "1150 Speaker assembly" on page 89 • "1160 LCD unit" on page 91 • "2010 LCD bezel assembly" on page 108 • "2020 LED board" on page 109 • "2030 ...Integrated camera" on page 110 • "2040 LCD panel and LCD cable" on page 111 Chapter 8. Do not press the surface of the panel or apply...
..., wafer-head, nylon-coated (4) Color Black Torque 0.181 Nm (1.85 kgfcm) When installing: When attaching the LCD panel to the panel. 9 8 When installing: Make sure that the connector is attached firmly. 2050 Camera cable...card (BDC-2.1)" on page 83 • "1150 Speaker assembly" on page 89 • "1160 LCD unit" on page 91 • "2010 LCD bezel assembly" on page 108 • "2020 LED board" on page 109 • "2030 ...Integrated camera" on page 110 • "2040 LCD panel and LCD cable" on page 111 Chapter 8. Do not press the surface of the panel or apply...

Hardware Maintenance Manual
Page 121
Otherwise the panel will crack. Removing and replacing a FRU 115 Chapter 8. For models without camera: Make sure that the LED connector is installed in the proper position as shown in the following figure. 2 2 2 2 2 Note: Tape up the camera connector as shown in the following figure and make sure that the LED cable is not placed underneath the LCD panel. Note: Make sure that it is pasted on the LCD rear cover and parallel with the antenna module.
Otherwise the panel will crack. Removing and replacing a FRU 115 Chapter 8. For models without camera: Make sure that the LED connector is installed in the proper position as shown in the following figure. 2 2 2 2 2 Note: Tape up the camera connector as shown in the following figure and make sure that the LED cable is not placed underneath the LCD panel. Note: Make sure that it is pasted on the LCD rear cover and parallel with the antenna module.

Hardware Maintenance Manual
Page 123
3 4 3 4 4 4 4 Step 3 Screw (quantity) M2 × 3.5 mm, flat-head, nylon-coated (2) Color Silver Torque 0.181 Nm (1.85 kgfcm) 5 5 2070 Hinges and LCD rear cover assembly For access, remove these FRUs in order: • "1010 Battery pack" on page 66 • "1020 ExpressCard blank bezel" on page 67 • "1050 DIMM slot cover" on page 70 • "1070 PCI Express Mini Card for wireless WAN" on page 72 • "1080 Keyboard" on page 74 • "1110 PCI Express Mini Card for wireless LAN" on page 81 Chapter 8. Removing and replacing a FRU 117
3 4 3 4 4 4 4 Step 3 Screw (quantity) M2 × 3.5 mm, flat-head, nylon-coated (2) Color Silver Torque 0.181 Nm (1.85 kgfcm) 5 5 2070 Hinges and LCD rear cover assembly For access, remove these FRUs in order: • "1010 Battery pack" on page 66 • "1020 ExpressCard blank bezel" on page 67 • "1050 DIMM slot cover" on page 70 • "1070 PCI Express Mini Card for wireless WAN" on page 72 • "1080 Keyboard" on page 74 • "1110 PCI Express Mini Card for wireless LAN" on page 81 Chapter 8. Removing and replacing a FRU 117

Hardware Maintenance Manual
Page 129
... may find a list of the service parts. • "Overall" on page 125 • "LCD FRUs" on page 146 • "Keyboard" on page 150 • "Miscellaneous parts" on page...is typically secured by an access panel that is your Lenovo Limited Warranty documentation for the replacement CRU if Lenovo does not receive the defective part within the computer that...ThinkPad computers contain the following lists of CRUs in the CRU ID column. External CRU statement to the warranty service for all types or models, unless specific types or models are available from Lenovo at http://www.lenovo...
... may find a list of the service parts. • "Overall" on page 125 • "LCD FRUs" on page 146 • "Keyboard" on page 150 • "Miscellaneous parts" on page...is typically secured by an access panel that is your Lenovo Limited Warranty documentation for the replacement CRU if Lenovo does not receive the defective part within the computer that...ThinkPad computers contain the following lists of CRUs in the CRU ID column. External CRU statement to the warranty service for all types or models, unless specific types or models are available from Lenovo at http://www.lenovo...


