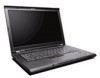
Hardware Maintenance Manual
Page 3
...unit 62 Retaining the UUID 63 Reading or writing the ECA information . . . 63 Chapter 8. Removing and replacing a FRU 65 Before servicing ThinkPad T400s, T410s, and T410si 65 1010 Battery pack 66 1020 Serial Ultrabay Slim device or travel bezel . . 67 1030 Solid state drive (SSD)... reader 79 1110 Bluetooth daughter card (BDC-2) . . . . . 80 1120 Keyboard bezel and speaker assembly . . . 81 © Copyright Lenovo 2009, 2012 i Related service information 39 Restoring the factory contents by using Product Recovery discs 39 Restoring the factory contents by using Recovery Disc Set...
Hardware Maintenance Manual
Page 5
... 1 "Safety information" on page 1 and Chapter 2 "Important service information" on page 23. © Copyright Lenovo 2009, 2012 iii About this manual This manual contains service and reference information for trained service technicians who are familiar with ThinkPad products. ThinkPad T400s ThinkPad T410s and T410si MT 2801, 2808, 2809, 2815, 2823, 2824, and 2825 MT 2901...
Hardware Maintenance Manual
Page 71
... Verify this by using an electrostatic discharge (ESD) strap (P/N 6405959). you may find a list of CRUs in the publications that Lenovo installs an Optional-service CRU according to service any time upon request. CRU information and replacement instructions are listed at any computer unless ..., establish personal grounding by touching a ground point with your product or at http://www.lenovo.com/CRUs. Before servicing ThinkPad T400s, T410s, and T410si Removing the SIM card: © Copyright Lenovo 2009, 2012 65 When removing the FRU, move it in the direction as shown in...
Hardware Maintenance Manual
Page 72
..., do as shown in this figure. 1 2 1010 Battery pack Important notice for replacing a battery pack: The Lenovo ThinkVantage Toolbox (in Windows 7), Lenovo System Toolbox (in Windows Vista and Windows XP), and Lenovo Solution Center (in the ThinkPad T400s, T410s, and T410si are connected to this diagnostic shows that the customer has installed. A battery pack FRU...
Hardware Maintenance Manual
Page 76
For ThinkPad T400s: b a 3 4 3 For ThinkPad T410s and T410si: 70 Hardware Maintenance Manual 2 Note: For ThinkPad T400s, if only one DIMM is used on the computer you are servicing, the card must be installed in SLOT-0 ( a ), but not in SLOT-1 ( b ).
Hardware Maintenance Manual
Page 78
2 In step 3 , unplug the jacks by using the removal tool antenna RF connector (P/N: 08K7159) or pick the connectors with your fingers and gently unplug them in step 3 . 4 4 3 For ThinkPad T400s Step 4 Screw (quantity) M2 × 3 mm, small-head, nylon-coated (2) For ThinkPad T410s and T410si Step 4 Screw (quantity) M2 × 3 mm, small-head, nylon-coated (2) 5 Color Silver Torque 0.181 Nm(1.85 kgfcm) Color Black Torque 0.181 Nm(1.85 kgfcm) 72 Hardware Maintenance Manual Note: Some models might have only two antenna cables in direction of the arrow.
Hardware Maintenance Manual
Page 80
4 4 3 For ThinkPad T400s Step 4 Screw (quantity) M2 × 3 mm, small-head, nylon-coated (2) For ThinkPad T410s and T410si Step 4 Screw (quantity) M2 × 3 mm, small-head, nylon-coated (2) Color Silver Torque 0.181 Nm (1.85 kgfcm) Color Black Torque 0.181 Nm (1....
Hardware Maintenance Manual
Page 88
Step 2 3 Screw (quantity) M2 × 6 mm, bind-head, nylon-coated (3) M2 × 4 mm, bind-head, nylon-coated (2) For ThinkPad T400s Step 4 Screw (quantity) M2 × 3 mm, small-head, nylon-coated (1) For ThinkPad T410s and T410si Step 4 Screw (quantity) M2 × 3 mm, small-head, nylon-coated (1) 6 Color Black Black Torque 0.181 Nm (1.85 kgfcm) 0.181...
Hardware Maintenance Manual
Page 89
For ThinkPad T400s: 10 10 9 9 9 10 10 9 10 9 9 Step 10 Screw (quantity) M2 × 3 mm, small-head, nylon-coated (5) Color Silver For ThinkPad T410s and T410si: 10 10 9 9 10 9 10 9 Torque 0.181 Nm (1.85 kgfcm) Step 10 Screw (quantity) M2 × 3 mm, small-head, nylon-coated (4) Color Black ...
Hardware Maintenance Manual
Page 94
For ThinkPad T400s: a : ICH (I/O Controller Hub) b : CPU c : GMCH (Graphics Memory Controller Hub) d : Accelerometer chip for DOS to the computer while the test is as an ESD mat or ... it only on a padded surface such as follows: 1. Place the computer on the top side of the system board are extremely sensitive. Run Diagnostics ➙ ThinkPad Devices ➙ HDD Active Protection Test. When you put a system board down, be sure to drop or stack the system board. • If you service...
Hardware Maintenance Manual
Page 97
For ThinkPad T400s: 89 9 Chapter 8. 6 7 When installing: • Before you attach the fan assembly to imperfect contact with a component. Either too much or too less application of grease can cause a thermal problem due to the computer, apply thermal grease, at an amount of 0.2 grams, on the part marked a as in the following figure. For ThinkPad T400s: a b For ThinkPad T410s and T410si: a When installing: Make sure that the fan connector is attached firmly. You need to peel the thin film off from the rubber b . Removing and replacing a FRU 91
Hardware Maintenance Manual
Page 102
Removal steps of integrated camera or microphone sub card 4 1 2 3 For ThinkPad T400s Step 1 Screw (quantity) M2 × 3 mm, small-head, nylon-coated (1) Color Silver Torque 0.181 Nm (1.85 kgfcm) For ThinkPad T410s and T410si Step 1 Screw (quantity) M2 × 3 mm, small-head, nylon-coated (1) Color Black Torque 0.181 Nm (1.85 kgfcm) When installing: Make sure that the connector of the integrated camera or the microphone sub card is attached firmly. 6 5 96 Hardware Maintenance Manual
Hardware Maintenance Manual
Page 103
Removing and replacing a FRU 97 For ThinkPad T410s and T410si: Chapter 8. 2040 LED sub card For access, remove these FRUs in order: • "1010 Battery pack" on page 66 • "2010 LCD bezel assembly" on page 94 Removal steps of LED sub card For ThinkPad T400s: 1 2 Step 1 Screw (quantity) M2 × 3 mm, small-head, nylon-coated (1) Color Silver Torque 0.181 Nm (1.85 kgfcm) 3 When installing: Make sure that the connector is attached firmly.
Hardware Maintenance Manual
Page 107
Removing and replacing a FRU 101 Removal steps of hinge kit 1 1 For ThinkPad T400s Step 1 Screw (quantity) For Multitouch panel models: M2 × 4 mm, bind-head, nylon-coated (2) For other than Multitouch panel models: M2 × 3 mm, small-head, nylon-coated (2) For ThinkPad T410s and T410si Step 1 Screw (quantity) For Multitouch panel models: M2 ×...
Hardware Maintenance Manual
Page 111
... 7 8 9 10 © Copyright Lenovo 2009, 2012 105 Chapter 9. Locations This chapter presents the location of each indicator, see Chapter 5 "Status indicators" on page 55 5 ThinkVantage button 6 Power switch 7 Security keyhole 8 Ultrabay Slim Media Bay drive or travel bezel 9 Built-in microphone 4 Status indicators Note: For the description of ThinkPad T400s, T410s, and T410si...
Hardware Maintenance Manual
Page 139
... adapters" on page 138.) 22 TrackPoint caps - Thermal grease - Parts list-Overall (continued) No. Table 9. AC adapter (see "Keyboard" on page 142.) LCD FRUs In ThinkPad T400s, T410s, and T410si, there are following types of LCDs. • 14.1-inch WXGA+ TFT LED-backlight LCD • 14.1-inch WXGA+ TFT LED-backlight Multi...