
Hardware Maintenance Manual
Page 50
...you determine, during regular servicing, what FRUs are likely to need to be any number. Symptom-to -FRU index in suspend mode. Do not replace a nondefective FRU. A numeric error is restored from hibernation mode and resumes operation. The hibernation file in the boot record on page 48 The ..., and if the user does not do any operation with the keyboard, the TrackPoint, the hard disk drive, the parallel connector, or the diskette drive within that action. - Pressing the power button. - Note: Do the FRU replacement or other actions in the sequence shown in the column headed "...
...you determine, during regular servicing, what FRUs are likely to need to be any number. Symptom-to -FRU index in suspend mode. Do not replace a nondefective FRU. A numeric error is restored from hibernation mode and resumes operation. The hibernation file in the boot record on page 48 The ..., and if the user does not do any operation with the keyboard, the TrackPoint, the hard disk drive, the parallel connector, or the diskette drive within that action. - Pressing the power button. - Note: Do the FRU replacement or other actions in the sequence shown in the column headed "...

Hardware Maintenance Manual
Page 51
...action, in the ThinkPad Notebooks, see the manual for more than 8 hours by connecting the ac adapter. 2. EAIA data access error-The access to reset the time and date. 3. System board. 0210 Stuck Key (two short beeps) Change keyboard, and restart the computer. 0211 Keyboard error (two ... beeps) Turn off the computer and discharge CMOS. Then restart the computer. 0260 System timer error. (two short beeps) 1. DIMM. 2. Replace the backup battery and run BIOS Setup Utility to EEPROM is failed. (two short beeps) 0189 Invalid RFID configuration information area-The EEPROM checksum ...
...action, in the ThinkPad Notebooks, see the manual for more than 8 hours by connecting the ac adapter. 2. EAIA data access error-The access to reset the time and date. 3. System board. 0210 Stuck Key (two short beeps) Change keyboard, and restart the computer. 0211 Keyboard error (two ... beeps) Turn off the computer and discharge CMOS. Then restart the computer. 0260 System timer error. (two short beeps) 1. DIMM. 2. Replace the backup battery and run BIOS Setup Utility to EEPROM is failed. (two short beeps) 0189 Invalid RFID configuration information area-The EEPROM checksum ...
Hardware Maintenance Manual
Page 83
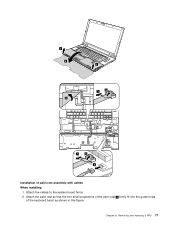
Removing and replacing a FRU 77 Chapter 8. Attach the palm rest so that the two small projections of the palm rest a firmly fit into the guide holes of palm rest assembly with cables When installing: 1. Attach the cables to the system board firmly. 2. 3 4 5 3 7 6 7 6 8 Installation of the keyboard bezel as shown in this figure.
Removing and replacing a FRU 77 Chapter 8. Attach the palm rest so that the two small projections of the palm rest a firmly fit into the guide holes of palm rest assembly with cables When installing: 1. Attach the cables to the system board firmly. 2. 3 4 5 3 7 6 7 6 8 Installation of the keyboard bezel as shown in this figure.
Hardware Maintenance Manual
Page 89
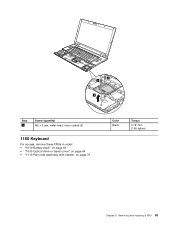
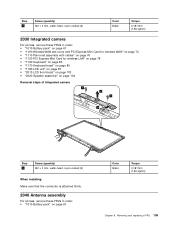
2 2 3 Step 2 Screw (quantity) M2 × 3 mm, wafer-head, nylon-coated (2) 1160 Keyboard For access, remove these FRUs in order: • "1010 Battery pack" on page 61 • "1030 Optical drive or travel cover" on page 64 • "1110 Palm rest assembly with cables" on page 76 Color Black Torque 0.181 Nm (1.85 kgfcm) Chapter 8. Removing and replacing a FRU 83
2 2 3 Step 2 Screw (quantity) M2 × 3 mm, wafer-head, nylon-coated (2) 1160 Keyboard For access, remove these FRUs in order: • "1010 Battery pack" on page 61 • "1030 Optical drive or travel cover" on page 64 • "1110 Palm rest assembly with cables" on page 76 Color Black Torque 0.181 Nm (1.85 kgfcm) Chapter 8. Removing and replacing a FRU 83

Hardware Maintenance Manual
Page 91
... 64 Chapter 8. Secure the keyboard by tightening the screws from the bottom side of the keyboard 1. Gently press the keys with your palms and slightly slide the keyboard toward you until it snaps into position. 4. Attach the keyboard so that the keyboard edge is under the frame ...as follows: Installation of the computer. 1170 Keyboard bezel For access, remove these FRUs in the following figure. 3. Removing and replacing a FRU 85 Attach ...
... 64 Chapter 8. Secure the keyboard by tightening the screws from the bottom side of the keyboard 1. Gently press the keys with your palms and slightly slide the keyboard toward you until it snaps into position. 4. Attach the keyboard so that the keyboard edge is under the frame ...as follows: Installation of the computer. 1170 Keyboard bezel For access, remove these FRUs in the following figure. 3. Removing and replacing a FRU 85 Attach ...
Hardware Maintenance Manual
Page 97
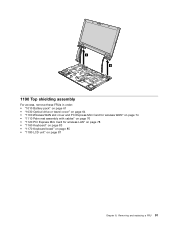
6 6 1190 Top shielding assembly For access, remove these FRUs in order: • "1010 Battery pack" on page 61 • "1030 Optical drive or travel cover" on page 64 • "1100 Wireless WAN slot cover and PCI Express Mini Card for wireless WAN" on page 74 • "1110 Palm rest assembly with cables" on page 76 • "1120 PCI Express Mini Card for wireless LAN" on page 78 • "1160 Keyboard" on page 83 • "1170 Keyboard bezel" on page 85 • "1180 LCD unit" on page 87 Chapter 8. Removing and replacing a FRU 91
6 6 1190 Top shielding assembly For access, remove these FRUs in order: • "1010 Battery pack" on page 61 • "1030 Optical drive or travel cover" on page 64 • "1100 Wireless WAN slot cover and PCI Express Mini Card for wireless WAN" on page 74 • "1110 Palm rest assembly with cables" on page 76 • "1120 PCI Express Mini Card for wireless LAN" on page 78 • "1160 Keyboard" on page 83 • "1170 Keyboard bezel" on page 85 • "1180 LCD unit" on page 87 Chapter 8. Removing and replacing a FRU 91

Hardware Maintenance Manual
Page 105
Removing and replacing a FRU 99 For ThinkPad SL510 and L510: For ThinkPad SL410 and L410: 1220 DC-in cable and base cover For access, remove these FRUs in order: • "1010 Battery pack" on page 61 • "... wireless LAN" on page 78 • "1150 Media Card Reader slot board and Media Card Reader cable assembly" on page 81 • "1160 Keyboard" on page 83 • "1170 Keyboard bezel" on page 85 • "1180 LCD unit" on page 87 • "1190 Top shielding assembly" on page 91 • "1200 System...
Removing and replacing a FRU 99 For ThinkPad SL510 and L510: For ThinkPad SL410 and L410: 1220 DC-in cable and base cover For access, remove these FRUs in order: • "1010 Battery pack" on page 61 • "... wireless LAN" on page 78 • "1150 Media Card Reader slot board and Media Card Reader cable assembly" on page 81 • "1160 Keyboard" on page 83 • "1170 Keyboard bezel" on page 85 • "1180 LCD unit" on page 87 • "1190 Top shielding assembly" on page 91 • "1200 System...
Hardware Maintenance Manual
Page 109
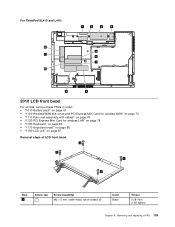
Removing and replacing a FRU 103 For ThinkPad SL410 and L410: 12 11 10 1 2 3 4 5 6 7 9 8 2010 LCD front bezel For access, remove these FRUs in order: • "1010 Battery pack" on page 61 • "...; "1110 Palm rest assembly with cables" on page 76 • "1120 PCI Express Mini Card for wireless LAN" on page 78 • "1160 Keyboard" on page 83 • "1170 Keyboard bezel" on page 85 • "1180 LCD unit" on page 87 Removal steps of LCD front bezel 1 1 1 1 Step 1 Screw cap Screw (quantity...
Removing and replacing a FRU 103 For ThinkPad SL410 and L410: 12 11 10 1 2 3 4 5 6 7 9 8 2010 LCD front bezel For access, remove these FRUs in order: • "1010 Battery pack" on page 61 • "...; "1110 Palm rest assembly with cables" on page 76 • "1120 PCI Express Mini Card for wireless LAN" on page 78 • "1160 Keyboard" on page 83 • "1170 Keyboard bezel" on page 85 • "1180 LCD unit" on page 87 Removal steps of LCD front bezel 1 1 1 1 Step 1 Screw cap Screw (quantity...
Hardware Maintenance Manual
Page 111
...; "1110 Palm rest assembly with cables" on page 76 • "1120 PCI Express Mini Card for wireless LAN" on page 78 • "1160 Keyboard" on page 83 • "1170 Keyboard bezel" on page 85 • "1180 LCD unit" on page 87 • "2010 LCD front bezel" on page 103 • "2020 Speaker... assembly For access, remove these FRUs in order: • "1010 Battery pack" on page 61 Color Black Torque 0.181 Nm (1.85 kgfcm) Chapter 8. Removing and replacing a FRU 105
...; "1110 Palm rest assembly with cables" on page 76 • "1120 PCI Express Mini Card for wireless LAN" on page 78 • "1160 Keyboard" on page 83 • "1170 Keyboard bezel" on page 85 • "1180 LCD unit" on page 87 • "2010 LCD front bezel" on page 103 • "2020 Speaker... assembly For access, remove these FRUs in order: • "1010 Battery pack" on page 61 Color Black Torque 0.181 Nm (1.85 kgfcm) Chapter 8. Removing and replacing a FRU 105
Hardware Maintenance Manual
Page 121
... Warranty documentation for full details. You may be resolved with your product. ThinkPad computers contain the following lists of the service parts. • "Overall" on page 116 • "LCD FRUs" on page 142 • "Keyboard" on page 151 • "Miscellaneous parts" on page 152 •... return is required: (1) return instructions, a prepaid shipping label, and a container will ship the CRU to the warranty service for the replacement CRU if Lenovo does not receive the defective part within the computer that are held by a single asterisk (*) or two asterisks (**) in U. •...
... Warranty documentation for full details. You may be resolved with your product. ThinkPad computers contain the following lists of the service parts. • "Overall" on page 116 • "LCD FRUs" on page 142 • "Keyboard" on page 151 • "Miscellaneous parts" on page 152 •... return is required: (1) return instructions, a prepaid shipping label, and a container will ship the CRU to the warranty service for the replacement CRU if Lenovo does not receive the defective part within the computer that are held by a single asterisk (*) or two asterisks (**) in U. •...


