
Hardware Maintenance Manual
Page 50
..." on page 47 • "Intermittent problems" on page 48 • "Undetermined problems" on page 48 The symptom-to restart the system. This index can be replaced next. Also, the computer goes into hibernation mode, perform that time. • If the timer conditions are stored on , the computer returns from the hard... the computer enters the hibernation mode while it is listed first, in sequence." The most likely cause is docked to be any operation with the keyboard, the TrackPoint, the hard disk drive, the parallel connector, or the diskette drive within that action. -
..." on page 47 • "Intermittent problems" on page 48 • "Undetermined problems" on page 48 The symptom-to restart the system. This index can be replaced next. Also, the computer goes into hibernation mode, perform that time. • If the timer conditions are stored on , the computer returns from the hard... the computer enters the hibernation mode while it is listed first, in sequence." The most likely cause is docked to be any operation with the keyboard, the TrackPoint, the hard disk drive, the parallel connector, or the diskette drive within that action. -

Hardware Maintenance Manual
Page 51
...or action, in the ThinkPad Notebooks, see the manual for more than 8 hours by pressing F10. 2. Battery pack. 0191 System Security-Invalid Remote Change requested. 1. DIMM. 2. Charge the backup battery for that device. Default configuration used . (two short beeps) 1. Replace the backup battery and ...connecting the ac adapter. 2. System board. 0210 Stuck Key (two short beeps) Change keyboard, and restart the computer. 0211 Keyboard error (two short beeps) Run interactive tests of the keyboard and the auxiliary input device. 0230 Shadow RAM error-Shadow RAM fails at offset nnnn. ...
...or action, in the ThinkPad Notebooks, see the manual for more than 8 hours by pressing F10. 2. Battery pack. 0191 System Security-Invalid Remote Change requested. 1. DIMM. 2. Charge the backup battery for that device. Default configuration used . (two short beeps) 1. Replace the backup battery and ...connecting the ac adapter. 2. System board. 0210 Stuck Key (two short beeps) Change keyboard, and restart the computer. 0211 Keyboard error (two short beeps) Run interactive tests of the keyboard and the auxiliary input device. 0230 Shadow RAM error-Shadow RAM fails at offset nnnn. ...
Hardware Maintenance Manual
Page 83
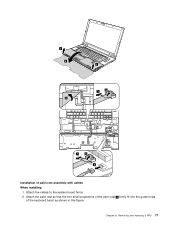
3 4 5 3 7 6 7 6 8 Installation of the keyboard bezel as shown in this figure. Attach the palm rest so that the two small projections of the palm rest a firmly fit into the guide holes of palm rest assembly with cables When installing: 1. Attach the cables to the system board firmly. 2. Chapter 8. Removing and replacing a FRU 77
3 4 5 3 7 6 7 6 8 Installation of the keyboard bezel as shown in this figure. Attach the palm rest so that the two small projections of the palm rest a firmly fit into the guide holes of palm rest assembly with cables When installing: 1. Attach the cables to the system board firmly. 2. Chapter 8. Removing and replacing a FRU 77
Hardware Maintenance Manual
Page 89
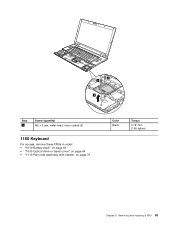
2 2 3 Step 2 Screw (quantity) M2 × 3 mm, wafer-head, nylon-coated (2) 1160 Keyboard For access, remove these FRUs in order: • "1010 Battery pack" on page 61 • "1030 Optical drive or travel cover" on page 64 • "1110 Palm rest assembly with cables" on page 76 Color Black Torque 0.181 Nm (1.85 kgfcm) Chapter 8. Removing and replacing a FRU 83
2 2 3 Step 2 Screw (quantity) M2 × 3 mm, wafer-head, nylon-coated (2) 1160 Keyboard For access, remove these FRUs in order: • "1010 Battery pack" on page 61 • "1030 Optical drive or travel cover" on page 64 • "1110 Palm rest assembly with cables" on page 76 Color Black Torque 0.181 Nm (1.85 kgfcm) Chapter 8. Removing and replacing a FRU 83

Hardware Maintenance Manual
Page 91
... replacing a FRU 85 Gently press the keys with your palms and slightly slide the keyboard toward you until it snaps into position. 4. Secure the keyboard by tightening the screws from the bottom side of the keyboard 1. Attach the connectors. 2. Attach the keyboard so that the keyboard edge... is under the frame as follows: Installation of the computer. 1170 Keyboard bezel For access, remove these FRUs in...
... replacing a FRU 85 Gently press the keys with your palms and slightly slide the keyboard toward you until it snaps into position. 4. Secure the keyboard by tightening the screws from the bottom side of the keyboard 1. Attach the connectors. 2. Attach the keyboard so that the keyboard edge... is under the frame as follows: Installation of the computer. 1170 Keyboard bezel For access, remove these FRUs in...
Hardware Maintenance Manual
Page 97
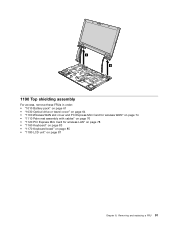
Removing and replacing a FRU 91 6 6 1190 Top shielding assembly For access, remove these FRUs in order: • "1010 Battery pack" on page 61 • "1030 Optical drive or travel cover" on page 64 • "1100 Wireless WAN slot cover and PCI Express Mini Card for wireless WAN" on page 74 • "1110 Palm rest assembly with cables" on page 76 • "1120 PCI Express Mini Card for wireless LAN" on page 78 • "1160 Keyboard" on page 83 • "1170 Keyboard bezel" on page 85 • "1180 LCD unit" on page 87 Chapter 8.
Removing and replacing a FRU 91 6 6 1190 Top shielding assembly For access, remove these FRUs in order: • "1010 Battery pack" on page 61 • "1030 Optical drive or travel cover" on page 64 • "1100 Wireless WAN slot cover and PCI Express Mini Card for wireless WAN" on page 74 • "1110 Palm rest assembly with cables" on page 76 • "1120 PCI Express Mini Card for wireless LAN" on page 78 • "1160 Keyboard" on page 83 • "1170 Keyboard bezel" on page 85 • "1180 LCD unit" on page 87 Chapter 8.

Hardware Maintenance Manual
Page 105
Removing and replacing a FRU 99 For ThinkPad SL510 and L510: For ThinkPad SL410 and L410: 1220 DC-in cable and base cover For access, remove these FRUs in order: • "1010 Battery pack" on page 61 • "... wireless LAN" on page 78 • "1150 Media Card Reader slot board and Media Card Reader cable assembly" on page 81 • "1160 Keyboard" on page 83 • "1170 Keyboard bezel" on page 85 • "1180 LCD unit" on page 87 • "1190 Top shielding assembly" on page 91 • "1200 System...
Removing and replacing a FRU 99 For ThinkPad SL510 and L510: For ThinkPad SL410 and L410: 1220 DC-in cable and base cover For access, remove these FRUs in order: • "1010 Battery pack" on page 61 • "... wireless LAN" on page 78 • "1150 Media Card Reader slot board and Media Card Reader cable assembly" on page 81 • "1160 Keyboard" on page 83 • "1170 Keyboard bezel" on page 85 • "1180 LCD unit" on page 87 • "1190 Top shielding assembly" on page 91 • "1200 System...
Hardware Maintenance Manual
Page 109
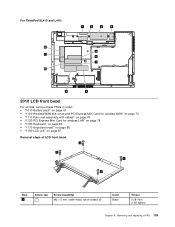
For ThinkPad SL410 and L410: 12 11 10 1 2 3 4 5 6 7 9 8 2010 LCD front bezel For access, remove these FRUs in order: • "1010 Battery pack" on page 61 • "...; "1110 Palm rest assembly with cables" on page 76 • "1120 PCI Express Mini Card for wireless LAN" on page 78 • "1160 Keyboard" on page 83 • "1170 Keyboard bezel" on page 85 • "1180 LCD unit" on page 87 Removal steps of LCD front bezel 1 1 1 1 Step 1 Screw cap Screw (quantity...
For ThinkPad SL410 and L410: 12 11 10 1 2 3 4 5 6 7 9 8 2010 LCD front bezel For access, remove these FRUs in order: • "1010 Battery pack" on page 61 • "...; "1110 Palm rest assembly with cables" on page 76 • "1120 PCI Express Mini Card for wireless LAN" on page 78 • "1160 Keyboard" on page 83 • "1170 Keyboard bezel" on page 85 • "1180 LCD unit" on page 87 Removal steps of LCD front bezel 1 1 1 1 Step 1 Screw cap Screw (quantity...
Hardware Maintenance Manual
Page 111
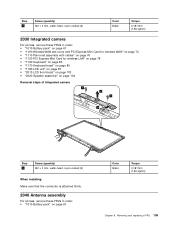
Removing and replacing a FRU 105 Step 1 Screw (quantity) M2 × 3 mm, wafer-head, nylon-coated (2) Color Black Torque 0.181 Nm (1.85 kgfcm) 2030 Integrated camera For access, remove ...; "1110 Palm rest assembly with cables" on page 76 • "1120 PCI Express Mini Card for wireless LAN" on page 78 • "1160 Keyboard" on page 83 • "1170 Keyboard bezel" on page 85 • "1180 LCD unit" on page 87 • "2010 LCD front bezel" on page 103 • "2020 Speaker...
Removing and replacing a FRU 105 Step 1 Screw (quantity) M2 × 3 mm, wafer-head, nylon-coated (2) Color Black Torque 0.181 Nm (1.85 kgfcm) 2030 Integrated camera For access, remove ...; "1110 Palm rest assembly with cables" on page 76 • "1120 PCI Express Mini Card for wireless LAN" on page 78 • "1160 Keyboard" on page 83 • "1170 Keyboard bezel" on page 85 • "1180 LCD unit" on page 87 • "2010 LCD front bezel" on page 103 • "2020 Speaker...
Hardware Maintenance Manual
Page 121
... and described as xxU (where U is not a CRU. ThinkPad computers contain the following lists of CRUs: - Optional-service CRUs: These CRUs are isolated parts within thirty (30) days of your responsibility; Examples of the replacement CRU. Once the access panel is removed, the specific CRU ...return is a Self-service CRU; you may include the memory module, wireless card, keyboard, and palm rest with the replacement CRU; An N in the CRU ID column. A single asterisk (*) means that Lenovo installs an Optional-service CRU according to you can be included with finger print reader and...
... and described as xxU (where U is not a CRU. ThinkPad computers contain the following lists of CRUs: - Optional-service CRUs: These CRUs are isolated parts within thirty (30) days of your responsibility; Examples of the replacement CRU. Once the access panel is removed, the specific CRU ...return is a Self-service CRU; you may include the memory module, wireless card, keyboard, and palm rest with the replacement CRU; An N in the CRU ID column. A single asterisk (*) means that Lenovo installs an Optional-service CRU according to you can be included with finger print reader and...


