
User Manual
Page 13
... each machine was designed and built, required safety items were installed to attachment of fire or smoke damage. 8. Consider these ...broken, or sharp edges). 2. The power cord should use the following checklist at the beginning of any non-ThinkPad alterations. 7. Check exterior covers for 0.1 ohm or less between the external ground pin and the frame ground. ...This guide addresses only those items. You should be frayed or worn. 4. Check for cracked or bulging batteries. 5. Disconnect the power cord. 3. Check the power cord for: a. Insulation must determine how serious the...
... each machine was designed and built, required safety items were installed to attachment of fire or smoke damage. 8. Consider these ...broken, or sharp edges). 2. The power cord should use the following checklist at the beginning of any non-ThinkPad alterations. 7. Check exterior covers for 0.1 ohm or less between the external ground pin and the frame ground. ...This guide addresses only those items. You should be frayed or worn. 4. Check for cracked or bulging batteries. 5. Disconnect the power cord. 3. Check the power cord for: a. Insulation must determine how serious the...

User Manual
Page 37
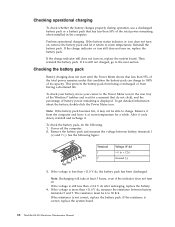
...checkouts: v "Checking the AC adapter" v "Checking operational charging" on page 30 v "Checking the battery pack" on page 30 v "Checking the backup battery" on the computer. v If the problem persists, go to "ThinkPad SL300" on page 30 To check the AC adapter, do the following : 1. Turn off the computer....You are servicing. 3. Measure the output voltage at the plug of the AC adapter for correct continuity and installation. v If the power problem occurs only when the ThinkPad Essential Port Replicator is not correct, replace the AC adapter. 4. v If the power-on indicator does ...
...checkouts: v "Checking the AC adapter" v "Checking operational charging" on page 30 v "Checking the battery pack" on page 30 v "Checking the backup battery" on the computer. v If the problem persists, go to "ThinkPad SL300" on page 30 To check the AC adapter, do the following : 1. Turn off the computer....You are servicing. 3. Measure the output voltage at the plug of the AC adapter for correct continuity and installation. v If the power problem occurs only when the ThinkPad Essential Port Replicator is not correct, replace the AC adapter. 4. v If the power-on indicator does ...
User Manual
Page 38
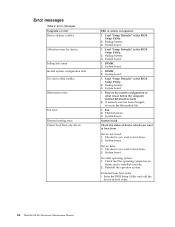
...battery charges properly during operation, use a discharged battery pack or a battery pack that less than +11.0 V dc, measure the resistance between battery terminals 1 (+) and 7 (-). under this condition the battery pack can charge to 100% of the total power remaining when installed...ThinkPad SL300 Hardware Maintenance Manual If the resistance is less than +11.0 V dc after recharging, replace the battery. 4. To check your battery, move your cursor to room temperature. Remove the battery pack and measure the voltage between battery terminals 5 and 7. Reinstall the battery...
...battery charges properly during operation, use a discharged battery pack or a battery pack that less than +11.0 V dc, measure the resistance between battery terminals 1 (+) and 7 (-). under this condition the battery pack can charge to 100% of the total power remaining when installed...ThinkPad SL300 Hardware Maintenance Manual If the resistance is less than +11.0 V dc after recharging, replace the battery. 4. To check your battery, move your cursor to room temperature. Remove the battery pack and measure the voltage between battery terminals 5 and 7. Reinstall the battery...
User Manual
Page 52
...add the device in the BIOS Setup Utility. 2. Failing bits: nnnn. Load "Setup Defaults" in boot order. 44 ThinkPad SL300 Hardware Maintenance Manual DIMM. 2. DIMM. 2. Backup battery. 3. Fan. 2. System board. The device you want to boot from . Reinstall the operation system. Allocation error for ...System board. 1. No valid operating system. 1. Device Error. 1. Check that the operating system has no failure and is installed correctly. 2. System board. System board. 1. Device not found. 1. Excluded from any device. Error messages Symptom or error Device address conflict.
...add the device in the BIOS Setup Utility. 2. Failing bits: nnnn. Load "Setup Defaults" in boot order. 44 ThinkPad SL300 Hardware Maintenance Manual DIMM. 2. DIMM. 2. Backup battery. 3. Fan. 2. System board. The device you want to boot from . Reinstall the operation system. Allocation error for ...System board. 1. No valid operating system. 1. Device Error. 1. Check that the operating system has no failure and is installed correctly. 2. System board. System board. 1. Device not found. 1. Excluded from any device. Error messages Symptom or error Device address conflict.
User Manual
Page 55
...nothing to isolate the failing FRU (do not replace any damaged FRU. 3. System board b. Remove or disconnect all attached devices are installed, or if the system simply is detected, replace the FRU shown by the computer. Hard disk drive f. External diskette drive or ...optical drive g. FRU replacement should be due to a variety of the following : 1. Non-ThinkPad devices b. PC Cards 4. Battery pack e. Turn on page 29.) 1. Run the diagnostic test for damage. Visually check each FRU for the system board in the ...
...nothing to isolate the failing FRU (do not replace any damaged FRU. 3. System board b. Remove or disconnect all attached devices are installed, or if the system simply is detected, replace the FRU shown by the computer. Hard disk drive f. External diskette drive or ...optical drive g. FRU replacement should be due to a variety of the following : 1. Non-ThinkPad devices b. PC Cards 4. Battery pack e. Turn on page 29.) 1. Run the diagnostic test for damage. Visually check each FRU for the system board in the ...

User Manual
Page 62
...--> Systemboard Power Diagnostics --> ThinkPad Devices --> AC Adapter, Battery 1 (Battery2) LCD unit 1. Then, run the test again. Diagnostics --> Systemboard --> Keyboard 2. Diagnostics --> Other Devices--> Optical Drive 2. Fan 1. Run Diagnostics --> ThinkPad Devices --> Fan. 54 ThinkPad SL300 Hardware Maintenance Manual Table 9. ...PC Card slot. 2. If two DIMMs are installed, remove one , and run this test. PC Card slot Diagnostics --> Systemboard --> PCMCIA ExpressCard slot Keyboard 1. Run Diagnostics --> ThinkPad Devices --> ExpressCard slot. 1. Interactive Tests -->...
...--> Systemboard Power Diagnostics --> ThinkPad Devices --> AC Adapter, Battery 1 (Battery2) LCD unit 1. Then, run the test again. Diagnostics --> Systemboard --> Keyboard 2. Diagnostics --> Other Devices--> Optical Drive 2. Fan 1. Run Diagnostics --> ThinkPad Devices --> Fan. 54 ThinkPad SL300 Hardware Maintenance Manual Table 9. ...PC Card slot. 2. If two DIMMs are installed, remove one , and run this test. PC Card slot Diagnostics --> Systemboard --> PCMCIA ExpressCard slot Keyboard 1. Run Diagnostics --> ThinkPad Devices --> ExpressCard slot. 1. Interactive Tests -->...

User Manual
Page 71
Then make sure that the battery release lever is in the parts list for your computer. 1010 Battery pack DANGER Use only the battery specified in the locked position. Holding the battery release lever in the unlocked position 2 , remove the battery pack in the direction shown by arrow 3. 1 2 3 When installing: Install the battery pack along the slide rails of battery pack Unlock the battery release lever 1 . Table 11. Removal steps of the slot. ThinkPad SL300 63 Any other battery could ignite or explode.
Then make sure that the battery release lever is in the parts list for your computer. 1010 Battery pack DANGER Use only the battery specified in the locked position. Holding the battery release lever in the unlocked position 2 , remove the battery pack in the direction shown by arrow 3. 1 2 3 When installing: Install the battery pack along the slide rails of battery pack Unlock the battery release lever 1 . Table 11. Removal steps of the slot. ThinkPad SL300 63 Any other battery could ignite or explode.

User Manual
Page 76
b a When installing: Insert the notched end of DIMM 1 1 2 Note: If only one DIMM is firmly fixed in SLOT-1 ( b : upper slot). Make sure that it snaps into the socket. Removal steps of the DIMM into the place. Press the DIMM firmly, and pivot it until it is used on page 67 Table 15. 1050 DIMM For access, remove these FRUs in order: v "1010 Battery pack" on page 63 v "1040 DIMM slot cover" on the computer you are servicing, the card must be installed in SLOT-0 ( a : lower slot), but not in the slot and does not move easily. 68 ThinkPad SL300 Hardware Maintenance Manual
b a When installing: Insert the notched end of DIMM 1 1 2 Note: If only one DIMM is firmly fixed in SLOT-1 ( b : upper slot). Make sure that it snaps into the socket. Removal steps of the DIMM into the place. Press the DIMM firmly, and pivot it until it is used on page 67 Table 15. 1050 DIMM For access, remove these FRUs in order: v "1010 Battery pack" on page 63 v "1040 DIMM slot cover" on the computer you are servicing, the card must be installed in SLOT-0 ( a : lower slot), but not in the slot and does not move easily. 68 ThinkPad SL300 Hardware Maintenance Manual

User Manual
Page 85
1110 CPU For access, remove these FRUs in order: v "1010 Battery pack" on page 63 v "1080 Thermal door" on page 72 v "1090 Fan assembly" on page 73 v "1100 CPU thermal module" on the CPU socket a , and ... head of rough handling. Removal steps of CPU Rotate the head of the screw in the direction shown by arrow 1 to secure the CPU. ThinkPad SL300 77 a 1 2 b When installing: Place the CPU on page 75 Attention: CPU is extremely sensitive. Table 23. then remove the CPU. When you service the CPU, avoid any...
1110 CPU For access, remove these FRUs in order: v "1010 Battery pack" on page 63 v "1080 Thermal door" on page 72 v "1090 Fan assembly" on page 73 v "1100 CPU thermal module" on the CPU socket a , and ... head of rough handling. Removal steps of CPU Rotate the head of the screw in the direction shown by arrow 1 to secure the CPU. ThinkPad SL300 77 a 1 2 b When installing: Place the CPU on page 75 Attention: CPU is extremely sensitive. Table 23. then remove the CPU. When you service the CPU, avoid any...

User Manual
Page 89
ThinkPad SL300 81 Removal steps of BDC 1 2 Step 1 Screw (quantity) M2 × 3 mm, wafer-head, nylon-coated (1) Color Black Torque 0.167 Nm (1.7 kgfcm) When installing: Make sure that connector is attached firmly. 1130 Bluetooth daughter card (BDC) For access, remove these FRUs in order: v "1010 Battery pack" on page 63 v "1030 Hard disk drive (HDD) cover and HDD" on page 65 v "1120 Palm rest" on page 78 Table 25.
ThinkPad SL300 81 Removal steps of BDC 1 2 Step 1 Screw (quantity) M2 × 3 mm, wafer-head, nylon-coated (1) Color Black Torque 0.167 Nm (1.7 kgfcm) When installing: Make sure that connector is attached firmly. 1130 Bluetooth daughter card (BDC) For access, remove these FRUs in order: v "1010 Battery pack" on page 63 v "1030 Hard disk drive (HDD) cover and HDD" on page 65 v "1120 Palm rest" on page 78 Table 25.

User Manual
Page 90
... servicing has three cables, put the white cable in order: v "1010 Battery pack" on page 63 v "1030 Hard disk drive (HDD) cover and HDD" on page 65 v "1120 Palm rest" on the card. 82 ThinkPad SL300 Hardware Maintenance Manual Note: Some models might have three antenna cables in step... 1 . 2 1 1 2 Step 2 Screw (quantity) M2 × 3 mm, wafer-head, nylon-coated (1) Color Black Torque 0.167 Nm (1.7 kgfcm) When installing: In models with wireless LAN card ...
... servicing has three cables, put the white cable in order: v "1010 Battery pack" on page 63 v "1030 Hard disk drive (HDD) cover and HDD" on page 65 v "1120 Palm rest" on the card. 82 ThinkPad SL300 Hardware Maintenance Manual Note: Some models might have three antenna cables in step... 1 . 2 1 1 2 Step 2 Screw (quantity) M2 × 3 mm, wafer-head, nylon-coated (1) Color Black Torque 0.167 Nm (1.7 kgfcm) When installing: In models with wireless LAN card ...

User Manual
Page 94
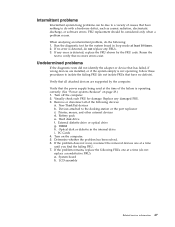
Removal steps of backup battery 1 2 When installing: Make sure that the battery connector is attached firmly. 86 ThinkPad SL300 Hardware Maintenance Manual For access, remove these FRUs in the parts list for your computer. 1160 Backup battery DANGER Use only the battery specified in order: v "1010 Battery pack" on page 63 v "1030 Hard disk drive (HDD) cover and HDD" on page 65 v "1120 Palm rest" on page 78 Table 28. Any other battery could ignite or explode.
Removal steps of backup battery 1 2 When installing: Make sure that the battery connector is attached firmly. 86 ThinkPad SL300 Hardware Maintenance Manual For access, remove these FRUs in the parts list for your computer. 1160 Backup battery DANGER Use only the battery specified in order: v "1010 Battery pack" on page 63 v "1030 Hard disk drive (HDD) cover and HDD" on page 65 v "1120 Palm rest" on page 78 Table 28. Any other battery could ignite or explode.

User Manual
Page 112
2020 Integrated camera For access, remove these FRUs in order: v "1010 Battery pack" on page 63 v "2010 LCD front bezel" on page 103 Note: Some models do not have the integrated camera. Table 37. Removal steps of integrated camera 3 2 1 When installing: Make sure that the connector is attached firmly. 104 ThinkPad SL300 Hardware Maintenance Manual
2020 Integrated camera For access, remove these FRUs in order: v "1010 Battery pack" on page 63 v "2010 LCD front bezel" on page 103 Note: Some models do not have the integrated camera. Table 37. Removal steps of integrated camera 3 2 1 When installing: Make sure that the connector is attached firmly. 104 ThinkPad SL300 Hardware Maintenance Manual

User Manual
Page 115
Tension could cause the cables to be broken. ThinkPad SL300 107 2040 Antenna assembly, LCD cable, camera cable, and hinges For access, remove these FRUs in order: v "1010 Battery pack" on page 63 v "1020 Optical drive" on page 64 v "1030 Hard disk drive (HDD) cover and HDD" on page 65 v "1040 DIMM ..." on page 105 Table 39. Removal steps of antenna assemblies and camera cable In step 1 , remove the tapes securing the antenna cables. 1 1 1 1 1 1 1 When installing: As you route the cables, make sure that they are not subjected to be damaged by the cable guides, or a wire to any tension.
Tension could cause the cables to be broken. ThinkPad SL300 107 2040 Antenna assembly, LCD cable, camera cable, and hinges For access, remove these FRUs in order: v "1010 Battery pack" on page 63 v "1020 Optical drive" on page 64 v "1030 Hard disk drive (HDD) cover and HDD" on page 65 v "1040 DIMM ..." on page 105 Table 39. Removal steps of antenna assemblies and camera cable In step 1 , remove the tapes securing the antenna cables. 1 1 1 1 1 1 1 When installing: As you route the cables, make sure that they are not subjected to be damaged by the cable guides, or a wire to any tension.
(English) Power Manager Deployment Guide
Page 3
... with Active Directory and ADM or ADMX files . . . 5 Adding Administrative Templates 5 General Setting 6 Power Plan (Scheme) Deployments 8 Global Power Setting 29 Battery Maintenance 36 Power Agenda Deployments 37 Appendix A. Installation 3 Net Framework dependence 3 Considerations for non-administrator groups or users on Windows XP client computers 45 Appendix B. Notices 47 Trademarks 48 ©...
... with Active Directory and ADM or ADMX files . . . 5 Adding Administrative Templates 5 General Setting 6 Power Plan (Scheme) Deployments 8 Global Power Setting 29 Battery Maintenance 36 Power Agenda Deployments 37 Appendix A. Installation 3 Net Framework dependence 3 Considerations for non-administrator groups or users on Windows XP client computers 45 Appendix B. Notices 47 Trademarks 48 ©...

(English) Power Manager Deployment Guide
Page 14
... policies, do the following: • For Windows XP client computers (ADM and ADMX files) Under Computer Configuration, click Administrative Templates ➙ Lenovo ThinkVantage Components ➙ Power Manager ➙ Power Plan (Scheme) Deployments. • For Windows Vista or Windows 7 client computers (ADM file...to edit existing power plans on client computers. Also, the Buy a battery link in Windows Power Option is deleted by this policy is able to configure every policy under Power Manager's installation folder. Specifies whether or not to configure a power plan with a...
... policies, do the following: • For Windows XP client computers (ADM and ADMX files) Under Computer Configuration, click Administrative Templates ➙ Lenovo ThinkVantage Components ➙ Power Manager ➙ Power Plan (Scheme) Deployments. • For Windows Vista or Windows 7 client computers (ADM file...to edit existing power plans on client computers. Also, the Buy a battery link in Windows Power Option is deleted by this policy is able to configure every policy under Power Manager's installation folder. Specifies whether or not to configure a power plan with a...
(English) Setup Guide
Page 1
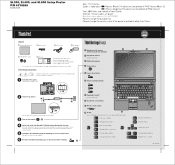
... 4 Point and click with other keys to move across the touch pad in the direction you want to access special ThinkPad features. For more detailed information, press the Lenovo CareSM button: 5 1 UltraConnectTM wireless antennas (main and auxiliary) 2 Integrated camera* *Select models only. 3 Built...Read the safety notices and important tips in combination with UltraNav Multi-pointing Navigation System: Press the TrackPoint cap or move the pointer. Install battery pack: Your battery is ready to use. 2 1 Connect to power: 1 2 2 3 1 The location of the power jack depends on -screen...
... 4 Point and click with other keys to move across the touch pad in the direction you want to access special ThinkPad features. For more detailed information, press the Lenovo CareSM button: 5 1 UltraConnectTM wireless antennas (main and auxiliary) 2 Integrated camera* *Select models only. 3 Built...Read the safety notices and important tips in combination with UltraNav Multi-pointing Navigation System: Press the TrackPoint cap or move the pointer. Install battery pack: Your battery is ready to use. 2 1 Connect to power: 1 2 2 3 1 The location of the power jack depends on -screen...


