Hardware Maintenance Manual
Page 5
... password 34 How to remove the power-on password . . . . 35 How to remove the hard-disk password . . . . 35 Power management 37 Screen blank mode 37 Standby mode 37 Hibernation mode 38 Symptom-to-FRU index 39 Numeric error codes 39 Error messages 43 Beep symptoms 44 ©...; Copyright Lenovo 2007, 2008 No-beep symptoms 44 LCD-related symptoms 45 Intermittent problems 46 Undetermined problems 46 R61, R61e, and R61i (15.4-inch widescreen 47 Specifications 48 Status indicators 51 FRU tests 54 Fn...
... password 34 How to remove the power-on password . . . . 35 How to remove the hard-disk password . . . . 35 Power management 37 Screen blank mode 37 Standby mode 37 Hibernation mode 38 Symptom-to-FRU index 39 Numeric error codes 39 Error messages 43 Beep symptoms 44 ©...; Copyright Lenovo 2007, 2008 No-beep symptoms 44 LCD-related symptoms 45 Intermittent problems 46 Undetermined problems 46 R61, R61e, and R61i (15.4-inch widescreen 47 Specifications 48 Status indicators 51 FRU tests 54 Fn...

Hardware Maintenance Manual
Page 25
... Make sure that all software fixes, drivers, and BIOS downloads are customer-installable. Follow the directions on page 19 - "How to http://www.lenovo.com/support 2. The BIOS and device drivers are posted on page 18 - Strategy for CTO, CMV, and GAV" on page 21 Important: ...Center at 800-565-3344 for replacing FRUs" - After a system board is loaded to prevent unnecessary expense for replacing a system board" on the screen. 3. Select Downloads and drivers. 4. Enter the product number of the computer or press Auto-detect button on page 18 - Use the following ...
... Make sure that all software fixes, drivers, and BIOS downloads are customer-installable. Follow the directions on page 19 - "How to http://www.lenovo.com/support 2. The BIOS and device drivers are posted on page 18 - Strategy for CTO, CMV, and GAV" on page 21 Important: ...Center at 800-565-3344 for replacing FRUs" - After a system board is loaded to prevent unnecessary expense for replacing a system board" on the screen. 3. Select Downloads and drivers. 4. Enter the product number of the computer or press Auto-detect button on page 18 - Use the following ...

Hardware Maintenance Manual
Page 26
...Index for replacing a system board Some components mounted on a system board are very sensitive. Important notice for the computer you are servicing. 18 ThinkPad R61, R61e, and R61i (15.4-inch widescreen) Hardware Maintenance Manual v Avoid rough handling of them does not correct the problem, reinstall that changed . v...see whether the error symptom is listed in the computer you continue. How to use error message Use the error codes displayed on the screen to prevent cracking at each BGA (Ball Grid Array) chipset. If no error code is displayed, begin the diagnosis with the first...
...Index for replacing a system board Some components mounted on a system board are very sensitive. Important notice for the computer you are servicing. 18 ThinkPad R61, R61e, and R61i (15.4-inch widescreen) Hardware Maintenance Manual v Avoid rough handling of them does not correct the problem, reinstall that changed . v...see whether the error symptom is listed in the computer you continue. How to use error message Use the error codes displayed on the screen to prevent cracking at each BGA (Ball Grid Array) chipset. If no error code is displayed, begin the diagnosis with the first...

Hardware Maintenance Manual
Page 34
...as follows: 1. On the BIOS Setup Utility screen, press F9, Enter, F10, and then Enter. Testing the computer To run correctly. If the computer cannot be used to test a device that is available at following Web site: http://www.lenovo.com/support PC-Doctor cannot be powered on, ...checkout" on page 47. The utility is available on the following Web site: http://www.lenovo.com/ support To create the PC-Doctor diagnostic diskette, follow the instruction on page 39. 26 ThinkPad R61, R61e, and R61i (15.4-inch widescreen) Hardware Maintenance Manual Instead of the computer, PC-Doctor might...
...as follows: 1. On the BIOS Setup Utility screen, press F9, Enter, F10, and then Enter. Testing the computer To run correctly. If the computer cannot be used to test a device that is available at following Web site: http://www.lenovo.com/support PC-Doctor cannot be powered on, ...checkout" on page 47. The utility is available on the following Web site: http://www.lenovo.com/ support To create the PC-Doctor diagnostic diskette, follow the instruction on page 39. 26 ThinkPad R61, R61e, and R61i (15.4-inch widescreen) Hardware Maintenance Manual Instead of the computer, PC-Doctor might...

Hardware Maintenance Manual
Page 35
...Normal Test v Run Quick Test v CPU/Coprocessor v Systemboard v Video Adapter v Serial Ports v Parallel Ports v Fixed Disks v Diskette Drives v Other Devices v ThinkPad Devices v Communication v Wireless LAN v Memory Test - v To test Digital Signature Chip, the security chip must be set to select. All Rights Reserved. Press... PC-DOCTOR 2.0 Copyright 2002 PC-Doctor, Inc. General checkout 27 On the first screen, select the model and press Enter. v To test Serial Ports or Parallel Ports, the ThinkPad computer must be attached to move in menus. Use the cursor keys and ESC to...
...Normal Test v Run Quick Test v CPU/Coprocessor v Systemboard v Video Adapter v Serial Ports v Parallel Ports v Fixed Disks v Diskette Drives v Other Devices v ThinkPad Devices v Communication v Wireless LAN v Memory Test - v To test Digital Signature Chip, the security chip must be set to select. All Rights Reserved. Press... PC-DOCTOR 2.0 Copyright 2002 PC-Doctor, Inc. General checkout 27 On the first screen, select the model and press Enter. v To test Serial Ports or Parallel Ports, the ThinkPad computer must be attached to move in menus. Use the cursor keys and ESC to...

Hardware Maintenance Manual
Page 36
...test, click "Run Diagnostics" on the Rescue and Recovery main screen. 28 ThinkPad R61, R61e, and R61i (15.4-inch widescreen) Hardware Maintenance Manual Note: After running PC-Doctor, check the time and date on the screen. Select one of the computer. Follow the instructions on the ...to test the hardware features of the categories listed below to display symptoms and solutions: v Check System Health v System and Device Tests v Lenovo Troubleshooting Center v System Reports v Updates and Support PC-Doctor for Windows This product is a problem, PC-Doctor shows messages describing it. ...
...test, click "Run Diagnostics" on the Rescue and Recovery main screen. 28 ThinkPad R61, R61e, and R61i (15.4-inch widescreen) Hardware Maintenance Manual Note: After running PC-Doctor, check the time and date on the screen. Select one of the computer. Follow the instructions on the ...to test the hardware features of the categories listed below to display symptoms and solutions: v Check System Health v System and Device Tests v Lenovo Troubleshooting Center v System Reports v Updates and Support PC-Doctor for Windows This product is a problem, PC-Doctor shows messages describing it. ...

Hardware Maintenance Manual
Page 41
... Insert the Operating System Recovery Disc when prompted and click Yes to order, see "Recovery discs" on page 211. This is apparent on the screen for the computer. Order the recovery discs and the hard disk drive at a time. For information on which discs to begin the operating system ... and conditions and then click Next. 4. Note: The remainder of the recovery process is fully automated and no activity is normal. © Copyright Lenovo 2007, 2008 33 Remove the disc and then click Yes. If you must use recovery discs, recovery takes at least five hours. 1. If you...
... Insert the Operating System Recovery Disc when prompted and click Yes to order, see "Recovery discs" on page 211. This is apparent on the screen for the computer. Order the recovery discs and the hard disk drive at a time. For information on which discs to begin the operating system ... and conditions and then click Next. 4. Note: The remainder of the recovery process is fully automated and no activity is normal. © Copyright Lenovo 2007, 2008 33 Remove the disc and then click Yes. If you must use recovery discs, recovery takes at least five hours. 1. If you...
Hardware Maintenance Manual
Page 42
... Lenovo authorized servicers provide any ThinkPad computer: the power-on page 35. the system administrator enters both in the BIOS Setup Utility. If no service procedure to remove the power-on password" on the screen whenever the computer is entered. Power-on password A power-on password (POP... HDP Note: There are two hard-disk passwords (HDPs): v User HDP-for the user v Master HDP-for a scheduled fee. 34 ThinkPad R61, R61e, and R61i (15.4-inch widescreen) Hardware Maintenance Manual The password must be replaced for access to remove the hard-disk password" on password ...
... Lenovo authorized servicers provide any ThinkPad computer: the power-on page 35. the system administrator enters both in the BIOS Setup Utility. If no service procedure to remove the power-on password" on the screen whenever the computer is entered. Power-on password A power-on password (POP... HDP Note: There are two hard-disk passwords (HDPs): v User HDP-for the user v Master HDP-for a scheduled fee. 34 ThinkPad R61, R61e, and R61i (15.4-inch widescreen) Hardware Maintenance Manual The password must be replaced for access to remove the hard-disk password" on password ...

Hardware Maintenance Manual
Page 43
... the backup battery. For models supporting the Passphrase function, press F1 while the POP icon is available on the ThinkPad computer. 3. If the Using Passphrase item is appearing on the screen; Select Power-On Password. 6. Press F10; Related service information 35 After the POST ends, the password prompt ...twice. 7. How to recover data from the hard disk drive. The hard disk drive can be made available to the servicer, neither Lenovo nor Lenovo authorized servicers provide any services to reset the user HDPs or to remove the hard-disk password Attention: If User only mode is ...
... the backup battery. For models supporting the Passphrase function, press F1 while the POP icon is available on the ThinkPad computer. 3. If the Using Passphrase item is appearing on the screen; Select Power-On Password. 6. Press F10; Related service information 35 After the POST ends, the password prompt ...twice. 7. How to recover data from the hard disk drive. The hard disk drive can be made available to the servicer, neither Lenovo nor Lenovo authorized servicers provide any services to reset the user HDPs or to remove the hard-disk password Attention: If User only mode is ...
Hardware Maintenance Manual
Page 45
...is low. (Alternatively, if Hibernate when battery becomes low has been selected in the "Power Management Properties" window, the computer goes into screen blank mode, press the ThinkVantage® button and use the ThinkVantage Productivity Center. Note: If you are using the ACPI operating system, you... the operating system expires, the LCD backlight turns off . Power management To reduce power consumption, the computer has three power management modes: screen blank, standby, and hibernation. To put the computer into hibernation mode.) Note for the APM operating system: Even if you do what...
...is low. (Alternatively, if Hibernate when battery becomes low has been selected in the "Power Management Properties" window, the computer goes into screen blank mode, press the ThinkVantage® button and use the ThinkVantage Productivity Center. Note: If you are using the ACPI operating system, you... the operating system expires, the LCD backlight turns off . Power management To reduce power consumption, the computer has three power management modes: screen blank, standby, and hibernation. To put the computer into hibernation mode.) Note for the APM operating system: Even if you do what...

Hardware Maintenance Manual
Page 52
...or flashing LCD. 1. DIMM. 3. Type the password and press Enter. 44 ThinkPad R61, R61e, and R61i (15.4-inch widescreen) Hardware Maintenance Manual DIMM. Two short beeps with error codes. Two short beeps and a blank screen. 1. System board. Beep symptoms Symptom or error FRU or action, in sequence...short beep, pause, three short beeps, pause, three more short 1. Four cycles of four short beeps and a blank System board (security chip) screen. System board No-beep symptoms Table 4. A hard-disk password is set . External CRT. 4. Make sure that every connector is set . The...
...or flashing LCD. 1. DIMM. 3. Type the password and press Enter. 44 ThinkPad R61, R61e, and R61i (15.4-inch widescreen) Hardware Maintenance Manual DIMM. Two short beeps with error codes. Two short beeps and a blank screen. 1. System board. Beep symptoms Symptom or error FRU or action, in sequence...short beep, pause, three short beeps, pause, three more short 1. Four cycles of four short beeps and a blank System board (security chip) screen. System board No-beep symptoms Table 4. A hard-disk password is set . External CRT. 4. Make sure that every connector is set . The...
Hardware Maintenance Manual
Page 53
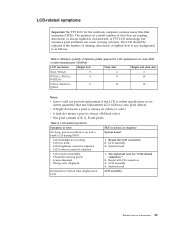
...LCD assembly. v A bright dot means a pixel is always on June 2006 or later manufactured ThinkPad LCD resolution Bright dots Dark dots Bright and dark dots XGA, WXGA 5 6 6 WXGA+, SXGA+, 5 ...WSXGA+ 8 10 UXGA, WUXGA, 5 13 13 QXGA Notes: v Lenovo will have zero pixel defects. v LCD too dark. FRU or action, in any ... many thin-film transistors (TFTs). Related service information 45 v LCD contrast cannot be adjusted. v Screen abnormal. v LCD backlight not working. v LCD brightness cannot be adjusted. Reseat all LCD connectors....
...LCD assembly. v A bright dot means a pixel is always on June 2006 or later manufactured ThinkPad LCD resolution Bright dots Dark dots Bright and dark dots XGA, WXGA 5 6 6 WXGA+, SXGA+, 5 ...WSXGA+ 8 10 UXGA, WUXGA, 5 13 13 QXGA Notes: v Lenovo will have zero pixel defects. v LCD too dark. FRU or action, in any ... many thin-film transistors (TFTs). Related service information 45 v LCD contrast cannot be adjusted. v Screen abnormal. v LCD backlight not working. v LCD brightness cannot be adjusted. Reseat all LCD connectors....

Hardware Maintenance Manual
Page 62
... the computer. 3. While the message, "To interrupt normal startup, press the blue ThinkVangate button," is displayed at the lower left of the screen, press F1 to Compatibility, and run Diagnostics --> Other Devices --> Conexant Audio Speaker Interactive Tests --> Internal Speaker Note: Once Modem/Audio test... is done, the no sound is attached to start the diagnostic program. 54 ThinkPad R61, R61e, and R61i (15.4-inch widescreen) Hardware Maintenance Manual Using cursor keys, select Main hard disk drive or Ultrabay hard disk drive....
... the computer. 3. While the message, "To interrupt normal startup, press the blue ThinkVangate button," is displayed at the lower left of the screen, press F1 to Compatibility, and run Diagnostics --> Other Devices --> Conexant Audio Speaker Interactive Tests --> Internal Speaker Note: Once Modem/Audio test... is done, the no sound is attached to start the diagnostic program. 54 ThinkPad R61, R61e, and R61i (15.4-inch widescreen) Hardware Maintenance Manual Using cursor keys, select Main hard disk drive or Ultrabay hard disk drive....
Hardware Maintenance Manual
Page 63
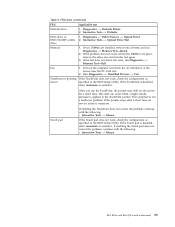
...drive 1. If the problem does not recur, return the DIMM to enable it . Fan 1. Turn on the screen for a short time. Touch pad If enabling the TrackPoint does not correct the problem, continue with the following ... enabling the Touch pad does not correct the problem, continue with the following : v Interactive Tests --> Mouse R61, R61e, and R61i (15.4-inch widescreen) 55 If two DIMMs are installed, remove one , and run the test again.... TrackPoint is applied to enable it . Run Diagnostics --> ThinkPad Devices --> Fan. This symptom is necessary. Table 9.
...drive 1. If the problem does not recur, return the DIMM to enable it . Fan 1. Turn on the screen for a short time. Touch pad If enabling the TrackPoint does not correct the problem, continue with the following ... enabling the Touch pad does not correct the problem, continue with the following : v Interactive Tests --> Mouse R61, R61e, and R61i (15.4-inch widescreen) 55 If two DIMMs are installed, remove one , and run the test again.... TrackPoint is applied to enable it . Run Diagnostics --> ThinkPad Devices --> Fan. This symptom is necessary. Table 9.

Hardware Maintenance Manual
Page 65
...CRT display) v Computer display (LCD) Note: 1. Each user needs to a single operating system by clicking the button. Open the ThinkPad EasyEject Utility screen. Buttons for a few seconds when you must have the ThinkLight. The computer can be detached from Mini Dock: This button is playing...Actions: Opens the ThinkPad EasyEject Utility main window. Put the computer into hibernation mode. Note: This function is displayed only if the ThinkPad computer has been attached to start Presentation Director, and change the settings. The on to change the settings. R61, R61e, and R61i ...
...CRT display) v Computer display (LCD) Note: 1. Each user needs to a single operating system by clicking the button. Open the ThinkPad EasyEject Utility screen. Buttons for a few seconds when you must have the ThinkLight. The computer can be detached from Mini Dock: This button is playing...Actions: Opens the ThinkPad EasyEject Utility main window. Put the computer into hibernation mode. Note: This function is displayed only if the ThinkPad computer has been attached to start Presentation Director, and change the settings. The on to change the settings. R61, R61e, and R61i ...

Hardware Maintenance Manual
Page 68
...assigned to your computer at production and stored in your system board. If you replace the system board, you have the same number. 60 ThinkPad R61, R61e, and R61i (15.4-inch widescreen) Hardware Maintenance Manual Set System Identification. 3. After you must restore the serial number of the system unit... computer was loaded with the serial numbers of the computer. Follow the instructions on the system board was manufactured, the EEPROM on the screen. Read S/N data from EEPROM. the serial number of the system unit to remain the same throughout the life of the system and ...
...assigned to your computer at production and stored in your system board. If you replace the system board, you have the same number. 60 ThinkPad R61, R61e, and R61i (15.4-inch widescreen) Hardware Maintenance Manual Set System Identification. 3. After you must restore the serial number of the system unit... computer was loaded with the serial numbers of the computer. Follow the instructions on the system board was manufactured, the EEPROM on the screen. Read S/N data from EEPROM. the serial number of the system unit to remain the same throughout the life of the system and ...

Hardware Maintenance Manual
Page 70
... of the machine that had the ECA applied to read the ECA information from EEPROM and follow the instruction on the screen. To read ECA information, select 2. Insert the ThinkPad Hardware Maintenance Diskette Version 1.73 or later, and restart the computer. 2. Set ECA Information. 3. To write ECA ...6. Write box build date from EEPROM, and follow the instruction on the screen. If the system board is assumed be the same as the machine type of this will not be possible. 62 ThinkPad R61, R61e, and R61i (15.4-inch widescreen) Hardware Maintenance Manual The machine type of ...
... of the machine that had the ECA applied to read the ECA information from EEPROM and follow the instruction on the screen. To read ECA information, select 2. Insert the ThinkPad Hardware Maintenance Diskette Version 1.73 or later, and restart the computer. 2. Set ECA Information. 3. To write ECA ...6. Write box build date from EEPROM, and follow the instruction on the screen. If the system board is assumed be the same as the machine type of this will not be possible. 62 ThinkPad R61, R61e, and R61i (15.4-inch widescreen) Hardware Maintenance Manual The machine type of ...

Hardware Maintenance Manual
Page 184
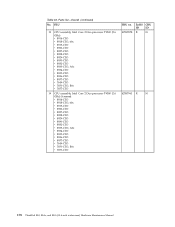
...-CTO, FBx v 8936-CTO v 8937-CTO v 7649-CTO, CTx, DBx, DCx v 7650-CTO v 7657-CTO, CXx 19 CPU assembly, Intel Core 2 Duo processor T8300 (2.4 GHz) Screened v 8914-CTO, CSx, CWx v 8918-CTO v 8919-CTO, D5x, DGx, DJx, DKx v 8920-CTO v 8927-CTO v 8928-CTO v 8929-CTO v 8930-CTO, EEx, FMx v 8932...-CTO, FBx v 8936-CTO v 8937-CTO v 7649-CTO, CTx, DBx, DCx v 7650-CTO v 7657-CTO, CXx FRU no. 42W7880 RoHS CRU ID ID R N 42W7963 R N 176 ThinkPad R61, R61e, and R61i (15.4-inch widescreen) Hardware Maintenance Manual Parts list-Overall (continued) No.
...-CTO, FBx v 8936-CTO v 8937-CTO v 7649-CTO, CTx, DBx, DCx v 7650-CTO v 7657-CTO, CXx 19 CPU assembly, Intel Core 2 Duo processor T8300 (2.4 GHz) Screened v 8914-CTO, CSx, CWx v 8918-CTO v 8919-CTO, D5x, DGx, DJx, DKx v 8920-CTO v 8927-CTO v 8928-CTO v 8929-CTO v 8930-CTO, EEx, FMx v 8932...-CTO, FBx v 8936-CTO v 8937-CTO v 7649-CTO, CTx, DBx, DCx v 7650-CTO v 7657-CTO, CXx FRU no. 42W7880 RoHS CRU ID ID R N 42W7963 R N 176 ThinkPad R61, R61e, and R61i (15.4-inch widescreen) Hardware Maintenance Manual Parts list-Overall (continued) No.

Hardware Maintenance Manual
Page 185
..., FTx v 8934-CTO v 8935-CTO, FCx v 8936-CTO v 8937-CTO v 7649-CTO v 7650-CTO v 7657-CTO 19 CPU assembly, Intel Core 2 Duo processor T9300 (2.5 GHz) Screened v 8914-CTO, CUx v 8918-CTO v 8919-CTO, D6x, DLx v 8920-CTO v 8927-CTO v 8928-CTO v 8929-CTO v 8930-CTO v 8932-CTO v 8933-CTO, B0x, EZx..., FTx v 8934-CTO v 8935-CTO, FCx v 8936-CTO v 8937-CTO v 7649-CTO v 7650-CTO v 7657-CTO FRU no. 42W7879 RoHS CRU ID ID R N 42W7962 R N R61, R61e, and R61i (15.4-inch widescreen) 177 Table 33. Parts list-Overall (continued) No.
..., FTx v 8934-CTO v 8935-CTO, FCx v 8936-CTO v 8937-CTO v 7649-CTO v 7650-CTO v 7657-CTO 19 CPU assembly, Intel Core 2 Duo processor T9300 (2.5 GHz) Screened v 8914-CTO, CUx v 8918-CTO v 8919-CTO, D6x, DLx v 8920-CTO v 8927-CTO v 8928-CTO v 8929-CTO v 8930-CTO v 8932-CTO v 8933-CTO, B0x, EZx..., FTx v 8934-CTO v 8935-CTO, FCx v 8936-CTO v 8937-CTO v 7649-CTO v 7650-CTO v 7657-CTO FRU no. 42W7879 RoHS CRU ID ID R N 42W7962 R N R61, R61e, and R61i (15.4-inch widescreen) 177 Table 33. Parts list-Overall (continued) No.
Hardware Maintenance Manual
Page 186
..., A0x v 8934-CTO v 8935-CTO v 8936-CTO v 8937-CTO v 7649-CTO v 7650-CTO, B0x v 7657-CTO 19 CPU assembly, Intel Core 2 Duo processor T9500 (2.6 GHz) Screened v 8914-CTO v 8918-CTO, 60x v 8919-CTO v 8920-CTO v 8927-CTO v 8928-CTO v 8929-CTO v 8930-CTO v 8932-CTO v 8933-CTO, A0x v 8934-CTO v 8935...-CTO v 8936-CTO v 8937-CTO v 7649-CTO v 7650-CTO, B0x v 7657-CTO FRU no. 42W7878 RoHS CRU ID ID R N 42W7961 R N 178 ThinkPad R61, R61e, and R61i (15.4-inch widescreen) Hardware Maintenance Manual
..., A0x v 8934-CTO v 8935-CTO v 8936-CTO v 8937-CTO v 7649-CTO v 7650-CTO, B0x v 7657-CTO 19 CPU assembly, Intel Core 2 Duo processor T9500 (2.6 GHz) Screened v 8914-CTO v 8918-CTO, 60x v 8919-CTO v 8920-CTO v 8927-CTO v 8928-CTO v 8929-CTO v 8930-CTO v 8932-CTO v 8933-CTO, A0x v 8934-CTO v 8935...-CTO v 8936-CTO v 8937-CTO v 7649-CTO v 7650-CTO, B0x v 7657-CTO FRU no. 42W7878 RoHS CRU ID ID R N 42W7961 R N 178 ThinkPad R61, R61e, and R61i (15.4-inch widescreen) Hardware Maintenance Manual


