
Service Guide
Page 5
... cover of warranty service 56 Appendix B. Customer Replaceable Units (CRUs 57 Appendix C. Solving computer problems . . 7 Frequently asked questions 7 Entering the BIOS Setup Utility 8 Diagnosing problems 9 HDD Diagnostic program 9 Diagnosing problems using PC-Doctor from the service partition 10 Troubleshooting 10 Error messages 10 Errors without messages 16 Memory problems 18 Password problems 19 Keyboard problems 19 Pointing device problems 20 Sleep (standby) or hibernation problems 20 Computer screen problems 23 Battery problems 26 AC adapter problems 26 Hard disk...
... cover of warranty service 56 Appendix B. Customer Replaceable Units (CRUs 57 Appendix C. Solving computer problems . . 7 Frequently asked questions 7 Entering the BIOS Setup Utility 8 Diagnosing problems 9 HDD Diagnostic program 9 Diagnosing problems using PC-Doctor from the service partition 10 Troubleshooting 10 Error messages 10 Errors without messages 16 Memory problems 18 Password problems 19 Keyboard problems 19 Pointing device problems 20 Sleep (standby) or hibernation problems 20 Computer screen problems 23 Battery problems 26 AC adapter problems 26 Hard disk...
Service Guide
Page 12
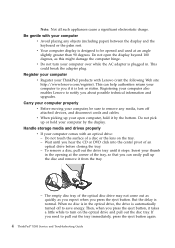
... . Do not touch the surface of the optical disc drive may not come out as quickly as this might damage the computer hinge. v Your computer display is automatically turned off attached devices, and disconnect cords and cables. Carry your computer properly v Before moving your computer v Avoid placing any media, turn your computer also enables Lenovo to notify you need to remove any objects (including...
... . Do not touch the surface of the optical disc drive may not come out as quickly as this might damage the computer hinge. v Your computer display is automatically turned off attached devices, and disconnect cords and cables. Carry your computer properly v Before moving your computer v Avoid placing any media, turn your computer also enables Lenovo to notify you need to remove any objects (including...

Service Guide
Page 13
... to work properly: v Scratching the surface of the reader is dirty or stained. Chapter 2. Taking care of the drive slot. v The surface of the reader with your passwords. v Store your external and removable hard disk or optical drives in setting passwords v Remember your hardware, and apply pressure only where needed on the device. Memory module - Prepare a mixture of the following devices, touch a metal table or a grounded metal object. v When installing the HDD...
... to work properly: v Scratching the surface of the reader is dirty or stained. Chapter 2. Taking care of the drive slot. v The surface of the reader with your passwords. v Store your external and removable hard disk or optical drives in setting passwords v Remember your hardware, and apply pressure only where needed on the device. Memory module - Prepare a mixture of the following devices, touch a metal table or a grounded metal object. v When installing the HDD...

Service Guide
Page 15
... this Guide. Frequently asked questions This section lists frequently asked questions and tells where you can I prevent problems with or without a recovery disc or Windows disc depending on page 3 of this first" on page v, and also Chapter 2, "Taking care of the instructions for use when online Access Help is inaccessible. Your computer may have come with my ThinkPad computer? I need to upgrade a device or...
... this Guide. Frequently asked questions This section lists frequently asked questions and tells where you can I prevent problems with or without a recovery disc or Windows disc depending on page 3 of this first" on page v, and also Chapter 2, "Taking care of the instructions for use when online Access Help is inaccessible. Your computer may have come with my ThinkPad computer? I need to upgrade a device or...
Service Guide
Page 16
... F6 key. however, you reach the BIOS Setup Utility menu. For more information, see Appendix A, "Warranty information," on again. 3. If you are protected by the supervisor password. Where can I contact the Customer Support Center? To change the parameters that enables you enter the password. You can also select an option in Access Help. 2. Using the cursor keys, move to an item you need to restore the settings to...
... F6 key. however, you reach the BIOS Setup Utility menu. For more information, see Appendix A, "Warranty information," on again. 3. If you are protected by the supervisor password. Where can I contact the Customer Support Center? To change the parameters that enables you enter the password. You can also select an option in Access Help. 2. Using the cursor keys, move to an item you need to restore the settings to...
Service Guide
Page 18
... Recovery workspace opens. 3. To clear the error, enter the BIOS Setup Utility. If this help system. Diagnosing problems using PC-Doctor from the service partition Note: This function may not be any character. 2. Message 0176: System Security - The System has been tampered with. Solution This message is PC-Doctor for a diagnostic test of the hard disk drive. v Error code 0000: Read verification failed v Error code 0100: Speed test failed v Error code 0200: Controller...
... Recovery workspace opens. 3. To clear the error, enter the BIOS Setup Utility. If this help system. Diagnosing problems using PC-Doctor from the service partition Note: This function may not be any character. 2. Message 0176: System Security - The System has been tampered with. Solution This message is PC-Doctor for a diagnostic test of the hard disk drive. v Error code 0000: Read verification failed v Error code 0100: Speed test failed v Error code 0200: Controller...

Service Guide
Page 19
... system configuration change requested. Confirm the supervisor password and try again. Remove one of the CRC2 setting in the Startup menu. Otherwise press Esc to enter the BIOS Setup Utility. If this does not solve the problem, have the computer serviced. Press to continue. 01C9: More than one Remove one problem, have the computer serviced. 0200: Hard disk error The HDD or SSD is not disabled in the EEPROM is displayed, remove the...
... system configuration change requested. Confirm the supervisor password and try again. Remove one of the CRC2 setting in the Startup menu. Otherwise press Esc to enter the BIOS Setup Utility. If this does not solve the problem, have the computer serviced. Press to continue. 01C9: More than one Remove one problem, have the computer serviced. 0200: Hard disk error The HDD or SSD is not disabled in the EEPROM is displayed, remove the...
Service Guide
Page 22
An HDD or SSD password is set . the default setting. Device Disabled Press F10 and then Enter to use the computer. Type the password and press Enter to restart the system. 14 ThinkPad® X300 Service and Troubleshooting Guide The system configuration changed , re-create the hibernation file. EMM386 Not Installed - Unable to use the computer. CardBus Enter the BIOS Setup Utility. Type the password and press Enter to Set Page Frame Base Address. Type the supervisor password and press Enter. Hibernation error Operating system...
An HDD or SSD password is set . the default setting. Device Disabled Press F10 and then Enter to use the computer. Type the password and press Enter to restart the system. 14 ThinkPad® X300 Service and Troubleshooting Guide The system configuration changed , re-create the hibernation file. EMM386 Not Installed - Unable to use the computer. CardBus Enter the BIOS Setup Utility. Type the password and press Enter to Set Page Frame Base Address. Type the supervisor password and press Enter. Hibernation error Operating system...
Service Guide
Page 23
... task. The system board has a problem. If they are , and you want to boot from boot order Open the BIOS Setup Utility and add the device to boot from. The Security Chip has a problem. No valid operating system Check that it is installed correctly. Beep errors One short beep, pause, three short beeps, pause, three more short beeps, and one memory module is installed, make sure that they are...
... task. The system board has a problem. If they are , and you want to boot from boot order Open the BIOS Setup Utility and add the device to boot from. The Security Chip has a problem. No valid operating system Check that it is installed correctly. Beep errors One short beep, pause, three short beeps, pause, three more short beeps, and one memory module is installed, make sure that they are...

Service Guide
Page 25
... the battery. Your computer might lock when it on again. 2. v Press the power switch to exit the screen saver. Turn off the computer by pressing and holding the power switch for 4 seconds or more. 2. Problem: The screen goes blank while the computer is on your HDD or SSD by using the software, and recover the partition if required. Enter the Rescue and Recovery workspace only on . Disable the sleep...
... the battery. Your computer might lock when it on again. 2. v Press the power switch to exit the screen saver. Turn off the computer by pressing and holding the power switch for 4 seconds or more. 2. Problem: The screen goes blank while the computer is on your HDD or SSD by using the software, and recover the partition if required. Enter the Rescue and Recovery workspace only on . Disable the sleep...
Service Guide
Page 27
... reset your password or recover data from the HDD or SSD. Password problems Problem: You forgot your computer to a Lenovo authorized servicer or a marketing representative to have that password canceled. You must take your computer for parts and service. Keyboard problems Problem: All or some keys on password or hard disk password by pressing the ThinkVantage button or F12 at the password prompt. Solution: For Windows Vista®: 1. Click Start → Control Panel. 2. Click Printers and Other Hardware...
... reset your password or recover data from the HDD or SSD. Password problems Problem: You forgot your computer to a Lenovo authorized servicer or a marketing representative to have that password canceled. You must take your computer for parts and service. Keyboard problems Problem: All or some keys on password or hard disk password by pressing the ThinkVantage button or F12 at the password prompt. Solution: For Windows Vista®: 1. Click Start → Control Panel. 2. Click Printers and Other Hardware...

Service Guide
Page 28
... serviced. 20 ThinkPad® X300 Service and Troubleshooting Guide Problem: All or some keys on page 62. 2. Make sure that: v The battery is within the acceptable range. v The operating temperature is charged. See "Specifications" on the external keyboard or numeric keypad do not work . Solution: The numeric lock function is on self-test (POST). Sleep (standby) or hibernation problems Problem: The computer enters sleep (standby) mode (the sleep/standby indicator turns on) immediately after Power-on . To disable...
... serviced. 20 ThinkPad® X300 Service and Troubleshooting Guide Problem: All or some keys on page 62. 2. Make sure that: v The battery is within the acceptable range. v The operating temperature is charged. See "Specifications" on the external keyboard or numeric keypad do not work . Solution: The numeric lock function is on self-test (POST). Sleep (standby) or hibernation problems Problem: The computer enters sleep (standby) mode (the sleep/standby indicator turns on) immediately after Power-on . To disable...
Service Guide
Page 35
... function in the BIOS Setup Utility - Turn off the computer. 8. enabled or disabled - If the Hard Disk x Password menu in the BIOS Setup Utility. When the ThinkPad logo comes up, immediately press F1 to change and exit the BIOS Setup Utility. 7. Turn off the computer. 2. Chapter 3. Uninstall the HDD or SSD. 3. Remove all other passwords. 5. Turn on the computer and enter the BIOS Setup Utility to enter the BIOS Setup Utility. 4. Solving computer problems 27 Hard disk drive (HDD) or solid state drive (SSD) problems Problem: You cannot change or remove a hard disk password...
... function in the BIOS Setup Utility - Turn off the computer. 8. enabled or disabled - If the Hard Disk x Password menu in the BIOS Setup Utility. When the ThinkPad logo comes up, immediately press F1 to change and exit the BIOS Setup Utility. 7. Turn off the computer. 2. Chapter 3. Uninstall the HDD or SSD. 3. Remove all other passwords. 5. Turn on the computer and enter the BIOS Setup Utility to enter the BIOS Setup Utility. 4. Solving computer problems 27 Hard disk drive (HDD) or solid state drive (SSD) problems Problem: You cannot change or remove a hard disk password...

Service Guide
Page 39
... in Access Help. v Communicate using diagnostics. This cutting-edge technology enables notebook systems to provide you can do the following: v Rescue and Restore your system settings and passwords. For more information about working with a solid state drive (SSD) for data storage. When the ThinkPad logo comes up your solid state drive (SSD) model. v Configure your files, folders, or backups. After the Rescue and Recovery workspace opens...
... in Access Help. v Communicate using diagnostics. This cutting-edge technology enables notebook systems to provide you can do the following: v Rescue and Restore your system settings and passwords. For more information about working with a solid state drive (SSD) for data storage. When the ThinkPad logo comes up your solid state drive (SSD) model. v Configure your files, folders, or backups. After the Rescue and Recovery workspace opens...
Service Guide
Page 51
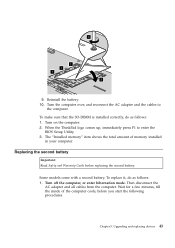
... replacing the second battery. Upgrading and replacing devices 43 To replace it, do as follows: 1. Wait for a few minutes, till the inside of memory installed in your computer. Turn the computer over, and reconnect the AC adapter and the cables to enter the BIOS Setup Utility. 3. Some models come with a second battery. Then disconnect the AC adapter and all cables from the computer. Reinstall the battery. 10. Turn on the computer. 2. 3 1 1 1 2 9. Replacing...
... replacing the second battery. Upgrading and replacing devices 43 To replace it, do as follows: 1. Wait for a few minutes, till the inside of memory installed in your computer. Turn the computer over, and reconnect the AC adapter and the cables to enter the BIOS Setup Utility. 3. Some models come with a second battery. Then disconnect the AC adapter and all cables from the computer. Reinstall the battery. 10. Turn on the computer. 2. 3 1 1 1 2 9. Replacing...
Service Guide
Page 56
... not covered: v Replacement or use of parts not manufactured for or by Lenovo hardware under warranty, trained service personnel are located in the "Worldwide telephone list" on the screen. Occasionally, there might be caused by Lenovo or nonwarranted parts Note: All warranted parts contain a 7-character identification in the format FRU XXXXXXX v Identification of software problem sources v Configuration of BIOS as part of an installation or upgrade v Changes, modifications, or upgrades to device drivers v Installation and maintenance of network operating...
... not covered: v Replacement or use of parts not manufactured for or by Lenovo hardware under warranty, trained service personnel are located in the "Worldwide telephone list" on the screen. Occasionally, there might be caused by Lenovo or nonwarranted parts Note: All warranted parts contain a 7-character identification in the format FRU XXXXXXX v Identification of software problem sources v Configuration of BIOS as part of an installation or upgrade v Changes, modifications, or upgrades to device drivers v Installation and maintenance of network operating...

Service Guide
Page 65
... notebook main battery and devices such as a screwdriver. v External CRUs with latches: These CRUs include a latch to access these instructions or if you have difficulty replacing a CRU, you can be upgraded or replaced by the customer. Online Access Help provides instructions for several critical CRU's. Additionally, the Service and Troubleshooting Guide (this guide) and Setup Instructions provide instructions for replacing internal and external CRUs. Customer Replaceable Units (CRUs) Customer Replaceable Units (CRUs) are safe...
... notebook main battery and devices such as a screwdriver. v External CRUs with latches: These CRUs include a latch to access these instructions or if you have difficulty replacing a CRU, you can be upgraded or replaced by the customer. Online Access Help provides instructions for several critical CRU's. Additionally, the Service and Troubleshooting Guide (this guide) and Setup Instructions provide instructions for replacing internal and external CRUs. Customer Replaceable Units (CRUs) Customer Replaceable Units (CRUs) are safe...
Service Guide
Page 66
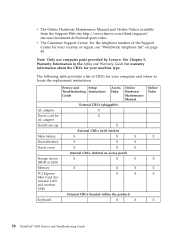
Service and Setup Troubleshooting Instructions Guide Access Help Online Hardware Maintenance Manual External CRUs (pluggable) AC adapter X Power cord for X AC adapter TrackPoint cap X External CRUs (with latches) Main battery X X X Second battery X X X Travel cover X X X Internal CRUs (behind an access panel) Storage device X (HDD or SSD) X X Memory X X X PCI Express Mini Card (for your machine type. Note: Only use computer parts provided by Lenovo. v The Online Hardware Maintenance Manual and Online Videos available from the Support Web site ...
Service and Setup Troubleshooting Instructions Guide Access Help Online Hardware Maintenance Manual External CRUs (pluggable) AC adapter X Power cord for X AC adapter TrackPoint cap X External CRUs (with latches) Main battery X X X Second battery X X X Travel cover X X X Internal CRUs (behind an access panel) Storage device X (HDD or SSD) X X Memory X X X PCI Express Mini Card (for your machine type. Note: Only use computer parts provided by Lenovo. v The Online Hardware Maintenance Manual and Online Videos available from the Support Web site ...
Service Guide
Page 67
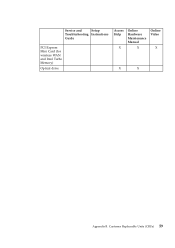
Customer Replaceable Units (CRUs) 59 Service and Setup Troubleshooting Instructions Guide PCI Express Mini Card (for wireless WAN and Intel Turbo Memory) Optical drive Access Help X Online Hardware Maintenance Manual X Online Video X X X Appendix B.
Customer Replaceable Units (CRUs) 59 Service and Setup Troubleshooting Instructions Guide PCI Express Mini Card (for wireless WAN and Intel Turbo Memory) Optical drive Access Help X Online Hardware Maintenance Manual X Online Video X X X Appendix B.
Service Guide
Page 83
... guide 1 R recovering data 33 recovery discs restoring the factory contents 33 recovery options 31 registering your computer 4 Regulatory Notice 2 replacing devices 35 Rescue and Recovery 2, 31 Rescue and Recovery workspace 10 restoring the factory contents 32 S Safety and Warranty Guide 1 second battery replacing 43 service and help 47 service partition diagnosing the system 10 restoring the factory contents 32 Setup Instructions 1 sleep mode troubleshooting 20 solid state drive (SSD) 31 diagnosing 9 troubleshooting 27 upgrading 38 specifications hardware 62 startup problems troubleshooting...
... guide 1 R recovering data 33 recovery discs restoring the factory contents 33 recovery options 31 registering your computer 4 Regulatory Notice 2 replacing devices 35 Rescue and Recovery 2, 31 Rescue and Recovery workspace 10 restoring the factory contents 32 S Safety and Warranty Guide 1 second battery replacing 43 service and help 47 service partition diagnosing the system 10 restoring the factory contents 32 Setup Instructions 1 sleep mode troubleshooting 20 solid state drive (SSD) 31 diagnosing 9 troubleshooting 27 upgrading 38 specifications hardware 62 startup problems troubleshooting...


