
Hardware Maintenance Manual
Page 1
ThinkCentre Hardware Maintenance Manual Machine Types: 3026, 3029, 3039, 3054, 3137, 3139, 3149, 3219, 3245, 3246, 3245, 3282, 3319, 3349, 3394, 3421, 3491, 3544, 3627, 3652, 3699, 3769, 3878, 3934, 4972, 4992, 5132, 5206, 5261, 5267, 5297, 5325, 5384, 5391, 5450, 5472, 5474, 5485, 5498, 5536, 5548, 5554, 5567, 5852, 5864, 6213, 6232, and 6590
ThinkCentre Hardware Maintenance Manual Machine Types: 3026, 3029, 3039, 3054, 3137, 3139, 3149, 3219, 3245, 3246, 3245, 3282, 3319, 3349, 3394, 3421, 3491, 3544, 3627, 3652, 3699, 3769, 3878, 3934, 4972, 4992, 5132, 5206, 5261, 5267, 5297, 5325, 5384, 5391, 5450, 5472, 5474, 5485, 5498, 5536, 5548, 5554, 5567, 5852, 5864, 6213, 6232, and 6590

Hardware Maintenance Manual
Page 3
ThinkCentre Hardware Maintenance Manual Machine Types: 3026, 3029, 3039, 3054, 3137, 3139, 3149, 3219, 3245, 3246, 3245, 3282, 3319, 3349, 3394, 3421, 3491, 3544, 3627, 3652, 3699, 3769, 3878, 3934, 4972, 4992, 5132, 5206, 5261, 5267, 5297, 5325, 5384, 5391, 5450, 5472, 5474, 5485, 5498, 5536, 5548, 5554, 5567, 5852, 5864, 6213, 6232, and 6590
ThinkCentre Hardware Maintenance Manual Machine Types: 3026, 3029, 3039, 3054, 3137, 3139, 3149, 3219, 3245, 3246, 3245, 3282, 3319, 3349, 3394, 3421, 3491, 3544, 3627, 3652, 3699, 3769, 3878, 3934, 4972, 4992, 5132, 5206, 5261, 5267, 5297, 5325, 5384, 5391, 5450, 5472, 5474, 5485, 5498, 5536, 5548, 5554, 5567, 5852, 5864, 6213, 6232, and 6590

Hardware Maintenance Manual
Page 5
..., 3149, 3245, 3269, 3319, 3394, 3491, 3627, 3699, 3878, 4972, 5132, 5261, 5297, 5391, 5472, 5485, 5536, 5548, 5567, 5864, and 6213. . . 30 Chapter 4. Safety information 3 General safety 3 Electrical safety 3 Voltage-selection switch 5 Safety inspection guide 5 Handling electrostatic discharge-sensitive ...RoHS compliant FRUs 1 Chapter 2. Using the Setup Utility program 41 Starting the Setup Utility program 41 © Copyright Lenovo 2010, 2012 Viewing and changing settings 41 Using passwords 41 Password considerations 41 Power-On Password 42 Administrator Password 42 ...
..., 3149, 3245, 3269, 3319, 3394, 3491, 3627, 3699, 3878, 4972, 5132, 5261, 5297, 5391, 5472, 5485, 5536, 5548, 5567, 5864, and 6213. . . 30 Chapter 4. Safety information 3 General safety 3 Electrical safety 3 Voltage-selection switch 5 Safety inspection guide 5 Handling electrostatic discharge-sensitive ...RoHS compliant FRUs 1 Chapter 2. Using the Setup Utility program 41 Starting the Setup Utility program 41 © Copyright Lenovo 2010, 2012 Viewing and changing settings 41 Using passwords 41 Password considerations 41 Power-On Password 42 Administrator Password 42 ...

Hardware Maintenance Manual
Page 6
... 7 Home Basic 32 Recovery CD . . 214 Windows 7 Home Basic 32 SP1 Recovery CD 217 Windows 7 Home Premium 32 Recovery CD 219 iv ThinkCentre Hardware Maintenance Manual Windows 7 Home Premium 32 SP1 Recovery CD 223 Windows 7 Professional 32 Recovery CD . . 227 Windows 7 Professional 32 SP1 Recovery ...: 3026, 3039, 3137, 3149, 3245, 3269, 3319, 3394, 3491, 3627, 3699, 3878, 4972, 5132, 5261, 5297, 5391, 5472, 5485, 5536, 5548, 5567, 5864, and 6213 259 Mechanical FRUs 275 Keyboard and Mouse 283 Adapters and miscellaneous FRUs 323 Power Cords 328 Recovery discs 340 Windows Vista Home Basic...
... 7 Home Basic 32 Recovery CD . . 214 Windows 7 Home Basic 32 SP1 Recovery CD 217 Windows 7 Home Premium 32 Recovery CD 219 iv ThinkCentre Hardware Maintenance Manual Windows 7 Home Premium 32 SP1 Recovery CD 223 Windows 7 Professional 32 Recovery CD . . 227 Windows 7 Professional 32 SP1 Recovery ...: 3026, 3039, 3137, 3149, 3245, 3269, 3319, 3394, 3491, 3627, 3699, 3878, 4972, 5132, 5261, 5297, 5391, 5472, 5485, 5536, 5548, 5567, 5864, and 6213 259 Mechanical FRUs 275 Keyboard and Mouse 283 Adapters and miscellaneous FRUs 323 Power Cords 328 Recovery discs 340 Windows Vista Home Basic...

Hardware Maintenance Manual
Page 38
..., 3149, 3245, 3269, 3319, 3394, 3491, 3627, 3699, 3878, 4972, 5132, 5261, 5297, 5391, 5472, 5485, 5536, 5548, 5567, 5864, and 6213. Low range: Minimum: 100 V ac Maximum: 127 V ac 30 ThinkCentre Hardware Maintenance Manual Dimensions Width: 175 mm (6.89 inches) Height: 402 mm (15.83 inches) Depth: 440 mm (17.32...
..., 3149, 3245, 3269, 3319, 3394, 3491, 3627, 3699, 3878, 4972, 5132, 5261, 5297, 5391, 5472, 5485, 5536, 5548, 5567, 5864, and 6213. Low range: Minimum: 100 V ac Maximum: 127 V ac 30 ThinkCentre Hardware Maintenance Manual Dimensions Width: 175 mm (6.89 inches) Height: 402 mm (15.83 inches) Depth: 440 mm (17.32...

Hardware Maintenance Manual
Page 109
...where to be done only by trained service technicians. FRU replacements are to connect the cables on the rear of your computer. © Copyright Lenovo 2010, 2012 101 Only the major FRUs are color-coded to help you replace any FRU. Front connector locations 1 USB connector 2 Headphone connector..., 3039, 3137, 3149, 3245, 3269, 3319, 3394, 3491, 3627, 3699, 3878, 4972, 5132, 5261, 5297, 5391, 5472, 5485, 5536, 5548, 5567, 5864, and 6213.) Important Be sure to read and understand Chapter 2 "Safety information" on the rear of connectors on page 3 before you work safely.
...where to be done only by trained service technicians. FRU replacements are to connect the cables on the rear of your computer. © Copyright Lenovo 2010, 2012 101 Only the major FRUs are color-coded to help you replace any FRU. Front connector locations 1 USB connector 2 Headphone connector..., 3039, 3137, 3149, 3245, 3269, 3319, 3394, 3491, 3627, 3699, 3878, 4972, 5132, 5261, 5297, 5391, 5472, 5485, 5536, 5548, 5567, 5864, and 6213.) Important Be sure to read and understand Chapter 2 "Safety information" on the rear of connectors on page 3 before you work safely.

Hardware Maintenance Manual
Page 111
... FRUs (Machine types: 3026, 3039, 3137, 3149, 3245, 3269, 3319, 3394, 3491, 3627, 3699, 3878, 4972, 5132, 5261, 5297, 5391, 5472, 5485, 5536, 5548, 5567, 5864, and 6213.) 103 Disconnect all power cords from the drives and turn off all attached devices and the computer. 2. Disconnect the power cords, Input/Output...
... FRUs (Machine types: 3026, 3039, 3137, 3149, 3245, 3269, 3319, 3394, 3491, 3627, 3699, 3878, 4972, 5132, 5261, 5297, 5391, 5472, 5485, 5536, 5548, 5567, 5864, and 6213.) 103 Disconnect all power cords from the drives and turn off all attached devices and the computer. 2. Disconnect the power cords, Input/Output...
Hardware Maintenance Manual
Page 113
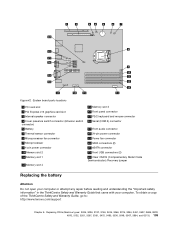
...(Machine types: 3026, 3039, 3137, 3149, 3245, 3269, 3319, 3394, 3491, 3627, 3699, 3878, 4972, 5132, 5261, 5297, 5391, 5472, 5485, 5536, 5548, 5567, 5864, and 6213.) 105 System board parts locations 1 PCI card slot 2 PCI Express x16 graphics card slot 3 Internal speaker connector 4 Cover presence switch connector (Intrusion switch... jumper Replacing the battery Attention Do not open your computer or attempt any repair before reading and understanding the "Important safety information" in the ThinkCentre Safety and Warranty Guide that came with your computer. Figure 42. To obtain a copy of the...
...(Machine types: 3026, 3039, 3137, 3149, 3245, 3269, 3319, 3394, 3491, 3627, 3699, 3878, 4972, 5132, 5261, 5297, 5391, 5472, 5485, 5536, 5548, 5567, 5864, and 6213.) 105 System board parts locations 1 PCI card slot 2 PCI Express x16 graphics card slot 3 Internal speaker connector 4 Cover presence switch connector (Intrusion switch... jumper Replacing the battery Attention Do not open your computer or attempt any repair before reading and understanding the "Important safety information" in the ThinkCentre Safety and Warranty Guide that came with your computer. Figure 42. To obtain a copy of the...

Hardware Maintenance Manual
Page 115
... memory module, open your computer or attempt any combination up to : http://www.lenovo.com/support This section provides instructions on page 104. 5. Pivot the optical drive bay... 3627, 3699, 3878, 4972, 5132, 5261, 5297, 5391, 5472, 5485, 5536, 5548, 5567, 5864, and 6213.) 107 See "Opening the computer cover" on page 104. Locate the memory slots. Your computer... memory modules in any repair before reading and understanding the "Important safety information" in the ThinkCentre Safety and Warranty Guide that came with your computer. When installing or replacing a memory module...
... memory module, open your computer or attempt any combination up to : http://www.lenovo.com/support This section provides instructions on page 104. 5. Pivot the optical drive bay... 3627, 3699, 3878, 4972, 5132, 5261, 5297, 5391, 5472, 5485, 5536, 5548, 5567, 5864, and 6213.) 107 See "Opening the computer cover" on page 104. Locate the memory slots. Your computer... memory modules in any repair before reading and understanding the "Important safety information" in the ThinkCentre Safety and Warranty Guide that came with your computer. When installing or replacing a memory module...

Hardware Maintenance Manual
Page 117
... FRUs (Machine types: 3026, 3039, 3137, 3149, 3245, 3269, 3319, 3394, 3491, 3627, 3699, 3878, 4972, 5132, 5261, 5297, 5391, 5472, 5485, 5536, 5548, 5567, 5864, and 6213.) 109 If you are installing a PCI card, remove the appropriate metal slot cover. If you are replacing an old PCI card, grasp the...
... FRUs (Machine types: 3026, 3039, 3137, 3149, 3245, 3269, 3319, 3394, 3491, 3627, 3699, 3878, 4972, 5132, 5261, 5297, 5391, 5472, 5485, 5536, 5548, 5567, 5864, and 6213.) 109 If you are installing a PCI card, remove the appropriate metal slot cover. If you are replacing an old PCI card, grasp the...

Hardware Maintenance Manual
Page 119
... FRUs (Machine types: 3026, 3039, 3137, 3149, 3245, 3269, 3319, 3394, 3491, 3627, 3699, 3878, 4972, 5132, 5261, 5297, 5391, 5472, 5485, 5536, 5548, 5567, 5864, and 6213.) 111 8 7 6 5 4 3 Figure 50. Note: You might need to remove the hard disk drive to gain easy access to the power supply assembly. 6. See...
... FRUs (Machine types: 3026, 3039, 3137, 3149, 3245, 3269, 3319, 3394, 3491, 3627, 3699, 3878, 4972, 5132, 5261, 5297, 5391, 5472, 5485, 5536, 5548, 5567, 5864, and 6213.) 111 8 7 6 5 4 3 Figure 50. Note: You might need to remove the hard disk drive to gain easy access to the power supply assembly. 6. See...

Hardware Maintenance Manual
Page 121
..., 3245, 3269, 3319, 3394, 3491, 3627, 3699, 3878, 4972, 5132, 5261, 5297, 5391, 5472, 5485, 5536, 5548, 5567, 5864, and 6213.) 113 To obtain a copy of the ThinkCentre Safety and Warranty Guide, go to the system board. The four screws cannot be removed from the system board to avoid...the heat sink to replace the microprocessor. Replacing the microprocessor Attention Do not open your computer or attempt any possible damage to : http://www.lenovo.com/support This section provides instructions on page 102. 3. See "Opening the computer cover" on how to the system board. Note: ...
..., 3245, 3269, 3319, 3394, 3491, 3627, 3699, 3878, 4972, 5132, 5261, 5297, 5391, 5472, 5485, 5536, 5548, 5567, 5864, and 6213.) 113 To obtain a copy of the ThinkCentre Safety and Warranty Guide, go to the system board. The four screws cannot be removed from the system board to avoid...the heat sink to replace the microprocessor. Replacing the microprocessor Attention Do not open your computer or attempt any possible damage to : http://www.lenovo.com/support This section provides instructions on page 102. 3. See "Opening the computer cover" on how to the system board. Note: ...

Hardware Maintenance Manual
Page 123
... FRUs (Machine types: 3026, 3039, 3137, 3149, 3245, 3269, 3319, 3394, 3491, 3627, 3699, 3878, 4972, 5132, 5261, 5297, 5391, 5472, 5485, 5536, 5548, 5567, 5864, and 6213.) 115 c. Reinstall the heat sink and fan assembly. See "Replacing the heat sink" on the bottom. d. Do not touch the gold contacts on...
... FRUs (Machine types: 3026, 3039, 3137, 3149, 3245, 3269, 3319, 3394, 3491, 3627, 3699, 3878, 4972, 5132, 5261, 5297, 5391, 5472, 5485, 5536, 5548, 5567, 5864, and 6213.) 115 c. Reinstall the heat sink and fan assembly. See "Replacing the heat sink" on the bottom. d. Do not touch the gold contacts on...

Hardware Maintenance Manual
Page 125
... FRUs (Machine types: 3026, 3039, 3137, 3149, 3245, 3269, 3319, 3394, 3491, 3627, 3699, 3878, 4972, 5132, 5261, 5297, 5391, 5472, 5485, 5536, 5548, 5567, 5864, and 6213.) 117 Note the orientation of the socket. Install one side of the socket cover into place. Carefully check the four corners of the...
... FRUs (Machine types: 3026, 3039, 3137, 3149, 3245, 3269, 3319, 3394, 3491, 3627, 3699, 3878, 4972, 5132, 5261, 5297, 5391, 5472, 5485, 5536, 5548, 5567, 5864, and 6213.) 117 Note the orientation of the socket. Install one side of the socket cover into place. Carefully check the four corners of the...

Hardware Maintenance Manual
Page 127
... FRUs (Machine types: 3026, 3039, 3137, 3149, 3245, 3269, 3319, 3394, 3491, 3627, 3699, 3878, 4972, 5132, 5261, 5297, 5391, 5472, 5485, 5536, 5548, 5567, 5864, and 6213.) 119 Disconnect the signal cable and the power cable from the bracket. 8. Insert the two retaining clips 1 of the bracket to remove the...
... FRUs (Machine types: 3026, 3039, 3137, 3149, 3245, 3269, 3319, 3394, 3491, 3627, 3699, 3878, 4972, 5132, 5261, 5297, 5391, 5472, 5485, 5536, 5548, 5567, 5864, and 6213.) 119 Disconnect the signal cable and the power cable from the bracket. 8. Insert the two retaining clips 1 of the bracket to remove the...

Hardware Maintenance Manual
Page 129
Connect the signal cable and the power cable to replace the internal speaker. To obtain a copy of the ThinkCentre Safety and Warranty Guide, go to: http://www.lenovo.com/support This section provides instructions on how to the rear of the optical drive. 9. Installing a new optical drive 8. Go ..., 3039, 3137, 3149, 3245, 3269, 3319, 3394, 3491, 3627, 3699, 3878, 4972, 5132, 5261, 5297, 5391, 5472, 5485, 5536, 5548, 5567, 5864, and 6213.) 121 Figure 63. Replacing the internal speaker Attention Do not open your computer or attempt any repair before reading and understanding the "Important...
Connect the signal cable and the power cable to replace the internal speaker. To obtain a copy of the ThinkCentre Safety and Warranty Guide, go to: http://www.lenovo.com/support This section provides instructions on how to the rear of the optical drive. 9. Installing a new optical drive 8. Go ..., 3039, 3137, 3149, 3245, 3269, 3319, 3394, 3491, 3627, 3699, 3878, 4972, 5132, 5261, 5297, 5391, 5472, 5485, 5536, 5548, 5567, 5864, and 6213.) 121 Figure 63. Replacing the internal speaker Attention Do not open your computer or attempt any repair before reading and understanding the "Important...

Hardware Maintenance Manual
Page 131
Figure 65. Insert the two tabs 2 on the new internal speaker. 9. Removing the internal speaker 8. Remove the attached thermal sensor cable from the old internal speaker and install it on the bottom of the new internal speaker into the corresponding holes in the chassis, and push the speaker straight down until the other two tabs 1 snap into position. Replacing FRUs (Machine types: 3026, 3039, 3137, 3149, 3245, 3269, 3319, 3394, 3491, 3627, 3699, 3878, 4972, 5132, 5261, 5297, 5391, 5472, 5485, 5536, 5548, 5567, 5864, and 6213.) 123 Chapter 9.
Figure 65. Insert the two tabs 2 on the new internal speaker. 9. Removing the internal speaker 8. Remove the attached thermal sensor cable from the old internal speaker and install it on the bottom of the new internal speaker into the corresponding holes in the chassis, and push the speaker straight down until the other two tabs 1 snap into position. Replacing FRUs (Machine types: 3026, 3039, 3137, 3149, 3245, 3269, 3319, 3394, 3491, 3627, 3699, 3878, 4972, 5132, 5261, 5297, 5391, 5472, 5485, 5536, 5548, 5567, 5864, and 6213.) 123 Chapter 9.

Hardware Maintenance Manual
Page 133
...Chapter 9. See "Locating parts on the system board" on how to : http://www.lenovo.com/support This section provides instructions on page 104. Remove the screw that came with the hole in the ThinkCentre Safety and Warranty Guide that secures the front audio and USB assembly to the front audio...types: 3026, 3039, 3137, 3149, 3245, 3269, 3319, 3394, 3491, 3627, 3699, 3878, 4972, 5132, 5261, 5297, 5391, 5472, 5485, 5536, 5548, 5567, 5864, and 6213.) 125 Reconnect the front audio and USB assembly cables to the chassis. 8 7 6 5 4 3 Figure 67. Install the screw to secure the new front audio...
...Chapter 9. See "Locating parts on the system board" on how to : http://www.lenovo.com/support This section provides instructions on page 104. Remove the screw that came with the hole in the ThinkCentre Safety and Warranty Guide that secures the front audio and USB assembly to the front audio...types: 3026, 3039, 3137, 3149, 3245, 3269, 3319, 3394, 3491, 3627, 3699, 3878, 4972, 5132, 5261, 5297, 5391, 5472, 5485, 5536, 5548, 5567, 5864, and 6213.) 125 Reconnect the front audio and USB assembly cables to the chassis. 8 7 6 5 4 3 Figure 67. Install the screw to secure the new front audio...

Hardware Maintenance Manual
Page 135
... FRUs (Machine types: 3026, 3039, 3137, 3149, 3245, 3269, 3319, 3394, 3491, 3627, 3699, 3878, 4972, 5132, 5261, 5297, 5391, 5472, 5485, 5536, 5548, 5567, 5864, and 6213.) 127
... FRUs (Machine types: 3026, 3039, 3137, 3149, 3245, 3269, 3319, 3394, 3491, 3627, 3699, 3878, 4972, 5132, 5261, 5297, 5391, 5472, 5485, 5536, 5548, 5567, 5864, and 6213.) 127

Hardware Maintenance Manual
Page 260
... US English • MT 3245: • MT 3269: • MT 3491: • MT 3627: • MT 5485: • MT 5536: • MT 5567: • MT 5864: • MT 3026, 3039, 3137, 3149, 3319, 3394, 3699, 3878, 4972, 5132, 5261, 5297,_SB Windows 7 Ultimate 64 Recovery CD Windows 7 Ultimate 64 US English... • MT 3246: • MT 3282: • MT 3544: • MT 3652: • MT 5474: • MT 5498: • MT 5554: Windows 7 Starter 32 252 ThinkCentre Hardware Maintenance Manual FRU # FRU # 03T1649 FRU # 03T1650 FRU # 03T1651 CRU CRU 1 CRU 1 CRU 1
... US English • MT 3245: • MT 3269: • MT 3491: • MT 3627: • MT 5485: • MT 5536: • MT 5567: • MT 5864: • MT 3026, 3039, 3137, 3149, 3319, 3394, 3699, 3878, 4972, 5132, 5261, 5297,_SB Windows 7 Ultimate 64 Recovery CD Windows 7 Ultimate 64 US English... • MT 3246: • MT 3282: • MT 3544: • MT 3652: • MT 5474: • MT 5498: • MT 5554: Windows 7 Starter 32 252 ThinkCentre Hardware Maintenance Manual FRU # FRU # 03T1649 FRU # 03T1650 FRU # 03T1651 CRU CRU 1 CRU 1 CRU 1