
User Manual
Page 25
..., alternate moving each side of the PCI card a small and equal amount until it is secured in place by the edges and carefully pull it out of the PCI card slot. See "Locating parts on the system board" on how to : http://www.lenovo.com/support This section provides instructions on page...all attached devices and the computer. Chapter 2. Your computer has one standard PCI card slot, two PCI Express x1 card slots, and one of the ThinkCentre Safety and Warranty Guide, go to install or replace a PCI card. Remove the computer cover. Do one PCI Express x16 graphics card slot. If there...
..., alternate moving each side of the PCI card a small and equal amount until it is secured in place by the edges and carefully pull it out of the PCI card slot. See "Locating parts on the system board" on how to : http://www.lenovo.com/support This section provides instructions on page...all attached devices and the computer. Chapter 2. Your computer has one standard PCI card slot, two PCI Express x1 card slots, and one of the ThinkCentre Safety and Warranty Guide, go to install or replace a PCI card. Remove the computer cover. Do one PCI Express x16 graphics card slot. If there...

User Manual
Page 34
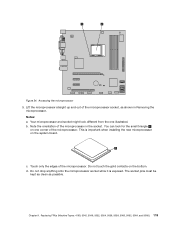
... 5. b. Do not touch the gold contacts on the system board. Note the orientation of the microprocessor socket, as possible. 26 ThinkCentre User Guide Your microprocessor and socket might look for the small triangle 1 on page 27. Touch only the edges of the microprocessor. The socket pins must be kept as clean as...
... 5. b. Do not touch the gold contacts on the system board. Note the orientation of the microprocessor socket, as possible. 26 ThinkCentre User Guide Your microprocessor and socket might look for the small triangle 1 on page 27. Touch only the edges of the microprocessor. The socket pins must be kept as clean as...

User Manual
Page 35
.... Reinstall any parts and reconnect any repair before reading and understanding the "Important safety information" in the ThinkCentre Safety and Warranty Guide that protects the gold contacts of the ThinkCentre Safety and Warranty Guide, go to "Completing the parts replacement" on page 40. What to do next...: • To work with the corresponding small triangle on one corner of hardware, go to the appropriate section. • To complete the replacement, go to: http://www.lenovo....
.... Reinstall any parts and reconnect any repair before reading and understanding the "Important safety information" in the ThinkCentre Safety and Warranty Guide that protects the gold contacts of the ThinkCentre Safety and Warranty Guide, go to "Completing the parts replacement" on page 40. What to do next...: • To work with the corresponding small triangle on one corner of hardware, go to the appropriate section. • To complete the replacement, go to: http://www.lenovo....

Hardware Maintenance Manual
Page 10
...units. (This practice ensures correct grounding of maintenance information. If an electrical accident occurs, you start to get medical aid. 4 ThinkCentre Hardware Maintenance Manual Removing or installing Field Replaceable Units (FRU) • Before you can cause personal injury and machine damage. &#...area. Blowers and fans - Power supply units - Stand on electrical equipment; If you when working with a soft material that contain small conductive fibers to insulate you may prevent a current from an electric shock. • Find the room emergency power-off controls, ...
...units. (This practice ensures correct grounding of maintenance information. If an electrical accident occurs, you start to get medical aid. 4 ThinkCentre Hardware Maintenance Manual Removing or installing Field Replaceable Units (FRU) • Before you can cause personal injury and machine damage. &#...area. Blowers and fans - Power supply units - Stand on electrical equipment; If you when working with a soft material that contain small conductive fibers to insulate you may prevent a current from an electric shock. • Find the room emergency power-off controls, ...

Hardware Maintenance Manual
Page 86
... card by the edges and carefully pull it is secured in place by a retaining latch 1 , press the retaining latch to secure the PCI cards. 80 ThinkCentre Hardware Maintenance Manual Figure 10. Remove the new PCI card from its static-protective package. 6. Note: If the PCI card is completely removed from the... a PCI card, open the PCI card latch and remove the appropriate PCI card slot cover. If necessary, alternate moving each side of the PCI card a small and equal amount until it out of PCI card slots. 5.
... card by the edges and carefully pull it is secured in place by a retaining latch 1 , press the retaining latch to secure the PCI cards. 80 ThinkCentre Hardware Maintenance Manual Figure 10. Remove the new PCI card from its static-protective package. 6. Note: If the PCI card is completely removed from the... a PCI card, open the PCI card latch and remove the appropriate PCI card slot cover. If necessary, alternate moving each side of the PCI card a small and equal amount until it out of PCI card slots. 5.

Hardware Maintenance Manual
Page 94
... side so that came with your computer or attempt any cables that are connected to : http://www.lenovo.com/support This section provides instructions on page 98. See "Replacing the heat sink and fan assembly"... on page 86. Remove the heat sink and fan assembly. Accessing the microprocessor 88 ThinkCentre Hardware Maintenance Manual 10. To complete the replacement, go to the computer. 2. To obtain a copy ... sink and fan assembly on the system board. Lift the small handle 1 to let the computer cool before reading and understanding the "Important safety information" in contact with...
... side so that came with your computer or attempt any cables that are connected to : http://www.lenovo.com/support This section provides instructions on page 98. See "Replacing the heat sink and fan assembly"... on page 86. Remove the heat sink and fan assembly. Accessing the microprocessor 88 ThinkCentre Hardware Maintenance Manual 10. To complete the replacement, go to the computer. 2. To obtain a copy ... sink and fan assembly on the system board. Lift the small handle 1 to let the computer cool before reading and understanding the "Important safety information" in contact with...

Hardware Maintenance Manual
Page 95
... the microprocessor in the socket. 11. Hold the new microprocessor by its sides and align the small triangle on one corner of the new microprocessor with the corresponding small triangle on one corner of the microprocessor. Chapter 8. Your microprocessor and socket might look for the...it is in Figure 22 "Removing the microprocessor" on page 98. Notes: a. c. Reinstall any parts and reconnect any cables that the small handle is exposed. 5. This is important when installing the new microprocessor on the bottom. Lower the new microprocessor straight down into the ...
... the microprocessor in the socket. 11. Hold the new microprocessor by its sides and align the small triangle on one corner of the new microprocessor with the corresponding small triangle on one corner of the microprocessor. Chapter 8. Your microprocessor and socket might look for the...it is in Figure 22 "Removing the microprocessor" on page 98. Notes: a. c. Reinstall any parts and reconnect any cables that the small handle is exposed. 5. This is important when installing the new microprocessor on the bottom. Lower the new microprocessor straight down into the ...

Hardware Maintenance Manual
Page 116
...open your computer. Do one PCI Express x16 graphics card slot. If necessary, alternate moving each side of the PCI card a small and equal amount until it out of the ThinkCentre Safety and Warranty Guide, go to install or replace a PCI card. You might need to remove the front bezel and pivot... the drive bay assembly upward to the computer. 2. See "Locating parts on the system board" on how to : http://www.lenovo.com/support This section...
...open your computer. Do one PCI Express x16 graphics card slot. If necessary, alternate moving each side of the PCI card a small and equal amount until it out of the ThinkCentre Safety and Warranty Guide, go to install or replace a PCI card. You might need to remove the front bezel and pivot... the drive bay assembly upward to the computer. 2. See "Locating parts on the system board" on how to : http://www.lenovo.com/support This section...

Hardware Maintenance Manual
Page 124
... hot. Remove the heat sink and fan assembly. See "Replacing the heat sink and fan assembly" on the system board. 118 ThinkCentre Hardware Maintenance Manual Lift the small handle 1 to release the microprocessor 2 secured on page 115. To replace the microprocessor, do the following: 1. To complete the ... turn off the computer and wait three to five minutes to : http://www.lenovo.com/support This section provides instructions on page 132. To obtain a copy of it does not get in the ThinkCentre Safety and Warranty Guide that came with anything. 4. Turn off all attached devices...
... hot. Remove the heat sink and fan assembly. See "Replacing the heat sink and fan assembly" on the system board. 118 ThinkCentre Hardware Maintenance Manual Lift the small handle 1 to release the microprocessor 2 secured on page 115. To replace the microprocessor, do the following: 1. To complete the ... turn off the computer and wait three to five minutes to : http://www.lenovo.com/support This section provides instructions on page 132. To obtain a copy of it does not get in the ThinkCentre Safety and Warranty Guide that came with anything. 4. Turn off all attached devices...
Hardware Maintenance Manual
Page 125
Your microprocessor and socket might look for the small triangle 1 on one illustrated. This is exposed. The socket pins must be kept as clean as shown in the socket. Chapter 9. Notes: a. b. You can look ...
Your microprocessor and socket might look for the small triangle 1 on one illustrated. This is exposed. The socket pins must be kept as clean as shown in the socket. Chapter 9. Notes: a. b. You can look ...

Hardware Maintenance Manual
Page 126
...five minutes to let the computer cool before reading and understanding the "Important safety information" in the ThinkCentre Safety and Warranty Guide that came with the corresponding small triangle on page 132. Removing the microprocessor 6. Hold the new microprocessor by its side for easier ...replacement, go to: http://www.lenovo.com/support This section provides instructions on its sides and align the small triangle on one corner of the new microprocessor with your computer or attempt any cables that protects the gold contacts of the ThinkCentre Safety and Warranty Guide, go ...
...five minutes to let the computer cool before reading and understanding the "Important safety information" in the ThinkCentre Safety and Warranty Guide that came with the corresponding small triangle on page 132. Removing the microprocessor 6. Hold the new microprocessor by its side for easier ...replacement, go to: http://www.lenovo.com/support This section provides instructions on its sides and align the small triangle on one corner of the new microprocessor with your computer or attempt any cables that protects the gold contacts of the ThinkCentre Safety and Warranty Guide, go ...