
Hardware Maintenance Manual (HMM)
Page 37
... maximum system performance. Table 1. Chapter 3. The following table lists the programs that applies to customize some innovative built-in Lenovo ThinkVantage Tools Create Recovery Media Factory Recovery Disks Fingerprint Software Fingerprint Reader Lenovo ThinkVantage Toolbox/Lenovo Solution Center System Health and Diagnostics SimpleTap SimpleTap ThinkVantage Password Manager Password Vault ThinkVantage Power Manager Power Controls ThinkVantage Rescue...
... maximum system performance. Table 1. Chapter 3. The following table lists the programs that applies to customize some innovative built-in Lenovo ThinkVantage Tools Create Recovery Media Factory Recovery Disks Fingerprint Software Fingerprint Reader Lenovo ThinkVantage Toolbox/Lenovo Solution Center System Health and Diagnostics SimpleTap SimpleTap ThinkVantage Password Manager Password Vault ThinkVantage Power Manager Power Controls ThinkVantage Rescue...

Hardware Maintenance Manual (HMM)
Page 47
...• Make sure that the disc you are using is not scratched or damaged. Wiping a disc in the startup sequence before the hard disk drive. Action: Make sure that the power cable and signal cable are securely connected to your computer. Refer to the drive. If you need..., to start your computer Symptom: Unable to use a startable (bootable) recovery medium, such as the Product Recovery CD, to the outside. If these actions do not correct the problem, run the diagnostic programs (see "Lenovo Solution Center" on some models the startup sequence is permanently set and cannot be ...
...• Make sure that the disc you are using is not scratched or damaged. Wiping a disc in the startup sequence before the hard disk drive. Action: Make sure that the power cable and signal cable are securely connected to your computer. Refer to the drive. If you need..., to start your computer Symptom: Unable to use a startable (bootable) recovery medium, such as the Product Recovery CD, to the outside. If these actions do not correct the problem, run the diagnostic programs (see "Lenovo Solution Center" on some models the startup sequence is permanently set and cannot be ...
Hardware Maintenance Manual (HMM)
Page 63
... 3595, 3597, 3617, 3634, 3655, 3662, 3665, and 3675, see "Completing the parts replacement" on page 73. 4. Move the Clear CMOS /Recovery jumper back to the USB connector cannot be any combination of the following : 1. From the Setup Utility program main menu, select Devices. 3. Chapter 6. Then...Use this feature is set to Disable, all devices connected to the computer. 2. To erase a lost or forgotten passwords, such as hard disk drives or the optical drive) are connected to the SATA connectors (such as a user password. Remove the computer cover. Note: A password...
... 3595, 3597, 3617, 3634, 3655, 3662, 3665, and 3675, see "Completing the parts replacement" on page 73. 4. Move the Clear CMOS /Recovery jumper back to the USB connector cannot be any combination of the following : 1. From the Setup Utility program main menu, select Devices. 3. Chapter 6. Then...Use this feature is set to Disable, all devices connected to the computer. 2. To erase a lost or forgotten passwords, such as hard disk drives or the optical drive) are connected to the SATA connectors (such as a user password. Remove the computer cover. Note: A password...
Hardware Maintenance Manual (HMM)
Page 163
...management features of the computer such as the system power supply, processor, hard disk drives, and some monitors. This can use the Wake on LAN-enabled and there is allowed to the Clear CMOS /Recovery jumper. 5. Reinstall any parts and reconnect any cables that have been removed ... Move the jumper from you set Wake on LAN to the maintenance position (pin 2 and pin 3). 6. Wait a few minutes. Then, the recovery session begins. Move the jumper back to restart the operating system. When you . 9. Power management Power management reduces the power consumption of certain components...
...management features of the computer such as the system power supply, processor, hard disk drives, and some monitors. This can use the Wake on LAN-enabled and there is allowed to the Clear CMOS /Recovery jumper. 5. Reinstall any parts and reconnect any cables that have been removed ... Move the jumper from you set Wake on LAN to the maintenance position (pin 2 and pin 3). 6. Wait a few minutes. Then, the recovery session begins. Move the jumper back to restart the operating system. When you . 9. Power management Power management reduces the power consumption of certain components...

Hardware Maintenance Manual (HMM)
Page 167
...70 audio line-out connector 70 B basic troubleshooting 39 battery, replacing 90, 126 Boot-block Recovery 158 C changing password 58 startup device sequence 60 CMOS, clearing 59 components, internal 71, ...35-36 Ethernet connector 71 exiting, Setup Utility 61 external options, installing 83, 119 © Copyright Lenovo 2012 F failure, recovering from a POST and BIOS update 158 flashing the BIOS 157 front connectors, ... FRU locations 71, 78 FRU part numbers 1, 69, 73, 80, 83, 119 H hard disk drive, replacing 103, 127 heat sink and fan assembly replacing 132 heat sink and fan assembly, replacing...
...70 audio line-out connector 70 B basic troubleshooting 39 battery, replacing 90, 126 Boot-block Recovery 158 C changing password 58 startup device sequence 60 CMOS, clearing 59 components, internal 71, ...35-36 Ethernet connector 71 exiting, Setup Utility 61 external options, installing 83, 119 © Copyright Lenovo 2012 F failure, recovering from a POST and BIOS update 158 flashing the BIOS 157 front connectors, ... FRU locations 71, 78 FRU part numbers 1, 69, 73, 80, 83, 119 H hard disk drive, replacing 103, 127 heat sink and fan assembly replacing 132 heat sink and fan assembly, replacing...
Hardware Maintenance Manual (HMM)
Page 168
..., removing 114, 152 recovering from a POST and BIOS update failure 158 recovery Boot-block Recovery 158 removing computer cover 84, 120 removing, reinstalling front bezel 120 replacing battery 90, 126 hard disk drive 103, 127 heat sink and fan assembly 95, 132 microprocessor 98,... 139 power supply assembly 135 S security enabling or disabling 59 selecting startup device 60 temporary startup device 60 Self-service CRUs 71, 78 serial port 71 setting password 58 settings changing 57 viewing 57 Setup Utility 57 164 ThinkCentre...
..., removing 114, 152 recovering from a POST and BIOS update failure 158 recovery Boot-block Recovery 158 removing computer cover 84, 120 removing, reinstalling front bezel 120 replacing battery 90, 126 hard disk drive 103, 127 heat sink and fan assembly 95, 132 microprocessor 98,... 139 power supply assembly 135 S security enabling or disabling 59 selecting startup device 60 temporary startup device 60 Self-service CRUs 71, 78 serial port 71 setting password 58 settings changing 57 viewing 57 Setup Utility 57 164 ThinkCentre...

Hardware Maintenance Manual - ThinkCentre M72e (3261, 3263, 3264, 3267, 3273, 3856, 4004, and 4156)
Page 37
... help you to a host of information sources and provides easy access to various tools to customize some innovative built-in Lenovo ThinkVantage Tools Create Recovery Media Factory Recovery Disks Fingerprint Software Fingerprint Reader Lenovo ThinkVantage Toolbox/Lenovo Solution Center System Health and Diagnostics SimpleTap SimpleTap ThinkVantage Password Manager Password Vault ThinkVantage Power Manager ThinkVantage Rescue and...
... help you to a host of information sources and provides easy access to various tools to customize some innovative built-in Lenovo ThinkVantage Tools Create Recovery Media Factory Recovery Disks Fingerprint Software Fingerprint Reader Lenovo ThinkVantage Toolbox/Lenovo Solution Center System Health and Diagnostics SimpleTap SimpleTap ThinkVantage Password Manager Password Vault ThinkVantage Power Manager ThinkVantage Rescue and...

Hardware Maintenance Manual - ThinkCentre M72e (3261, 3263, 3264, 3267, 3273, 3856, 4004, and 4156)
Page 45
... on page 58 for instructions). Wiping a disc in the startup sequence before the hard disk drive. Make sure that the CD or DVD drive is permanently set and cannot be changed...drive. If these actions do not correct the problem, run the diagnostic programs (see "Lenovo Solution Center" on page 54 for information on viewing and changing the startup sequence. ... Unable to use a startable (bootable) recovery medium, such as the Product Recovery CD, to start your computer Symptom: Unable to use a startable (bootable) recovery medium, such as the Product Recovery CD, to the outside. To remove ...
... on page 58 for instructions). Wiping a disc in the startup sequence before the hard disk drive. Make sure that the CD or DVD drive is permanently set and cannot be changed...drive. If these actions do not correct the problem, run the diagnostic programs (see "Lenovo Solution Center" on page 54 for information on viewing and changing the startup sequence. ... Unable to use a startable (bootable) recovery medium, such as the Product Recovery CD, to start your computer Symptom: Unable to use a startable (bootable) recovery medium, such as the Product Recovery CD, to the outside. To remove ...

Hardware Maintenance Manual - ThinkCentre M72e (3261, 3263, 3264, 3267, 3273, 3856, 4004, and 4156)
Page 61
... alphabetic and numeric characters. Remove the computer cover. See "Removing the computer cover" on the system board. Locate the Clear CMOS /Recovery jumper on page 77. 3. See "Locating parts on the system board" on for approximately five seconds. 7. Turn on the computer ... Depending on page 123. 6. See "Completing the parts replacement" on the password type, select Set Power-On Password, Set Administrator Password, or Hard Disk Password. 4. See "Completing the parts replacement" on page 56. When this option to the following : 1. 2. Using the Setup Utility program 57 ...
... alphabetic and numeric characters. Remove the computer cover. See "Removing the computer cover" on the system board. Locate the Clear CMOS /Recovery jumper on page 77. 3. See "Locating parts on the system board" on for approximately five seconds. 7. Turn on the computer ... Depending on page 123. 6. See "Completing the parts replacement" on the password type, select Set Power-On Password, Set Administrator Password, or Hard Disk Password. 4. See "Completing the parts replacement" on page 56. When this option to the following : 1. 2. Using the Setup Utility program 57 ...
Hardware Maintenance Manual - ThinkCentre M72e (3261, 3263, 3264, 3267, 3273, 3856, 4004, and 4156)
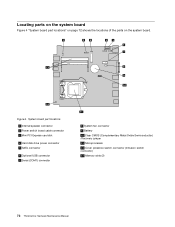
Page 76
... 3 Mini PCI Express card slot 4 Hard disk drive power connector 5 SATA connector 6 Optional USB connector 7 Serial (COM1) connector 8 System fan connector 9 Battery 10 Clear CMOS (Complementary Metal Oxide Semiconductor) /Recovery jumper 11 Microprocessor 12 Cover presence switch connector (Intrusion switch connector) 13 Memory slots (2) 72 ThinkCentre Hardware Maintenance Manual Figure 4. Locating parts on...
... 3 Mini PCI Express card slot 4 Hard disk drive power connector 5 SATA connector 6 Optional USB connector 7 Serial (COM1) connector 8 System fan connector 9 Battery 10 Clear CMOS (Complementary Metal Oxide Semiconductor) /Recovery jumper 11 Microprocessor 12 Cover presence switch connector (Intrusion switch connector) 13 Memory slots (2) 72 ThinkCentre Hardware Maintenance Manual Figure 4. Locating parts on...

Hardware Maintenance Manual - ThinkCentre M72e (3261, 3263, 3264, 3267, 3273, 3856, 4004, and 4156)
Page 133
...Additional service information 129 Reconnect any cables that were disconnected and reinstall the PCI card if removed. 7. Move the Clear CMOS /Recovery jumper back to electrical outlets. Reinstall the computer cover and reconnect any cables that were disconnected. 14. Power management Power management ... pin 2) to control the power management features of the computer such as the system power supply, processor, hard disk drives, and some monitors. Then, the recovery session begins. During this time, a warning message will turn on when it receives a specific signal from another ...
...Additional service information 129 Reconnect any cables that were disconnected and reinstall the PCI card if removed. 7. Move the Clear CMOS /Recovery jumper back to electrical outlets. Reinstall the computer cover and reconnect any cables that were disconnected. 14. Power management Power management ... pin 2) to control the power management features of the computer such as the system power supply, processor, hard disk drives, and some monitors. Then, the recovery session begins. During this time, a warning message will turn on when it receives a specific signal from another ...

Hardware Maintenance Manual - ThinkCentre M72e (3261, 3263, 3264, 3267, 3273, 3856, 4004, and 4156)
Page 137
...adapter bracket, replacing 95 ac power adapter, replacing 93 Administrator, password 56 B basic troubleshooting 37 battery, replacing 92 boot-block recovery 128 C changing password 56 startup device sequence 58 CMOS, clearing 57 components, internal 69 computer cover removing 77 computer cover, ... front connectors, controls, indicators 67 FRU locations 69 FRU part numbers 1, 67, 71, 73 © Copyright Lenovo 2012 H hard disk drive bracket, replacing 107 hard disk drive, replacing 111 heat sink, replacing 99 I Identifying FRUs 69 installing options memory module 79 installing or removing ...
...adapter bracket, replacing 95 ac power adapter, replacing 93 Administrator, password 56 B basic troubleshooting 37 battery, replacing 92 boot-block recovery 128 C changing password 56 startup device sequence 58 CMOS, clearing 57 components, internal 69 computer cover removing 77 computer cover, ... front connectors, controls, indicators 67 FRU locations 69 FRU part numbers 1, 67, 71, 73 © Copyright Lenovo 2012 H hard disk drive bracket, replacing 107 hard disk drive, replacing 111 heat sink, replacing 99 I Identifying FRUs 69 installing options memory module 79 installing or removing ...

Hardware Maintenance Manual - ThinkCentre M72e (3261, 3263, 3264, 3267, 3273, 3856, 4004, and 4156)
Page 138
... WiFi antennas, installing or removing 115 recovering from a POST/BIOS update failure 128 recovery boot-block 128 removing computer cover 77 replacing battery 92 hard disk drive 111 hard disk drive bracket 107 heat sink 99 microprocessor 102 power switch board 97 system board 104...system fan, replacing 117 T temporary startup device 58 the BIOS, updating (flashing) 127-128 troubleshooting, basic 37 troubleshooting, diagnostics 37 134 ThinkCentre Hardware Maintenance Manual U updating (flashing) the BIOS 127 updating (flashing) the BIOS 128 USB 2.0 connector 69 using passwords 55 Setup Utility...
... WiFi antennas, installing or removing 115 recovering from a POST/BIOS update failure 128 recovery boot-block 128 removing computer cover 77 replacing battery 92 hard disk drive 111 hard disk drive bracket 107 heat sink 99 microprocessor 102 power switch board 97 system board 104...system fan, replacing 117 T temporary startup device 58 the BIOS, updating (flashing) 127-128 troubleshooting, basic 37 troubleshooting, diagnostics 37 134 ThinkCentre Hardware Maintenance Manual U updating (flashing) the BIOS 127 updating (flashing) the BIOS 128 USB 2.0 connector 69 using passwords 55 Setup Utility...

(English) User Guide
Page 4
...Reinstalling device drivers 79 Solving recovery problems 79 Chapter 7. ...Lenovo Web site (http://www.lenovo.com) . . 117 Lenovo Support Web site 118 Help and service 118 Using the documentation and diagnostic programs 118 Calling for service 118 Using other services 119 Purchasing additional services 119 Appendix A. Notices 121 ii ThinkCentre... User Guide Using the Setup Utility program 81 Starting the Setup Utility program 81 Viewing and changing settings 81 Using passwords 81 Password considerations 82 Power-On Password 82 Administrator Password 82 Hard Disk...
...Reinstalling device drivers 79 Solving recovery problems 79 Chapter 7. ...Lenovo Web site (http://www.lenovo.com) . . 117 Lenovo Support Web site 118 Help and service 118 Using the documentation and diagnostic programs 118 Calling for service 118 Using other services 119 Purchasing additional services 119 Appendix A. Notices 121 ii ThinkCentre... User Guide Using the Setup Utility program 81 Starting the Setup Utility program 81 Viewing and changing settings 81 Using passwords 81 Password considerations 82 Power-On Password 82 Administrator Password 82 Hard Disk...

(English) User Guide
Page 17
... important setup tasks to help you to enroll your computer. Chapter 1. Fingerprint Software The integrated fingerprint reader provided on some innovative built-in Lenovo ThinkVantage Tools Create Recovery Media Factory Recovery Disks Fingerprint Software (available on some models) Fingerprint Reader (available on page 115 for diagnostic purposes. A fingerprint reader keyboard is only available on...
... important setup tasks to help you to enroll your computer. Chapter 1. Fingerprint Software The integrated fingerprint reader provided on some innovative built-in Lenovo ThinkVantage Tools Create Recovery Media Factory Recovery Disks Fingerprint Software (available on some models) Fingerprint Reader (available on page 115 for diagnostic purposes. A fingerprint reader keyboard is only available on...

(English) User Guide
Page 86
... ThinkCentre User Guide Then, follow the instructions on the hard disk drive will be deleted and replaced by the factory default files. When the Please select boot device window opens, release the F12 key. 3. The restore process begins. 4. To use recovery ...Start ➙ All Programs ➙ Lenovo ThinkVantage Tools ➙ Factory Recovery Disks. See "Reinstalling device drivers" on the computer. Also, you can designate where the Rescue and Recovery program stores the backup: • In a protected area of the hard disk drive to complete the operation. Note: ...
... ThinkCentre User Guide Then, follow the instructions on the hard disk drive will be deleted and replaced by the factory default files. When the Please select boot device window opens, release the F12 key. 3. The restore process begins. 4. To use recovery ...Start ➙ All Programs ➙ Lenovo ThinkVantage Tools ➙ Factory Recovery Disks. See "Reinstalling device drivers" on the computer. Also, you can designate where the Rescue and Recovery program stores the backup: • In a protected area of the hard disk drive to complete the operation. Note: ...

(Greek) User Guide
Page 90
Windows 7 USB Windows Vista Product Recovery)". Windows 7 Start All Programs) ➙ Lenovo ThinkVantage Tools Factory Recovery Disks Windows Vista Start All Programs) ➙ ThinkVantage ➙ Create Product Recovery Media Windows 7 και Windows Vista Windows 7 Windows Vista 1 USB CD/DVD 2 F12 Please select boot device F12. 3 Enter 4 84. Rescue and Recovery Rescue and Recovery: 78 ThinkCentre
Windows 7 USB Windows Vista Product Recovery)". Windows 7 Start All Programs) ➙ Lenovo ThinkVantage Tools Factory Recovery Disks Windows Vista Start All Programs) ➙ ThinkVantage ➙ Create Product Recovery Media Windows 7 και Windows Vista Windows 7 Windows Vista 1 USB CD/DVD 2 F12 Please select boot device F12. 3 Enter 4 84. Rescue and Recovery Rescue and Recovery: 78 ThinkCentre

(English) User Guide
Page 17
... on the date when your computer was manufactured, your computer. Lenovo Solution Center Note: Depending on some innovative built-in Lenovo ThinkVantage Tools Create Recovery Media Factory Recovery Disks Fingerprint Software (available on some models) Fingerprint Reader (available on some models) Lenovo Solution Center or Lenovo ThinkVantage Toolbox System Health and Diagnostics ThinkVantage Password Manager Password Vault...
... on the date when your computer was manufactured, your computer. Lenovo Solution Center Note: Depending on some innovative built-in Lenovo ThinkVantage Tools Create Recovery Media Factory Recovery Disks Fingerprint Software (available on some models) Fingerprint Reader (available on some models) Lenovo Solution Center or Lenovo ThinkVantage Toolbox System Health and Diagnostics ThinkVantage Password Manager Password Vault...

(English) User Guide
Page 82
..., click Start ➙ All Programs ➙ Lenovo ThinkVantage Tools ➙ Factory Recovery Disks. Select the desired startup device and press Enter. Also, you can use recovery media to restore the contents of hard disk drive recovery have failed. On the Windows Vista operating system,..."Reinstalling device drivers" on different operating systems. 70 ThinkCentre User Guide Note: On the Windows 7 operating system, you might have to reinstall device drivers for this operation is also called "creating Product Recovery discs." • To create recovery media on the computer.
..., click Start ➙ All Programs ➙ Lenovo ThinkVantage Tools ➙ Factory Recovery Disks. Select the desired startup device and press Enter. Also, you can use recovery media to restore the contents of hard disk drive recovery have failed. On the Windows Vista operating system,..."Reinstalling device drivers" on different operating systems. 70 ThinkCentre User Guide Note: On the Windows 7 operating system, you might have to reinstall device drivers for this operation is also called "creating Product Recovery discs." • To create recovery media on the computer.

(Greek) User Guide
Page 84
Windows 7 Start All Programs) ➙ Lenovo ThinkVantage Tools Factory Recovery Disks Windows Vista Start All Programs) ➙ ThinkVantage ➙ Create Product Recovery Media Windows 7 και Windows Vista Windows 7 Windows Vista 1 USB CD/DVD 2 F12 Please select boot device F12. 3 Enter 4 78. Rescue and Recovery Rescue and Recovery: 72 ThinkCentre Windows 7 USB Windows Vista Product Recovery)".
Windows 7 Start All Programs) ➙ Lenovo ThinkVantage Tools Factory Recovery Disks Windows Vista Start All Programs) ➙ ThinkVantage ➙ Create Product Recovery Media Windows 7 και Windows Vista Windows 7 Windows Vista 1 USB CD/DVD 2 F12 Please select boot device F12. 3 Enter 4 78. Rescue and Recovery Rescue and Recovery: 72 ThinkCentre Windows 7 USB Windows Vista Product Recovery)".


