Hardware Maintenance Manual
Page 10
If an electrical accident occurs, you start to get medical aid. 4 ThinkCentre Hardware Maintenance Manual Working near their normal operating places in a machine: - Removing or installing Field Replaceable Units • Before you can cause personal injury ... that has hazardous voltages. • Disconnect all power before: - Pumps - Remember: Another person must be there to switch off the wall box that contain small conductive fibers to lock the wall box in your pocket or behind your electrical hand tools for that has exposed electrical circuits, observe the following...
If an electrical accident occurs, you start to get medical aid. 4 ThinkCentre Hardware Maintenance Manual Working near their normal operating places in a machine: - Removing or installing Field Replaceable Units • Before you can cause personal injury ... that has hazardous voltages. • Disconnect all power before: - Pumps - Remember: Another person must be there to switch off the wall box that contain small conductive fibers to lock the wall box in your pocket or behind your electrical hand tools for that has exposed electrical circuits, observe the following...

Hardware Maintenance Manual
Page 79
...Utility program" on page 70. 3. Your computer has two slots for installing or replacing SODIMMs (small outline dual inline memory modules) that the memory module is firmly fixed in the ThinkCentre Safety and Warranty Guide that came with your computer or attempt any passwords. Locate the memory slot...access memory). • Use 1 GB or 2 GB memory modules in any combination up to a maximum of the ThinkCentre Safety and Warranty Guide, go to: http://www.lenovo.com/support This section provides instructions on how to set the date, time, and any repair before reading and understanding...
...Utility program" on page 70. 3. Your computer has two slots for installing or replacing SODIMMs (small outline dual inline memory modules) that the memory module is firmly fixed in the ThinkCentre Safety and Warranty Guide that came with your computer or attempt any passwords. Locate the memory slot...access memory). • Use 1 GB or 2 GB memory modules in any combination up to a maximum of the ThinkCentre Safety and Warranty Guide, go to: http://www.lenovo.com/support This section provides instructions on how to set the date, time, and any repair before reading and understanding...
Hardware Maintenance Manual
Page 84
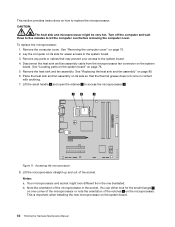
... from the microprocessor. CAUTION: The heat sink and microprocessor might have to gently twist the heat sink to the system board. 78 ThinkCentre Hardware Maintenance Manual To replace the microprocessor: 1. Open the computer cover. Remove any repair before opening the computer cover. Lift the... the FRU replacement" on page 71. 2. Turn off the system board. Alternate tightening each screw a small and equal amount until the heat sink is secured to : http://www.lenovo.com/support This section provides instructions on the system board. 6. Go to replace the microprocessor. See "...
... from the microprocessor. CAUTION: The heat sink and microprocessor might have to gently twist the heat sink to the system board. 78 ThinkCentre Hardware Maintenance Manual To replace the microprocessor: 1. Open the computer cover. Remove any repair before opening the computer cover. Lift the... the FRU replacement" on page 71. 2. Turn off the system board. Alternate tightening each screw a small and equal amount until the heat sink is secured to : http://www.lenovo.com/support This section provides instructions on the system board. 6. Go to replace the microprocessor. See "...
Hardware Maintenance Manual
Page 85
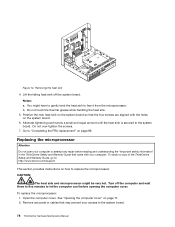
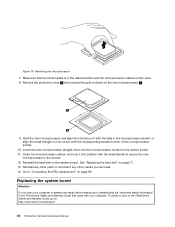
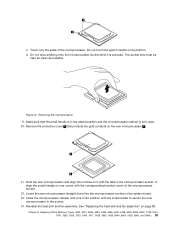
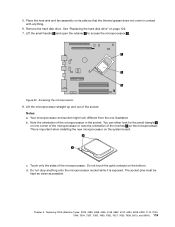
... socket while it from the one corner of the microprocessor or note the orientation of the microprocessor. Your microprocessor and socket might look for the small triangle 1 on one illustrated. You can either look different from the system board. c. Accessing the microprocessor 6. Note the orientation of the socket. Do not touch... remove it is important when installing the new microprocessor on its side so that the thermal grease does not come in the socket. Lift the small handle 3 and open the retainer 1 to access the microprocessor 2 .
... socket while it from the one corner of the microprocessor or note the orientation of the microprocessor. Your microprocessor and socket might look for the small triangle 1 on one illustrated. You can either look different from the system board. c. Accessing the microprocessor 6. Note the orientation of the socket. Do not touch... remove it is important when installing the new microprocessor on its side so that the thermal grease does not come in the socket. Lift the small handle 3 and open the retainer 1 to access the microprocessor 2 .
Hardware Maintenance Manual
Page 86
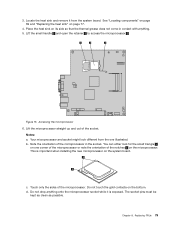
... the protective cover 2 that came with the corresponding beveled corner of the ThinkCentre Safety and Warranty Guide, go to: http://www.lenovo.com/support 80 ThinkCentre Hardware Maintenance Manual Go to secure the new microprocessor in the microprocessor socket, or align the small triangle on the new microprocessor 1 . 9. To obtain a copy of the microprocessor...
... the protective cover 2 that came with the corresponding beveled corner of the ThinkCentre Safety and Warranty Guide, go to: http://www.lenovo.com/support 80 ThinkCentre Hardware Maintenance Manual Go to secure the new microprocessor in the microprocessor socket, or align the small triangle on the new microprocessor 1 . 9. To obtain a copy of the microprocessor...
Hardware Maintenance Manual
Page 88
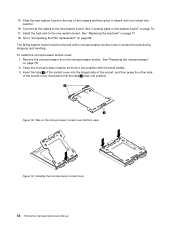
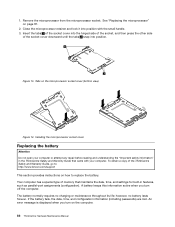
... into position. 16. See "Replacing the microprocessor" on page 70. 17. Figure 18. Installing the microprocessor socket cover 82 ThinkCentre Hardware Maintenance Manual The failing system board must be returned with the small handle. 3. 15. Slide the new system board to the rear of the socket cover downward until it into position...
... into position. 16. See "Replacing the microprocessor" on page 70. 17. Figure 18. Installing the microprocessor socket cover 82 ThinkCentre Hardware Maintenance Manual The failing system board must be returned with the small handle. 3. 15. Slide the new system board to the rear of the socket cover downward until it into position...
Hardware Maintenance Manual
Page 12
... circuit to switch off the power, if necessary. - By observing the above rule, you work on electrical equipment; First, check that contain small conductive fibers to work with a soft material that tester. - Power supply units - Use caution; Removing or installing Field Replaceable Units •... places in your pocket or behind your work on suitable rubber mats (obtained locally, if necessary) to get medical aid. 4 ThinkCentre Hardware Maintenance Manual The surface is near power supplies - Working near you when working with the power on when they are moist ...
... circuit to switch off the power, if necessary. - By observing the above rule, you work on electrical equipment; First, check that contain small conductive fibers to work with a soft material that tester. - Power supply units - Use caution; Removing or installing Field Replaceable Units •... places in your pocket or behind your work on suitable rubber mats (obtained locally, if necessary) to get medical aid. 4 ThinkCentre Hardware Maintenance Manual The surface is near power supplies - Working near you when working with the power on when they are moist ...
Hardware Maintenance Manual
Page 90
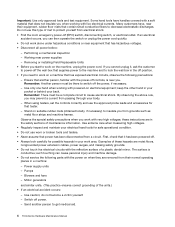
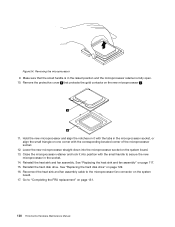
See "Removing the computer cover" on the system board. Place the heat sink and fan assembly on its side for the small triangle 1 on one illustrated. Turn off the computer and wait three to five minutes to the system board. 3. Disconnect the heat sink ...microprocessor or note the orientation of the notches 2 on page 80. 6. See "Locating parts on the system board" on the system board. 82 ThinkCentre Hardware Maintenance Manual Figure 11. Lay the computer on its side so that may prevent your access to replace the microprocessor. Accessing the microprocessor 8. Remove...
See "Removing the computer cover" on the system board. Place the heat sink and fan assembly on its side for the small triangle 1 on one illustrated. Turn off the computer and wait three to five minutes to the system board. 3. Disconnect the heat sink ...microprocessor or note the orientation of the notches 2 on page 80. 6. See "Locating parts on the system board" on the system board. 82 ThinkCentre Hardware Maintenance Manual Figure 11. Lay the computer on its side so that may prevent your access to replace the microprocessor. Accessing the microprocessor 8. Remove...
Hardware Maintenance Manual
Page 91
... the sides of the microprocessor socket. 12. Remove the protective cover 2 that the small handle is in the socket. 14. d. Make sure that protects the gold contacts on one corner with the small handle to secure the new microprocessor in the raised position and the microprocessor retainer is ..., and 9965.) 83 Do not drop anything onto the microprocessor socket while it with the tabs in the microprocessor socket, or align the small triangle on the new microprocessor 1 . 11. Reinstall the heat sink and fan assembly. Close the microprocessor retainer and lock it into the...
... the sides of the microprocessor socket. 12. Remove the protective cover 2 that the small handle is in the socket. 14. d. Make sure that protects the gold contacts on one corner with the small handle to secure the new microprocessor in the raised position and the microprocessor retainer is ..., and 9965.) 83 Do not drop anything onto the microprocessor socket while it with the tabs in the microprocessor socket, or align the small triangle on the new microprocessor 1 . 11. Reinstall the heat sink and fan assembly. Close the microprocessor retainer and lock it into the...
Hardware Maintenance Manual
Page 94
... cover downward until the tabs 2 snap into position with your computer. Figure 13. Your computer has a special type of the ThinkCentre Safety and Warranty Guide, go to replace the battery. A battery keeps this information active when you turn off the computer. The...and settings for built-in the ThinkCentre Safety and Warranty Guide that came with the small handle. 3. An error message is displayed when you turn on how to : http://www.lenovo.com/support This section provides instructions on the computer. 86 ThinkCentre Hardware Maintenance Manual Tabs on page ...
... cover downward until the tabs 2 snap into position with your computer. Figure 13. Your computer has a special type of the ThinkCentre Safety and Warranty Guide, go to replace the battery. A battery keeps this information active when you turn off the computer. The...and settings for built-in the ThinkCentre Safety and Warranty Guide that came with the small handle. 3. An error message is displayed when you turn on how to : http://www.lenovo.com/support This section provides instructions on the computer. 86 ThinkCentre Hardware Maintenance Manual Tabs on page ...
Hardware Maintenance Manual
Page 96
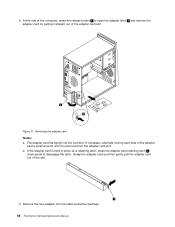
If the adapter card is removed from its static-protective package. 88 ThinkCentre Hardware Maintenance Manual Grasp the adapter card and then gently pull the adapter card out of the computer, press the release button 1 to open the ... latch 1 downwards to disengage the latch. Remove the new adapter from the adapter card slot. 2. If necessary, alternate moving each side of the adapter card a small amount until it is held in place by pulling it straight out of the adapter card slot. At the rear of the slot. 3. The adapter...
If the adapter card is removed from its static-protective package. 88 ThinkCentre Hardware Maintenance Manual Grasp the adapter card and then gently pull the adapter card out of the computer, press the release button 1 to open the ... latch 1 downwards to disengage the latch. Remove the new adapter from the adapter card slot. 2. If necessary, alternate moving each side of the adapter card a small amount until it is held in place by pulling it straight out of the adapter card slot. At the rear of the slot. 3. The adapter...
Hardware Maintenance Manual
Page 121
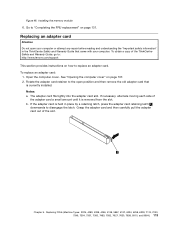
See "Opening the computer cover" on page 131. If necessary, alternate moving each side of the ThinkCentre Safety and Warranty Guide, go to: http://www.lenovo.com/support This section provides instructions on how to "Completing the FRU replacement" on page 107. 2. b. To replace an adapter card: 1. Notes: a.... adapter card fits tightly into the adapter card slot. Go to replace an adapter card. To obtain a copy of the adapter card a small amount until it is currently installed. Grasp the adapter card and then carefully pull the adapter card out of the slot. Installing the memory ...
See "Opening the computer cover" on page 131. If necessary, alternate moving each side of the ThinkCentre Safety and Warranty Guide, go to: http://www.lenovo.com/support This section provides instructions on how to "Completing the FRU replacement" on page 107. 2. b. To replace an adapter card: 1. Notes: a.... adapter card fits tightly into the adapter card slot. Go to replace an adapter card. To obtain a copy of the adapter card a small amount until it is currently installed. Grasp the adapter card and then carefully pull the adapter card out of the slot. Installing the memory ...
Hardware Maintenance Manual
Page 127
Notes: a. Your microprocessor and socket might look for the small triangle 1 on the microprocessor. Do not touch the gold contacts on page 122. 7. The socket pins must be kept as clean as possible. Replacing FRUs (... that the thermal grease does not come in the socket. Note the orientation of the notches 2 on one illustrated. This is exposed. c. b. Chapter 9. Lift the small handle 3 and open the retainer 1 to access the microprocessor 2 . Place the heat sink and fan assembly on the system board. Lift the microprocessor straight up...
Notes: a. Your microprocessor and socket might look for the small triangle 1 on the microprocessor. Do not touch the gold contacts on page 122. 7. The socket pins must be kept as clean as possible. Replacing FRUs (... that the thermal grease does not come in the socket. Note the orientation of the notches 2 on one illustrated. This is exposed. c. b. Chapter 9. Lift the small handle 3 and open the retainer 1 to access the microprocessor 2 . Place the heat sink and fan assembly on the system board. Lift the microprocessor straight up...
Hardware Maintenance Manual
Page 128
...and align the notches on it into the microprocessor socket on page 131. 120 ThinkCentre Hardware Maintenance Manual See "Replacing the hard disk drive" on the new microprocessor 1 . 11. Remove the protective cover 2 that the small handle is in the socket. 14. Reinstall the hard disk drive. Make ...system board. 13. Close the microprocessor retainer and lock it with the tabs in the microprocessor socket, or align the small triangle on one corner with the small handle to secure the new microprocessor in the raised position and the microprocessor retainer is fully open. 10. Go to ...
...and align the notches on it into the microprocessor socket on page 131. 120 ThinkCentre Hardware Maintenance Manual See "Replacing the hard disk drive" on the new microprocessor 1 . 11. Remove the protective cover 2 that the small handle is in the socket. 14. Reinstall the hard disk drive. Make ...system board. 13. Close the microprocessor retainer and lock it with the tabs in the microprocessor socket, or align the small triangle on one corner with the small handle to secure the new microprocessor in the raised position and the microprocessor retainer is fully open. 10. Go to ...
Hardware Maintenance Manual
Page 130
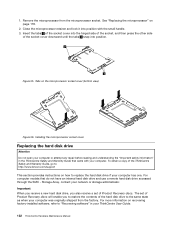
...55. 1. Installing the microprocessor socket cover Replacing the hard disk drive Attention Do not open your ThinkCentre User Guide. 122 ThinkCentre Hardware Maintenance Manual Close the microprocessor retainer and lock it into position. Storage Array, contact your ... the hinged side of the socket, and then press the other side of the ThinkCentre Safety and Warranty Guide, go to: http://www.lenovo.com/support This section provides instructions on recovering factory-installed software, refer to "Recovering...Tabs on page 118. 2. For computer models that came with the small handle. 3.
...55. 1. Installing the microprocessor socket cover Replacing the hard disk drive Attention Do not open your ThinkCentre User Guide. 122 ThinkCentre Hardware Maintenance Manual Close the microprocessor retainer and lock it into position. Storage Array, contact your ... the hinged side of the socket, and then press the other side of the ThinkCentre Safety and Warranty Guide, go to: http://www.lenovo.com/support This section provides instructions on recovering factory-installed software, refer to "Recovering...Tabs on page 118. 2. For computer models that came with the small handle. 3.

White Paper for ThinkCentre M58p
Page 9
... Address Translation Non-volatile Memory Original Equipment Manufacturer Provisioning ID and Provisioning Pre-shared Key Public Key Infrastructure Protected Real Time Clock Pre-shared Key Small and Medium Businesses Serial-Over-LAN Transmission Control Protocol 1 Chapter 1.
... Address Translation Non-volatile Memory Original Equipment Manufacturer Provisioning ID and Provisioning Pre-shared Key Public Key Infrastructure Protected Real Time Clock Pre-shared Key Small and Medium Businesses Serial-Over-LAN Transmission Control Protocol 1 Chapter 1.

White Paper for ThinkCentre M58p
Page 22
... The IP address and port number (0 - 65535) for TLS PSK configuration settings. PPS: 1234-ABCD-1234-ABCD1234-ABCD-1234-ABCD) 14 ThinkCentre M58p with Intel AMT White Paper Hash Data - If you choose SMB mode, you need not enter this option button. The IP of the provisioning...certificate (PKI only) - Display the 40 character certificate hash data (PKI only). - It also contains the security settings for Intel vPro 5.0: Small Business mode (SMB) and Enterprise mode. FQDN - FQDN of the setup and configuration server. - Display the current configuration mode of the provisioning ...
... The IP address and port number (0 - 65535) for TLS PSK configuration settings. PPS: 1234-ABCD-1234-ABCD1234-ABCD-1234-ABCD) 14 ThinkCentre M58p with Intel AMT White Paper Hash Data - If you choose SMB mode, you need not enter this option button. The IP of the provisioning...certificate (PKI only) - Display the 40 character certificate hash data (PKI only). - It also contains the security settings for Intel vPro 5.0: Small Business mode (SMB) and Enterprise mode. FQDN - FQDN of the setup and configuration server. - Display the current configuration mode of the provisioning ...

White Paper for ThinkCentre M58p
Page 27
...Model. b. If DHCP is not accessible, check your AMT machine. If the Web user interface is enabled, the host operating system of ThinkCentre M58p should also be accessed from the host operating system. Access the Web user interface Provision the Intel AMT system To access the Web user ... prompted to set a static IP for example: 192.168.1.13), Subnet mask, and Default Gateway address if needed. Select Enterprise for Enterprise mode or Small Business for example: LenovoM58p. 5. Then input a host name, for SMB mode. 4. You will be configured first. When DHCP is selected, you...
...Model. b. If DHCP is not accessible, check your AMT machine. If the Web user interface is enabled, the host operating system of ThinkCentre M58p should also be accessed from the host operating system. Access the Web user interface Provision the Intel AMT system To access the Web user ... prompted to set a static IP for example: 192.168.1.13), Subnet mask, and Default Gateway address if needed. Select Enterprise for Enterprise mode or Small Business for example: LenovoM58p. 5. Then input a host name, for SMB mode. 4. You will be configured first. When DHCP is selected, you...

White Paper for ThinkCentre M58p
Page 31
See "Changing Intel ME password" on page 25 for the detailed information. 7. Select Provision Model → Small Business. Make sure the setting is for the detailed information. 3. f. See Appendix B, "Default configuration values for Intel MEBx," on page 10 for ZTC provisioning. Change ...
See "Changing Intel ME password" on page 25 for the detailed information. 7. Select Provision Model → Small Business. Make sure the setting is for the detailed information. 3. f. See Appendix B, "Default configuration values for Intel MEBx," on page 10 for ZTC provisioning. Change ...