Hardware Maintenance Manual
Page 1
ThinkCentre Hardware Maintenance Manual Machine Types: 3063, 3231, 3285, 3379, 4083, 4084, 4085, 4086, 4087, 4088, 4099, 4138 5897, 6137, 6138, 6209, 6234, 6239,6258, 6302, 6303, 7174, 7188, 7220, 7244, 7346, 7347, 7354, 7355, 7357, 7358, 7360, 7373, 7483, 7484, 7571, 7582, 7627, 7628, 7630, 7635, 7638, 7639, 8494, 8854, 8910, 9728, 9960, 9964, and 9965
ThinkCentre Hardware Maintenance Manual Machine Types: 3063, 3231, 3285, 3379, 4083, 4084, 4085, 4086, 4087, 4088, 4099, 4138 5897, 6137, 6138, 6209, 6234, 6239,6258, 6302, 6303, 7174, 7188, 7220, 7244, 7346, 7347, 7354, 7355, 7357, 7358, 7360, 7373, 7483, 7484, 7571, 7582, 7627, 7628, 7630, 7635, 7638, 7639, 8494, 8854, 8910, 9728, 9960, 9964, and 9965
Hardware Maintenance Manual
Page 3
ThinkCentre Hardware Maintenance Manual Machine Types: 3063, 3231, 3285, 3379, 4083, 4084, 4085, 4086, 4087, 4088, 4099, 4138 5897, 6137, 6138, 6209, 6234, 6239,6258, 6302, 6303, 7174, 7188, 7220, 7244, 7346, 7347, 7354, 7355, 7357, 7358, 7360, 7373, 7483, 7484, 7571, 7582, 7627, 7628, 7630, 7635, 7638, 7639, 8494, 8854, 8910, 9728, 9960, 9964, and 9965
ThinkCentre Hardware Maintenance Manual Machine Types: 3063, 3231, 3285, 3379, 4083, 4084, 4085, 4086, 4087, 4088, 4099, 4138 5897, 6137, 6138, 6209, 6234, 6239,6258, 6302, 6303, 7174, 7188, 7220, 7244, 7346, 7347, 7354, 7355, 7357, 7358, 7360, 7373, 7483, 7484, 7571, 7582, 7627, 7628, 7630, 7635, 7638, 7639, 8494, 8854, 8910, 9728, 9960, 9964, and 9965
Hardware Maintenance Manual
Page 5
...Lenovo Solution Center 30 ThinkVantage Productivity Center 30 Access Help 30 Additional information resources 31 Specifications 32 For machine types: 3063, 3231, 3285, 4084, 4085, 4086, 4087, 6138, 6209, 6239, 6302, 7188, 7244, 7347, 7355, 7358, 7373, 7484, 7571, 7628, 7635, 7639, 8494, 8854, 9728...Chapter 3. General checkout . . . . . 35 Problem determination tips 36 Chapter 5. Diagnostic programs . . . 37 Lenovo ThinkVantage Toolbox 37 Lenovo Solution Center 37 Lenovo System Toolbox 38 PC-Doctor for Rescue and Recovery 38 PC-Doctor for DOS 38 Creating a diagnostic disc 39 Running ...
...Lenovo Solution Center 30 ThinkVantage Productivity Center 30 Access Help 30 Additional information resources 31 Specifications 32 For machine types: 3063, 3231, 3285, 4084, 4085, 4086, 4087, 6138, 6209, 6239, 6302, 7188, 7244, 7347, 7355, 7358, 7373, 7484, 7571, 7628, 7635, 7639, 8494, 8854, 9728...Chapter 3. General checkout . . . . . 35 Problem determination tips 36 Chapter 5. Diagnostic programs . . . 37 Lenovo ThinkVantage Toolbox 37 Lenovo Solution Center 37 Lenovo System Toolbox 38 PC-Doctor for Rescue and Recovery 38 PC-Doctor for DOS 38 Creating a diagnostic disc 39 Running ...
Hardware Maintenance Manual
Page 6
...4085, 4086, 4087, 6138, 6209, 6239, 6302, 7188, 7244, 7347, 7355, 7358, 7373, 7484, 7571, 7628, 7635, 7639, 8494, 8854, 9728, 9960, and 9965 133 Mechanical FRUs 168 Keyboard and Mouse 180 Adapters and miscellaneous FRUs 214 Power Cords 221 Recovery discs 234 Windows XP Professional... CD 514 Windows 7 Professional 32 Recovery CD . . 519 Windows 7 Professional 32 SP1 Recovery CD 529 Windows 7 Professional 64 Recovery CD . . 539 iv ThinkCentre Hardware Maintenance Manual Replacing FRUs (Machine Types: 3379, 4083, 4088, 4099, 4138, 5897, 6137, 6234, 6258, 6303, 7174, 7220, 7346, 7354, ...
...4085, 4086, 4087, 6138, 6209, 6239, 6302, 7188, 7244, 7347, 7355, 7358, 7373, 7484, 7571, 7628, 7635, 7639, 8494, 8854, 9728, 9960, and 9965 133 Mechanical FRUs 168 Keyboard and Mouse 180 Adapters and miscellaneous FRUs 214 Power Cords 221 Recovery discs 234 Windows XP Professional... CD 514 Windows 7 Professional 32 Recovery CD . . 519 Windows 7 Professional 32 SP1 Recovery CD 529 Windows 7 Professional 64 Recovery CD . . 539 iv ThinkCentre Hardware Maintenance Manual Replacing FRUs (Machine Types: 3379, 4083, 4088, 4099, 4138, 5897, 6137, 6234, 6258, 6303, 7174, 7220, 7346, 7354, ...
Hardware Maintenance Manual
Page 40
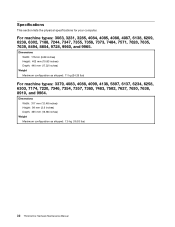
... types: 3063, 3231, 3285, 4084, 4085, 4086, 4087, 6138, 6209, 6239, 6302, 7188, 7244, 7347, 7355, 7358, 7373, 7484, 7571, 7628, 7635, 7639, 8494, 8854, 9728, 9960, and 9965. Dimensions Width: 175mm (6.89 inches) Height: 402 mm (15.83 inches) Depth: 440 mm (17.32 inches) Weight Maximum configuration as shipped...
... types: 3063, 3231, 3285, 4084, 4085, 4086, 4087, 6138, 6209, 6239, 6302, 7188, 7244, 7347, 7355, 7358, 7373, 7484, 7571, 7628, 7635, 7639, 8494, 8854, 9728, 9960, and 9965. Dimensions Width: 175mm (6.89 inches) Height: 402 mm (15.83 inches) Depth: 440 mm (17.32 inches) Weight Maximum configuration as shipped...
Hardware Maintenance Manual
Page 79
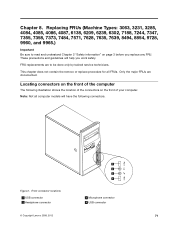
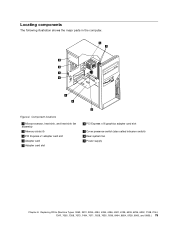
...2 "Safety information" on the front of your computer. Front connector locations 1 USB connector 2 Headphone connector 3 Microphone connector 4 USB connector © Copyright Lenovo 2008, 2012 71 Replacing FRUs (Machine Types: 3063, 3231, 3285, 4084, 4085, 4086, 4087, 6138, 6209, 6239, 6302, 7188, 7244, ...7347, 7355, 7358, 7373, 7484, 7571, 7628, 7635, 7639, 8494, 8854, 9728, 9960, and 9965.) Important Be sure to be done only by trained service technicians. FRU replacements are documented. Figure 1. Locating connectors on page 3 ...
...2 "Safety information" on the front of your computer. Front connector locations 1 USB connector 2 Headphone connector 3 Microphone connector 4 USB connector © Copyright Lenovo 2008, 2012 71 Replacing FRUs (Machine Types: 3063, 3231, 3285, 4084, 4085, 4086, 4087, 6138, 6209, 6239, 6302, 7188, 7244, ...7347, 7355, 7358, 7373, 7484, 7571, 7628, 7635, 7639, 8494, 8854, 9728, 9960, and 9965.) Important Be sure to be done only by trained service technicians. FRU replacements are documented. Figure 1. Locating connectors on page 3 ...
Hardware Maintenance Manual
Page 81
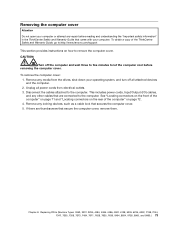
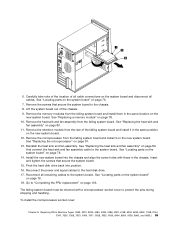
...the computer cool before reading and understanding the "Important safety information" in the ThinkCentre Safety and Warranty Guide that are thumbscrews that secures the computer cover. 5. Disconnect the cables attached to :http://www.lenovo.com/support This section provides instructions on page 72. 4. See "Locating ... the rear of the ThinkCentre Safety and Warranty Guide, go to the computer. Replacing FRUs (Machine Types: 3063, 3231, 3285, 4084, 4085, 4086, 4087, 6138, 6209, 6239, 6302, 7188, 7244, 7347, 7355, 7358, 7373, 7484, 7571, 7628, 7635, 7639, 8494, 8854, 9728, 9960, and 9965.)...
...the computer cool before reading and understanding the "Important safety information" in the ThinkCentre Safety and Warranty Guide that are thumbscrews that secures the computer cover. 5. Disconnect the cables attached to :http://www.lenovo.com/support This section provides instructions on page 72. 4. See "Locating ... the rear of the ThinkCentre Safety and Warranty Guide, go to the computer. Replacing FRUs (Machine Types: 3063, 3231, 3285, 4084, 4085, 4086, 4087, 6138, 6209, 6239, 6302, 7188, 7244, 7347, 7355, 7358, 7373, 7484, 7571, 7628, 7635, 7639, 8494, 8854, 9728, 9960, and 9965.)...
Hardware Maintenance Manual
Page 83
... Types: 3063, 3231, 3285, 4084, 4085, 4086, 4087, 6138, 6209, 6239, 6302, 7188, 7244, 7347, 7355, 7358, 7373, 7484, 7571, 7628, 7635, 7639, 8494, 8854, 9728, 9960, and 9965.) 75
... Types: 3063, 3231, 3285, 4084, 4085, 4086, 4087, 6138, 6209, 6239, 6302, 7188, 7244, 7347, 7355, 7358, 7373, 7484, 7571, 7628, 7635, 7639, 8494, 8854, 9728, 9960, and 9965.) 75
Hardware Maintenance Manual
Page 85
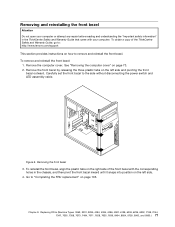
..., 6209, 6239, 6302, 7188, 7244, 7347, 7355, 7358, 7373, 7484, 7571, 7628, 7635, 7639, 8494, 8854, 9728, 9960, and 9965.) 77 To obtain a copy of the front bezel with the corresponding holes in the ThinkCentre Safety and Warranty Guide that came with your computer or attempt any repair before reading and understanding... reinstalling the front bezel Attention Do not open your computer. To reinstall the front bezel, align the plastic tabs on the right side of the ThinkCentre Safety and Warranty Guide, go to: http://www.lenovo.com/support This section provides instructions on page 73. 2.
..., 6209, 6239, 6302, 7188, 7244, 7347, 7355, 7358, 7373, 7484, 7571, 7628, 7635, 7639, 8494, 8854, 9728, 9960, and 9965.) 77 To obtain a copy of the front bezel with the corresponding holes in the ThinkCentre Safety and Warranty Guide that came with your computer or attempt any repair before reading and understanding... reinstalling the front bezel Attention Do not open your computer. To reinstall the front bezel, align the plastic tabs on the right side of the ThinkCentre Safety and Warranty Guide, go to: http://www.lenovo.com/support This section provides instructions on page 73. 2.
Hardware Maintenance Manual
Page 87
..., 7347, 7355, 7358, 7373, 7484, 7571, 7628, 7635, 7639, 8494, 8854, 9728, 9960, and 9965.) 79 Lay the computer on its side and remove the four screws at the rear of the ThinkCentre Safety and Warranty Guide, go to: http://www.lenovo.com/support This section provides instructions on how to "Completing the...
..., 7347, 7355, 7358, 7373, 7484, 7571, 7628, 7635, 7639, 8494, 8854, 9728, 9960, and 9965.) 79 Lay the computer on its side and remove the four screws at the rear of the ThinkCentre Safety and Warranty Guide, go to: http://www.lenovo.com/support This section provides instructions on how to "Completing the...

Hardware Maintenance Manual
Page 89
... 6239, 6302, 7188, 7244, 7347, 7355, 7358, 7373, 7484, 7571, 7628, 7635, 7639, 8494, 8854, 9728, 9960, and 9965.) 81 See "Removing the computer cover" on page 76. 5. CAUTION: The heat sink and fan... let the computer cool before reading and understanding the "Important safety information" in the ThinkCentre Safety and Warranty Guide that the four screws are aligned with your computer or attempt any... bracket so that came with the posts on the system board. Go to : http://www.lenovo.com/support Chapter 8. Locate the heat sink and fan assembly. Turn off the system board....
... 6239, 6302, 7188, 7244, 7347, 7355, 7358, 7373, 7484, 7571, 7628, 7635, 7639, 8494, 8854, 9728, 9960, and 9965.) 81 See "Removing the computer cover" on page 76. 5. CAUTION: The heat sink and fan... let the computer cool before reading and understanding the "Important safety information" in the ThinkCentre Safety and Warranty Guide that the four screws are aligned with your computer or attempt any... bracket so that came with the posts on the system board. Go to : http://www.lenovo.com/support Chapter 8. Locate the heat sink and fan assembly. Turn off the system board....
Hardware Maintenance Manual
Page 91
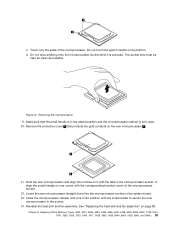
... Types: 3063, 3231, 3285, 4084, 4085, 4086, 4087, 6138, 6209, 6239, 6302, 7188, 7244, 7347, 7355, 7358, 7373, 7484, 7571, 7628, 7635, 7639, 8494, 8854, 9728, 9960, and 9965.) 83 Do not touch the gold contacts on page 80. Hold the new microprocessor and align the notches on it with the...
... Types: 3063, 3231, 3285, 4084, 4085, 4086, 4087, 6138, 6209, 6239, 6302, 7188, 7244, 7347, 7355, 7358, 7373, 7484, 7571, 7628, 7635, 7639, 8494, 8854, 9728, 9960, and 9965.) 83 Do not touch the gold contacts on page 80. Hold the new microprocessor and align the notches on it with the...
Hardware Maintenance Manual
Page 93
... Types: 3063, 3231, 3285, 4084, 4085, 4086, 4087, 6138, 6209, 6239, 6302, 7188, 7244, 7347, 7355, 7358, 7373, 7484, 7571, 7628, 7635, 7639, 8494, 8854, 9728, 9960, and 9965.) 85 Lift the system board out of all cables. See "Locating parts on the system board" on page 80. 11. Remove the...
... Types: 3063, 3231, 3285, 4084, 4085, 4086, 4087, 6138, 6209, 6239, 6302, 7188, 7244, 7347, 7355, 7358, 7373, 7484, 7571, 7628, 7635, 7639, 8494, 8854, 9728, 9960, and 9965.) 85 Lift the system board out of all cables. See "Locating parts on the system board" on page 80. 11. Remove the...
Hardware Maintenance Manual
Page 95
...This is turned on for information about replacing and disposing of the ThinkCentre Safety and Warranty Guide, go to: http://www.lenovo.com/support This section provides instructions on page 73. 2. To...the computer cover. Figure 16. Refer to the "Lithium battery notice" in the ThinkCentre Safety and Warranty Guide that came with your computer. To replace the battery: 1. ...and time and any repair before reading and understanding the "Important safety information" in the ThinkCentre Safety and Warranty Guide for the first time after replacing the battery. 6. Replacing FRUs ...
...This is turned on for information about replacing and disposing of the ThinkCentre Safety and Warranty Guide, go to: http://www.lenovo.com/support This section provides instructions on page 73. 2. To...the computer cover. Figure 16. Refer to the "Lithium battery notice" in the ThinkCentre Safety and Warranty Guide that came with your computer. To replace the battery: 1. ...and time and any repair before reading and understanding the "Important safety information" in the ThinkCentre Safety and Warranty Guide for the first time after replacing the battery. 6. Replacing FRUs ...
Hardware Maintenance Manual
Page 97
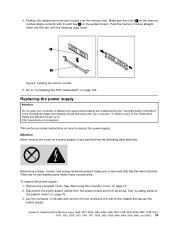
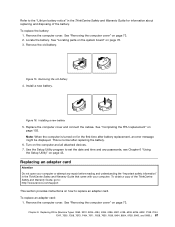
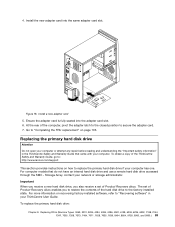
...: Chapter 8. Ensure the adapter card is fully seated into the same adapter card slot. The set of the ThinkCentre Safety and Warranty Guide, go to: http://www.lenovo.com/support This section provides instructions on how to secure the adapter card. 7. Install the new adapter card into..., 6302, 7188, 7244, 7347, 7355, 7358, 7373, 7484, 7571, 7628, 7635, 7639, 8494, 8854, 9728, 9960, and 9965.) 89 Replacing the primary hard disk drive Attention Do not open your ThinkCentre User Guide. For more information on page 103. 4. Install a new adapter card 5. Go to "Completing the FRU ...
...: Chapter 8. Ensure the adapter card is fully seated into the same adapter card slot. The set of the ThinkCentre Safety and Warranty Guide, go to: http://www.lenovo.com/support This section provides instructions on how to secure the adapter card. 7. Install the new adapter card into..., 6302, 7188, 7244, 7347, 7355, 7358, 7373, 7484, 7571, 7628, 7635, 7639, 8494, 8854, 9728, 9960, and 9965.) 89 Replacing the primary hard disk drive Attention Do not open your ThinkCentre User Guide. For more information on page 103. 4. Install a new adapter card 5. Go to "Completing the FRU ...
Hardware Maintenance Manual
Page 99
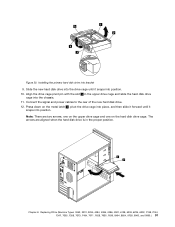
... Types: 3063, 3231, 3285, 4084, 4085, 4086, 4087, 6138, 6209, 6239, 6302, 7188, 7244, 7347, 7355, 7358, 7373, 7484, 7571, 7628, 7635, 7639, 8494, 8854, 9728, 9960, and 9965.) 91 Align the drive cage pivot pin with the slot 1 in the proper position. Connect the signal and power cables to the...
... Types: 3063, 3231, 3285, 4084, 4085, 4086, 4087, 6138, 6209, 6239, 6302, 7188, 7244, 7347, 7355, 7358, 7373, 7484, 7571, 7628, 7635, 7639, 8494, 8854, 9728, 9960, and 9965.) 91 Align the drive cage pivot pin with the slot 1 in the proper position. Connect the signal and power cables to the...
Hardware Maintenance Manual
Page 101
... Types: 3063, 3231, 3285, 4084, 4085, 4086, 4087, 6138, 6209, 6239, 6302, 7188, 7244, 7347, 7355, 7358, 7373, 7484, 7571, 7628, 7635, 7639, 8494, 8854, 9728, 9960, and 9965.) 93 To install the new hard disk drive into bracket Chapter 8. Installing the secondary hard disk drive into the blue bracket, flex...
... Types: 3063, 3231, 3285, 4084, 4085, 4086, 4087, 6138, 6209, 6239, 6302, 7188, 7244, 7347, 7355, 7358, 7373, 7484, 7571, 7628, 7635, 7639, 8494, 8854, 9728, 9960, and 9965.) 93 To install the new hard disk drive into bracket Chapter 8. Installing the secondary hard disk drive into the blue bracket, flex...
Hardware Maintenance Manual
Page 103
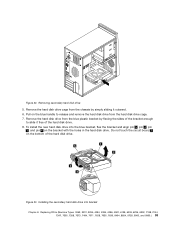
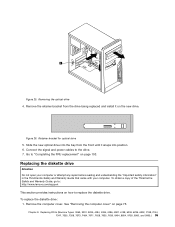
... snaps into position. 6. Connect the signal and power cables to : http://www.lenovo.com/support This section provides instructions on the new drive. Remove the retainer bracket from...6239, 6302, 7188, 7244, 7347, 7355, 7358, 7373, 7484, 7571, 7628, 7635, 7639, 8494, 8854, 9728, 9960, and 9965.) 95 See "Removing the computer cover" on page 103. To replace the diskette drive: 1. ...attempt any repair before reading and understanding the "Important safety information" in the ThinkCentre Safety and Warranty Guide that came with your computer. Go to replace the diskette drive. ...
... snaps into position. 6. Connect the signal and power cables to : http://www.lenovo.com/support This section provides instructions on the new drive. Remove the retainer bracket from...6239, 6302, 7188, 7244, 7347, 7355, 7358, 7373, 7484, 7571, 7628, 7635, 7639, 8494, 8854, 9728, 9960, and 9965.) 95 See "Removing the computer cover" on page 103. To replace the diskette drive: 1. ...attempt any repair before reading and understanding the "Important safety information" in the ThinkCentre Safety and Warranty Guide that came with your computer. Go to replace the diskette drive. ...
Hardware Maintenance Manual
Page 105
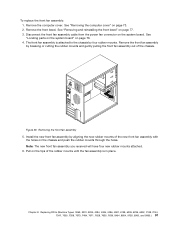
... Types: 3063, 3231, 3285, 4084, 4085, 4086, 4087, 6138, 6209, 6239, 6302, 7188, 7244, 7347, 7355, 7358, 7373, 7484, 7571, 7628, 7635, 7639, 8494, 8854, 9728, 9960, and 9965.) 97 Removing the front fan assembly 5. Pull on the chassis and push the rubber mounts through the holes. To replace the front...
... Types: 3063, 3231, 3285, 4084, 4085, 4086, 4087, 6138, 6209, 6239, 6302, 7188, 7244, 7347, 7355, 7358, 7373, 7484, 7571, 7628, 7635, 7639, 8494, 8854, 9728, 9960, and 9965.) 97 Removing the front fan assembly 5. Pull on the chassis and push the rubber mounts through the holes. To replace the front...
Hardware Maintenance Manual
Page 107
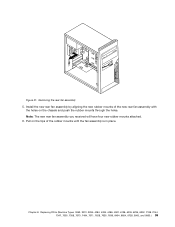
... Types: 3063, 3231, 3285, 4084, 4085, 4086, 4087, 6138, 6209, 6239, 6302, 7188, 7244, 7347, 7355, 7358, 7373, 7484, 7571, 7628, 7635, 7639, 8494, 8854, 9728, 9960, and 9965.) 99 Figure 31. Install the new rear fan assembly by aligning the new rubber mounts of the new rear fan assembly with...
... Types: 3063, 3231, 3285, 4084, 4085, 4086, 4087, 6138, 6209, 6239, 6302, 7188, 7244, 7347, 7355, 7358, 7373, 7484, 7571, 7628, 7635, 7639, 8494, 8854, 9728, 9960, and 9965.) 99 Figure 31. Install the new rear fan assembly by aligning the new rubber mounts of the new rear fan assembly with...